Sew double welt pockets into trousers #TH02
In the following tutorial, I explain step by step how to sew double welt pockets into the back of the trousers using video and illustrated text instructions. As sewing welt pockets requires some practice, you can download a practice pattern practice the individual steps before you sew the pockets into the trousers. Enjoy sewing!
1. This is required
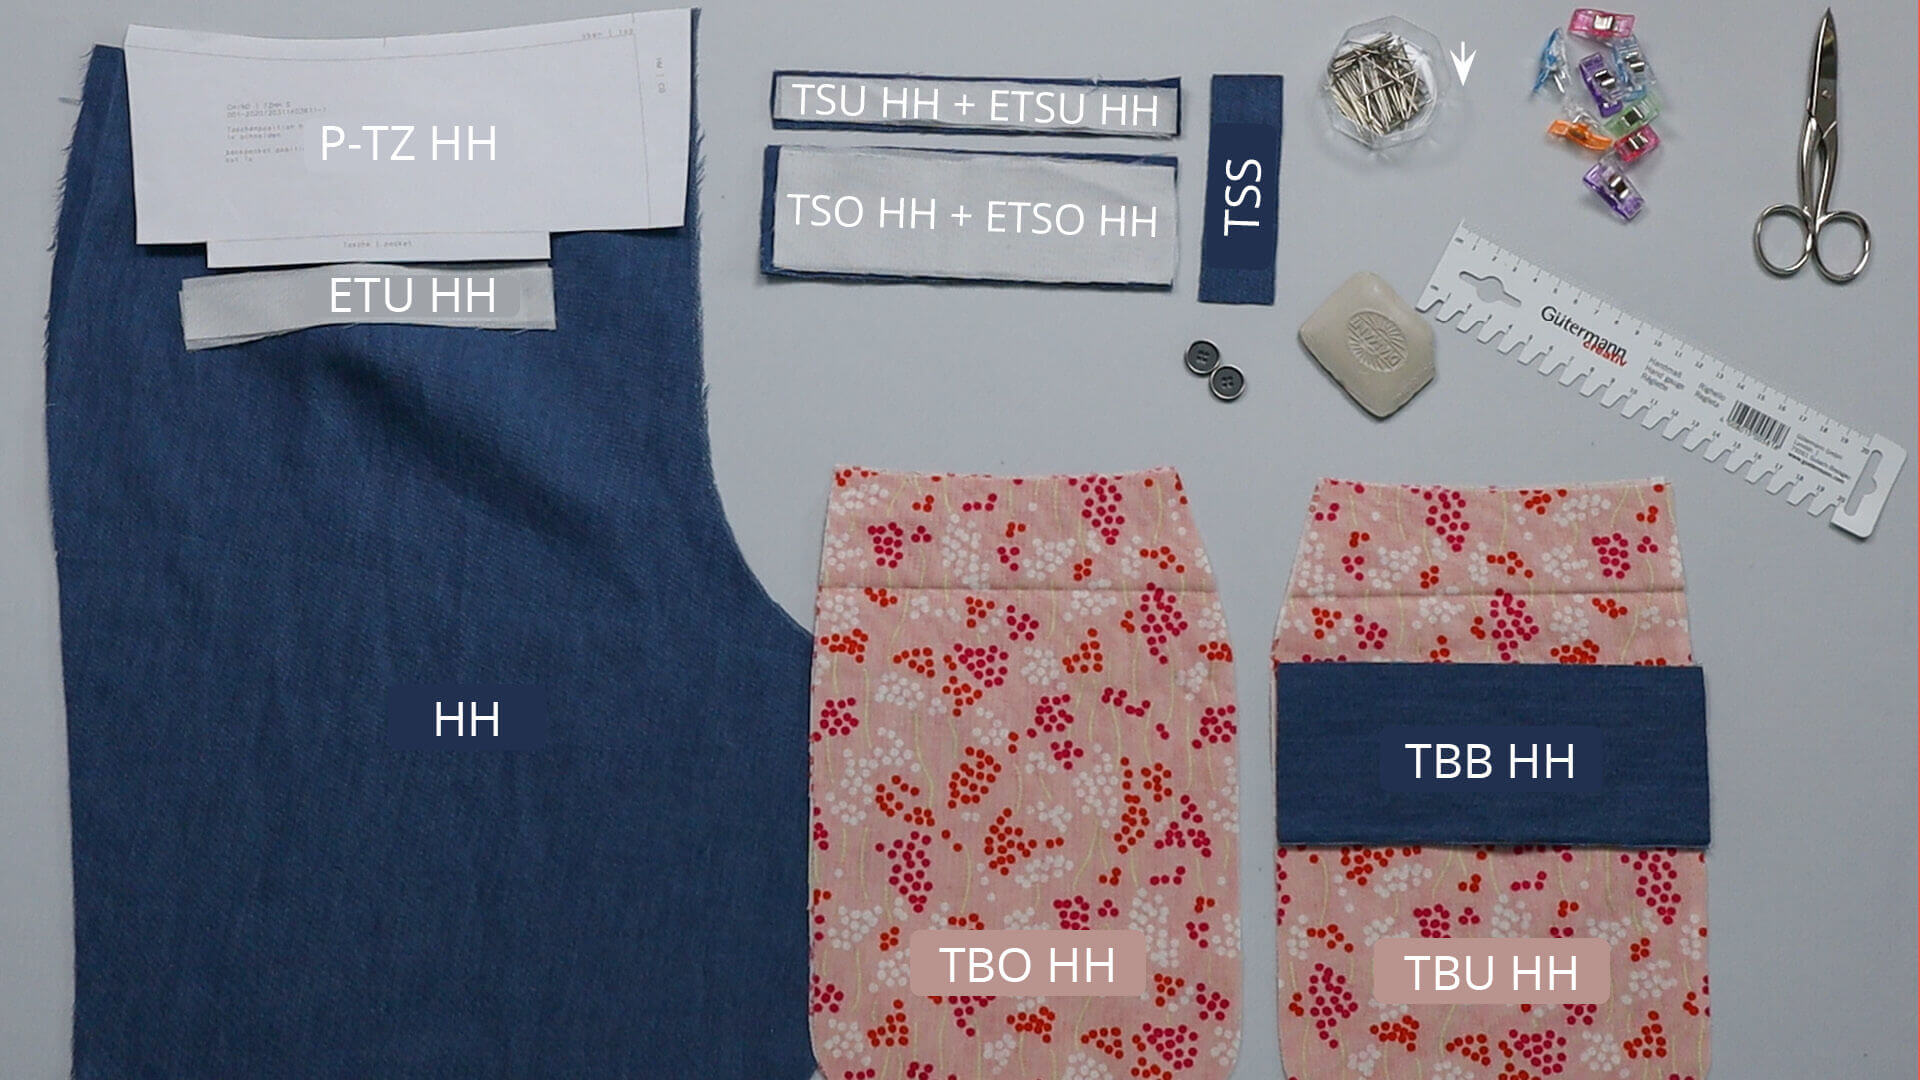
Pattern pieces made from main fabric:
- back pieces (HH) – 1 pair
- pocket bag facing (TBB HH) – 1 pair
- lower pocket welt (TSU HH) – 1 pair
- upper pocket welt (TSO HH) – 1 pair
- button loop (TSS) – 1 pair
Pattern pieces made from interfacing:
- lower pocket welt (ETSU HH) – 1 pair
- upper pocket welt (ETSO HH) – 1 pair
- pocket underlay (ETU HH) – 1 pair
Pattern pieces made from lining fabric:
- upper pocket bag (TBO HH) – 1 pair
- lower pocket bag (TBU HH) – 1 pair
- Note: The two pattern pieces are identical. The area on the lower pocket bag is marked in the pattern where the pocket bag facing will be sewn on later.
Tools and aids:
- template for the pocket position (P-TZ HH) out of paper
- 2 buttons
- pins
- scissors
- tailor’s chalk or fabric marker
- ruler
2. Reinforce the pocket opening
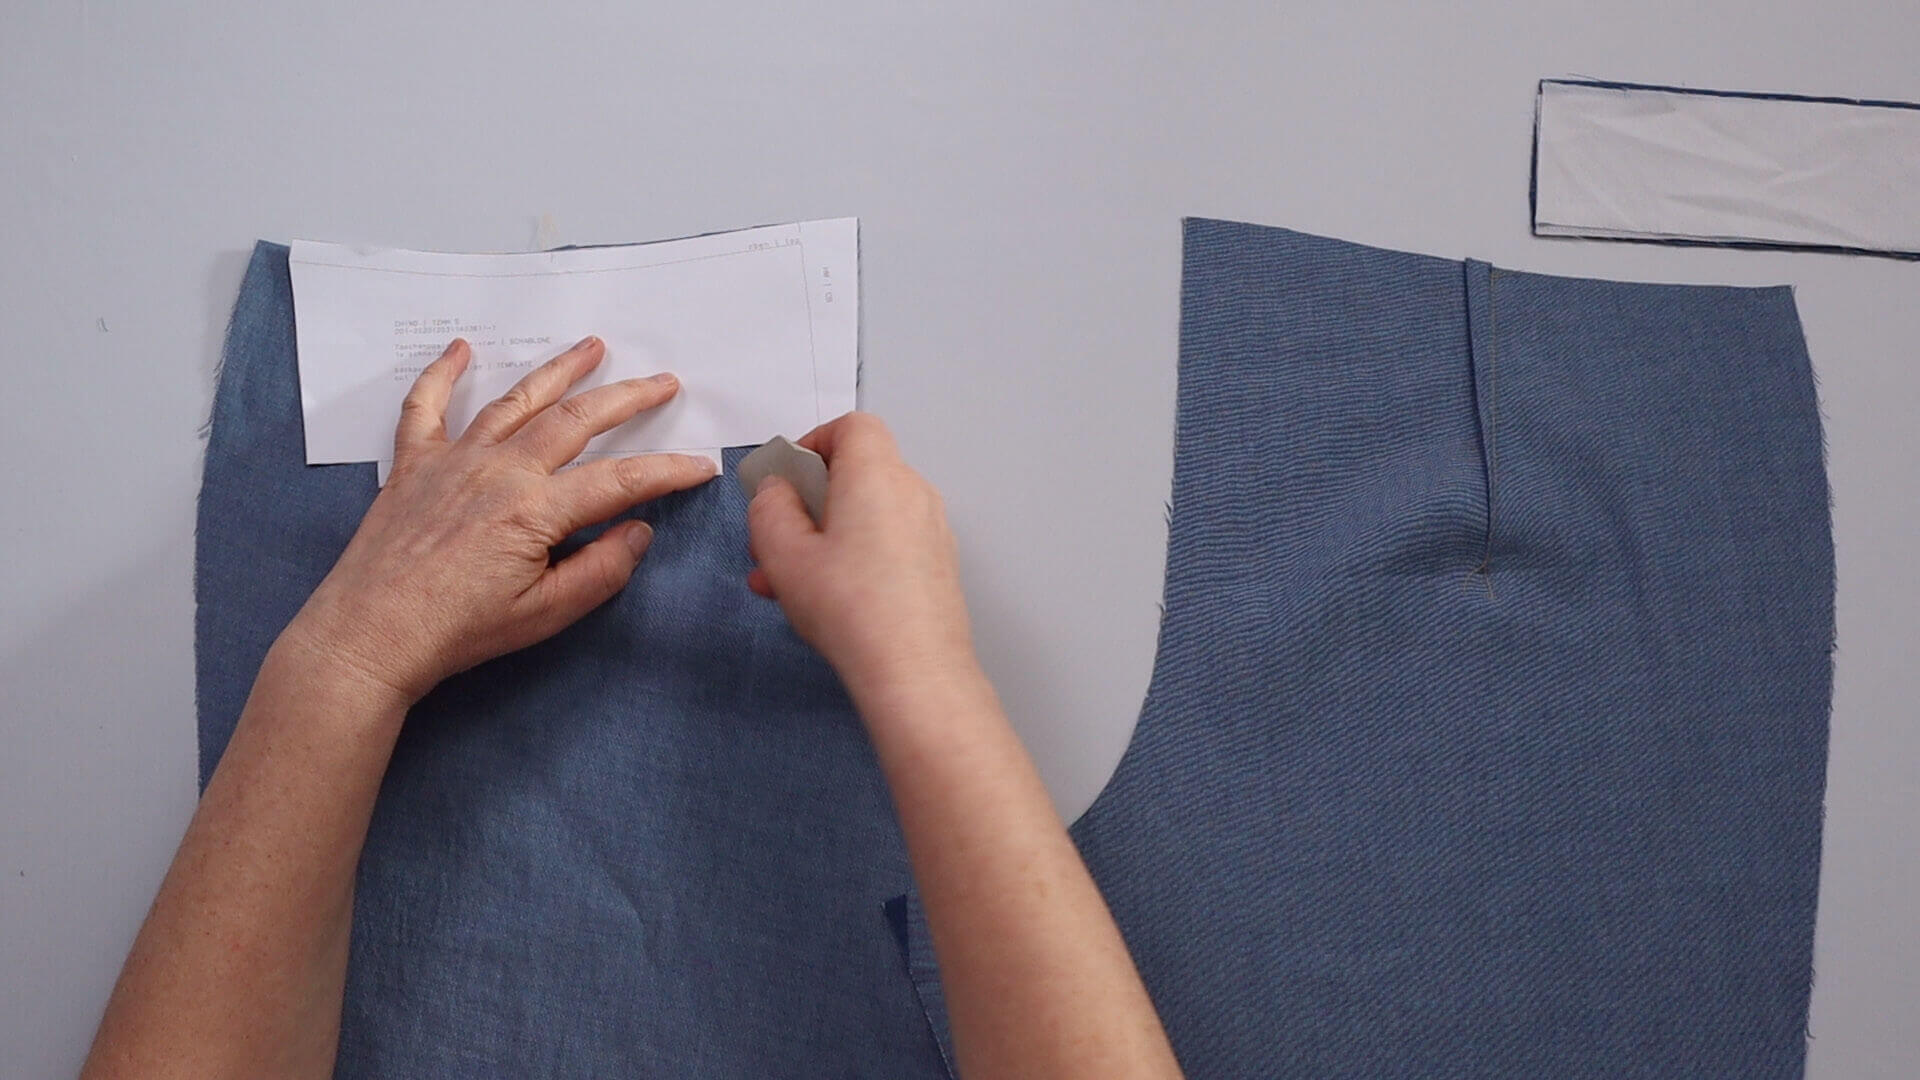
I place the back trousers in front of me wrong sides facing up and mark the double welt pockets’ position. To do this, I place the template so that it is flush with the center back and the top. Then I transfer the pocket rectangle with tailor’s chalk.
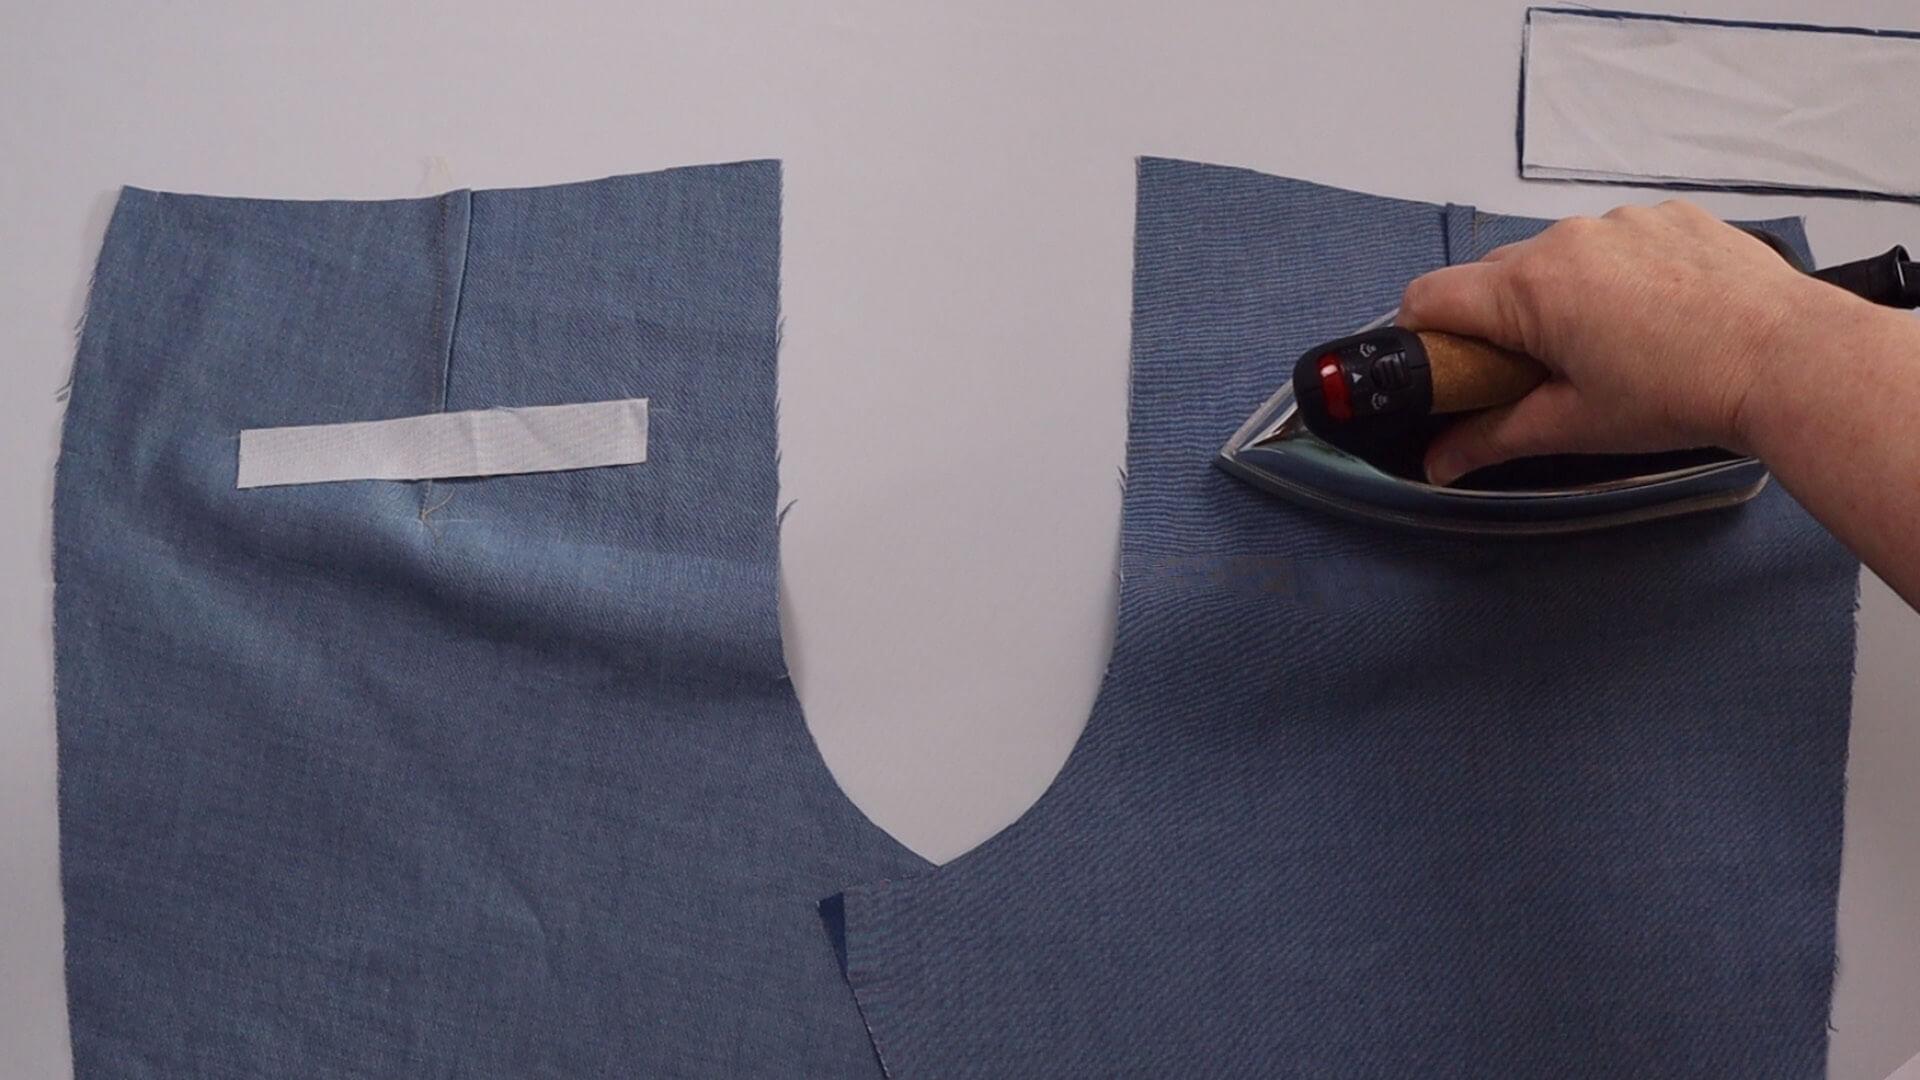
The interfacing is placed on the center of this rectangle and ironed on.
3. Place the upper pocket bag
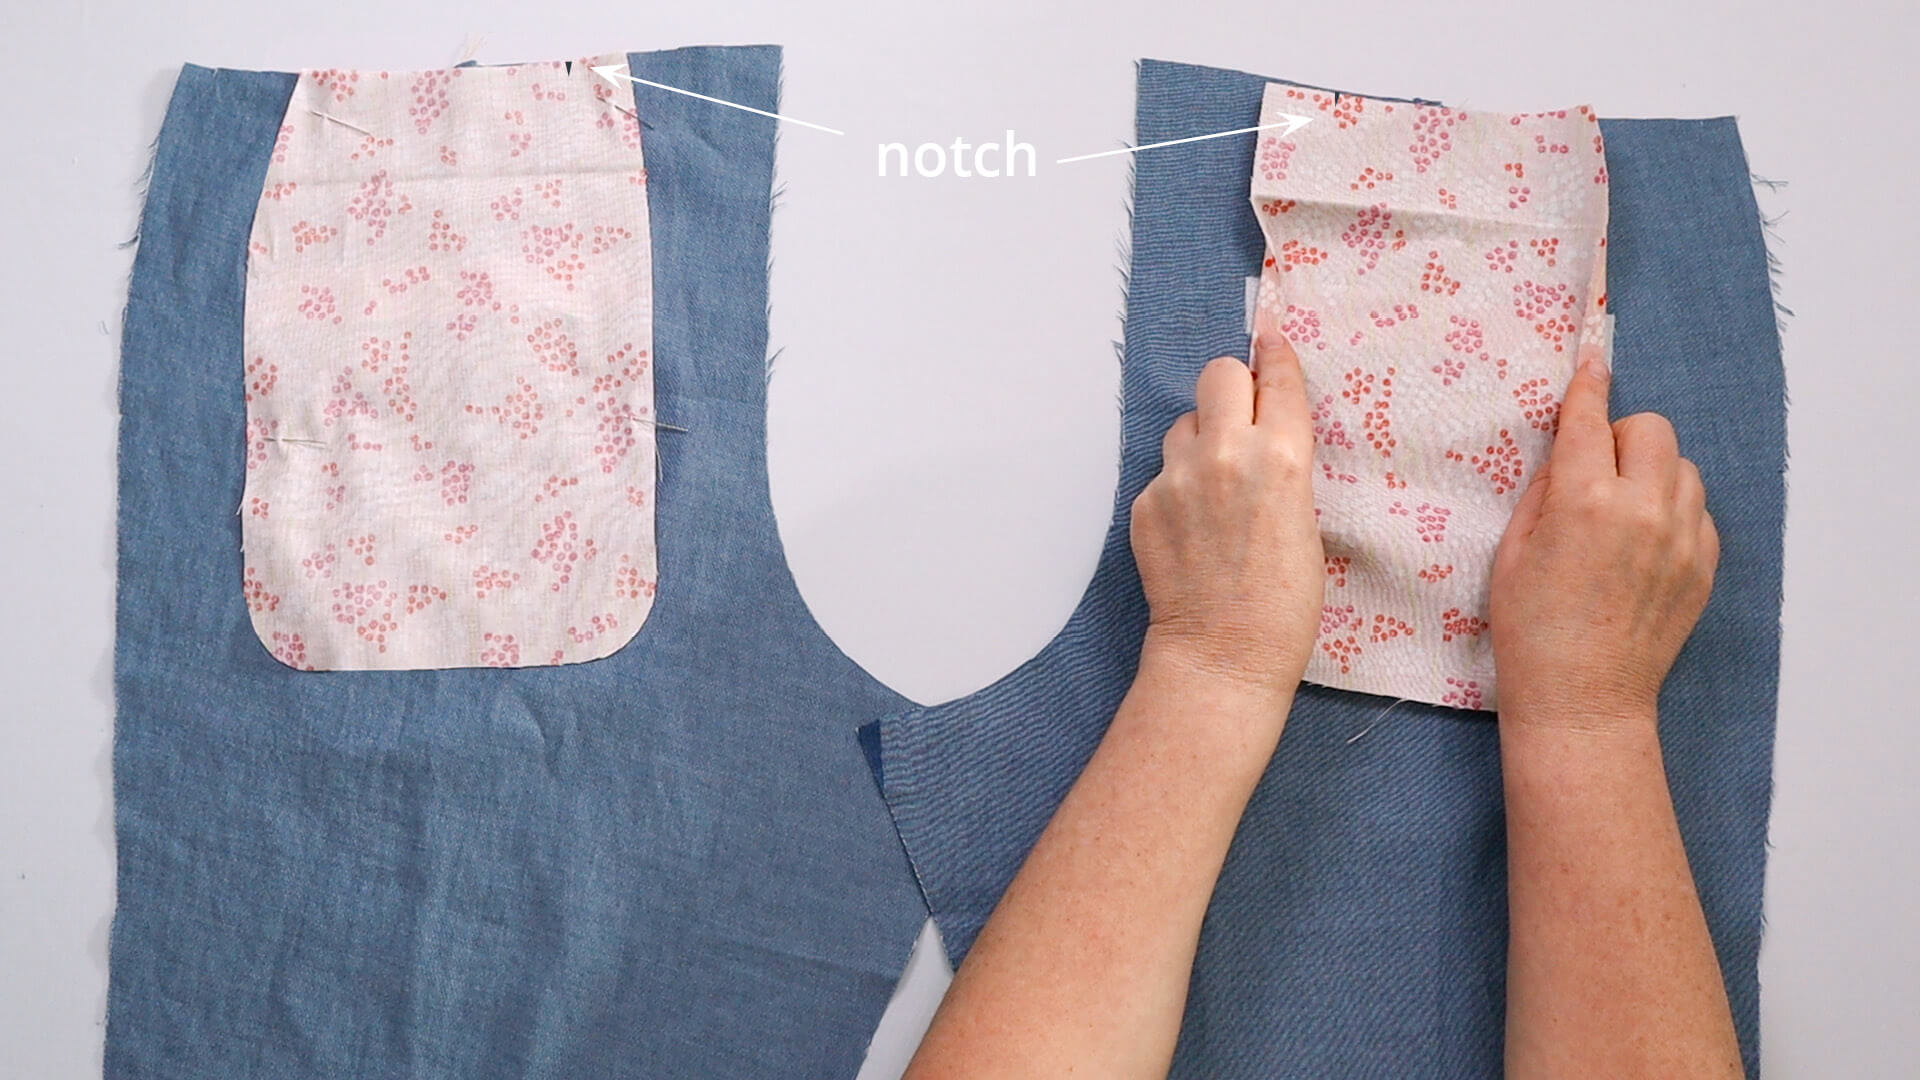
Now I place the upper pocket bag on the back of the trousers. The pocket bag is placed so the pocket rectangle is centered and the upper edges meet. I pin it in place at the top and a few centimeters below the pocket rectangle.
In this example, I have placed the pocket bag with the right side of the fabric on the wrong side of the back trousers. I am working with a patterned lining fabric an want the right side to be visible on the inside of the trousers.
4. Prepare double welt
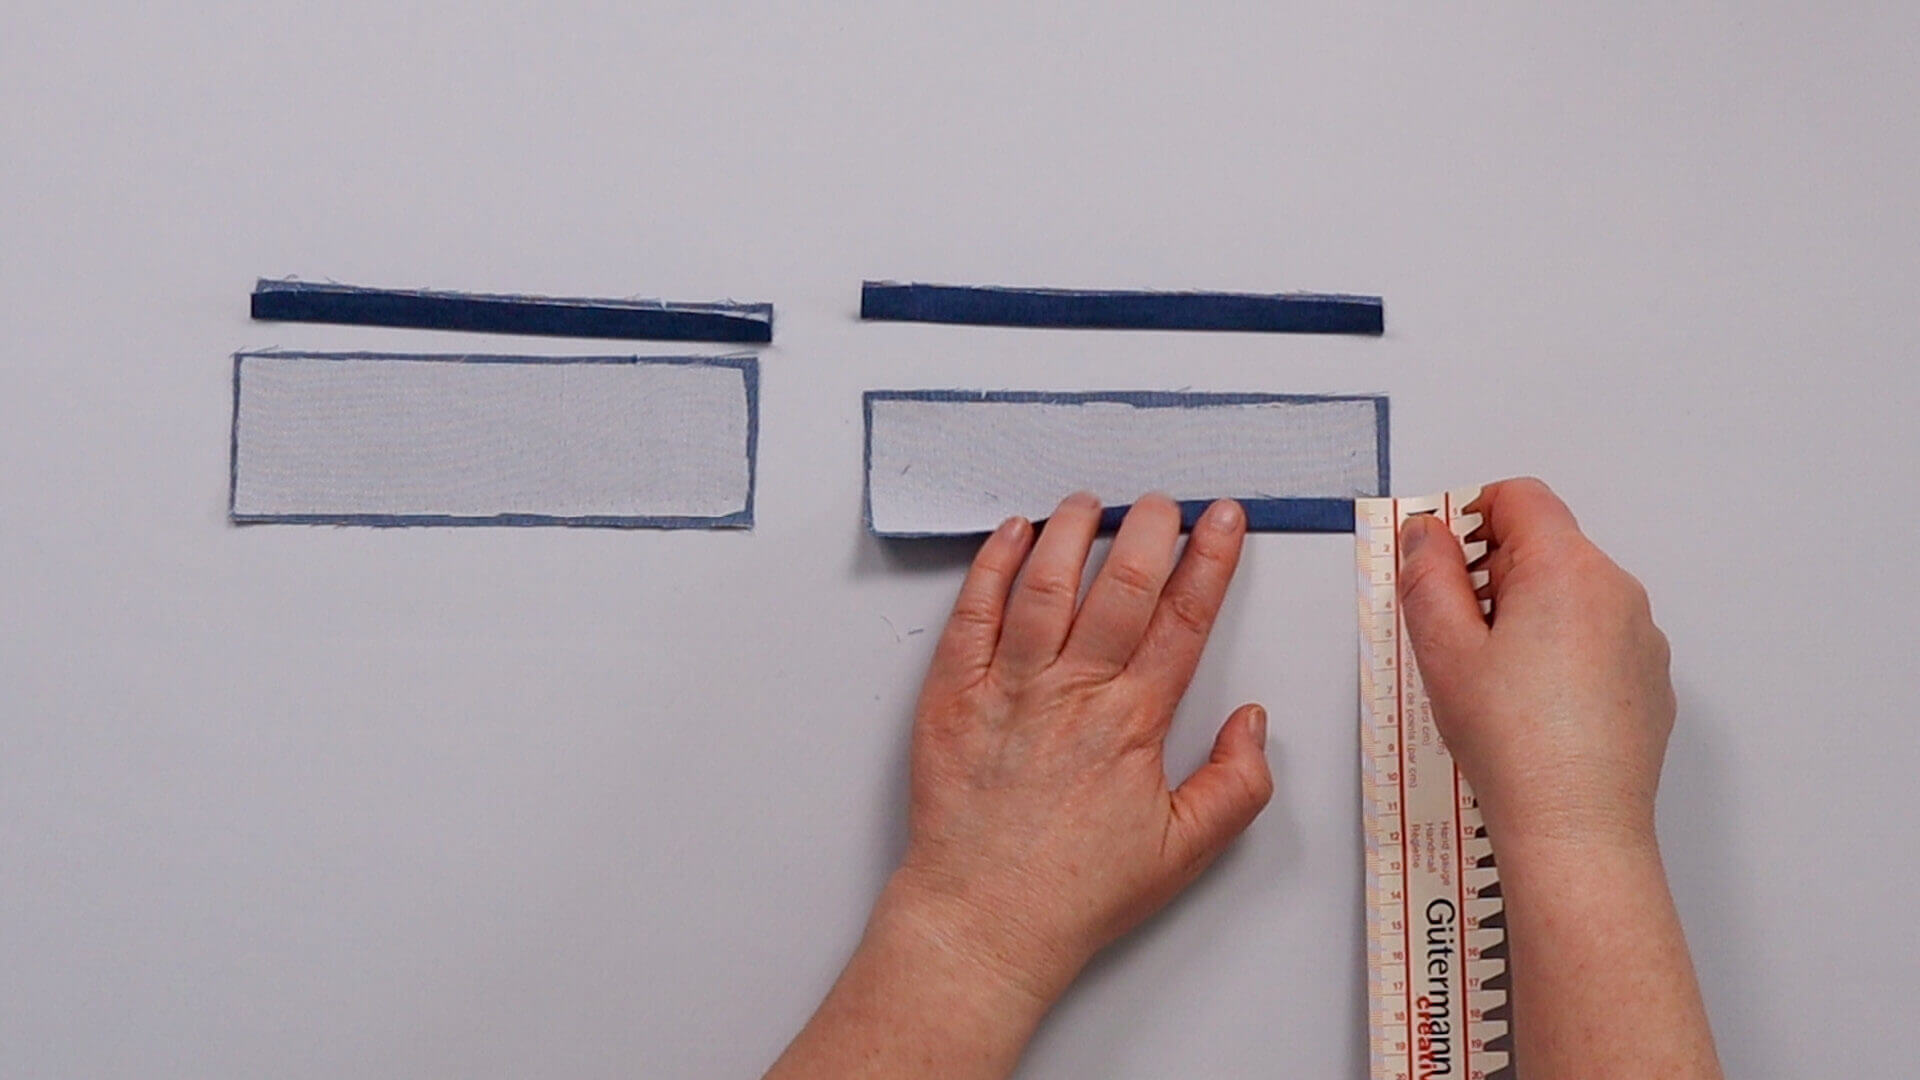
Now I iron the interfacing onto the welt strips. I press the upper (narrow) welt strip doule lengthwise, wrong sides facing. The bottom welt strip is pressed over by 12 mm at the bottom edge. The value of 12 mm results from the welt width of 6 mm plus half the pocket hight of 6 mm; you will find corresponding notches in your pattern.
5. Mark the pocket position
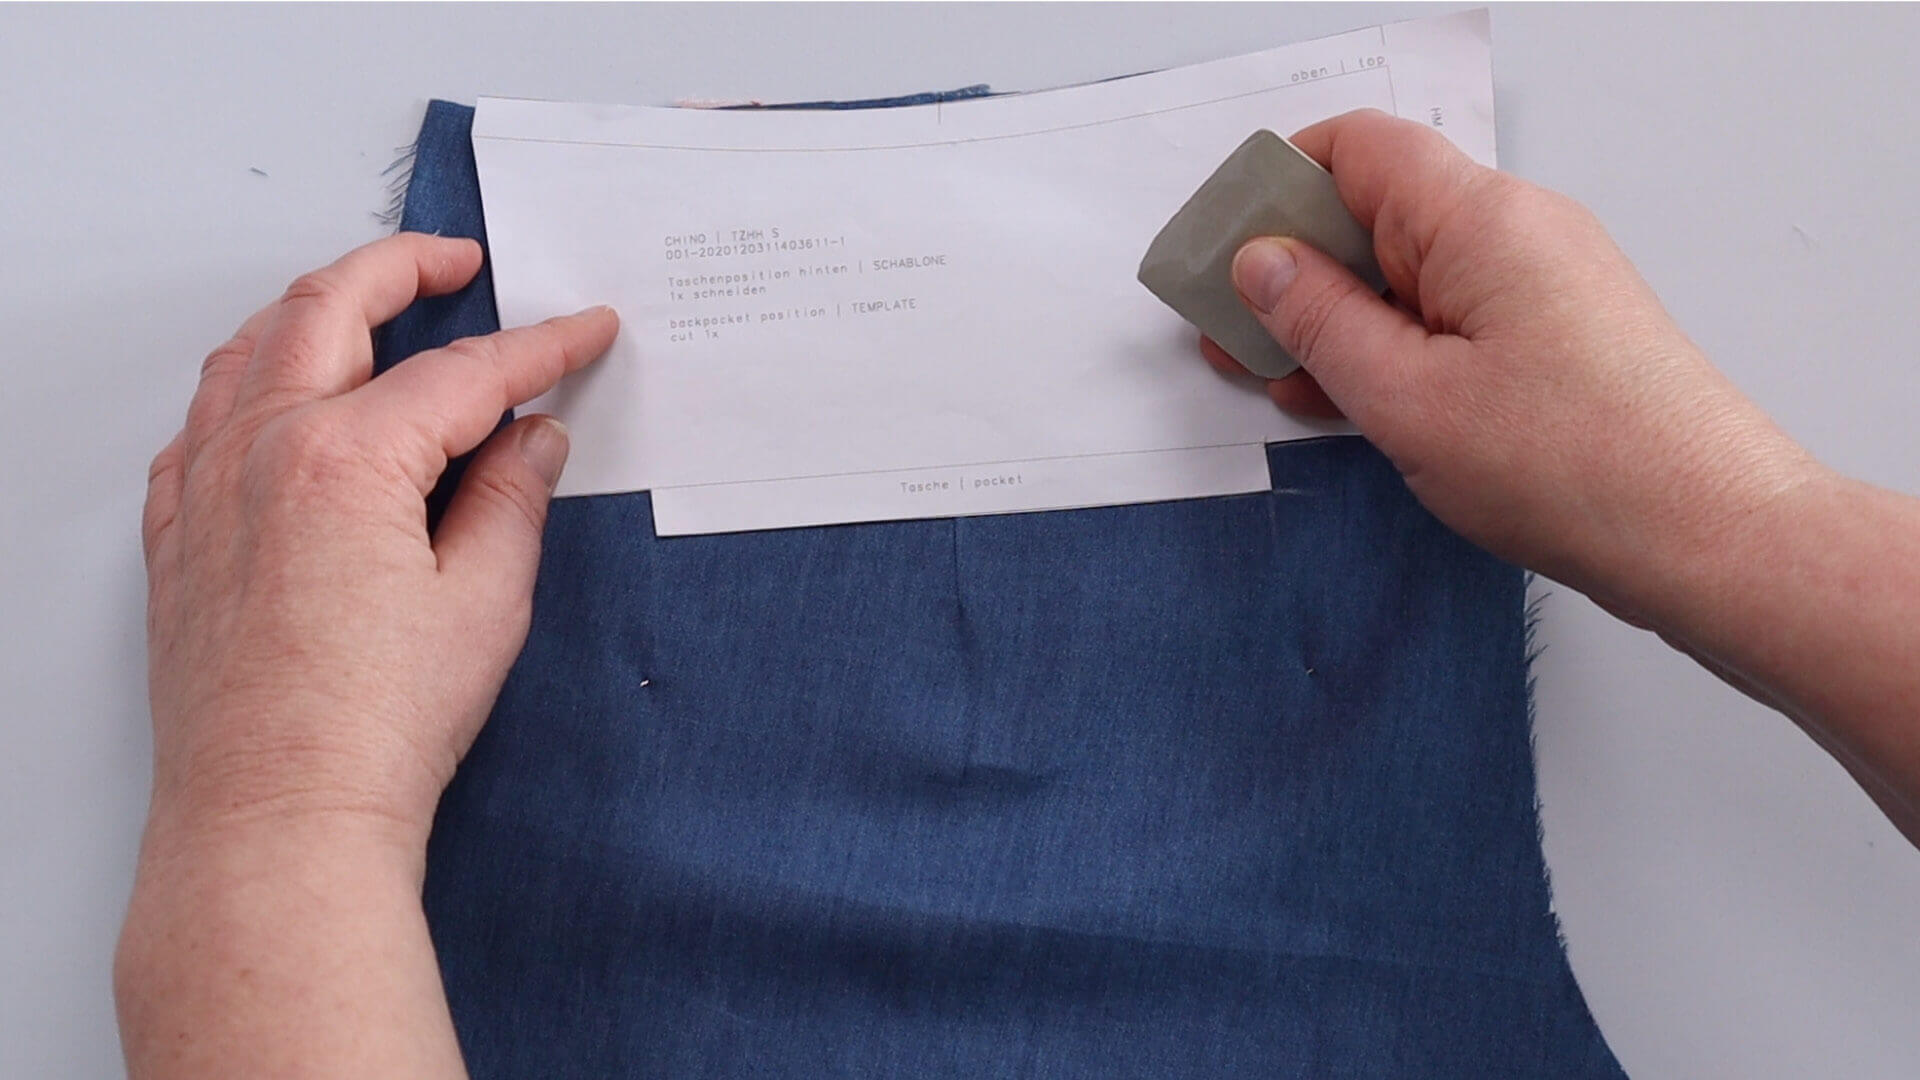
To mark the pocket position, I place the back trousers in front of me right sides facing up. I mark the position of the double welt pockets using the template.
6. Stitch on the pocket welt
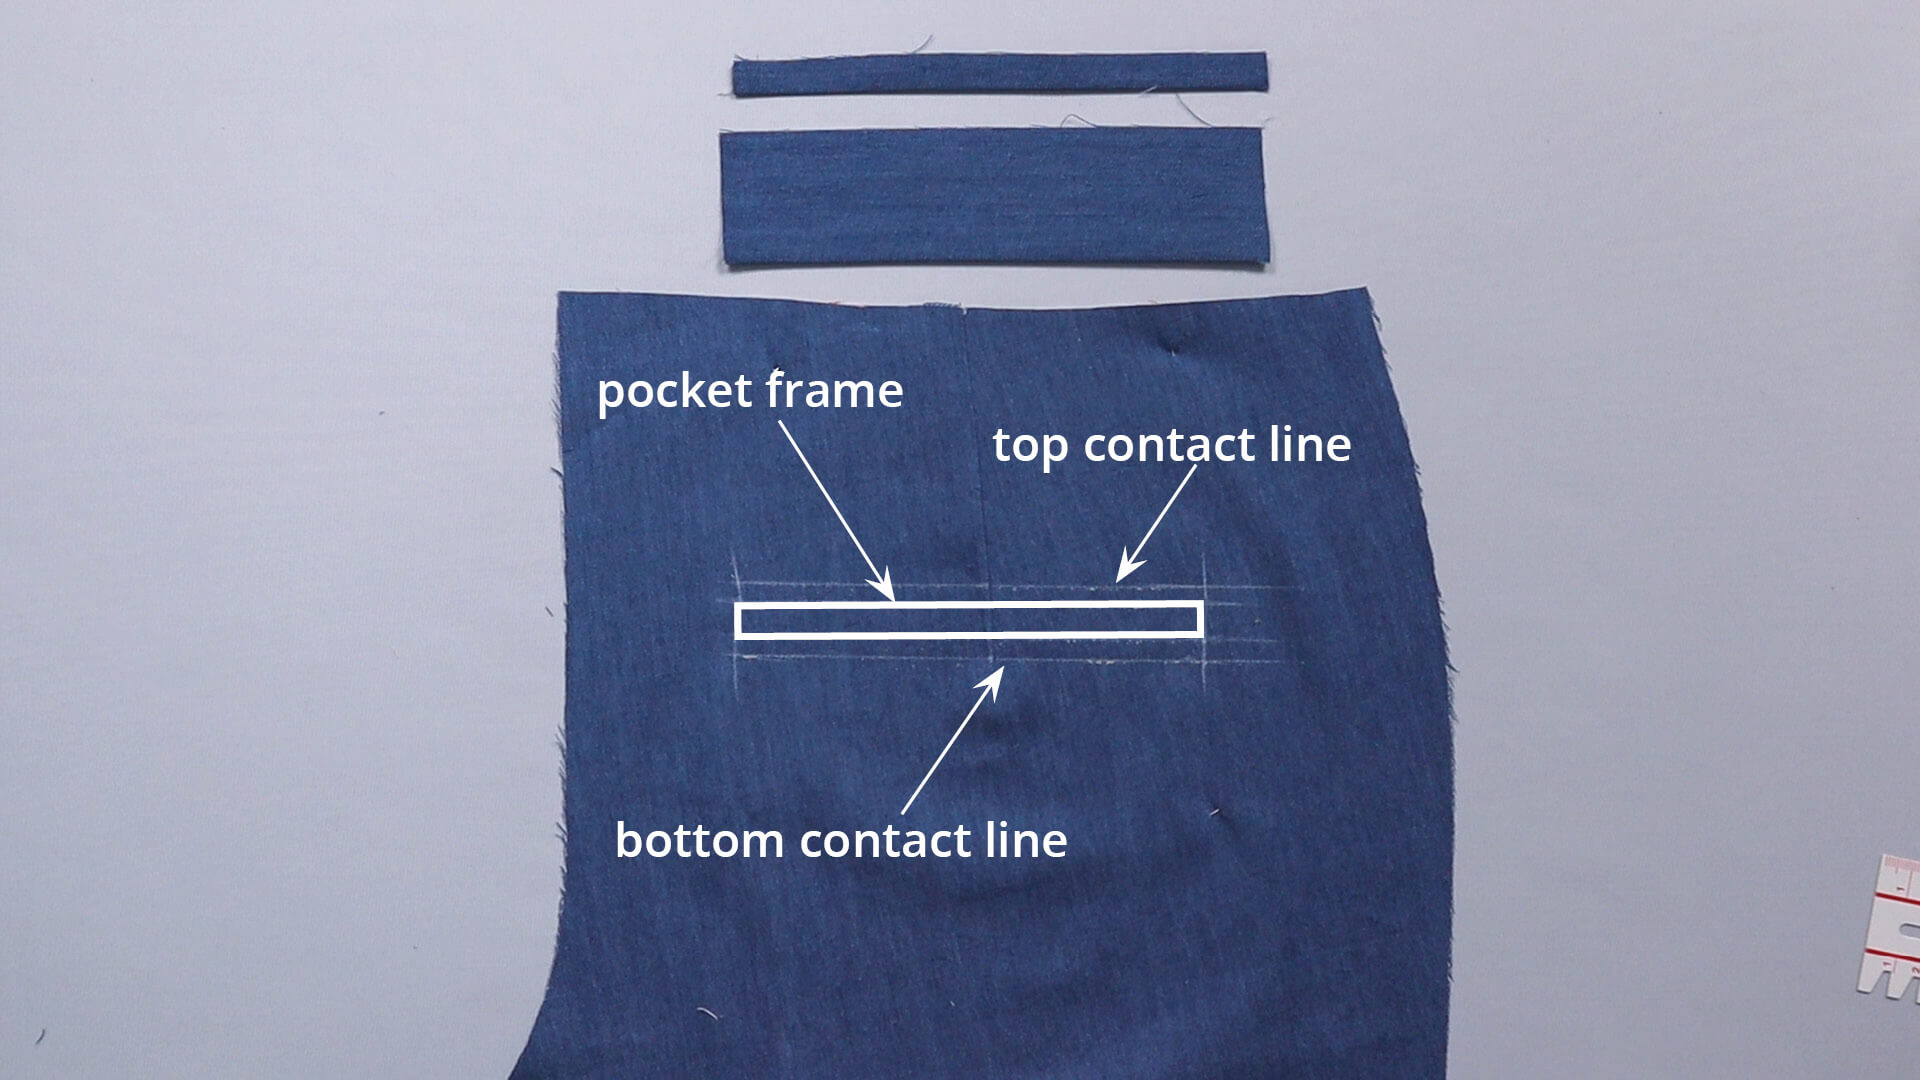
I measure the exact hight of the pocket rectangle in the template. In this example it’s 12 mm. This means that the two welts are each 6 mm wide.
From the top edge of the pocket rectangle, I draw a parallel line with this distance (6 mm) as a top contact line. From the bottom edge, I draw the second contact line at the same distance downwards.
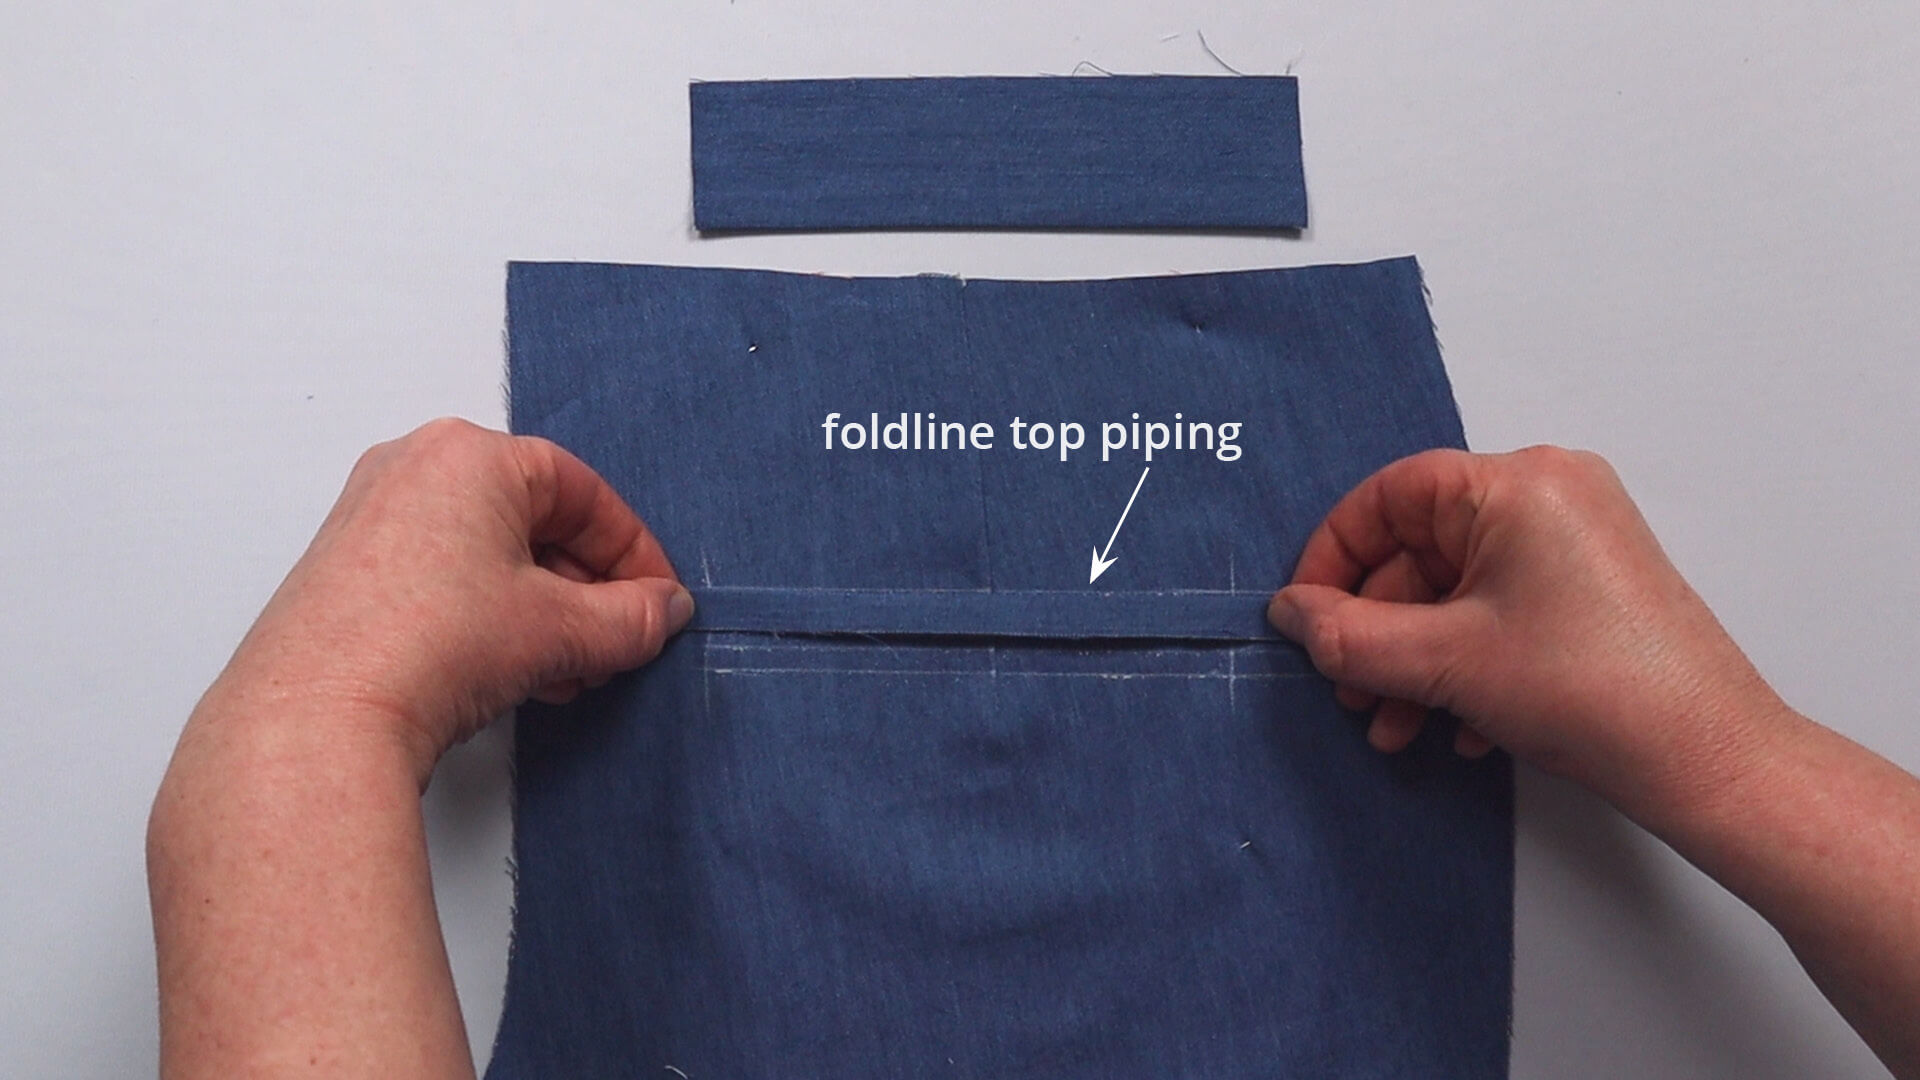
The upper narrow welt strip is pinned to the back of the trousers so that the folded edge is at the top of the line of contact and the open long edges are facing downwards. The edges should protrude from the sides in equal distances.
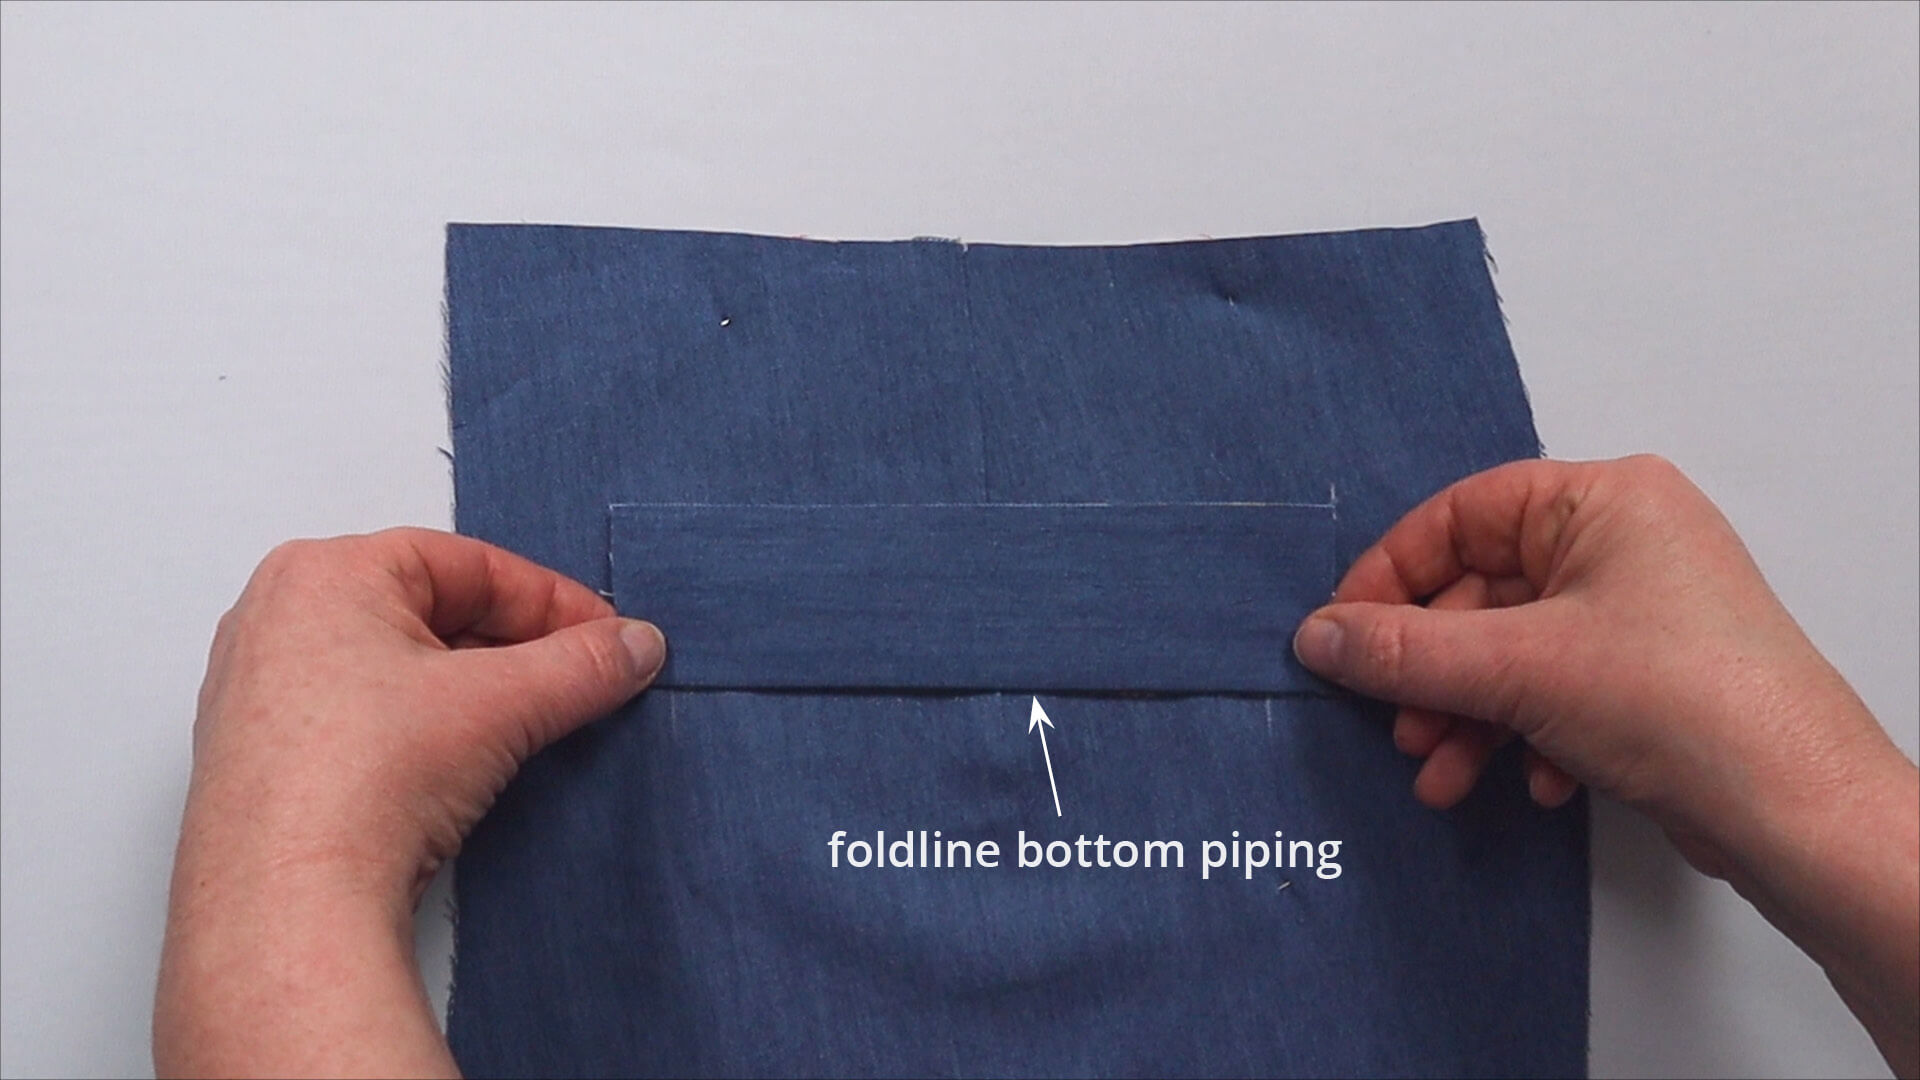
I pin the bottom welt strip to the back of the trousers so that the folded edge is at the bottom line and the open long edges are facing upwards. The side previously pressed over 12 mm wide lies on the back of the trousers. Here, too, the welt strip should protrude from the sides in equal distances.
Before the welt strips are stitched in place, you need to transfer the width of the double welt pockets. You can also transfer the top and bottom edges of the pocket rectangle to the welt strips as markings for the seam lines.
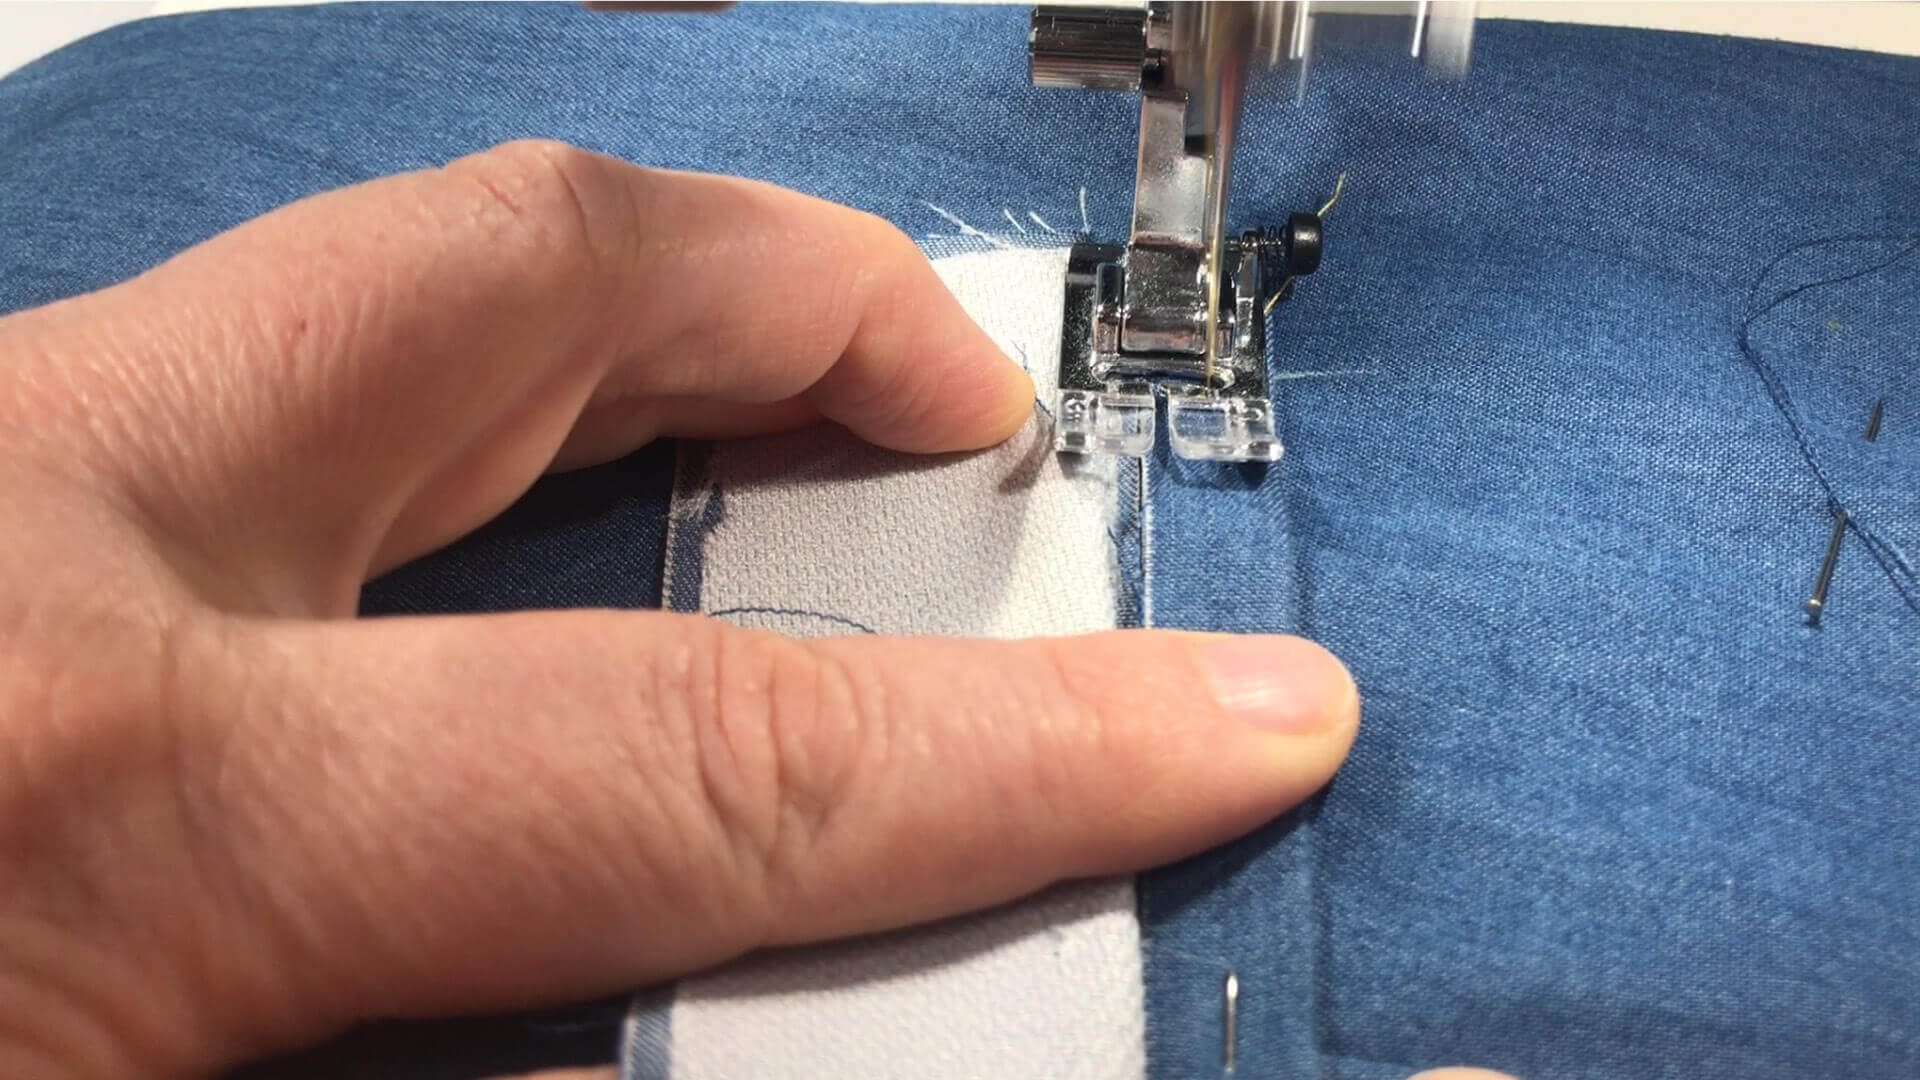
I stitch the lower and upper pocket welt according to the marking using a straight stitch. It is important to work very precisely and to secure the start and finish points well using a forward and back stitch.
7. Cut in the pocket opening
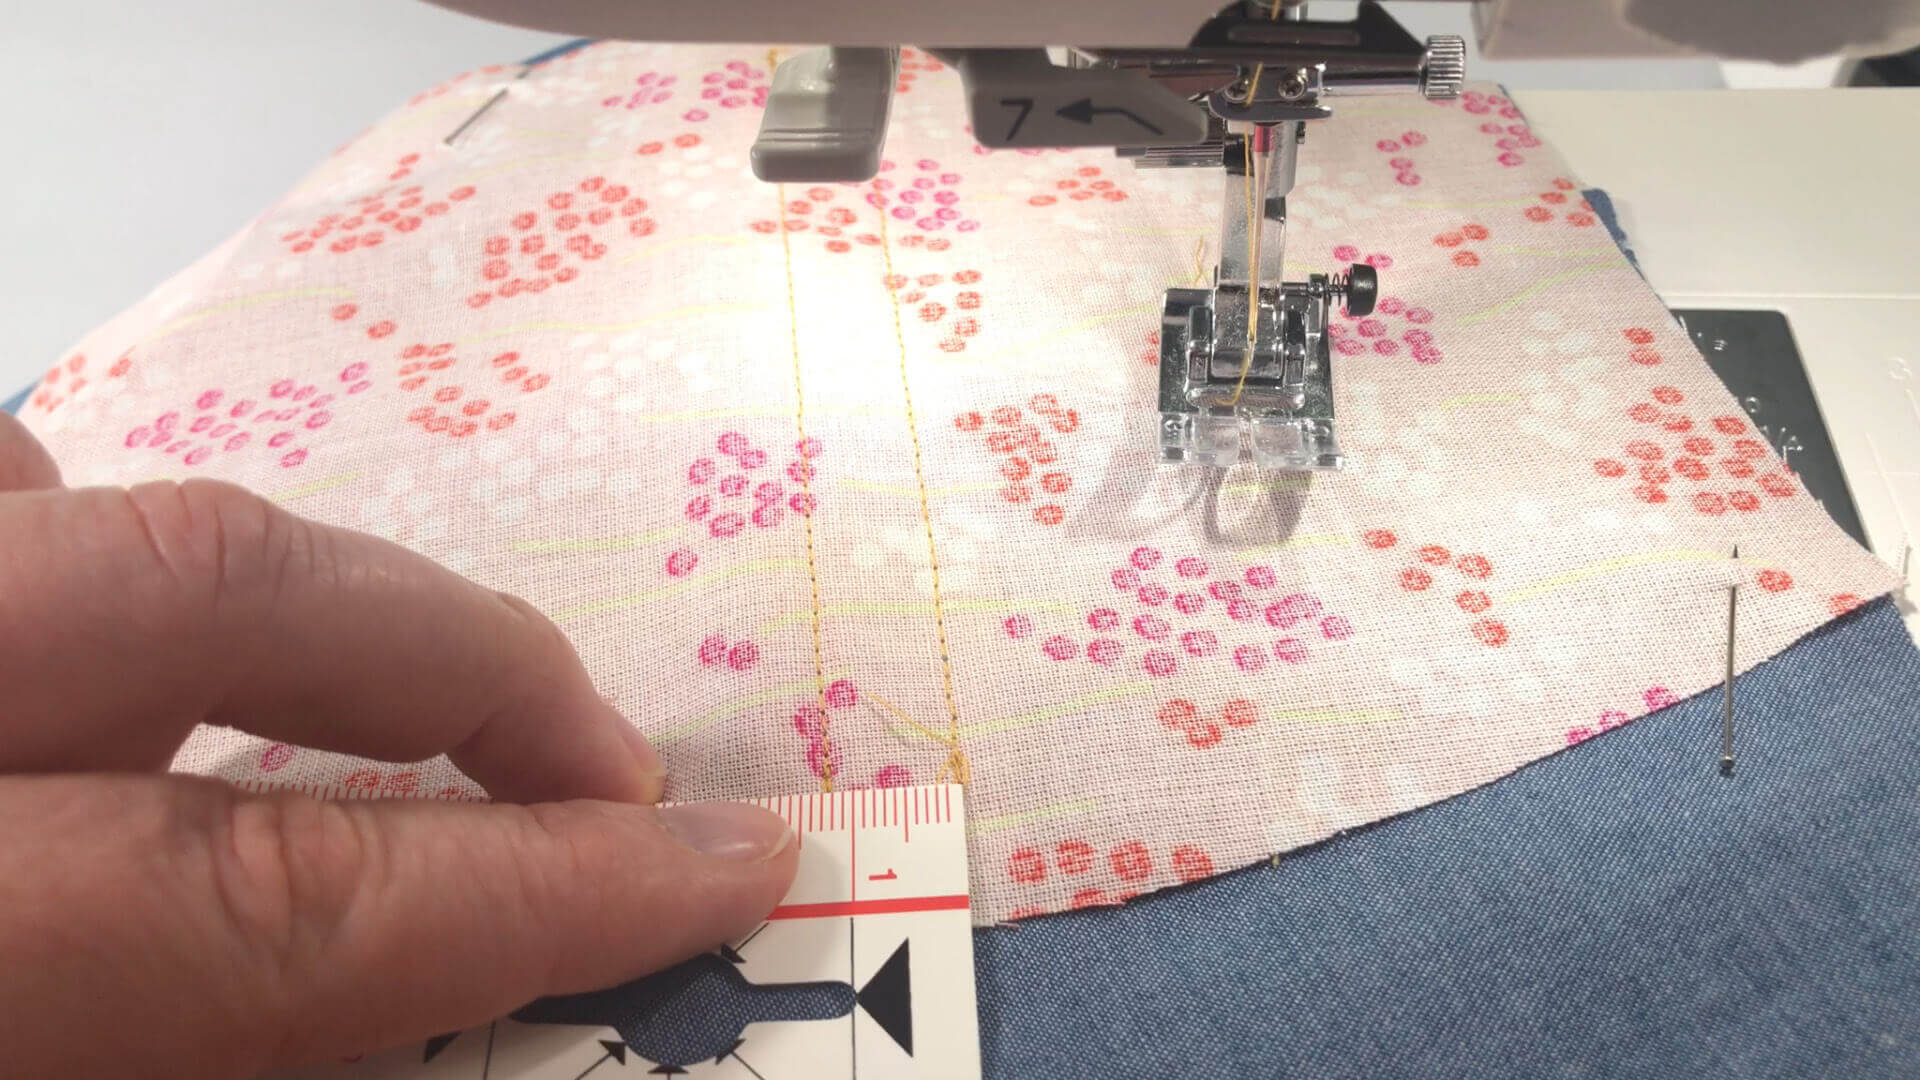
After sewing, I check from the wrong side whether the seam lines match the pocket size on the template.
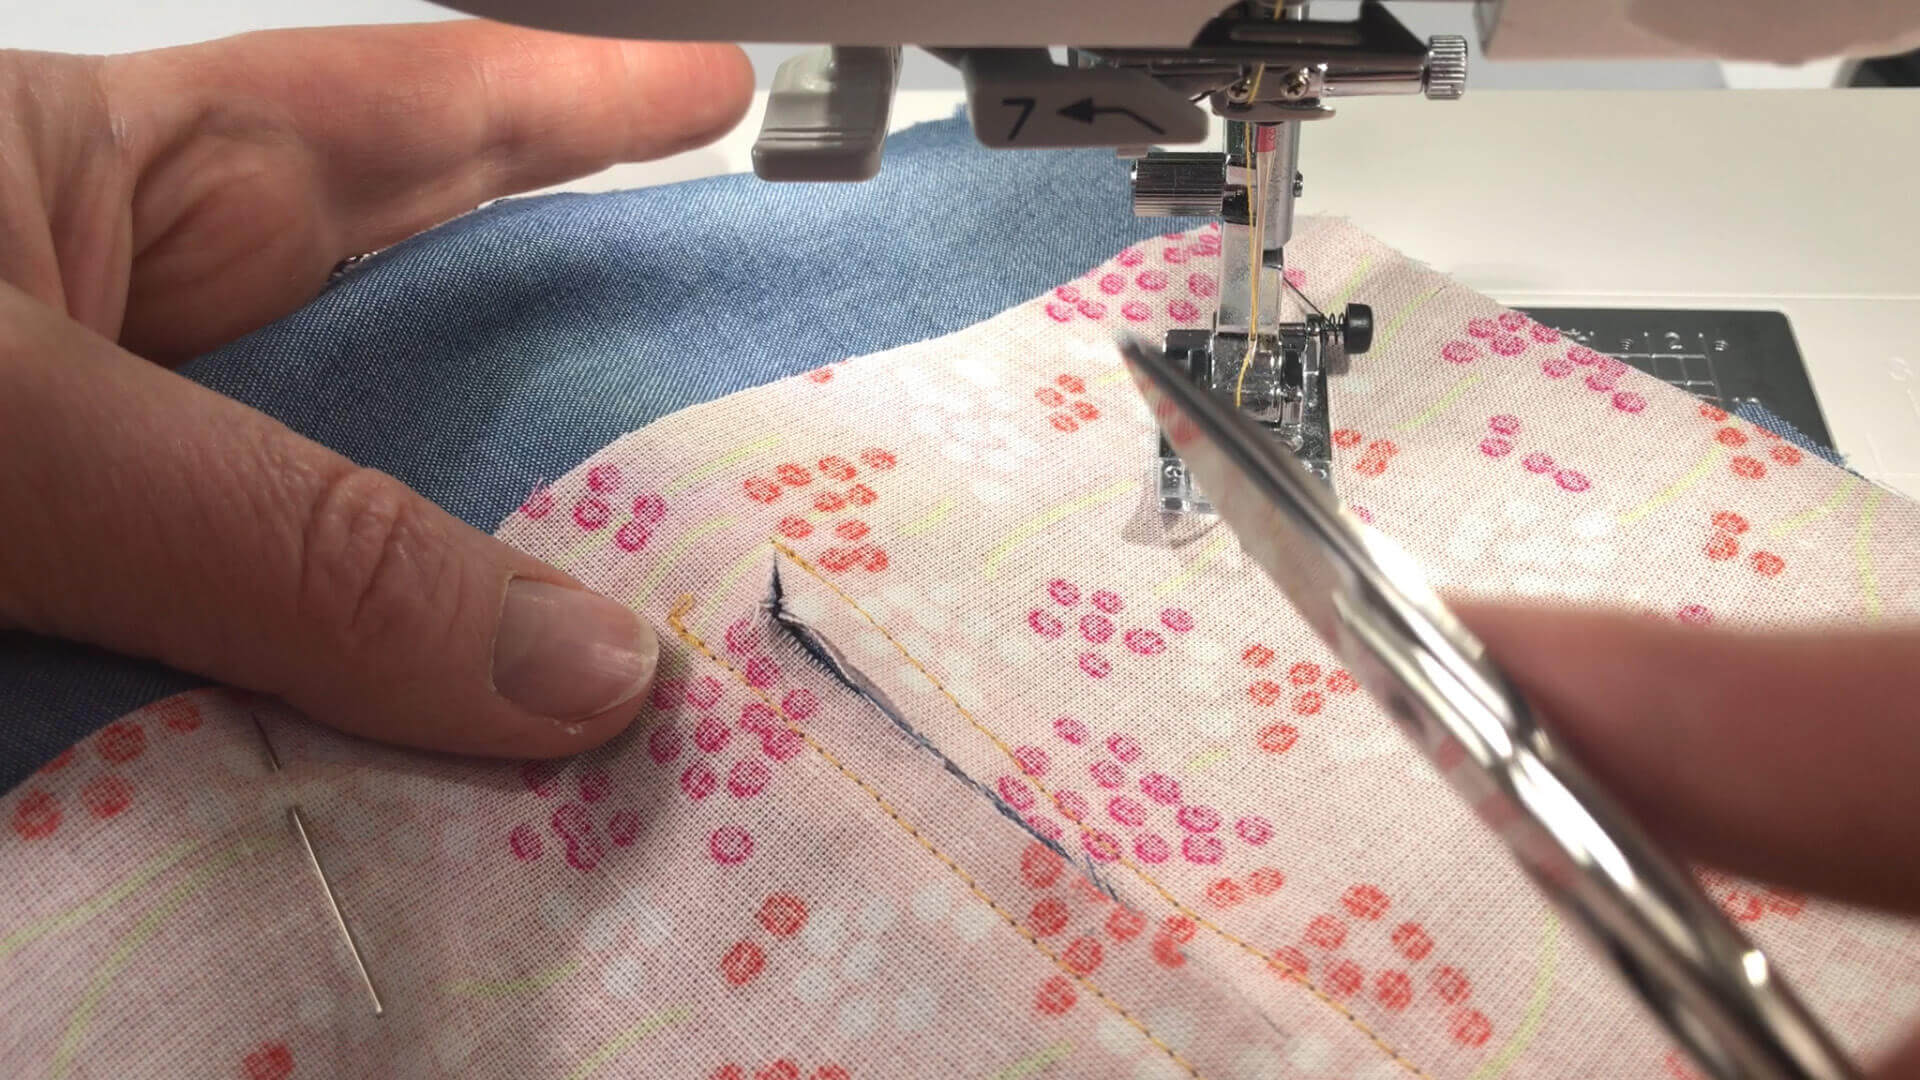
For the pocket opening, cut the opening through the back trousers and upper pocket bag in the middle between the 2 stitching lines ending approx. 6 mm before the end points. The easiest way to do this is to cut from the wrong side and fold away the seam allowances on the lower side.
I cut from the ends of this incision line to just before the upper and lower start and end points of the stitching lines, creating a small triangle. Be careful not to cut the seam.
8. Iron double welt and pocket opening
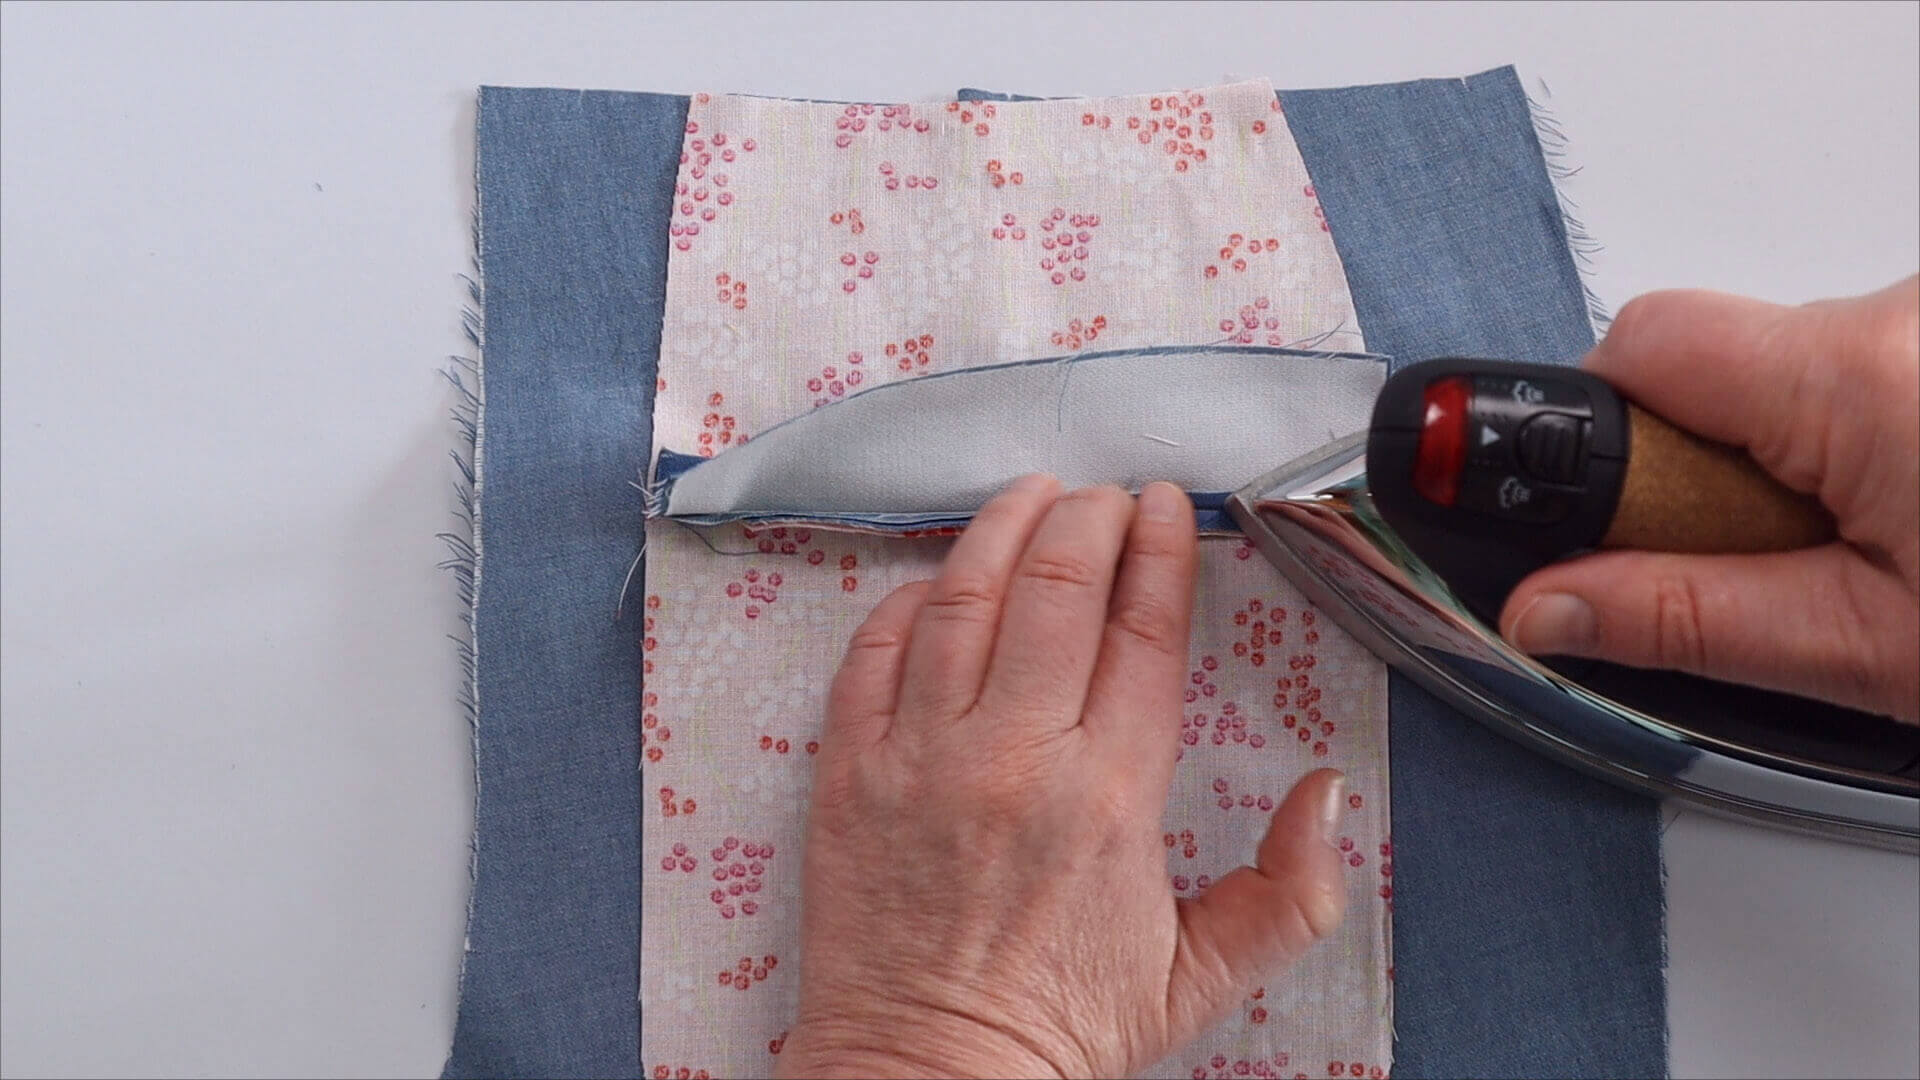
From the wrong side, I pull the lower part of the double welt inwards through the incision so that the folded edge is facing upwards. Then I fold the turnin upwards and press the seam apart.
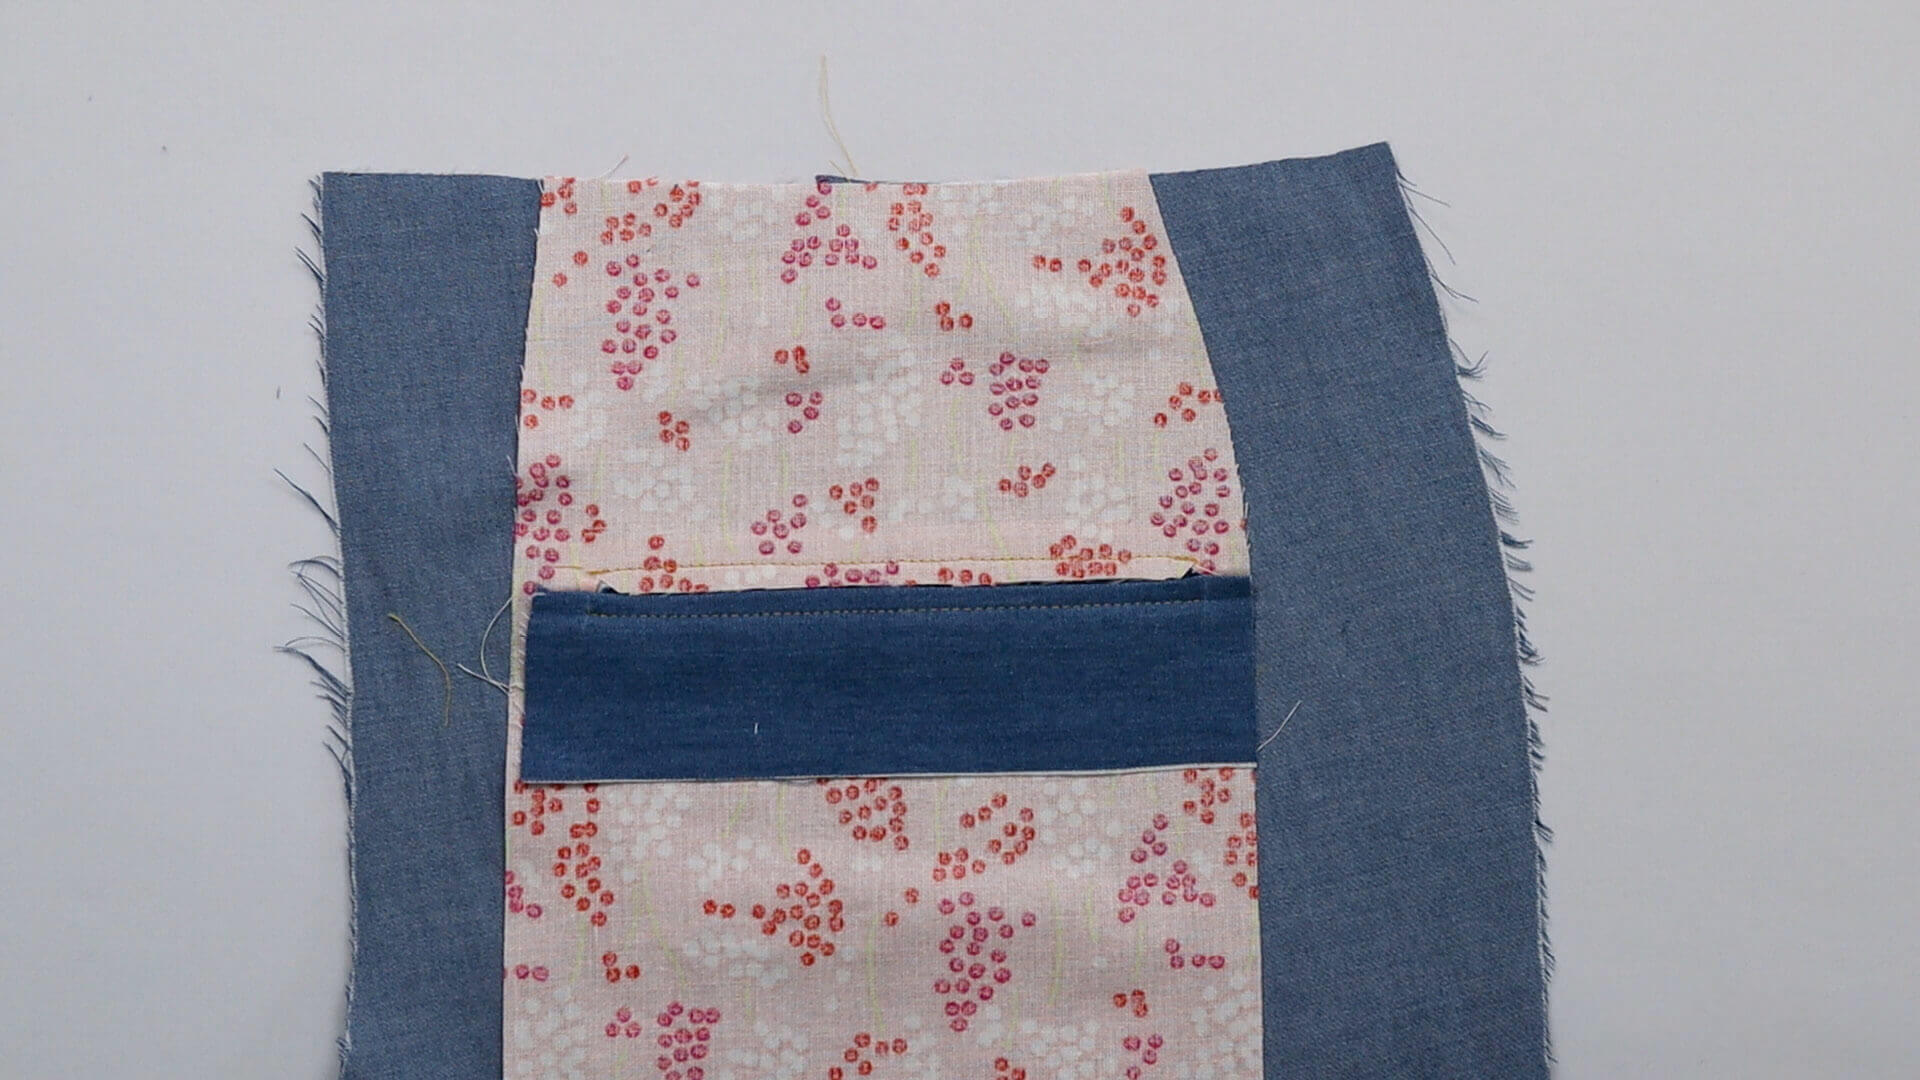
I press the fold back down and iron over the seam.
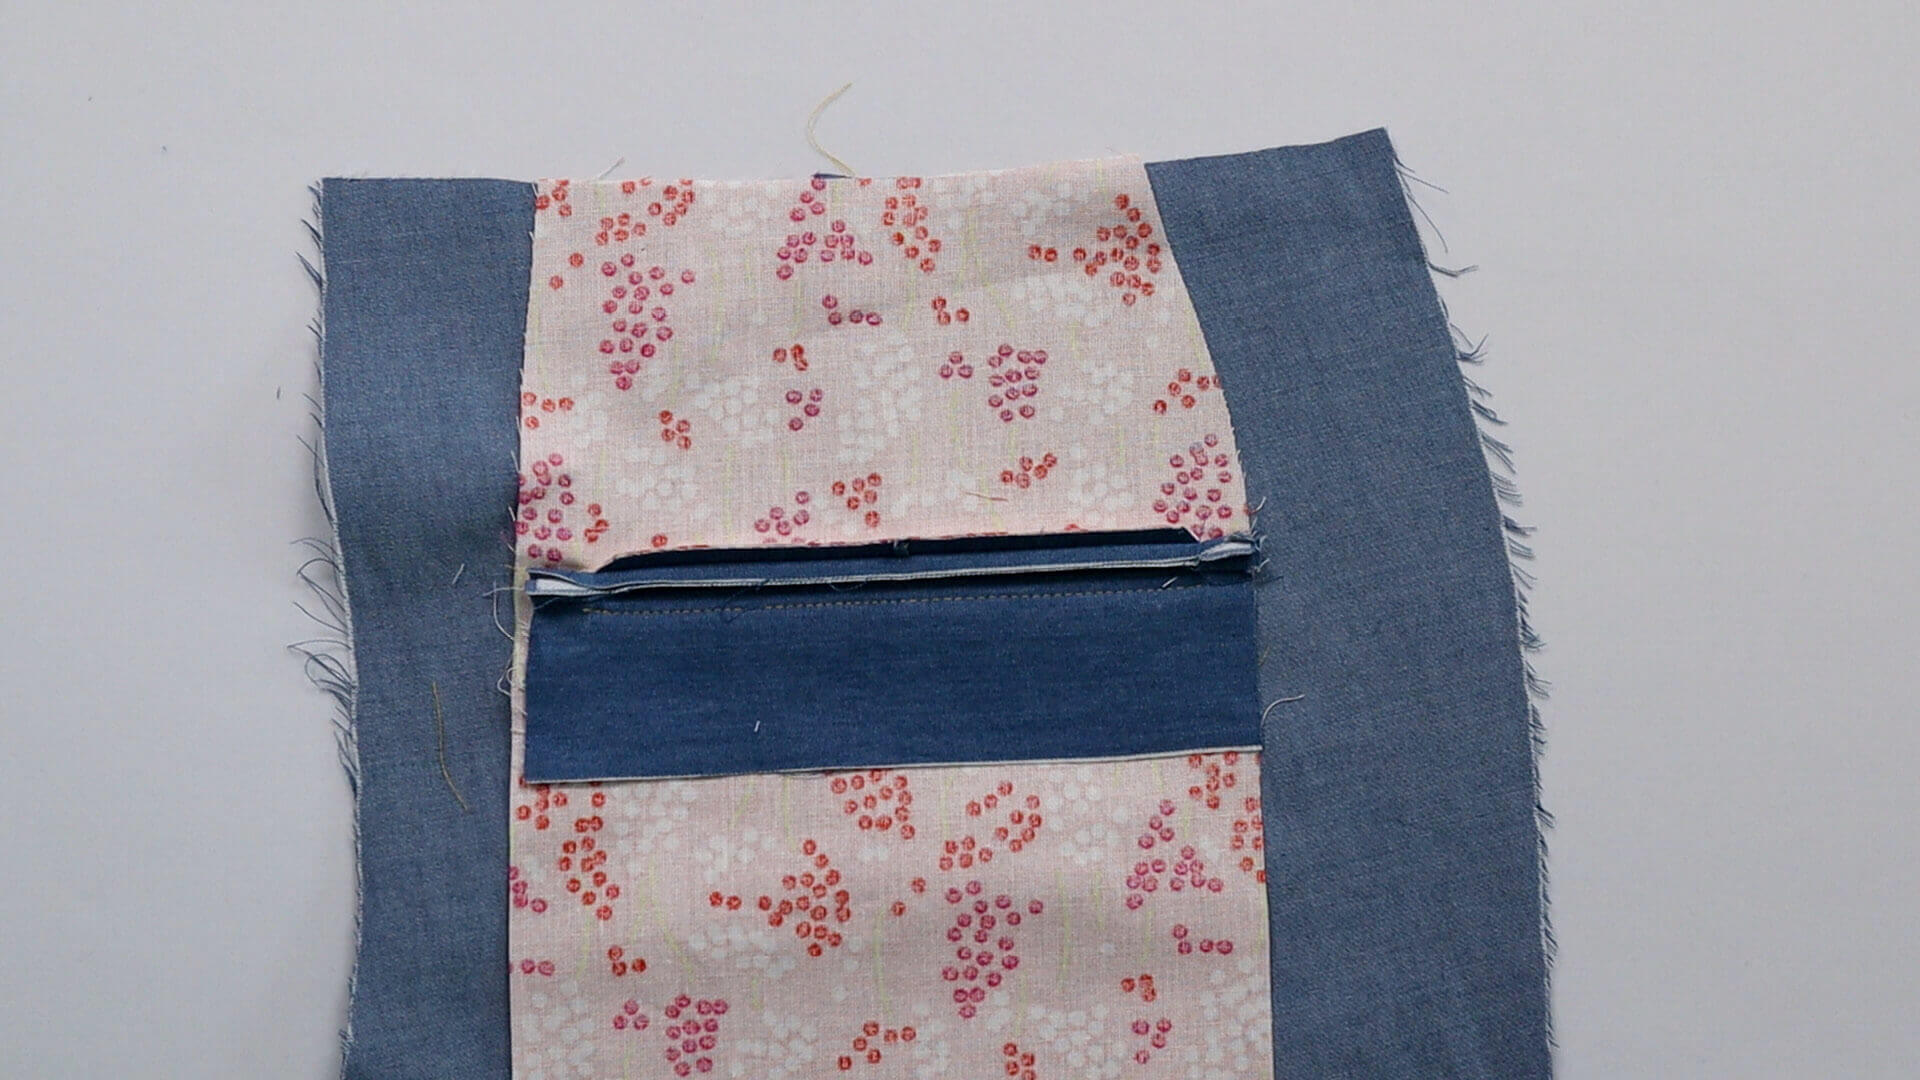
Now I also pull the upper part of the double welt to the wrong side and place it so the folded edge is facing downwards. Here, too, I press the seam allowance apart first.
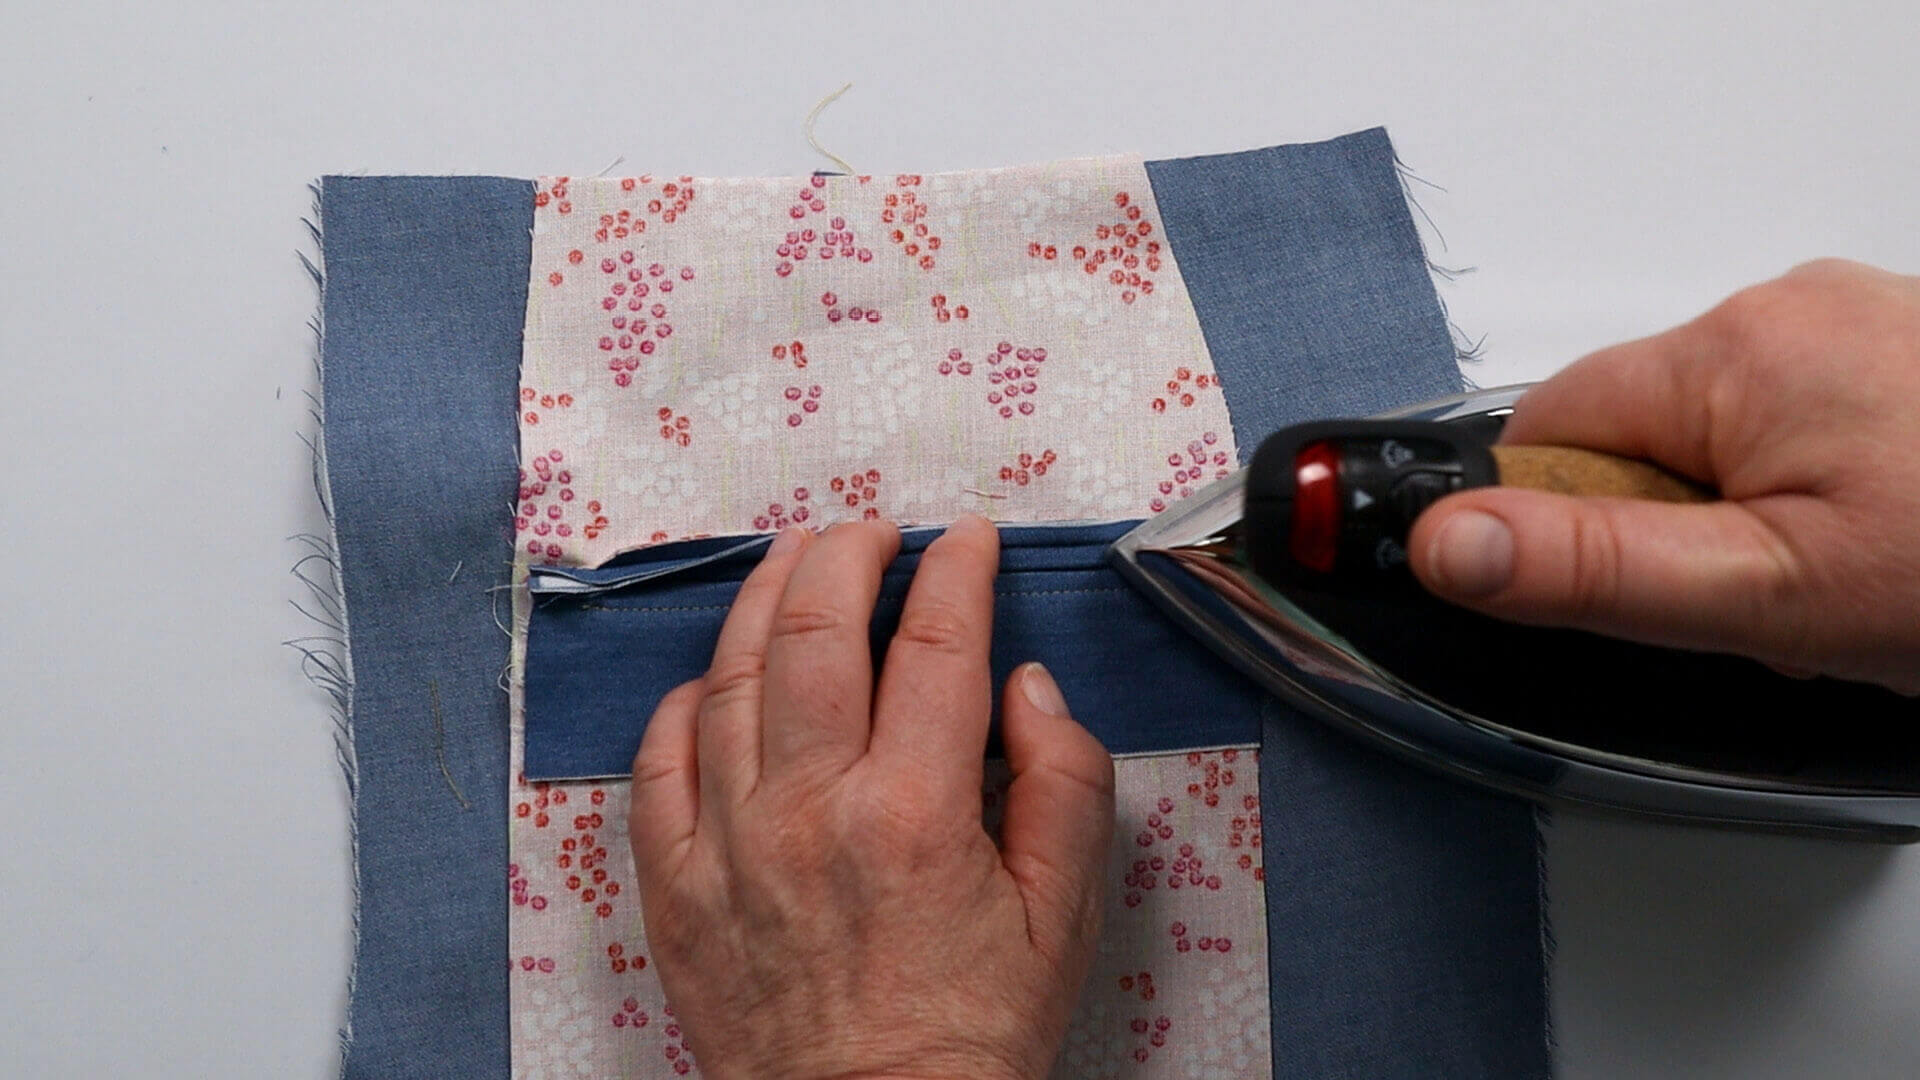
I then press the seam allowance over towards the waistband edge.
9. Secure the triangle at the corners
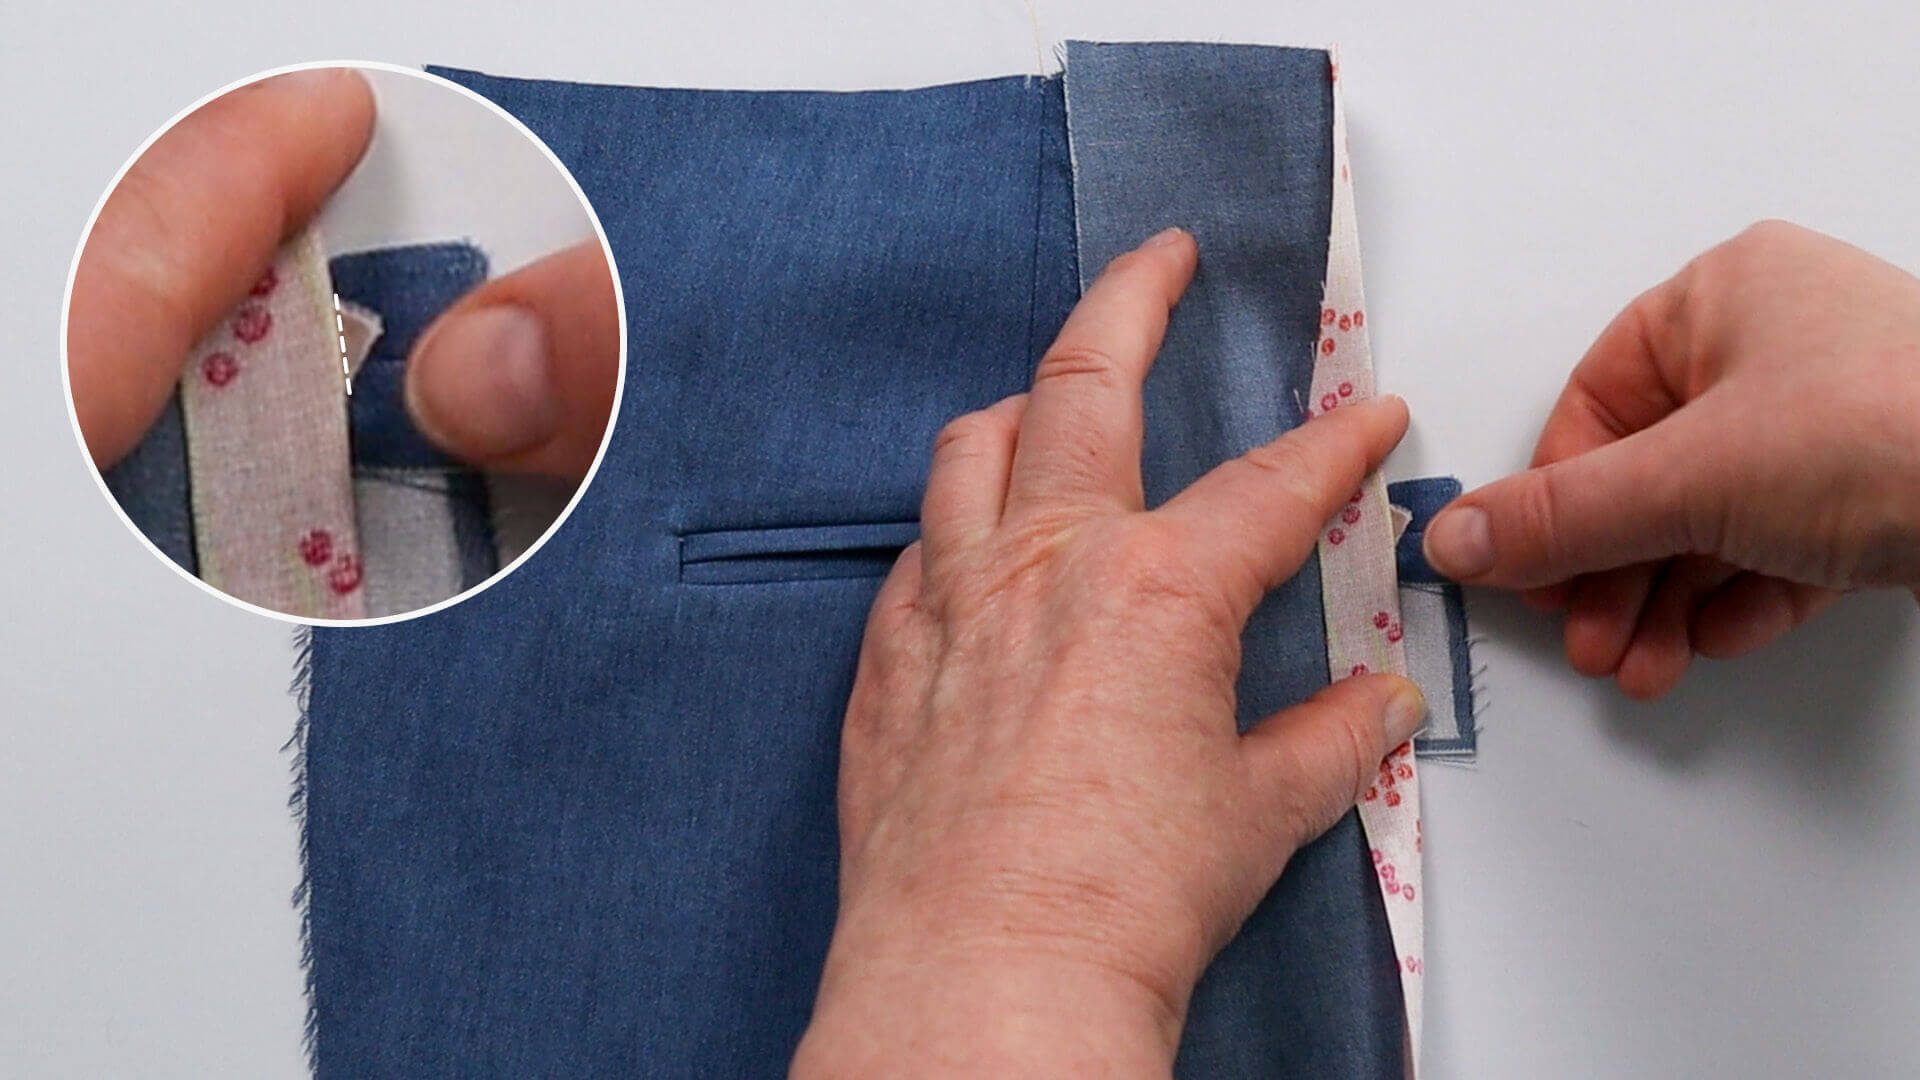
The triangles are stitched to the double welt from the inside. They must first be folded inwards, if this has not already been done automatically when pulling through the welt strips.
Before stitching, check again that the upper and lower welt strips meet exactly at the fold. I recommend to not secure the stitching at first. If you don’t get it right first time, you can unravel and correct it again without much effort.
10. Design variants for double welt pockets
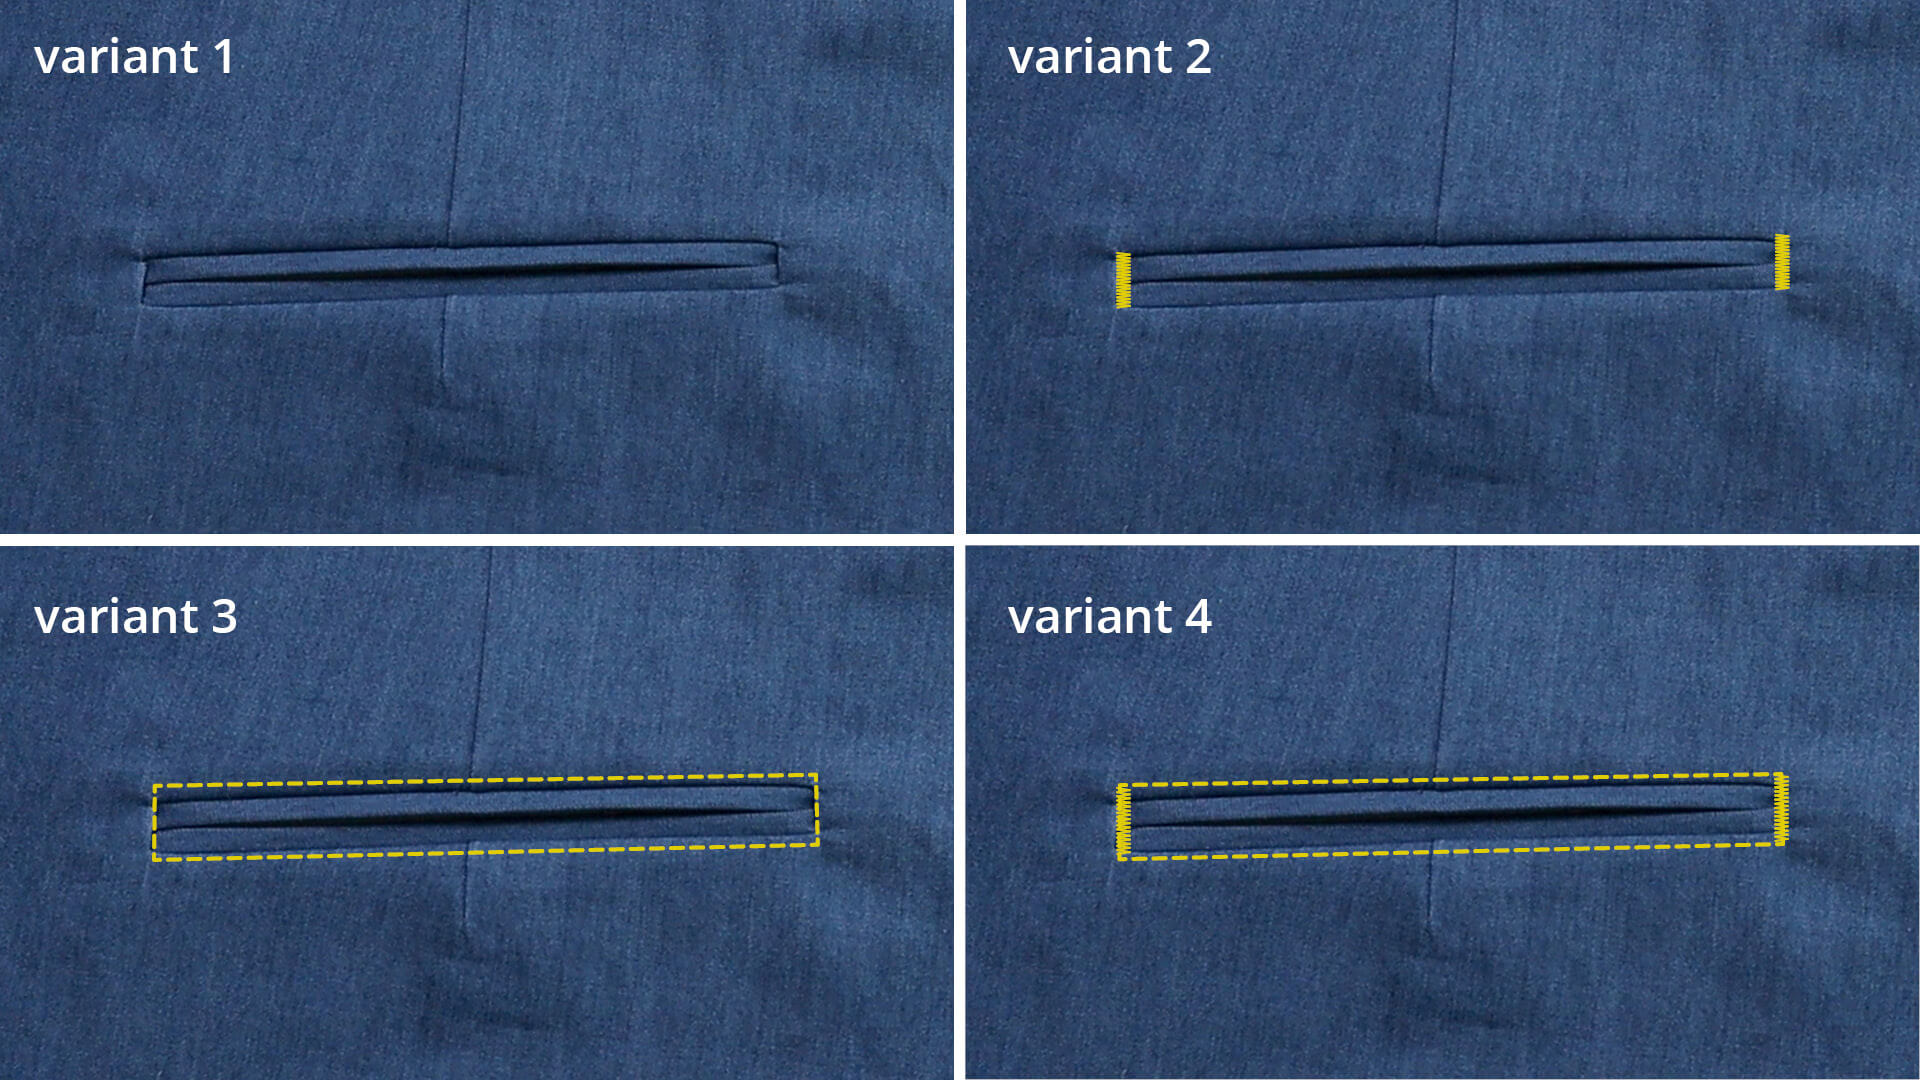
Depending on your preferences, you can topstitch around the bag, not or only partially topstitch. You can often see narrow bartacks on the sides, as shown in variants 2 and 4.
If you want to have topstitching on the bottom seam, you must do this before the pocket is joined to the bottom pocket bag.
11. Make button loops
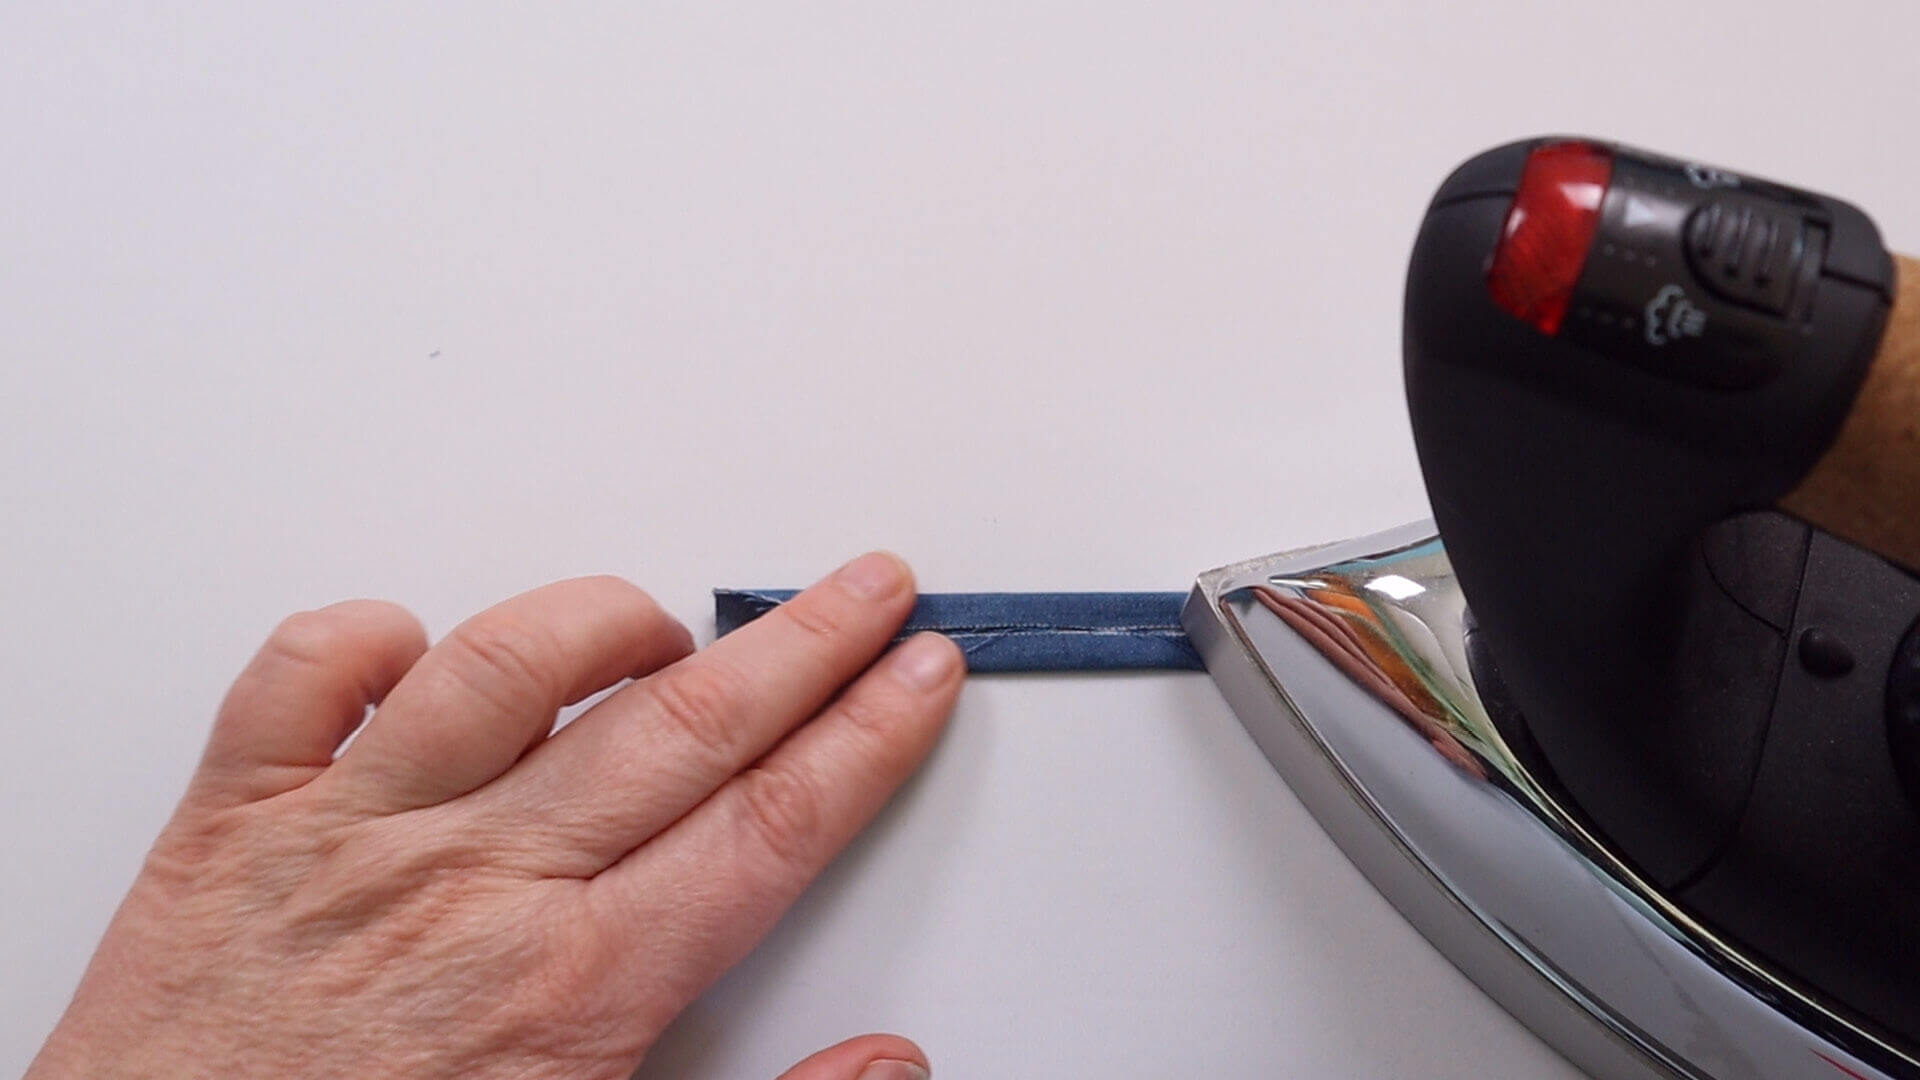
Optionally, you can make a button loop. To do this, first iron the long sides of the pattern piece lengthwise to the center. The strip is folded over and topstitched close to the edge.
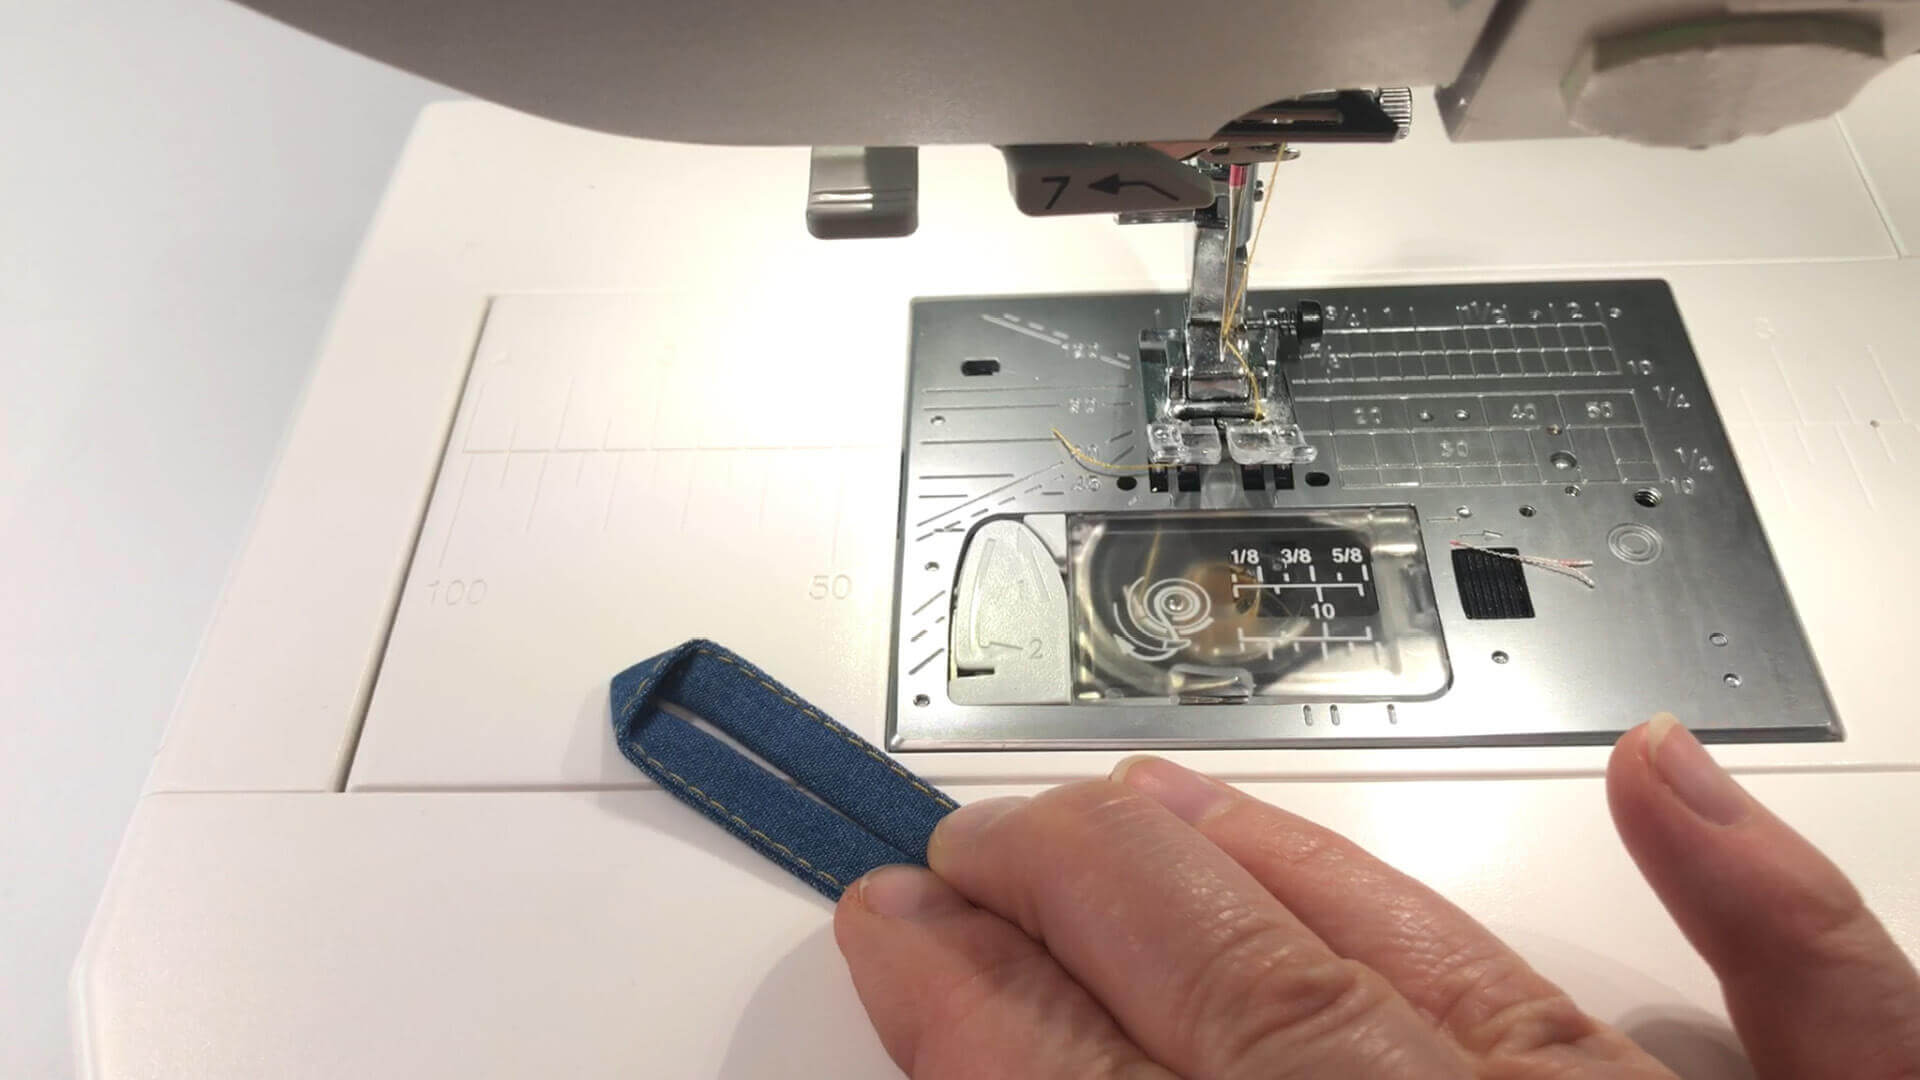
I fold the finished ribbon in half, as shown in the picture. Both sides lie flat next to each other. An area with a triangular tip forms the middle. I secure this with a machine or hand stitch.
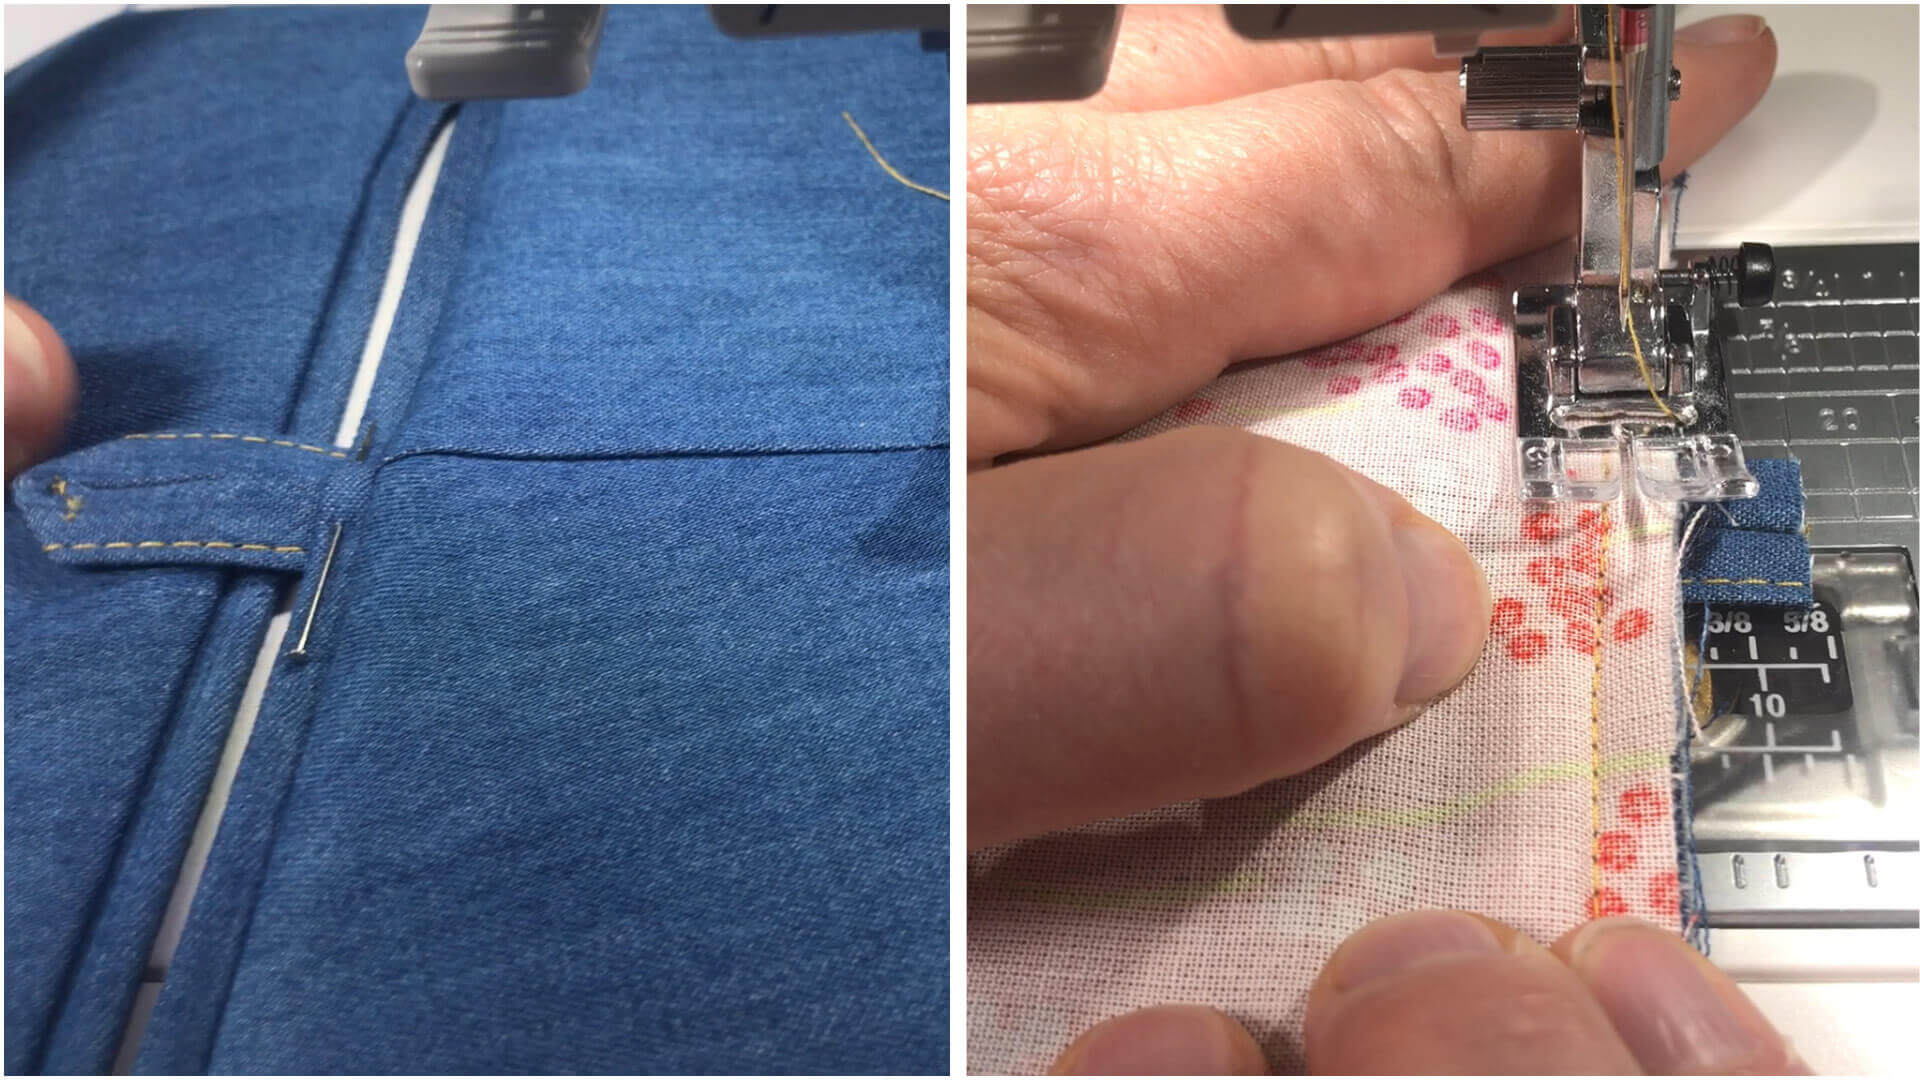
Starting at the top edge of the loop, I mark the button length and pin the loop in place in the middle of the pocket opening. The marking for the button length matches the folded line of the upper welt. The tip of the loop points downwards. Then I sew the loop onto the seam allowance above the pocket opening from the inside.
12. Connect the lower pocket bag
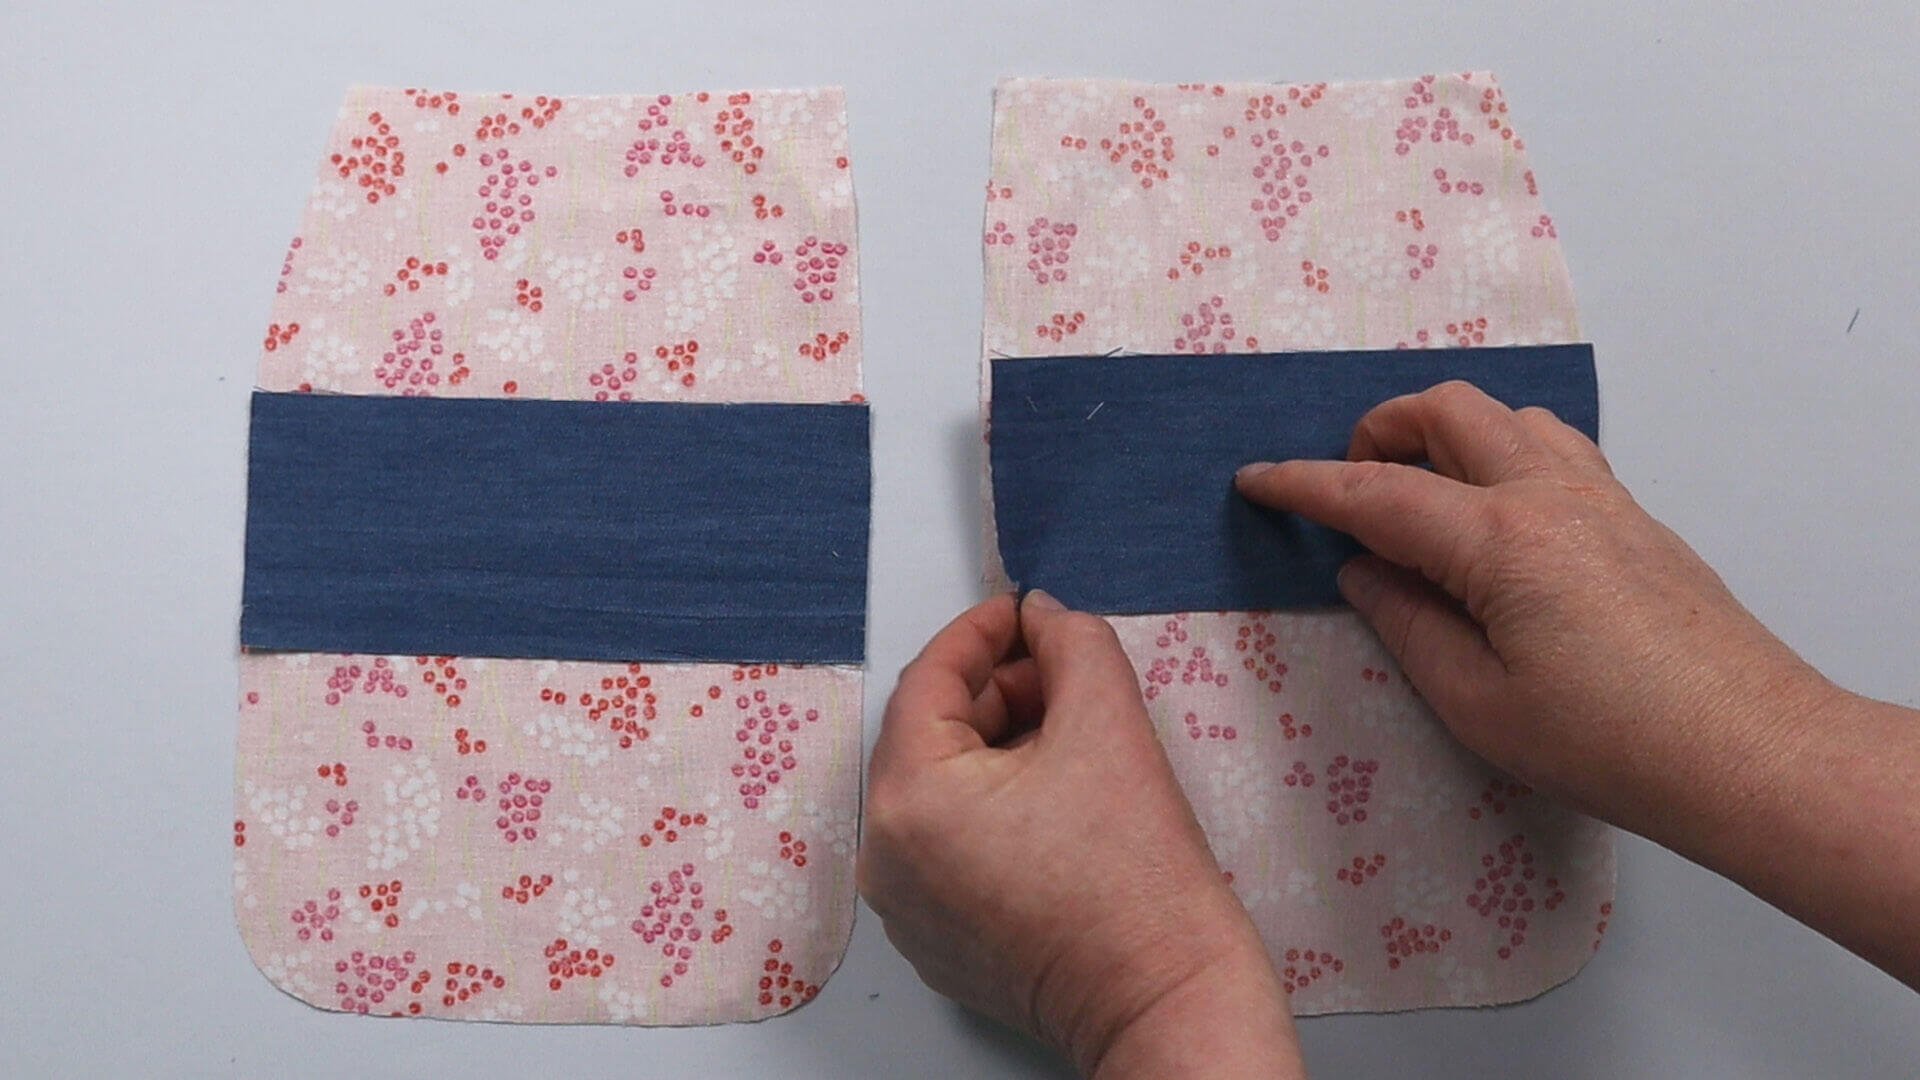
In the next step the bottom edge of the pocket bag facing is stitched to the wrong side of the lower pocket bag, notches matching. The bottom edge can be serged before stitching or folded over by 10 mm. I choose 2nd option, as my materials are quite thin.
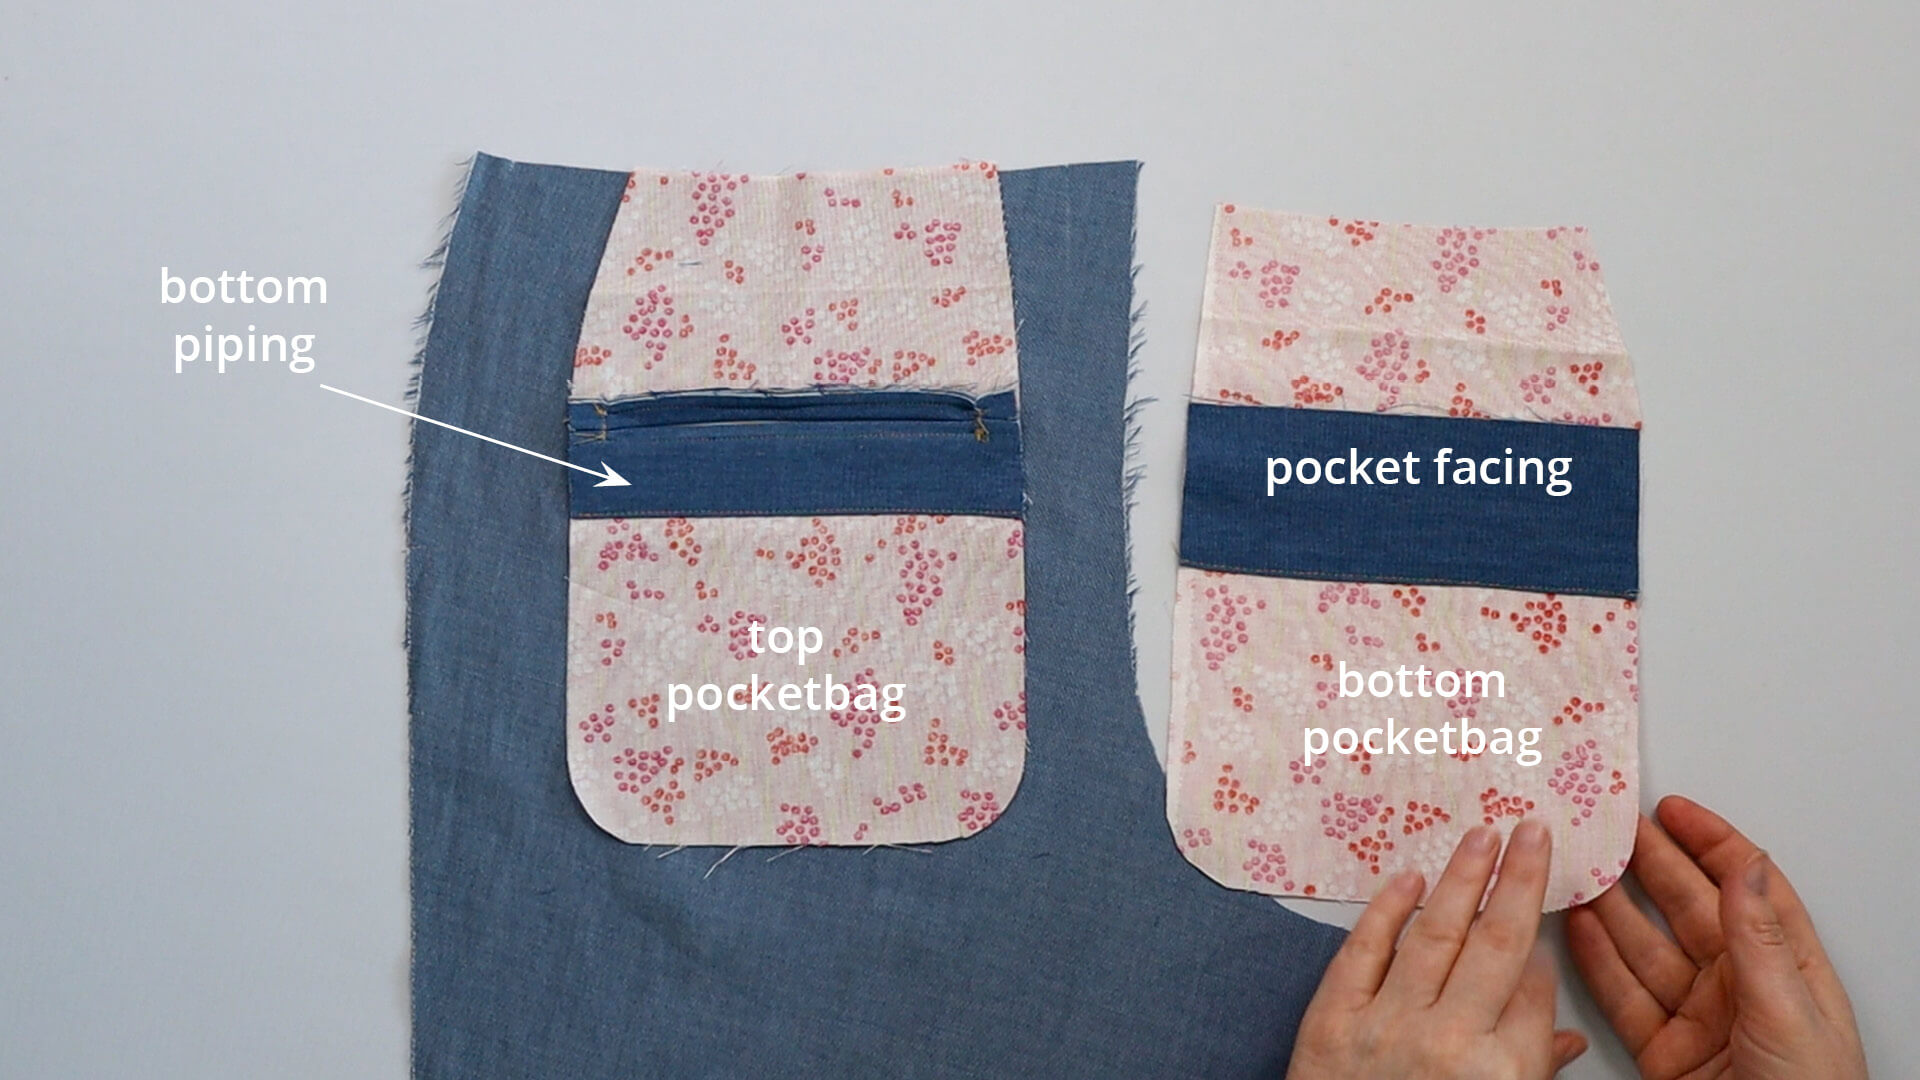
I alsostitch the bottom edge of the lower welt strip to the upper pocket bag. Here, too, you can either neaten the edge or fold it over by 10 mm.
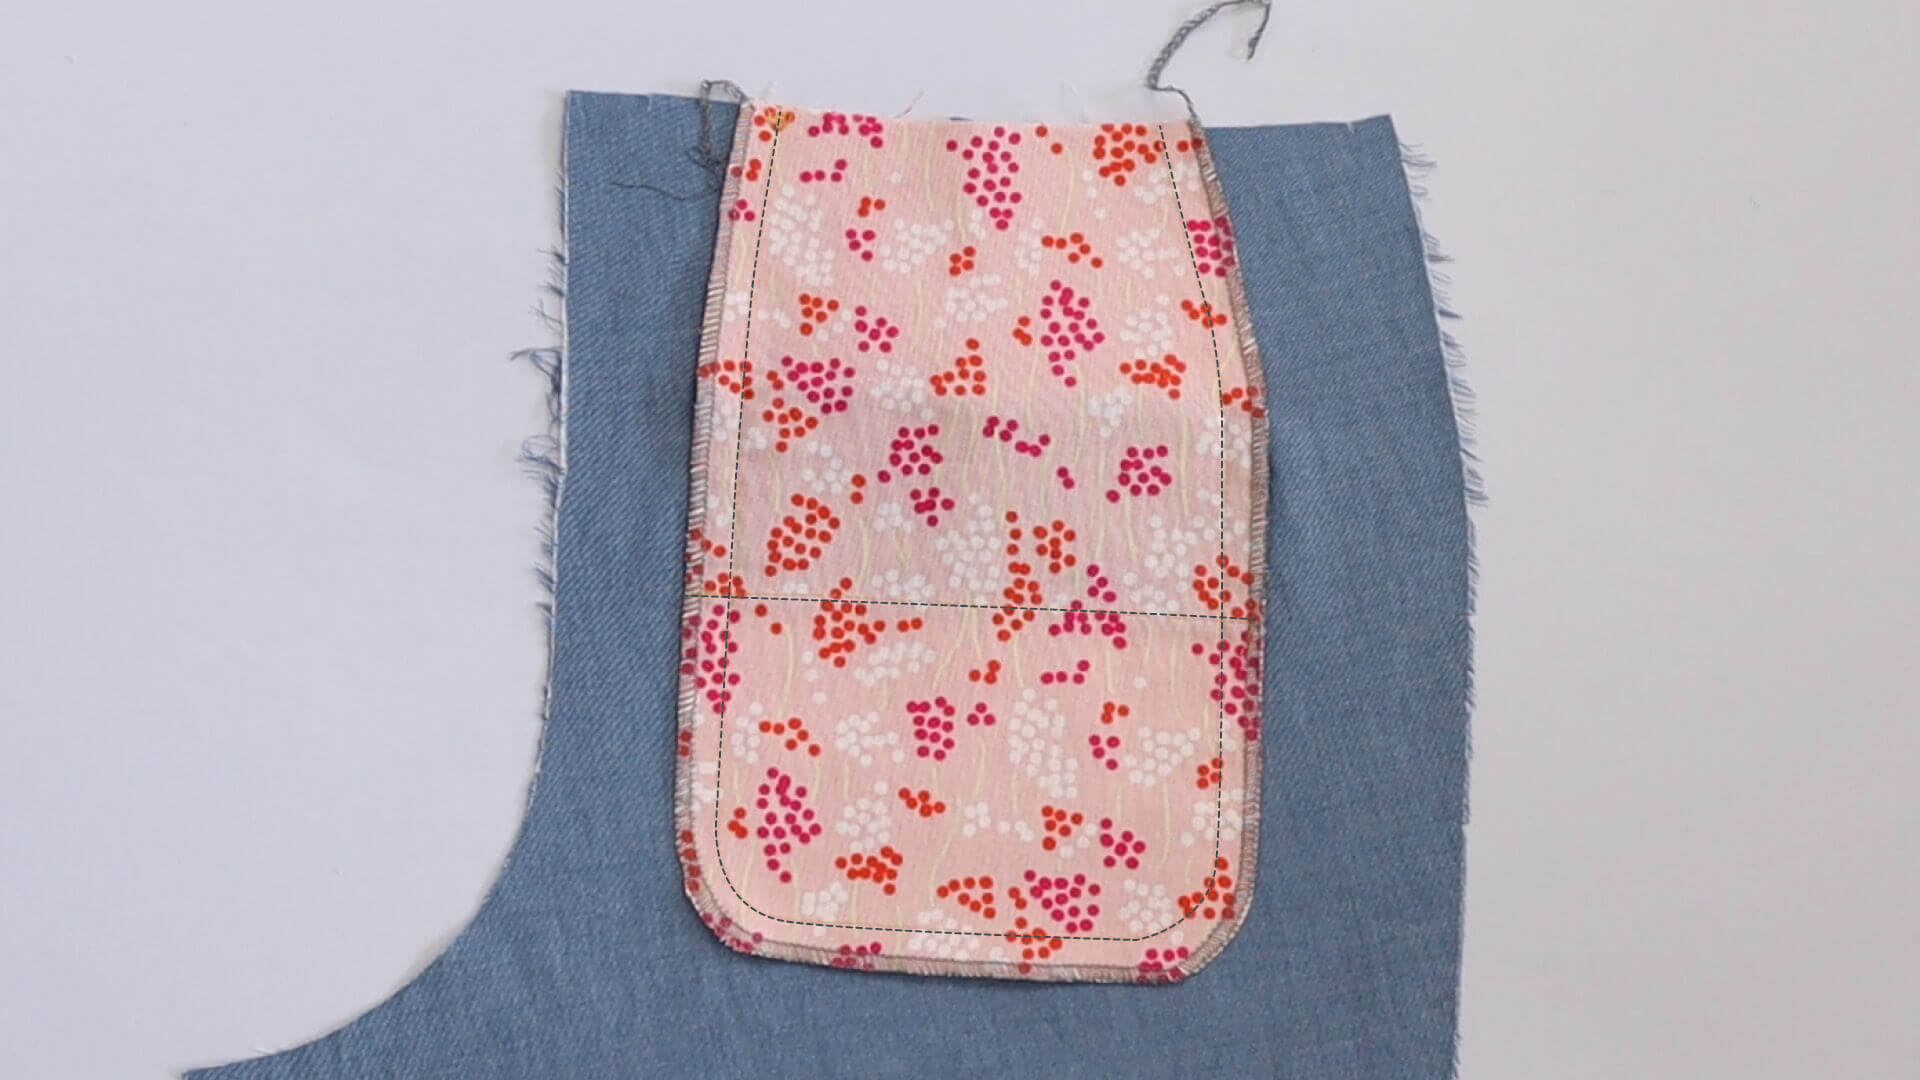
The two pocket bags are now joined together at the sides and the bottom edge. To do this, I pin them in place and then sew them together with a straight stitch and 10 mm seam allowance. Then I overlock the edges.
13. Topstitch the top and side opening edges
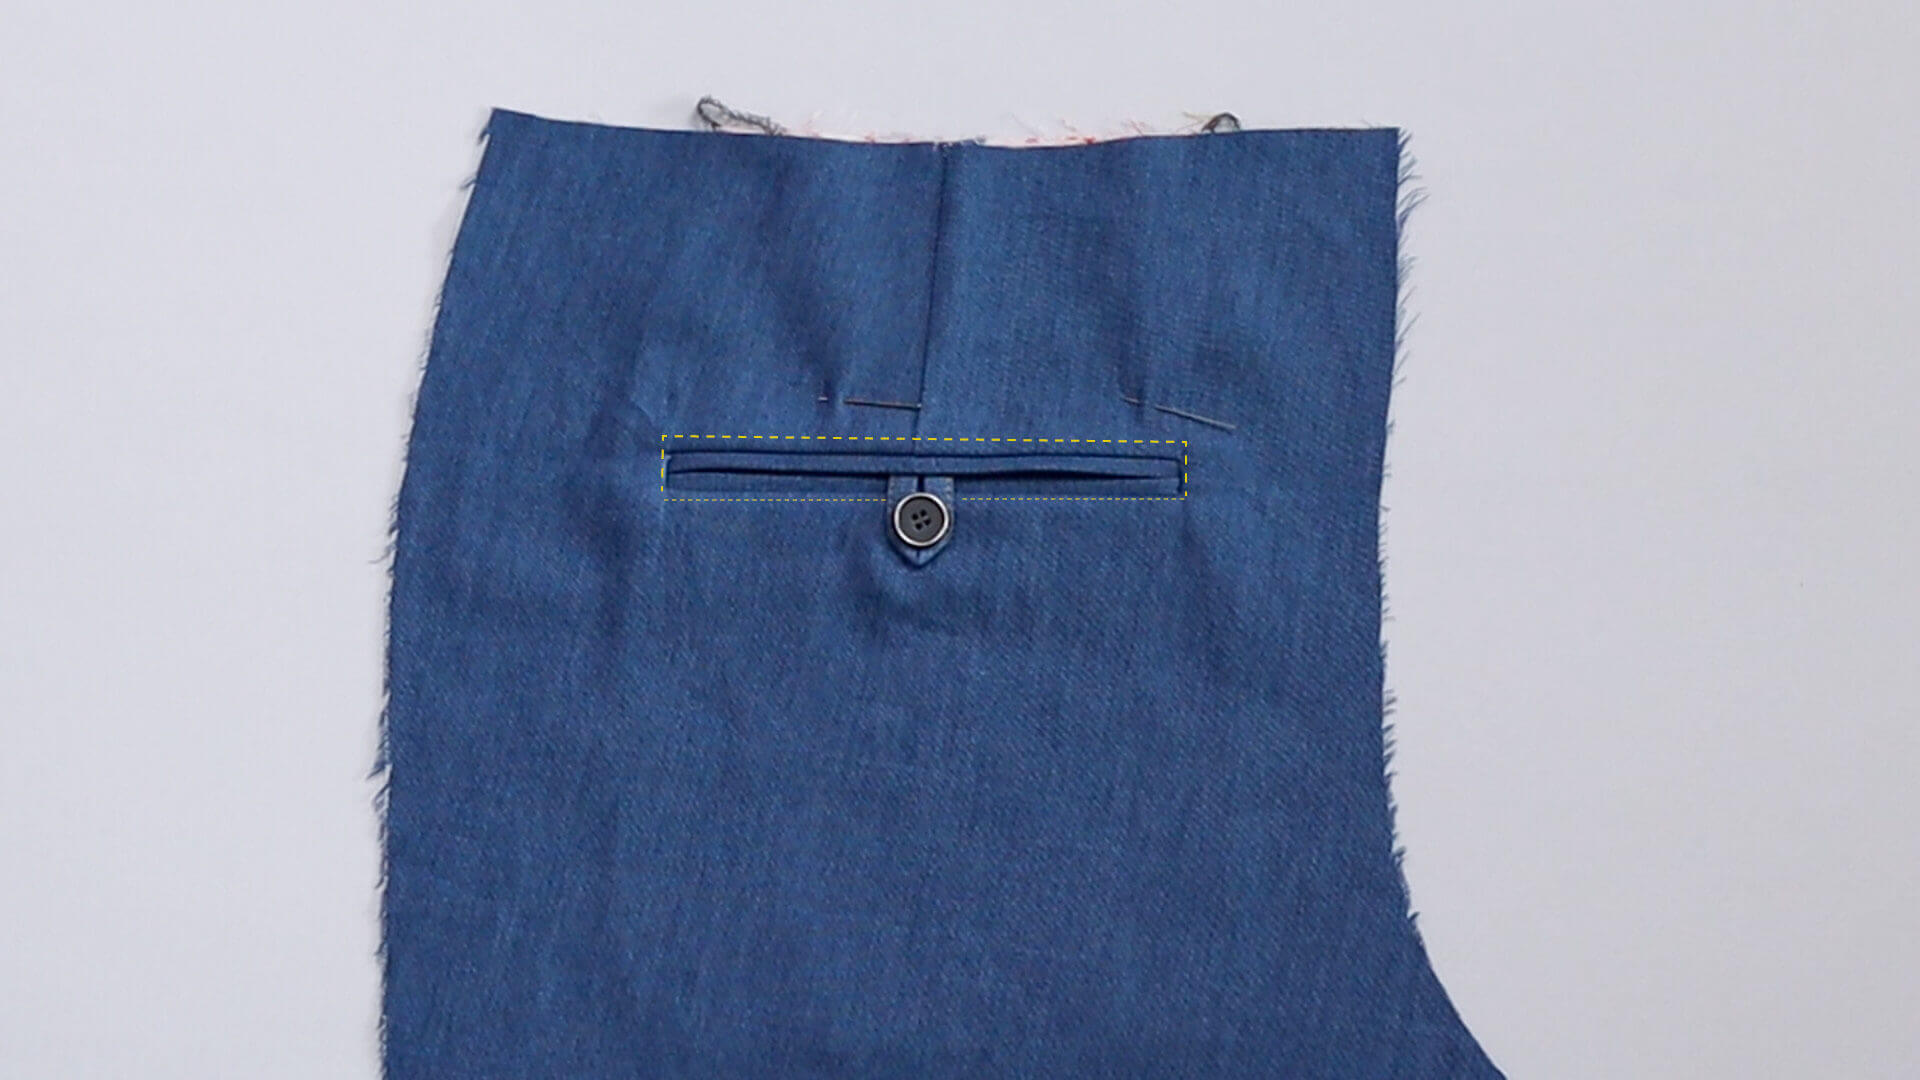
I place the trousers in front of me right side facing up. If you have opted for the version with topstitching around the double welt pockets, topstitch the sides and top. It’s helpful to pin the pocket bag in place with 1 to 2 pins beforehand.
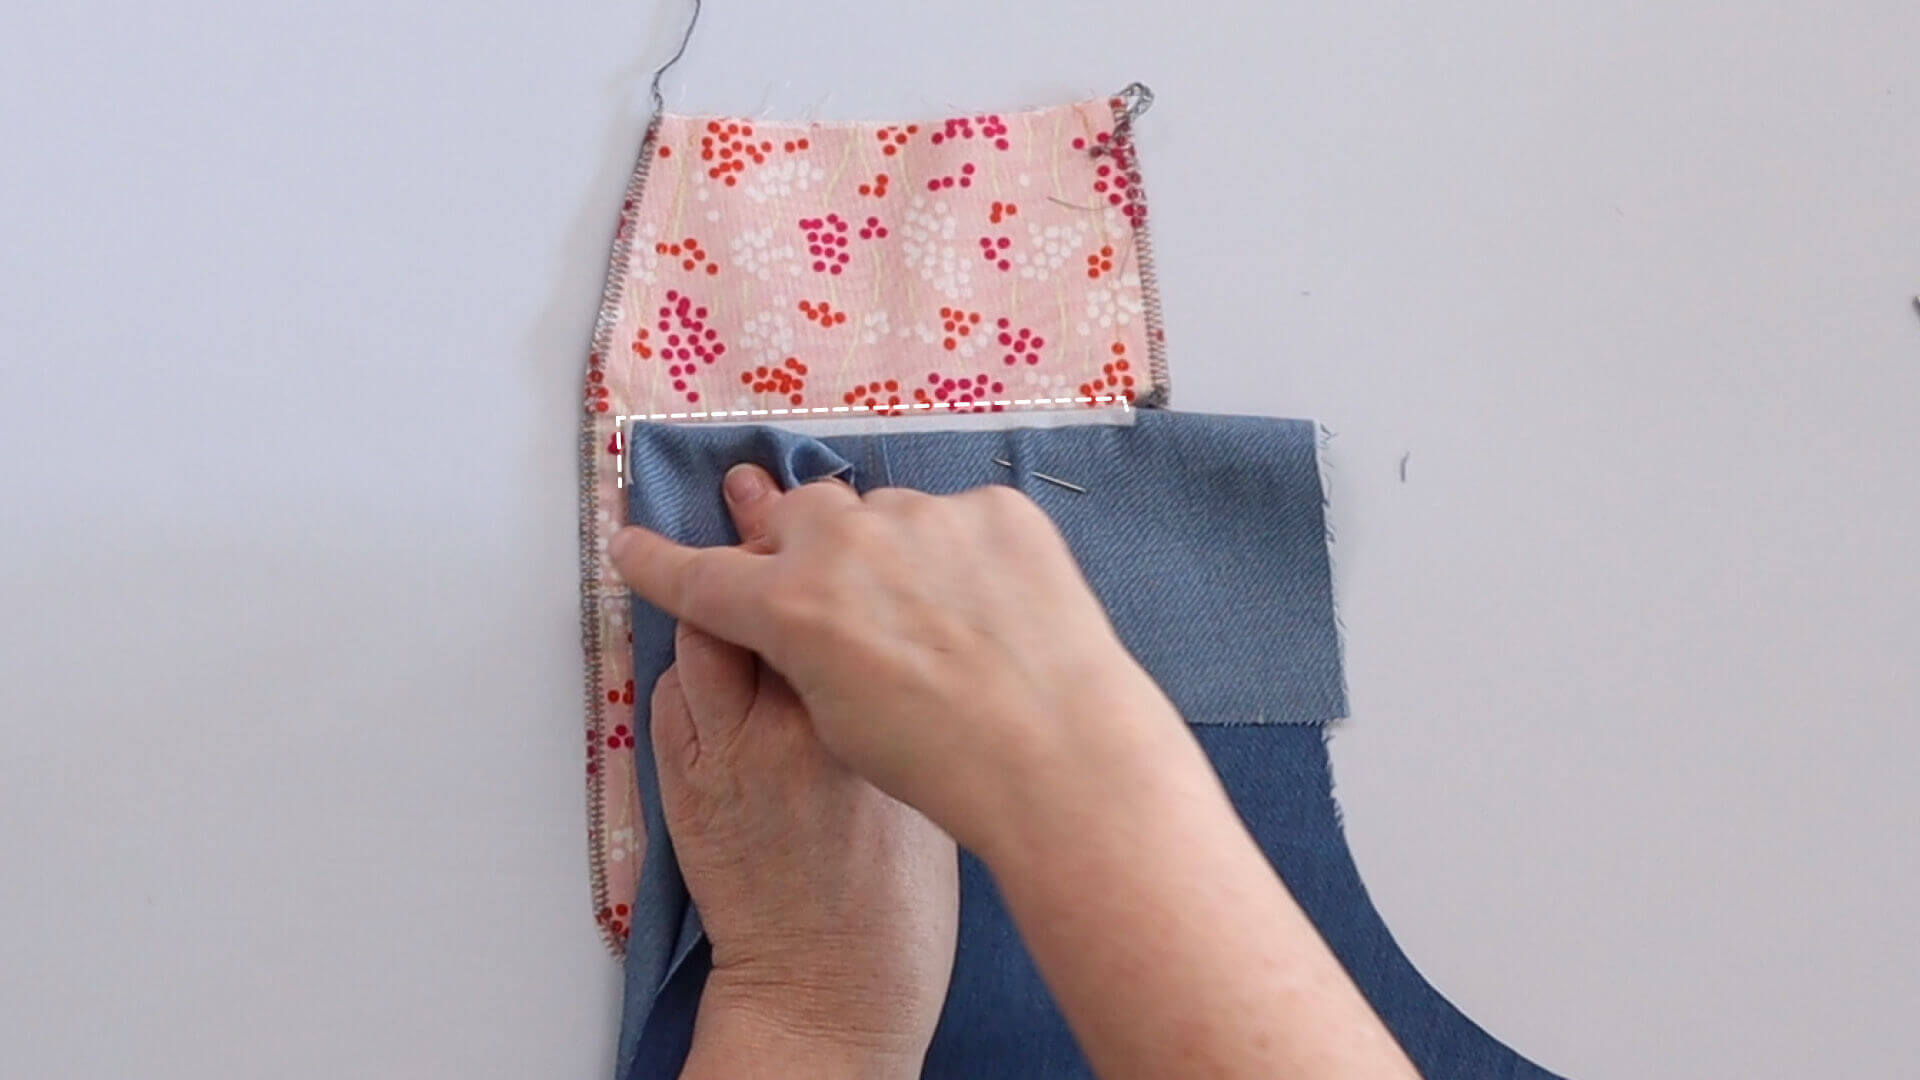
For the version without visible topstitching on the top edge, fold the fabric down above the opening and pin it in place. Now topstitch through the sides and top of the pocket bag on the upper pocket bag directly behind the attachment seam, so that you can only grap downwards into the double welt pockets.
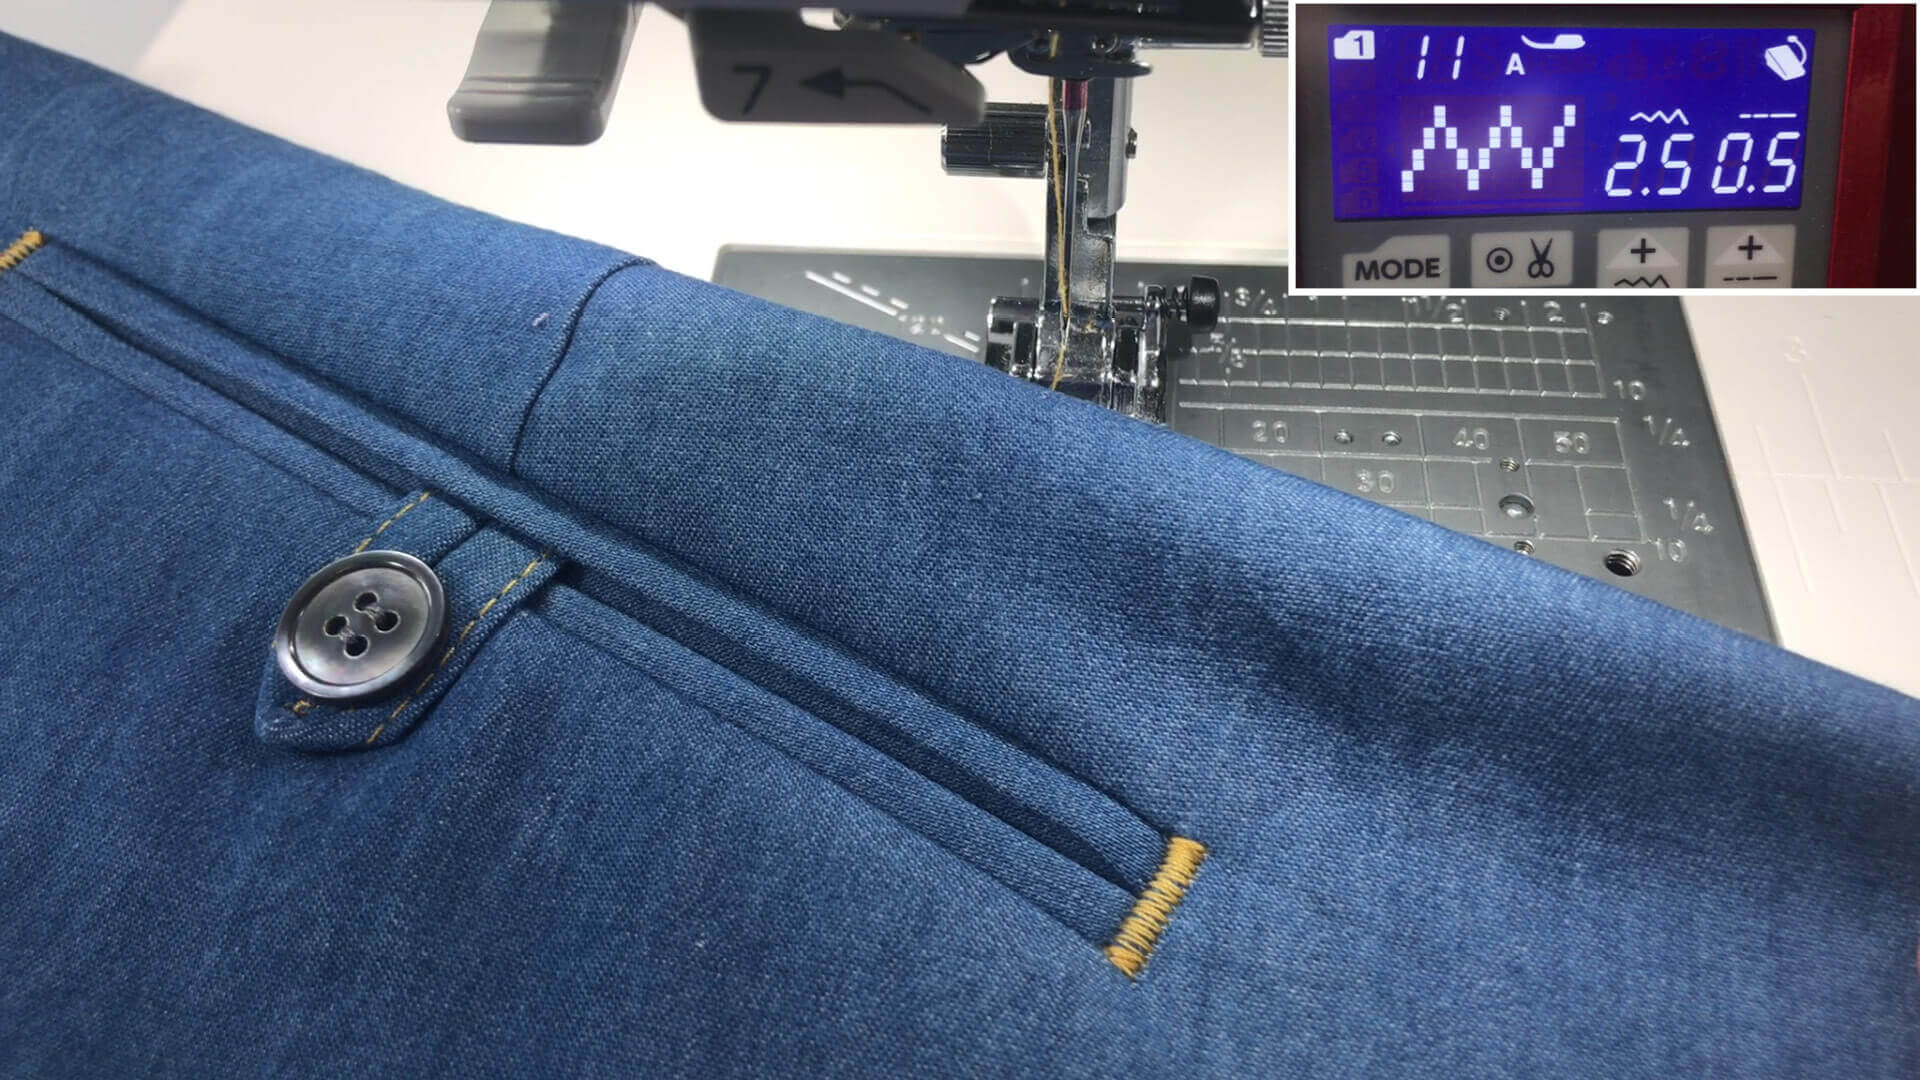
For the design with the side bartacks, I recommend trying it out on a piece of fabric first. In this example, I have used a narrow zigzag stitch with a stitch width of 2.5 mm and a stitch length of 0.5 mm.
14. Sew pocket bag to waistband edge
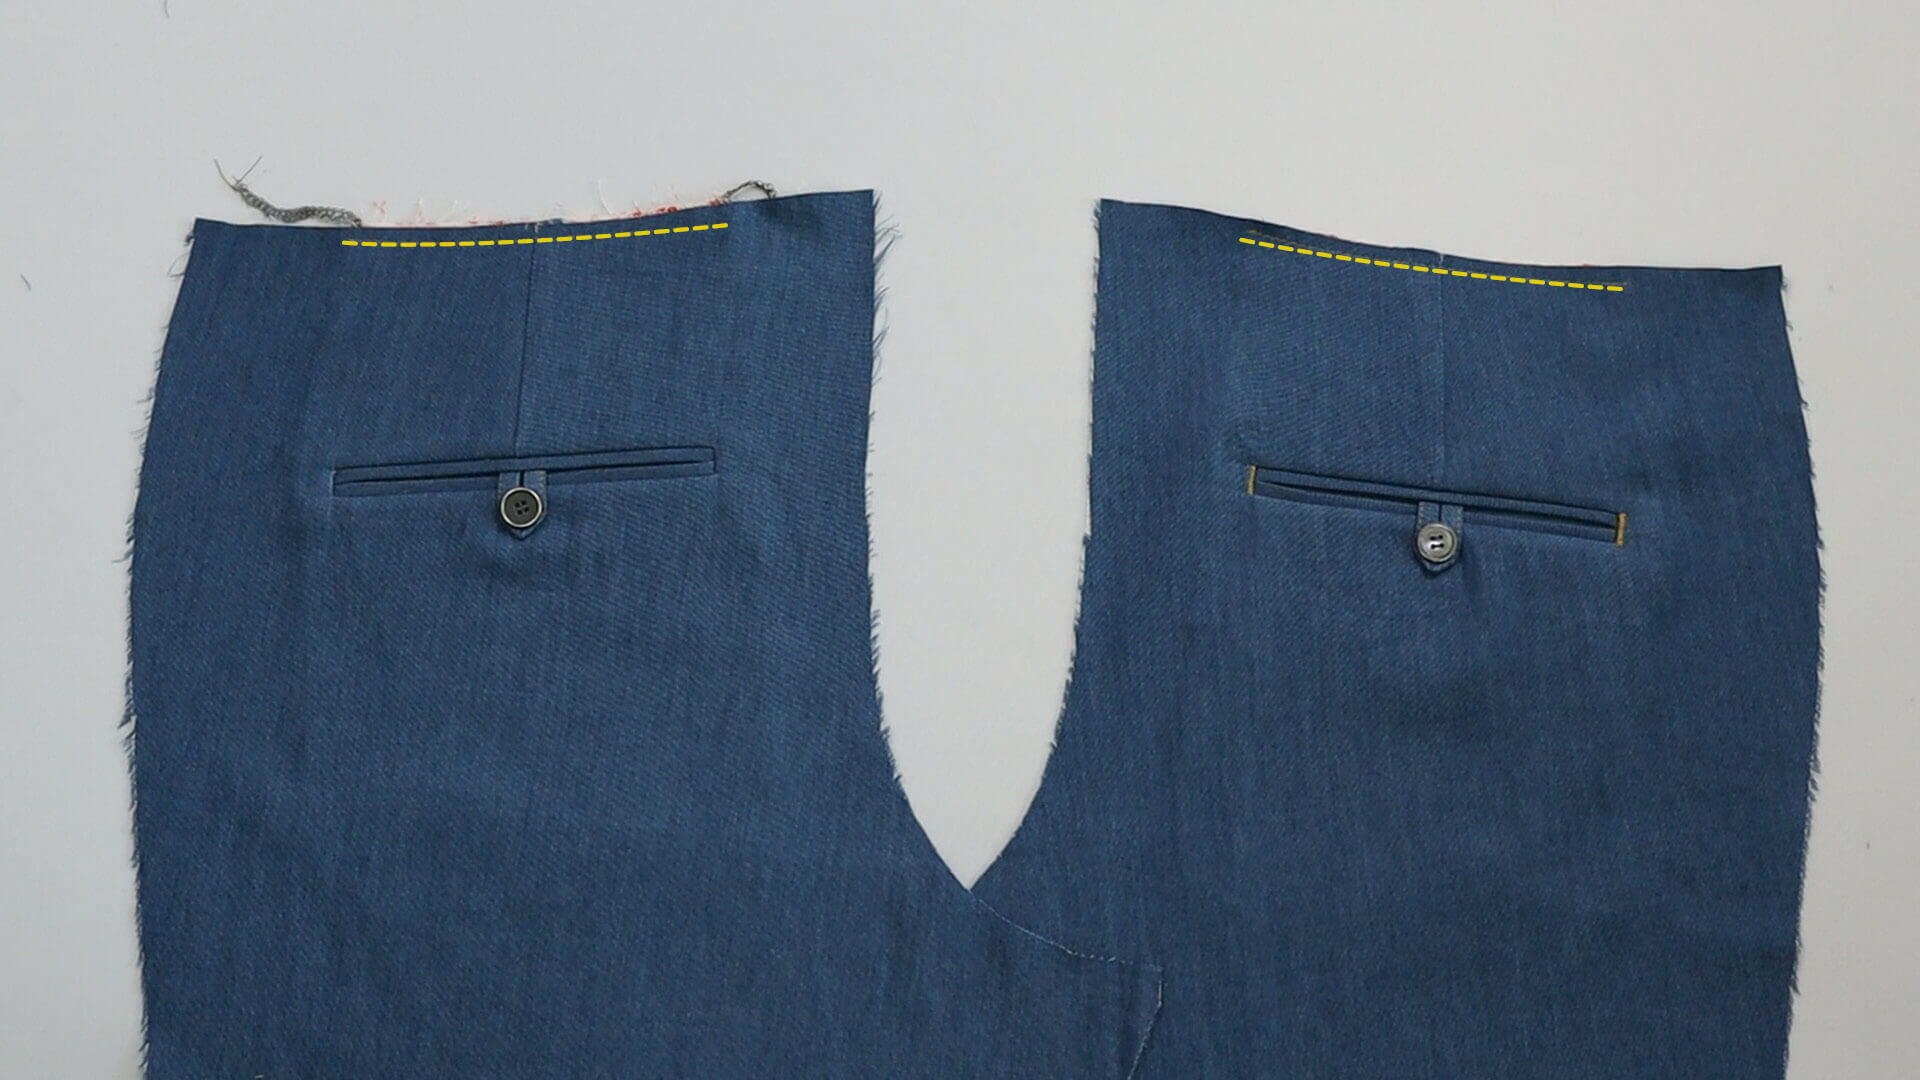
Finally, the pocket bag is sewn to the waistband edge with an auxiliary seam at 5 mm seam allowance. Your double welt pockets are finished and you can continue with the next step.
Here is a selection of links to further steps:
If you’re not quite ready yet and perhaps want to start from scratch, you’ll find some links here:


