Loading cart contents...


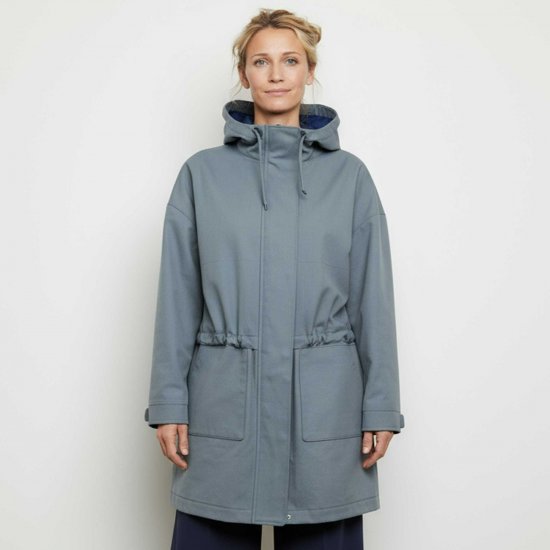
We’re delighted that you’re interested in the smartPATTERN Jacket with hood JM01 pattern or that you’ve perhaps already purchased it as a paper or PDF pattern!
The hooded jacket is part of the first collection with a heart. A little more about this below…
In this guide, you will find all the information you need to create your new hooded jacket step by step.
Take a look at our FAQ – there you will find answers to many questions, tips on buying fabrics and accessories, etc.
If your questions are not answered there or you have feedback for us, please send us an e-mail to hallo@smartpattern.de.
Note for customers outside the EU, GB and CH
For tax reasons, we do not sell the patterns in our online store to all countries outside the EU, Great Britain and Switzerland. You can find a list of which countries are activated in the online store here. We are happy when customers from other countries visit our Etsy store.
The collection with a heart…
… is a joint project by designer Carolin Behrens (formerly Hugo Boss), great pattern labels and the sewing community.
From the 01.11. until 31.12.2025 we are jointly making 12 exclusive women’s patterns available free of charge. We want to show how much creativity and solidarity there is in our community – and do good at the same time.
How you can take part
- Sewing – Realize your project.
- Share – Post your result on social media, blogs or with friends. On the website you will find banners, badges & logos.
- Make it visible – The more people know about it, the greater the impact.
- Donations (voluntary) – 100% of all contributions go to SOS Children’s Villages, securely and transparently via betterplace.org.
Every donation, no matter how small, helps to support disadvantaged children and families.
Why the instructions are only available online
We have deliberately decided to make our instructions available online only. This saves a lot of paper, because not everyone wants to use printed instructions. You can also zoom in if you can’t see something straight away or the font is too small. Of course, you can also print out the individual instructions if you wish. To do this, use the corresponding print options in your internet browser. In many browsers, it is also possible to save the respective page so that it is available offline. This means you don’t always need an internet connection while you’re sewing and you can still save yourself the trouble of printing out on paper.
Sizes and measurements
Size selection
Choose your size based on your chest measurement. If you are between two sizes, you can choose the smaller one. The jacket has an oversized fit, so it is cut very generously. Use the finished measurements in the table below as a guide and compare them with the measurements of an existing, well-fitting jacket if necessary.
If you are significantly larger or smaller than indicated in the body measurement chart and/or your arm length differs, you may need to adjust the length of the pattern. The best way to do this is to cut the pattern pieces of the front and back below the bust dart at a right angle (90°) to the grain – in the case of the sleeves, approximately in the middle of the sleeve – and then pull them apart or slide them over each other. Then match up the side seams. You can find numerous instructions on the internet.
Body measurement chart
You will find a body measurement table here that you can compare with your own measurements. Click on the button for instructions on how to take the right measurements.
All measurements are given in cm! If you want to convert to inches, divide the values by 2.54.
| US Size | 0 | 2 | 4 | 6 | 8 | 10 | 12 | 14 | 16 | 18 | 20 | 22 | |||
|---|---|---|---|---|---|---|---|---|---|---|---|---|---|---|---|
| UK Size | 4 | 6 | 8 | 10 | 12 | 14 | 16 | 18 | 20 | 22 | 24 | 26 | |||
| EU Size | 32 | 34 | 36 | 38 | 40 | 42 | 44 | 46 | 48 | 50 | 52 | 54 | |||
| Body height | 167 | 167 | 168 | 168 | 169 | 169 | 170 | 170 | 171 | 171 | 172 | 172 | |||
| Chest circumference | 79 | 82 | 85 | 88 | 92 | 96 | 100 | 106 | 112 | 118 | 124 | 130 | |||
| Waist circumference | 65 | 68 | 71 | 74 | 78 | 82 | 86 | 93 | 99 | 106 | 112 | 119 | |||
| Hip circumference | 88 | 91 | 94 | 97 | 101 | 105 | 109 | 115 | 120 | 126 | 131 | 137 | |||
| shoulder length to C7 | 17,4 | 17,8 | 18,2 | 18,6 | 19,1 | 19,6 | 20,1 | 20,8 | 21,5 | 22,2 | 22,9 | 23,6 | |||
| Arm length | 59,4 | 59,6 | 59,8 | 60 | 60,2 | 60,4 | 60,6 | 60,8 | 61 | 61,2 | 61,4 | 61,6 | |||
| Arm length to C7 | 76,8 | 77,4 | 78 | 78,6 | 79,3 | 80 | 80,7 | 81,6 | 82,5 | 83,4 | 84,3 | 85,2 |
Finished measurement table
We have listed some measurements of the finished jacket with hood in the finished measurements table. So you can easily compare them with the measurements of an existing, well-fitting jacket.
Click on the button to see a sketch showing how the measurements are taken.
All measurements are given in cm! If you want to convert to inches, divide the values by 2.54.
| US Size | 0 | 2 | 4 | 6 | 8 | 10 | 12 | 14 | 16 | 18 | 20 | 22 | |||
|---|---|---|---|---|---|---|---|---|---|---|---|---|---|---|---|
| UK Size | 4 | 6 | 8 | 10 | 12 | 14 | 16 | 18 | 20 | 22 | 24 | 26 | |||
| EU Size | 32 | 34 | 36 | 38 | 40 | 42 | 44 | 46 | 48 | 50 | 52 | 54 | |||
| Back length | 55 | 59 | 59 | 59 | 59 | 62 | 62 | 62 | 65 | 65 | 68 | 69 | |||
| Chest width | 110 | 113 | 116 | 119 | 124 | 128 | 132 | 139 | 145 | 151 | 158 | 164 | |||
| Hem width | 121 | 126 | 129 | 132 | 136 | 141 | 145 | 151 | 158 | 164 | 171 | 177 | |||
| Sleeve length to CB neck | 79,3 | 80 | 80,5 | 81,1 | 81,9 | 82,6 | 83,3 | 84,2 | 85,1 | 86 | 86,9 | 87,8 |
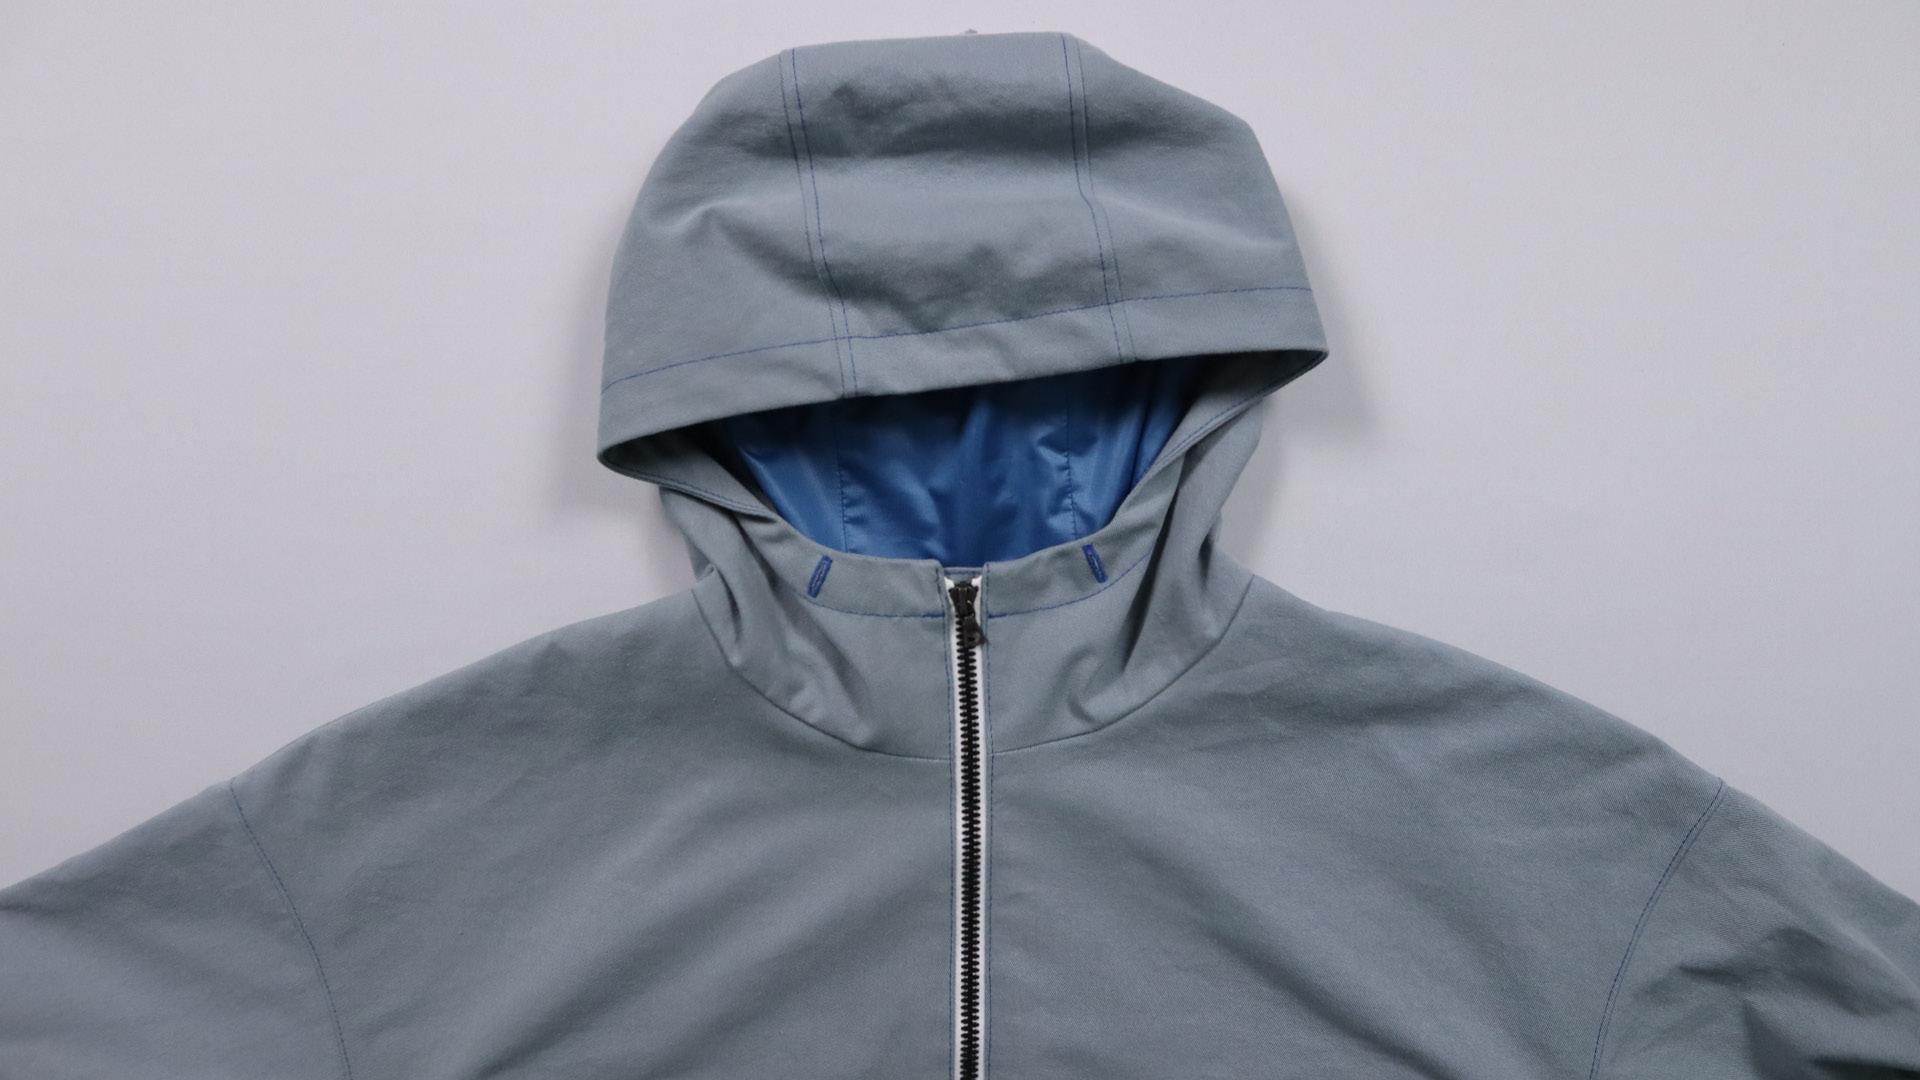
Product description
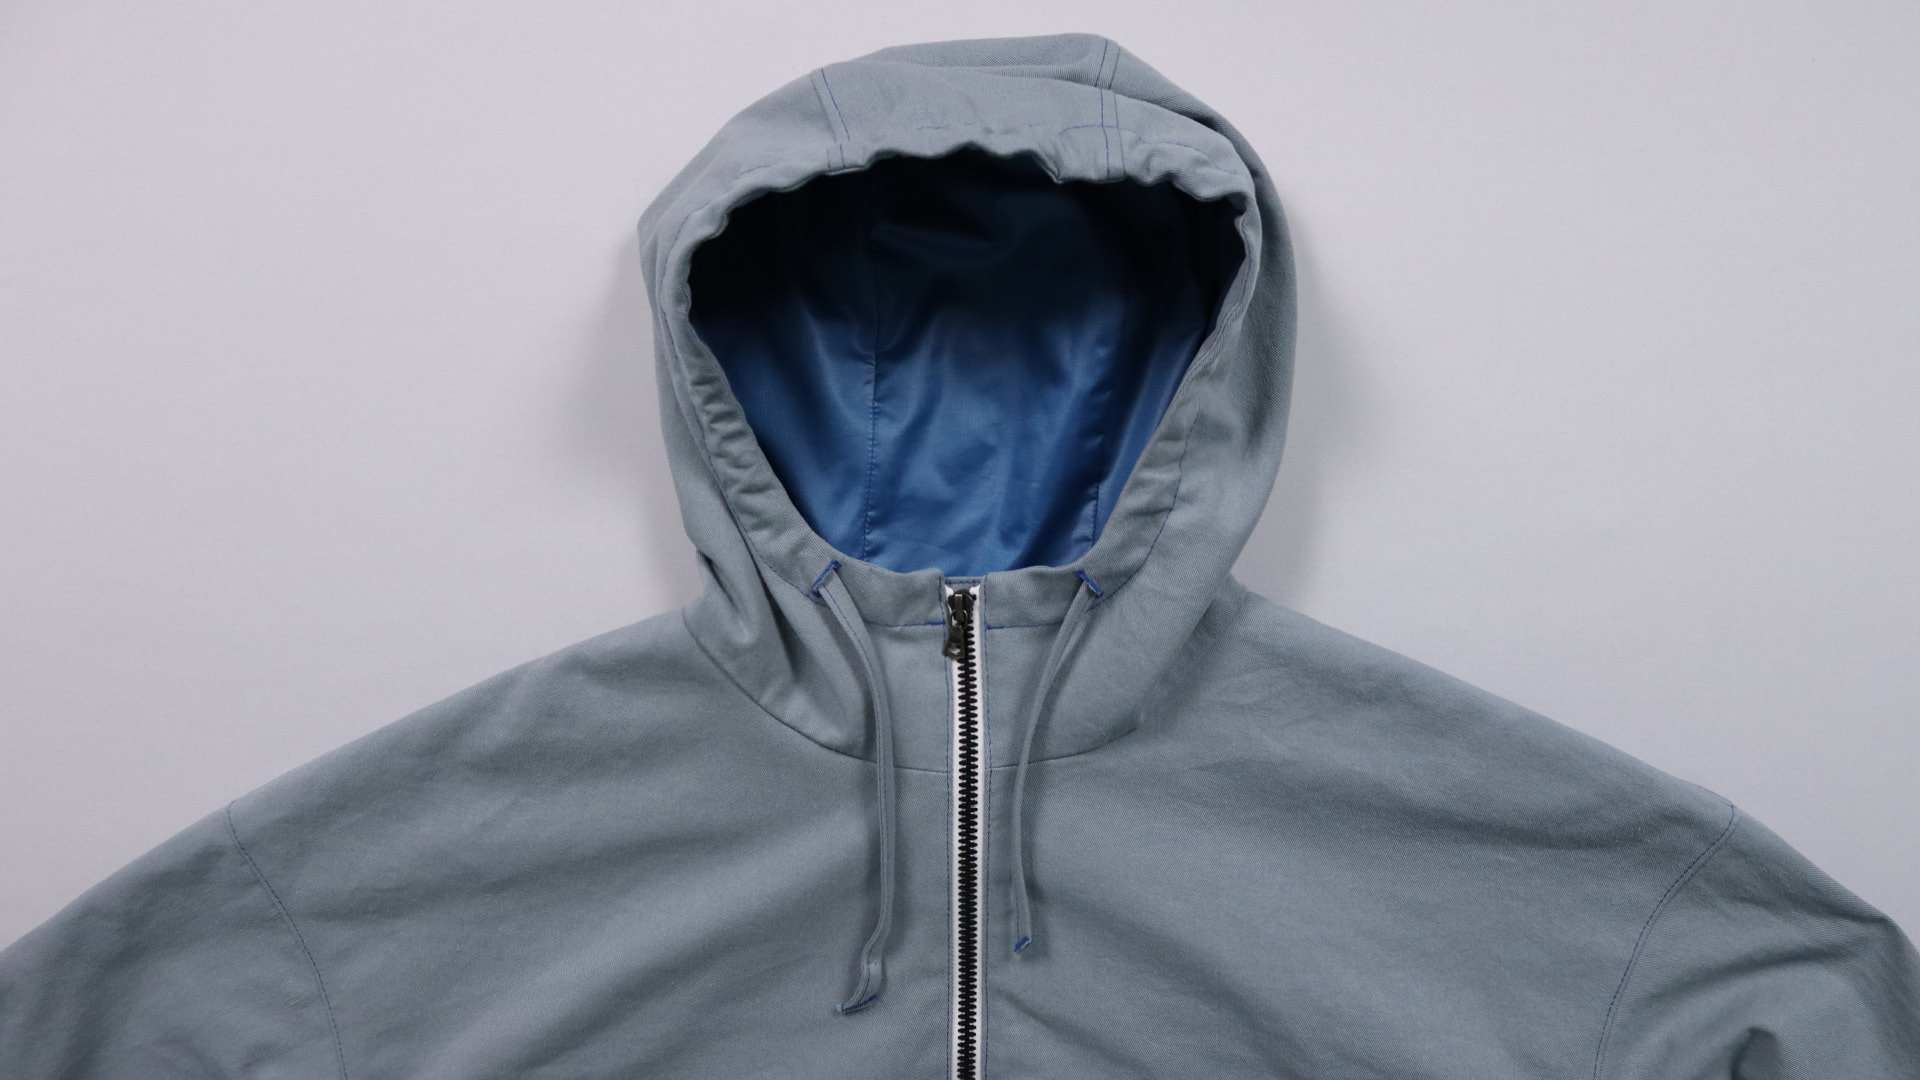
The jacket with hood has a very oversized cut. It’s hem is gathered with an elastic band sewn on the inside, which gives the jacket great volume.
The front features bust darts and large patch pockets and the width of the sleeve hems can be adjusted using the tab and buttons.
The inside of the jacket with hood is fully lined. There are separate pattern pieces for the lining.
Pattern and instructions are made for many different fabrics, e.g. denim, twill, corduroy, …
General information
Seam allowances
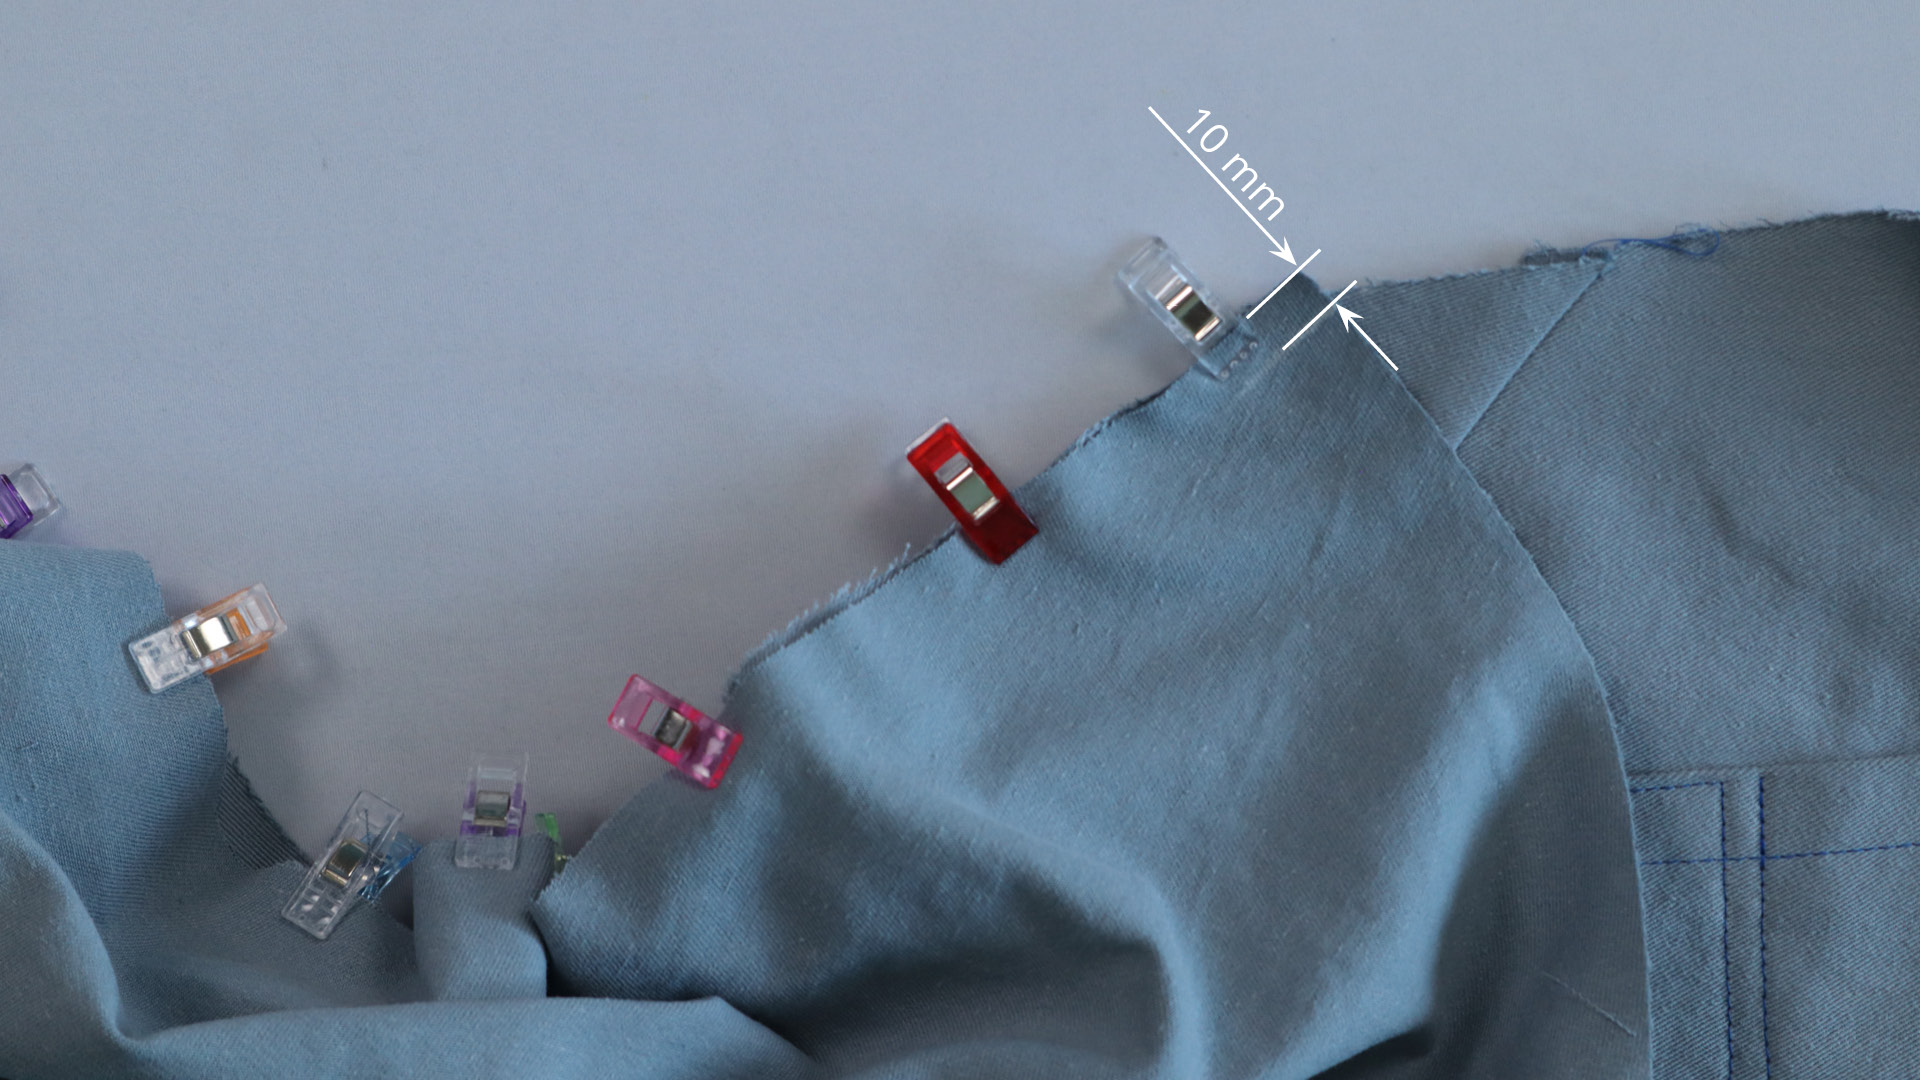
Our patterns already include all seam allowances. The standard seam width is 10 mm. We use wider seam allowances on some seams; these are marked with a notch at the beginning and end of the seam.
The seam lines are also visible in the paper pattern for the smallest size. You can determine the width of the seam allowances by measuring the distance between the seam line and the cutting line. The seam allowances are the same for all sizes.
If you have bought or would like to buy the pattern as a PDF file, please take a look at these instructions. There we explain how you can show and hide the seam and cutting lines for individual sizes in the PDF file.
Scope of delivery of the PDF pattern
You will receive the following files:
- The pattern as a PDF file in A4 format (also works for letter)
- The pattern as a PDF file in A0 format (the width of the pattern is A0 format, but can be longer – depending on how much space is required for the pattern pieces).
You will receive the pattern in two formats and can decide for yourself whether you want to print out the A4 file at home, glue it together and get started straight away. If you don’t feel like gluing, you can give the A0 file to a copy store or an online print shop and have a large pattern sheet created for you. Please note the additional printing and shipping costs of the respective provider.
You can open the PDF files with the free Adobe Reader.
Abbreviations
We use these abbreviations in our patterns:
VM | CF = center front
HM | CB = center back
RV | Zip = zipper
SN = side seam
Fabrics and materials
You will need the following materials to sew the jacket with hood. You can find out how much fabric you need for your size and how long the zipper needs to be in the table below.
- Outer fabric: woven fabric, preferably without elastane, e.g. cotton, linen, corduroy, denim, twill
- Lining fabric
- Fusible interfacing, e.g. Vlieseline G 405
- Edge tape 2 cm wide, e.g. Vlieseline T20
- Bias tape, 1.2 cm wide, e.g. Vlieseline T12
- Zipper, length see table
- 4 buttons for the sleeve tab
- cord for the hood if you don’t want to sew the ribbon yourself
- 5 mm wide, flat elastic tape
- Yarn matching your materials
![]() We generally recommend that you wash the fabric before sewing to prevent your finished jacket with hood from shrinking later on. Therefore, wash the fabric in exactly the same way (temperature, spin cycle, etc.) as you will wash the finished garment later and follow the manufacturer’s instructions.
We generally recommend that you wash the fabric before sewing to prevent your finished jacket with hood from shrinking later on. Therefore, wash the fabric in exactly the same way (temperature, spin cycle, etc.) as you will wash the finished garment later and follow the manufacturer’s instructions.
Take any shrinkage into account when purchasing the fabric! Unless otherwise stated for the respective fabric, assume an addition of 10 %, which should normally be sufficient.
To prevent or reduce bleeding on colored fabrics, you can add a dash of vinegar to the washing machine or water.
The following length specifications per size refer to the usable material width specified in the left-hand column, assuming that the fabric is plain-colored. If you choose a patterned fabric, you may need more fabric depending on the size of the pattern.
| US Size | 0 | 2 | 4 | 6 | 8 | 10 | 12 | 14 | 16 | 18 | 20 | 22 | |||
|---|---|---|---|---|---|---|---|---|---|---|---|---|---|---|---|
| UK Size | 4 | 6 | 8 | 10 | 12 | 14 | 16 | 18 | 20 | 22 | 24 | 26 | |||
| EU Size | 32 | 34 | 36 | 38 | 40 | 42 | 44 | 46 | 48 | 50 | 52 | 54 | |||
| Main fabric, 140 cm width | 166 | 179 | 180 | 187 | 187 | 202 | 206 | 211 | 223 | 228 | 246 | 251 | |||
| Pocket lining, 140 cm width | 127 | 127 | 131 | 131 | 141 | 141 | 161 | 161 | 182 | 182 | 192 | 192 | |||
| Interfacing, 90 cm width | 16 | 16 | 17 | 17 | 18 | 18 | 20 | 20 | 20 | 20 | 21 | 21 | |||
| Zipper length | 55 | 60 | 60 | 60 | 60 | 65 | 65 | 65 | 70 | 70 | 75 | 75 | |||
| Elastic band cut length | 71 | 74 | 77 | 80 | 84 | 88 | 92 | 98 | 103 | 109 | 114 | 120 |
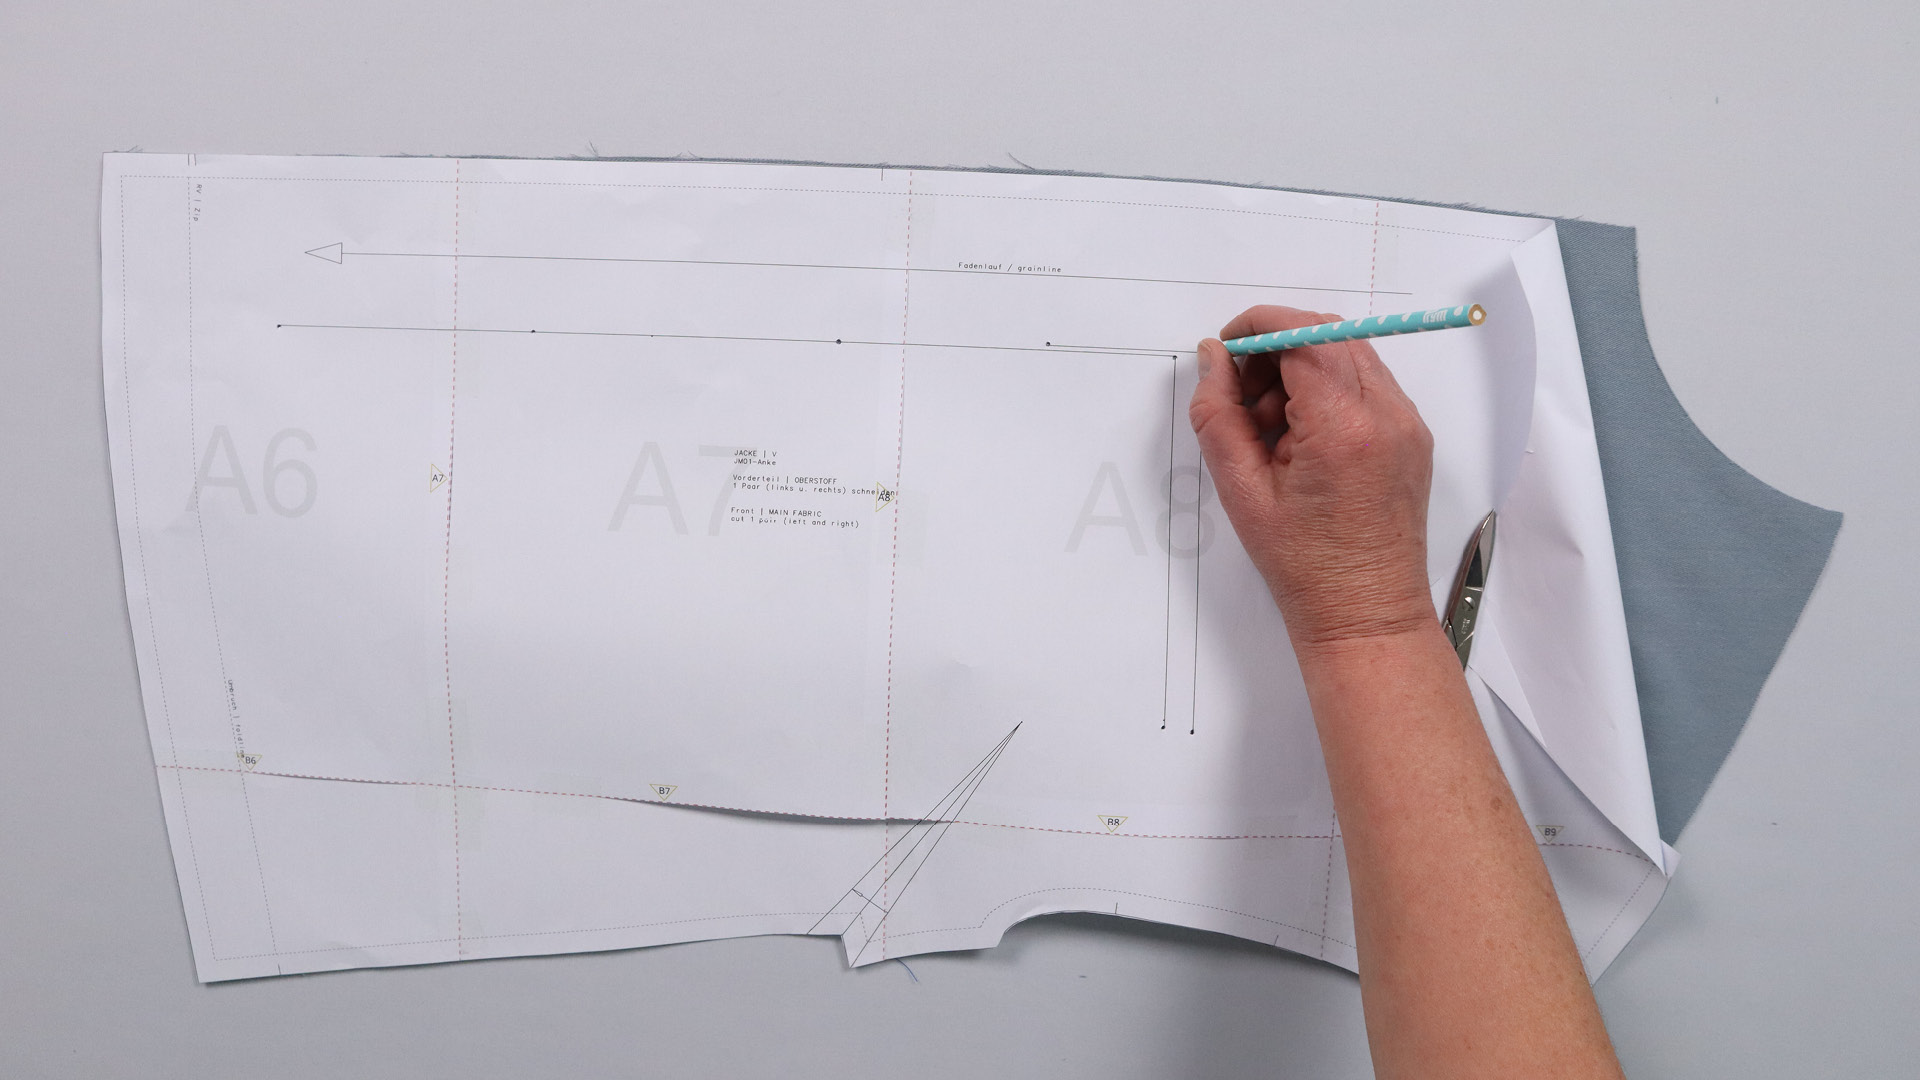
Print the pattern and prepare it for cutting
You can find out how to prepare your pattern for cutting in the instructions Preparing patterns in ready-made sizes. The first part explains how layer printing works for A4 and A0 files. If you have already printed out your pattern, you can start directly at point 7. This is about cutting out and sorting the pattern pieces.


Here you can see an example of the labeling of a smartPATTERN pattern piece.

In the legend of your pattern sheet, you can see which line type (=cutting edge) you have to follow when cutting out your chosen clothing size.
Cutting
Below you will find some example cutting plans based on the fabric widths given in the material consumption table. If you are using a fabric that is narrower, you will most likely need more fabric and will have to arrange the pattern pieces differently. If your fabric is wider, you may need less length.
You can arrange the pattern pieces in advance on a large table or the floor, on which you mark your fabric width, to find out exactly what length of fabric you need. Remember to take into account any shrinkage values of the fabric!
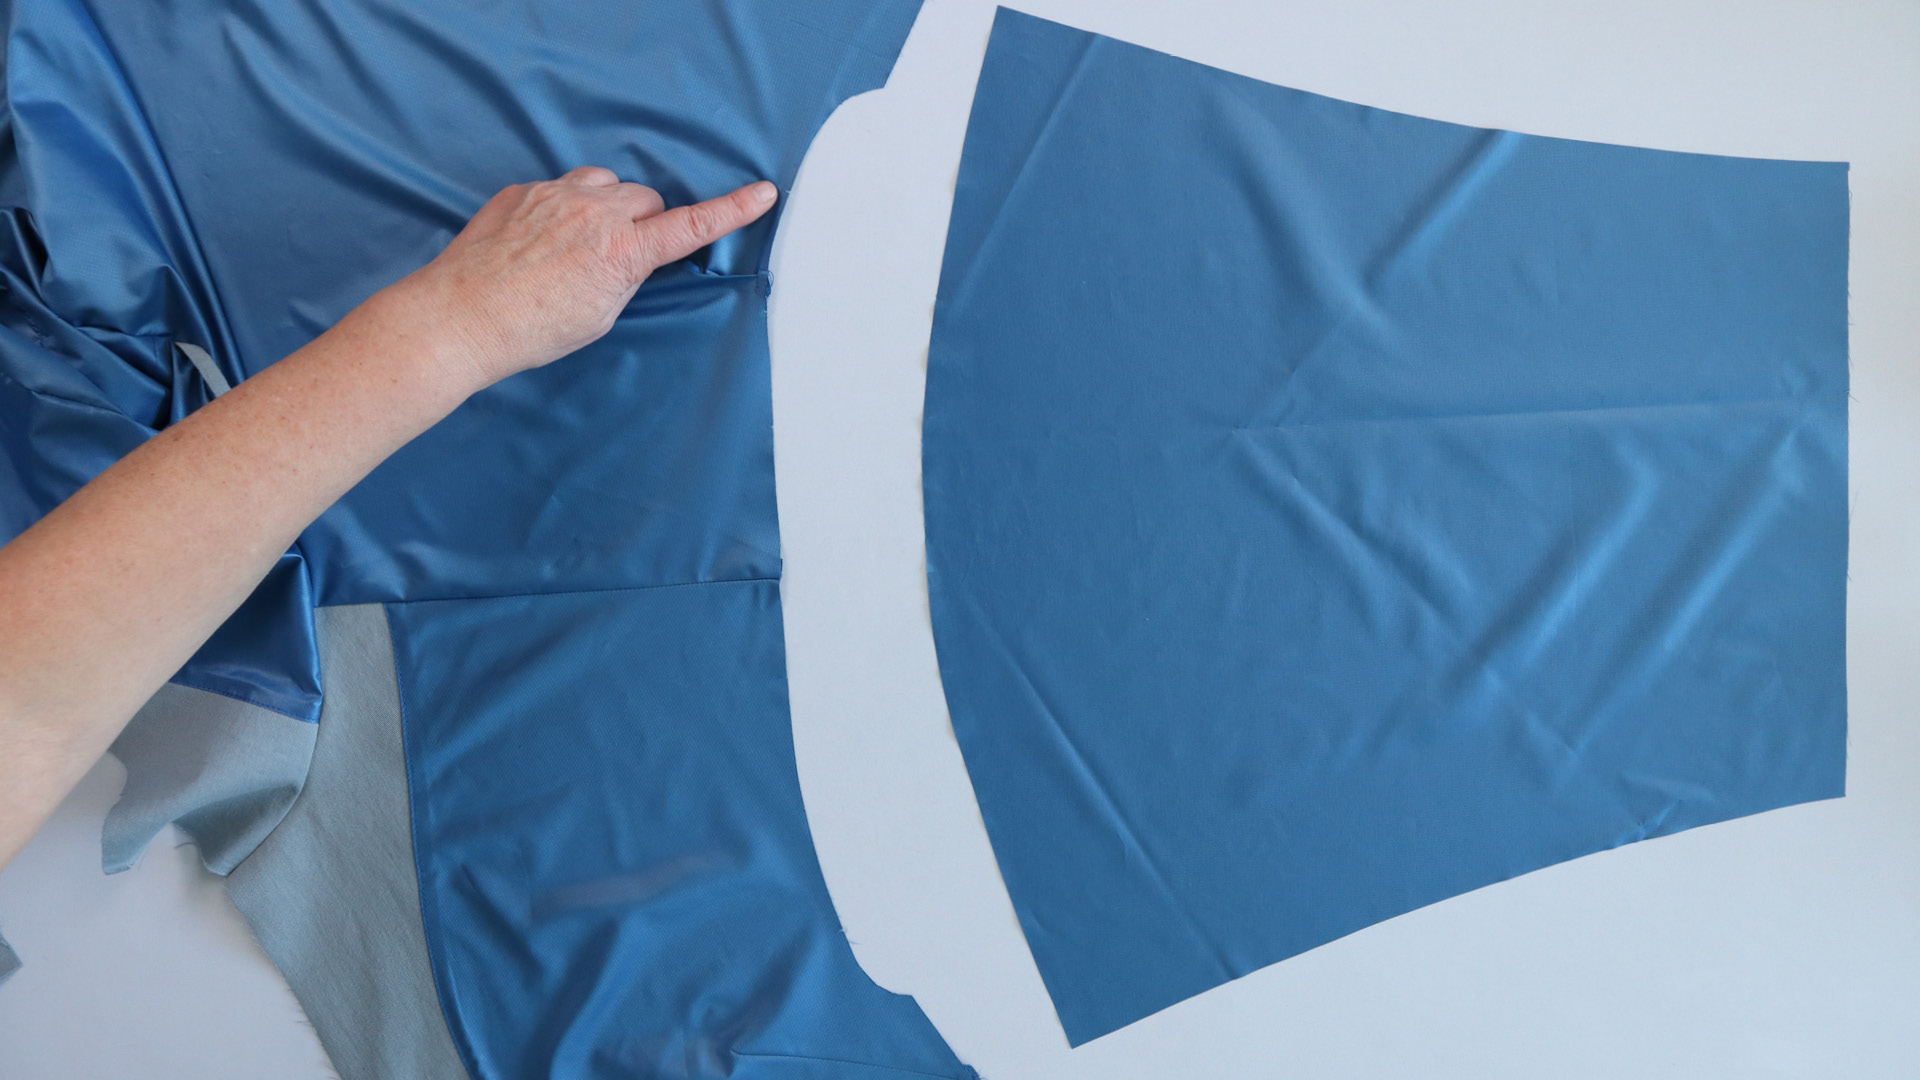
The pattern pieces are placed on the open or folded fabric. The right side of the fabric, or in the case of the iron-on interfacing, the side without the adhesive dots, should be facing upwards. You can see from the labeling on the pattern piece whether you need to cut a pattern piece individually or twice (as a pair or in reverse). You can find more information on this in the instructions for cutting fabrics and materials.

Cutting plans
Main fabric – size 38

Main fabric – size 46

Main fabric – size 54

Lining – size 38

Lining – size 46

Lining – size 54

Interfacing – size 38

Interfacing – size 46

Interfacing- size 54

Sewing instructions
Once you have gathered all the necessary materials, prepared them, and cut out the hooded jacket, you’re ready to get started! For a better overview, I will first show you a sketch of the jacket as well as overviews of the necessary pattern pieces and accessories. Then I will explain step by step how to sew the jacket.


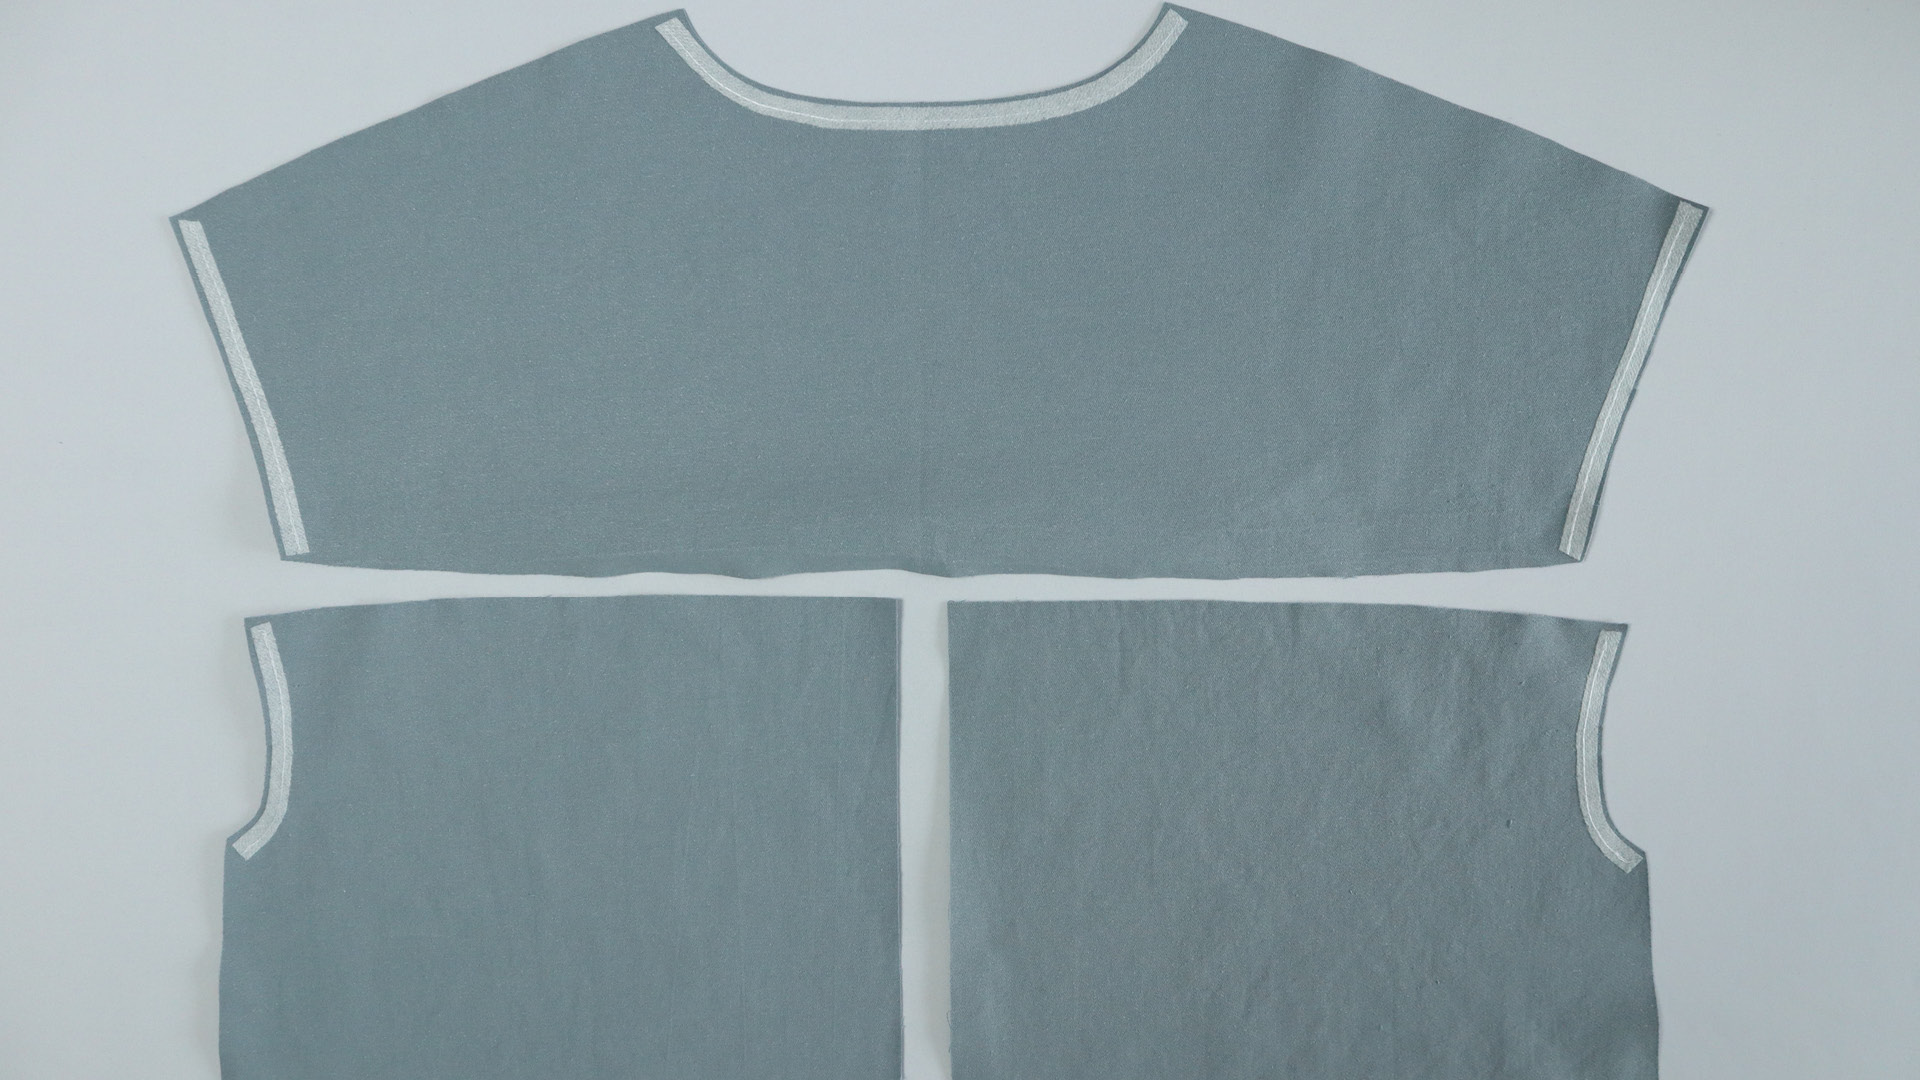
Here you can see which pattern pieces are needed for the jacket with hood.
from outer fabric:
sleeves (A) – 1 pair
hood facing (KAB) – 1 on fold
hood (KA) – 1 pair
hood center (KAM) – 1 on fold
underlap left (VDL) – 1 pair
front facing (VB) – 1 pair
front (V) – 1 pair
back yoke (RP) – 1 on fold
back (R) – 1 pair
pocket flap (TP) – 1 pair
patch pocket (TA) – 1 pair
sleeve tab (LA) – 2 pairs
made of paper:
ready sleeve tab (P_LA)
ready patch pocket (P_TA)
made from lining fabric:
sleeves (FA) – 1 pair
hood (FKA) – 1 pair
front (FV) – 1 pair
back (FR) – 1 on fold
hood center (FKAM) – 1 on fold
from interfacing:
pocket flap (TP) – 1 pair
patch pocket (ETA) – 1 pair
sleeve tab (LA) – 1 pair
sleeve hem (EAS) – 1 pair
Additionally, if you have chosen a light or very stretchy fabric:
front facing (VB) – 1 pair
hood facing (KAB) – 1 on fold
underlap left (VDL) – 1 x

Tools and accessories:
bias tape, 12 mm wide, e.g. Vlieseline T12
edge tape, 20 mm wide, e.g. Vlieseline T20
elastic band, 5 mm wide, length see chart
safety pin
4 buttons for the sleeve tabs
zipper, length see chart
hand measure or ruler
scissors
pins or clips
sewing thread and hand sewing needle if necessary
General information
Generally, the seam allowances do not need to be finished as the jacket is fully lined. If you are using heavily frayed fabrics, I recommend neatening all raw edges during sewing.
In addition to the pre-cut pattern pieces, you will also need the following:
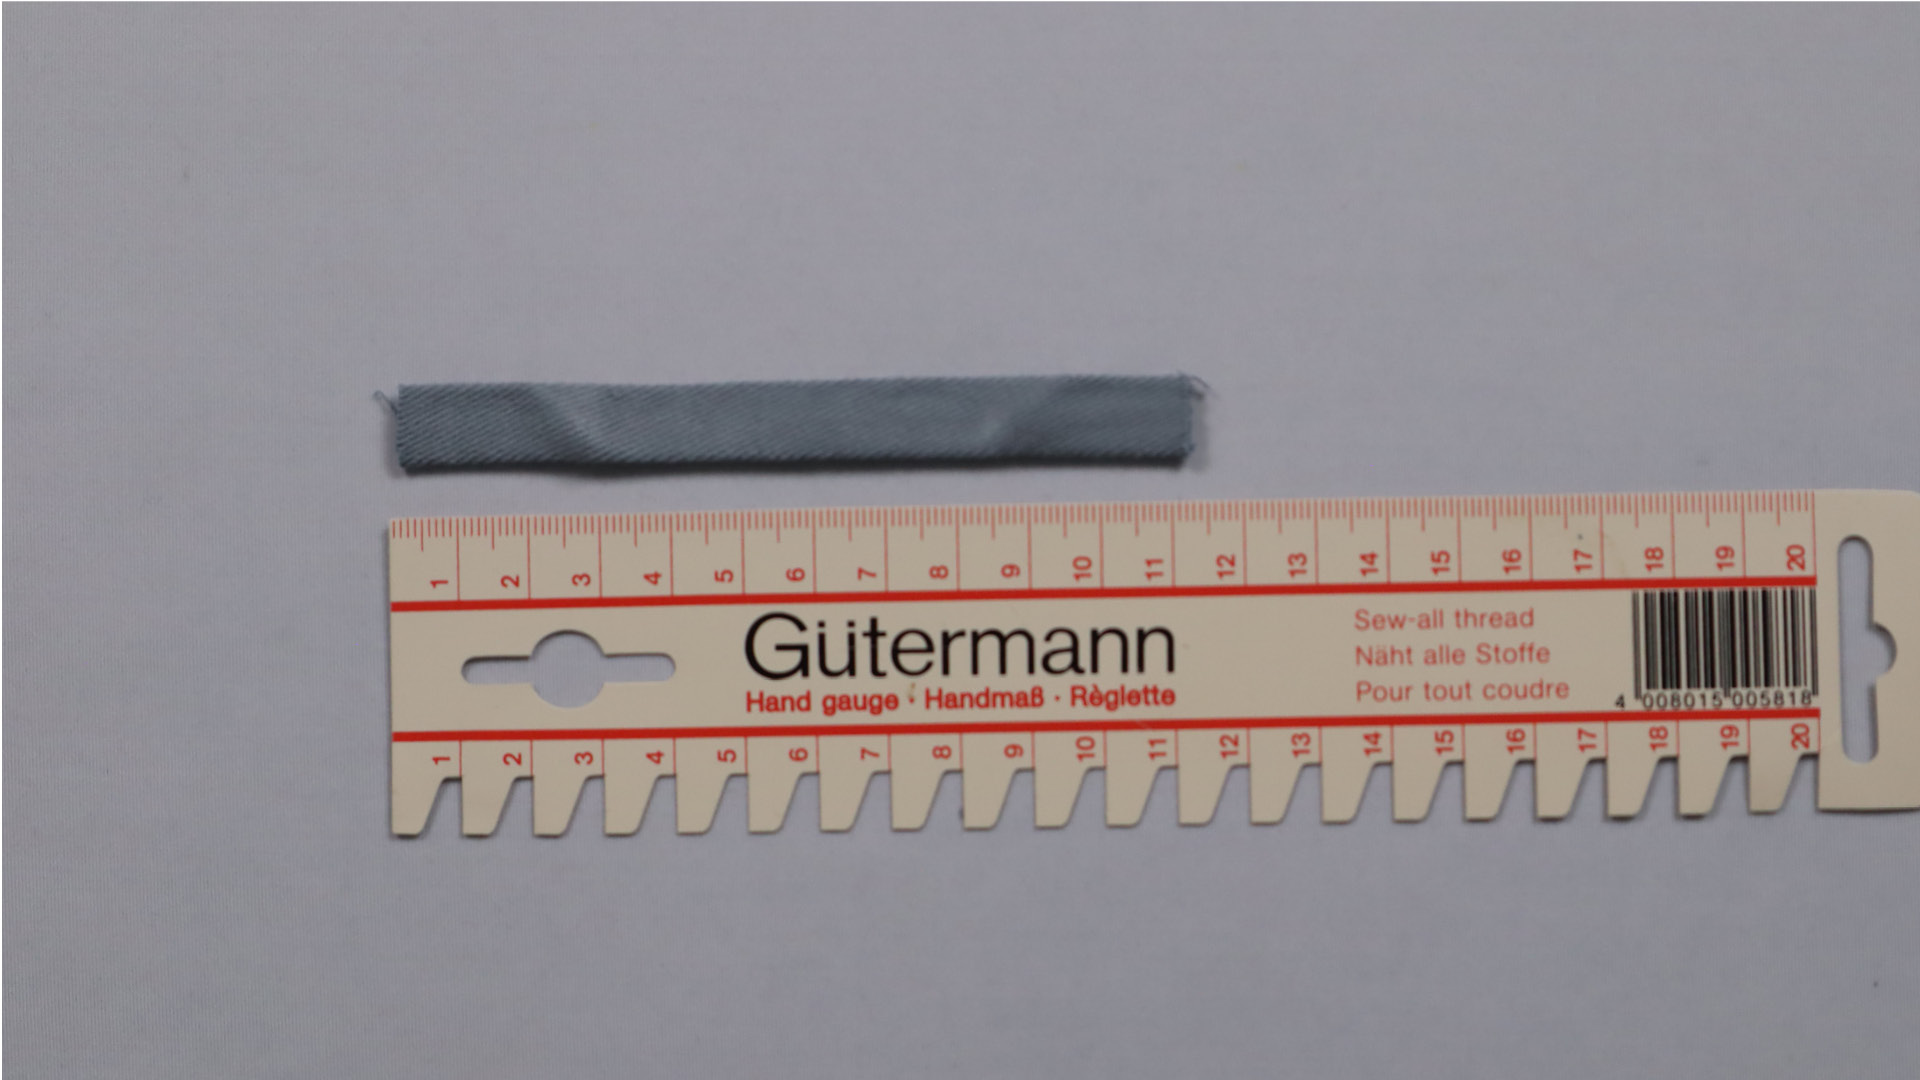
- 6 diagonal strips of lining, each 7 x 1.5 cm, to join the main fabric and lining; alternatively, you can also use a thin satin ribbon or similar
- 1 strip for the hanger made of main fabric, 3 x 15 cm; alternatively a ready-made ribbon
- 8 circles of main fabric, approx. 3 cm in diameter, to secure the pocket openings
- 2 strips of interlining, 3 x 2 cm, to fix the buttonholes on the hood
I describe how to iron on the interfacing in the individual sewing steps. Of course, you can also iron the interfacing onto all parts of your jacket with hood at the beginning:
- upper pocket opening (pattern pieces TA and ETA)
- side pocket opening of pattern piece TA with edge tape
- pocket flap (TP) – with very strong fabrics, it is sufficient to fix only the later outer side
- sleeve hem (pattern pieces A and EAS)
- the places on the hood where the buttonholes are to be worked in (see markings in the pattern)
- the outside of each sleeve tab
- on front pieces made from main fabric (pattern piece V): neckline, shoulders and armhole with bias tape
- on the back made of main fabric (pattern piece R): neckline and armhole with bias tape
- Optional depending on the fabric used
- the upper side of the underflap (VDL)
- hood facing (KAB)
- front facing (VB)
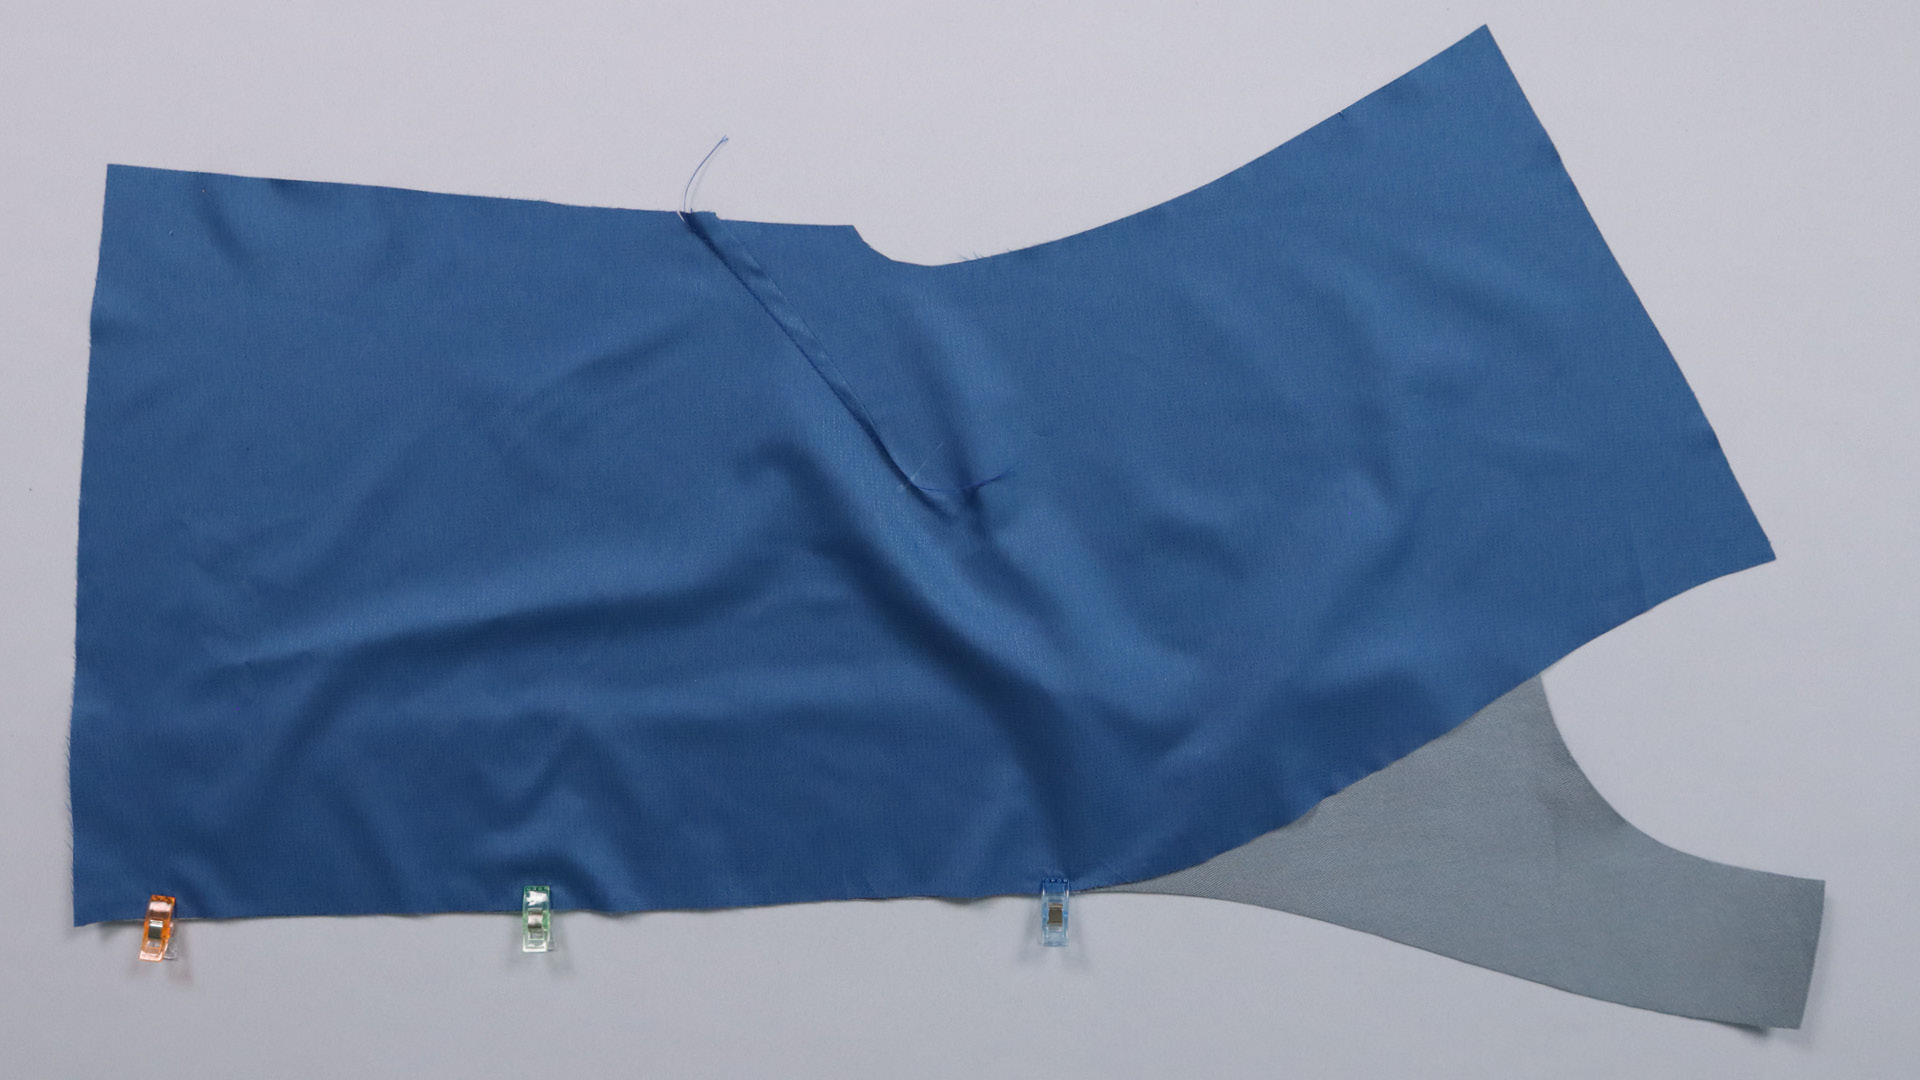
Sew the front part of the jacket with hood
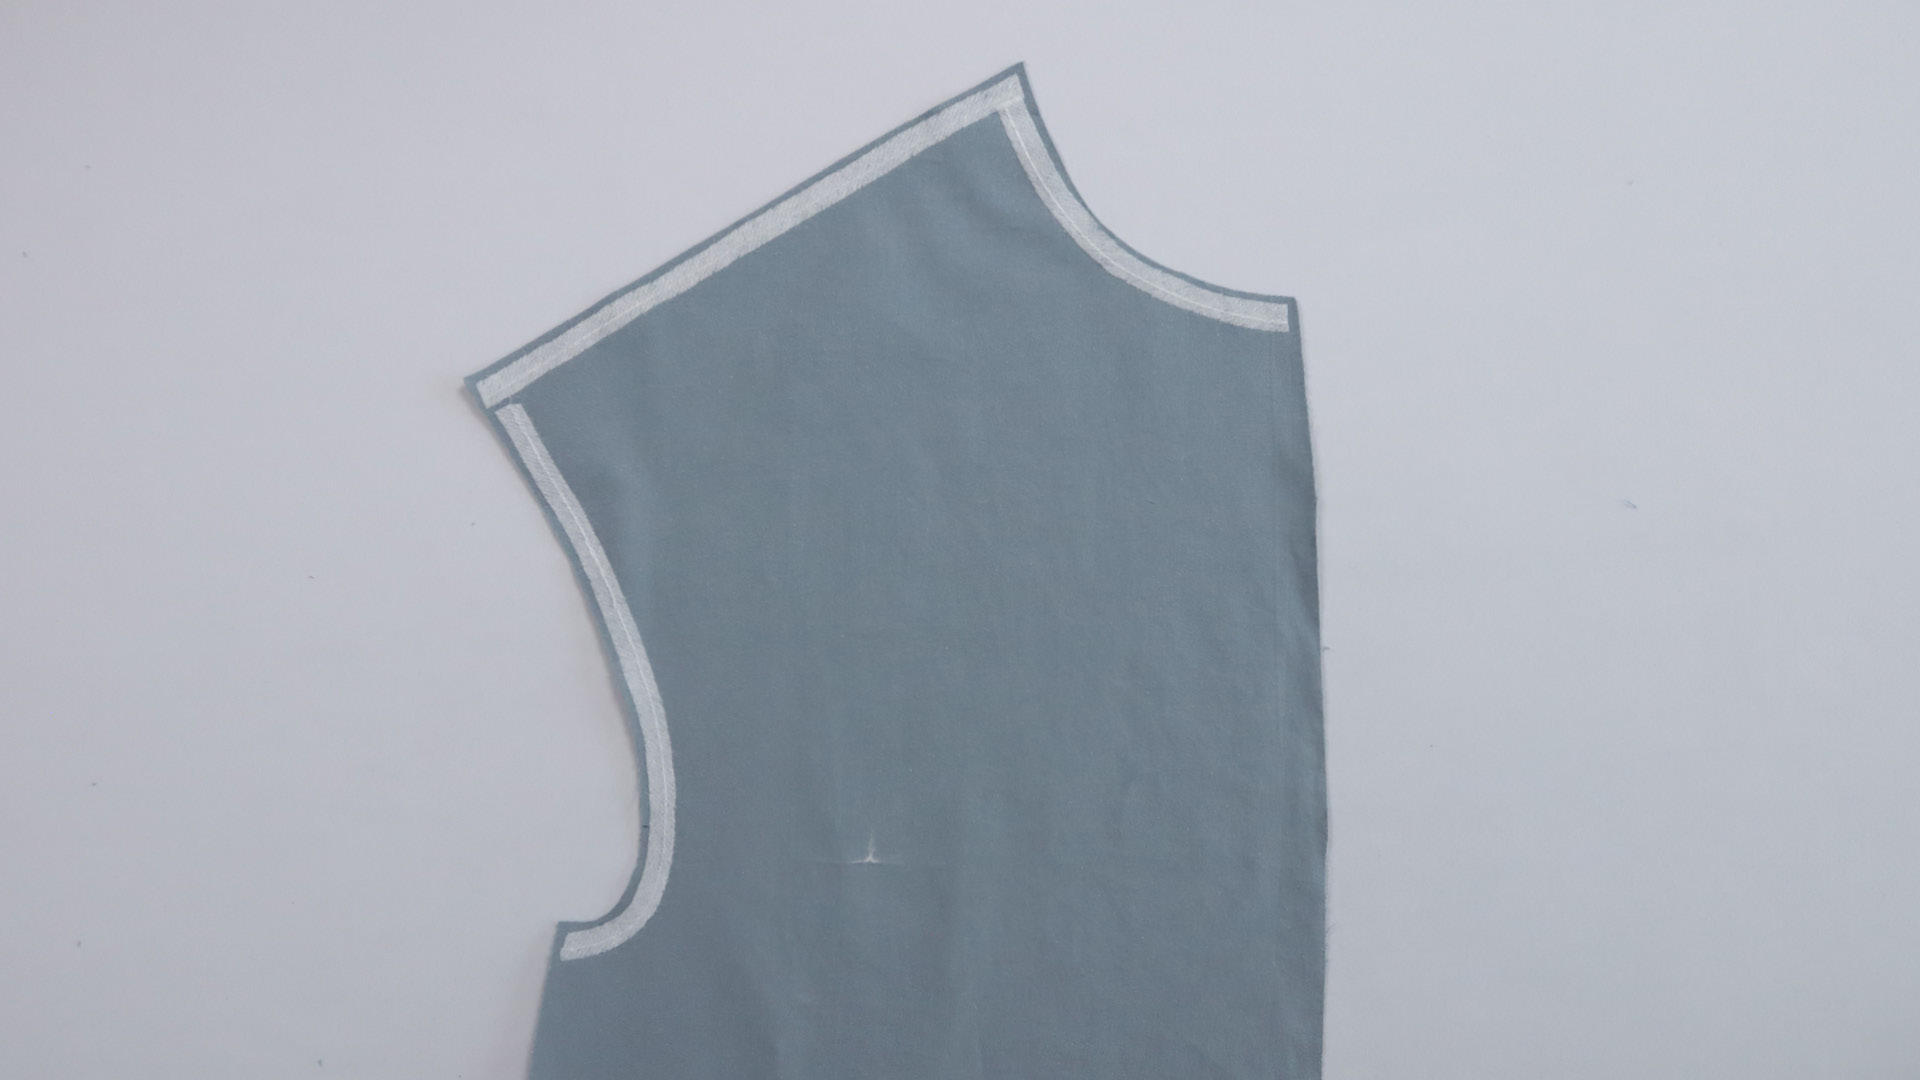
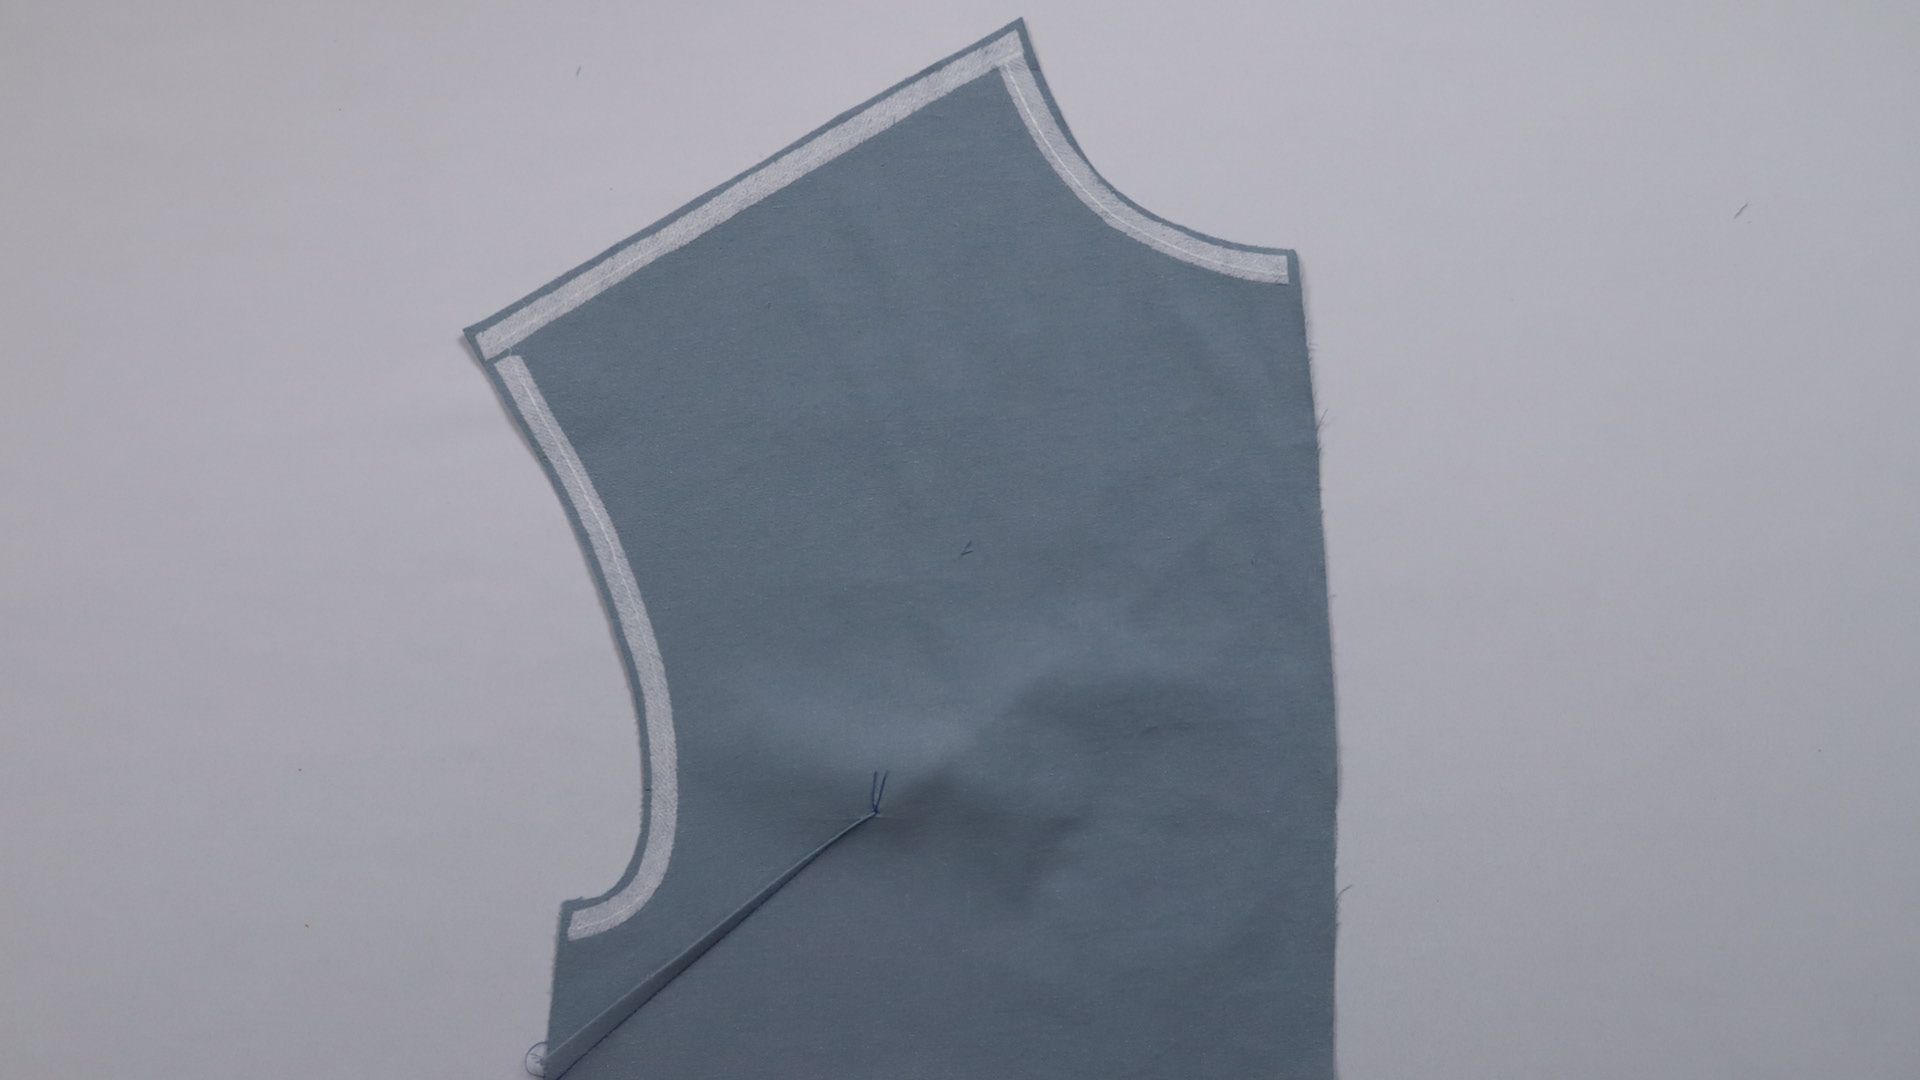
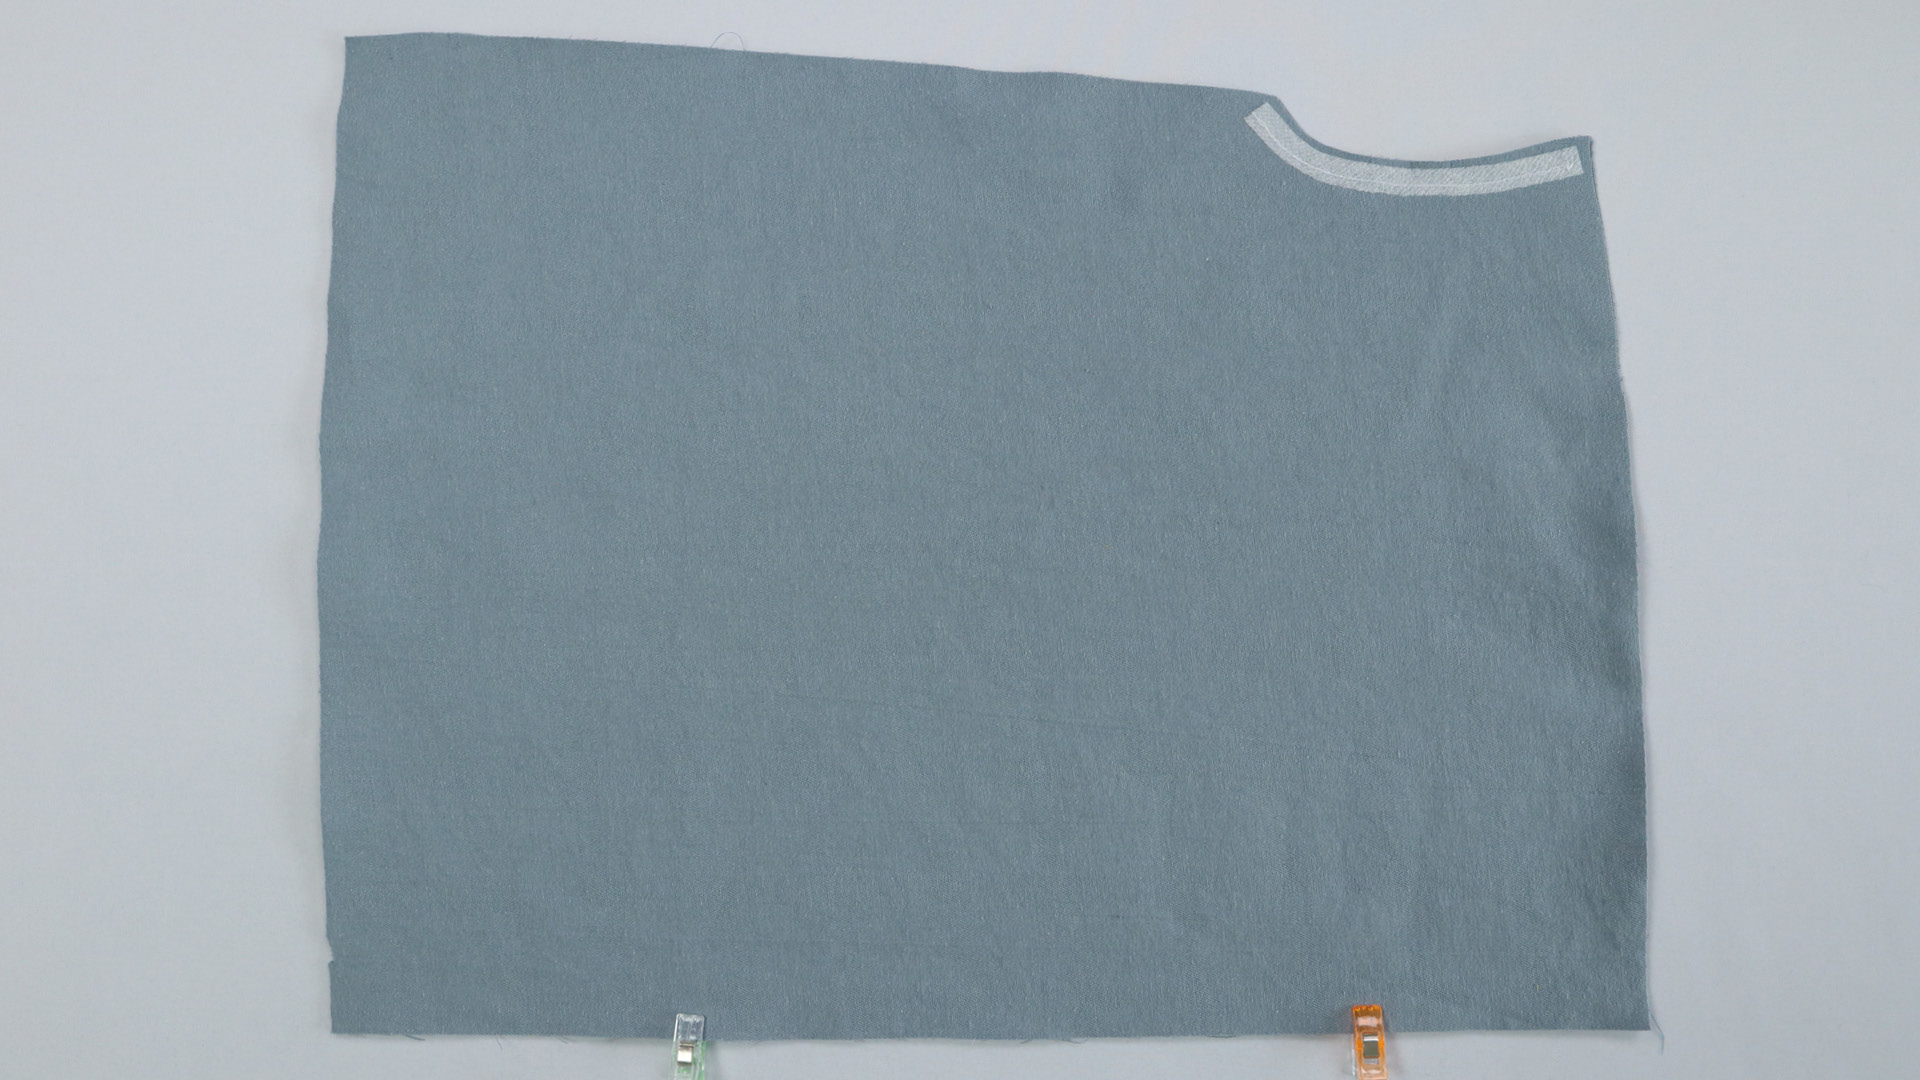
If you have not already done so, secure the shoulder seams, neckline and armholes on the front pieces with a bias tape, e.g. with Vlieseline T12.
Chest darts
Then sew the chest darts according to the markings in the pattern. Always start sewing at the side seam and sew beyond the point of the dart without backstitching. The thread ends are then knotted well and cut off to approx. 2 cm.
The dart content is ironed upwards, i.e. towards the shoulder.
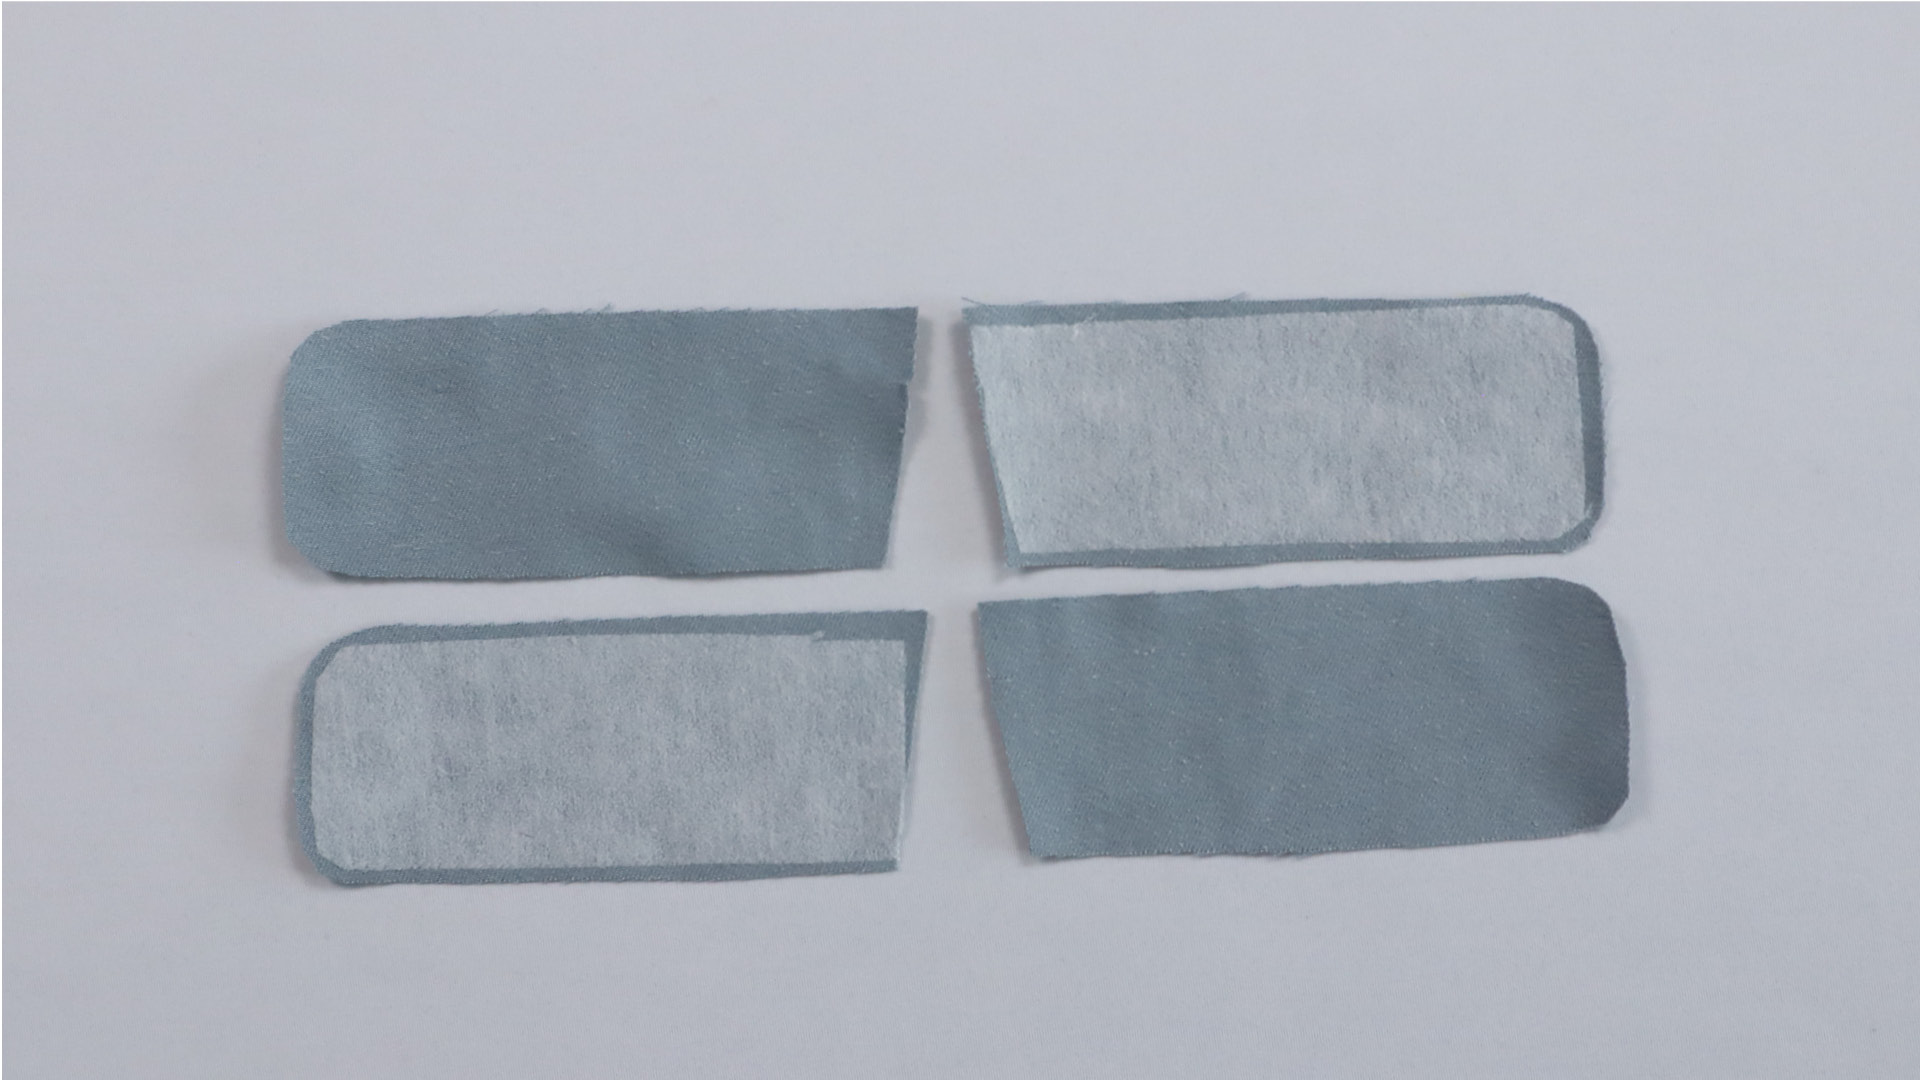
Prepare the flaps
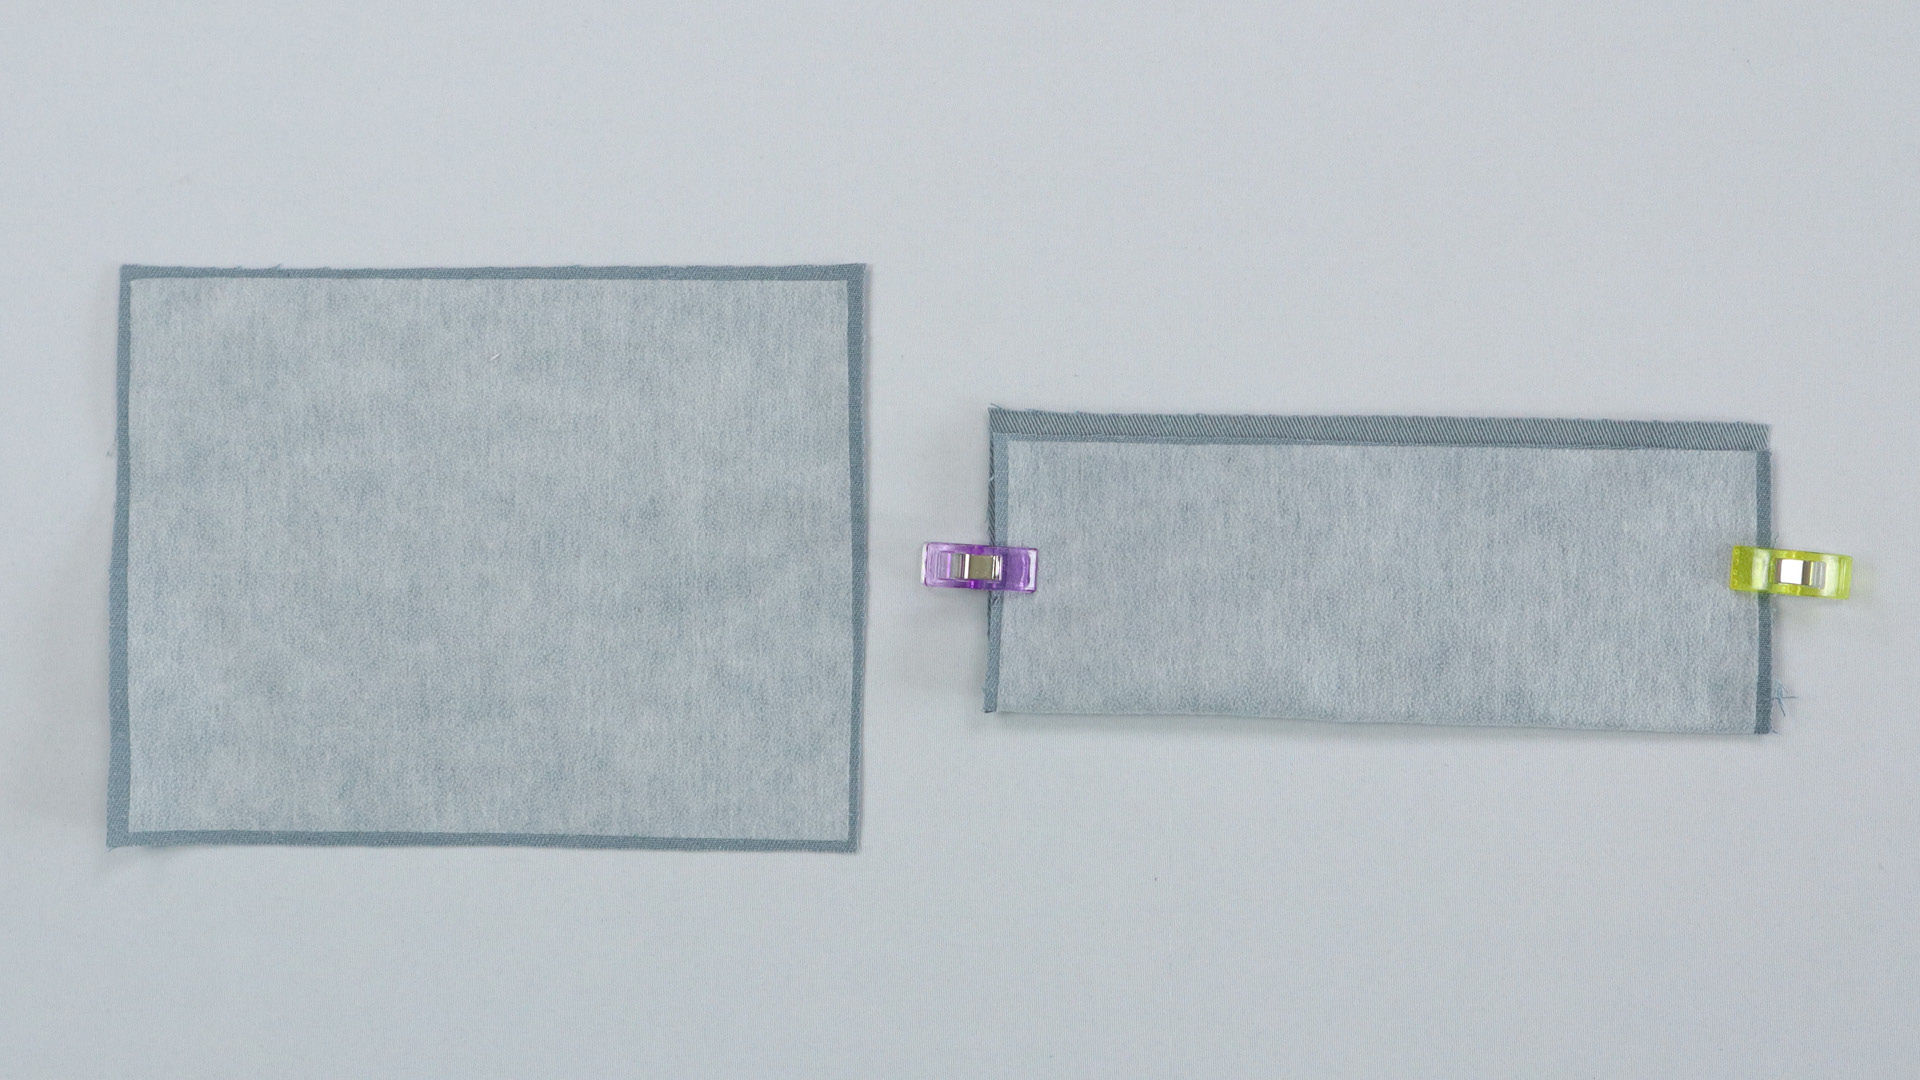
First, iron the interlining onto the flaps. If you are using a thick fabric, it is sufficient to only reinforce the side that will later be on the outside. You can tell which side this is by folding your pattern piece at the notches – the outer side is slightly larger than the inner side.
Then fold the flaps right sides together at the notches and sew the sides together. Cut back the seam allowances on the fold at an angle if necessary, press the seam allowances open and turn the flaps.
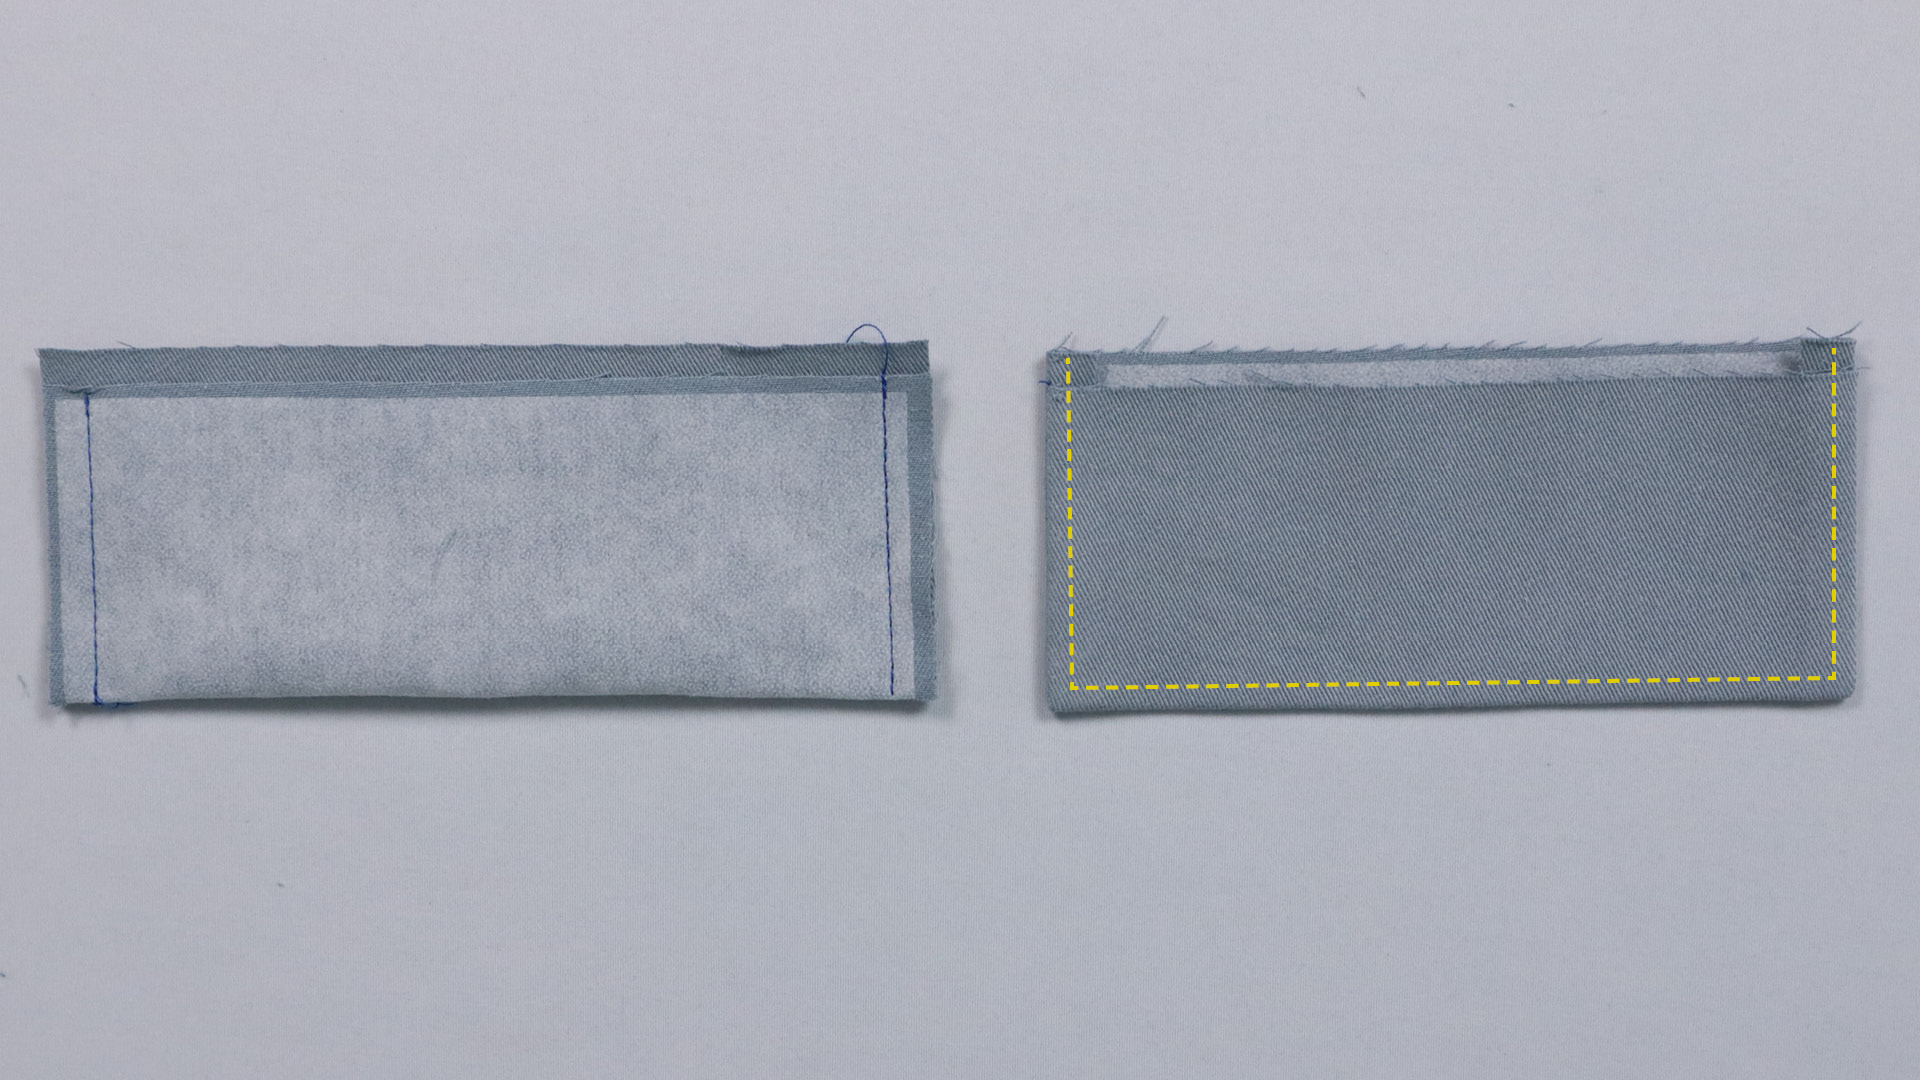
From the right side, iron them well again before topstitching the edges close to the edge or with a seam allowance of approx. 7 mm. Of course, you can also choose a different width here or double topstitch if you prefer.
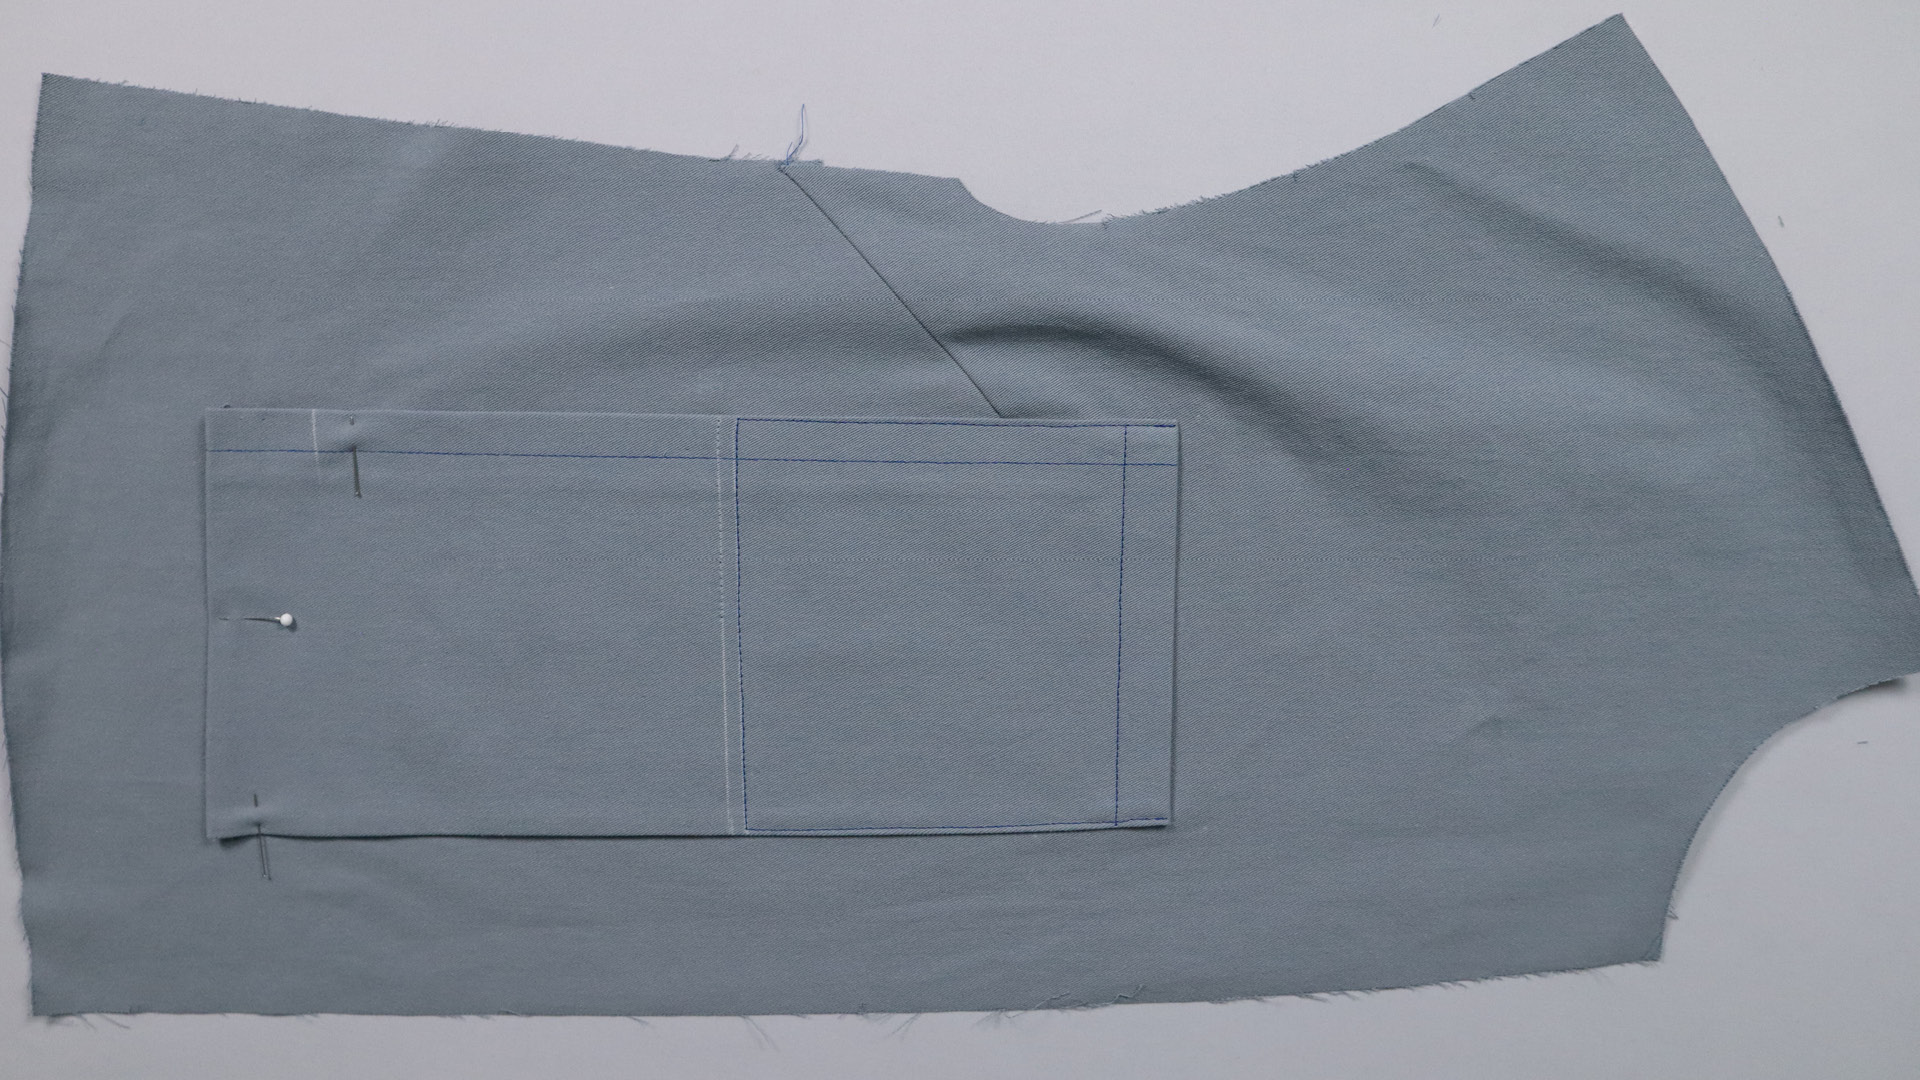
Sew patch pockets
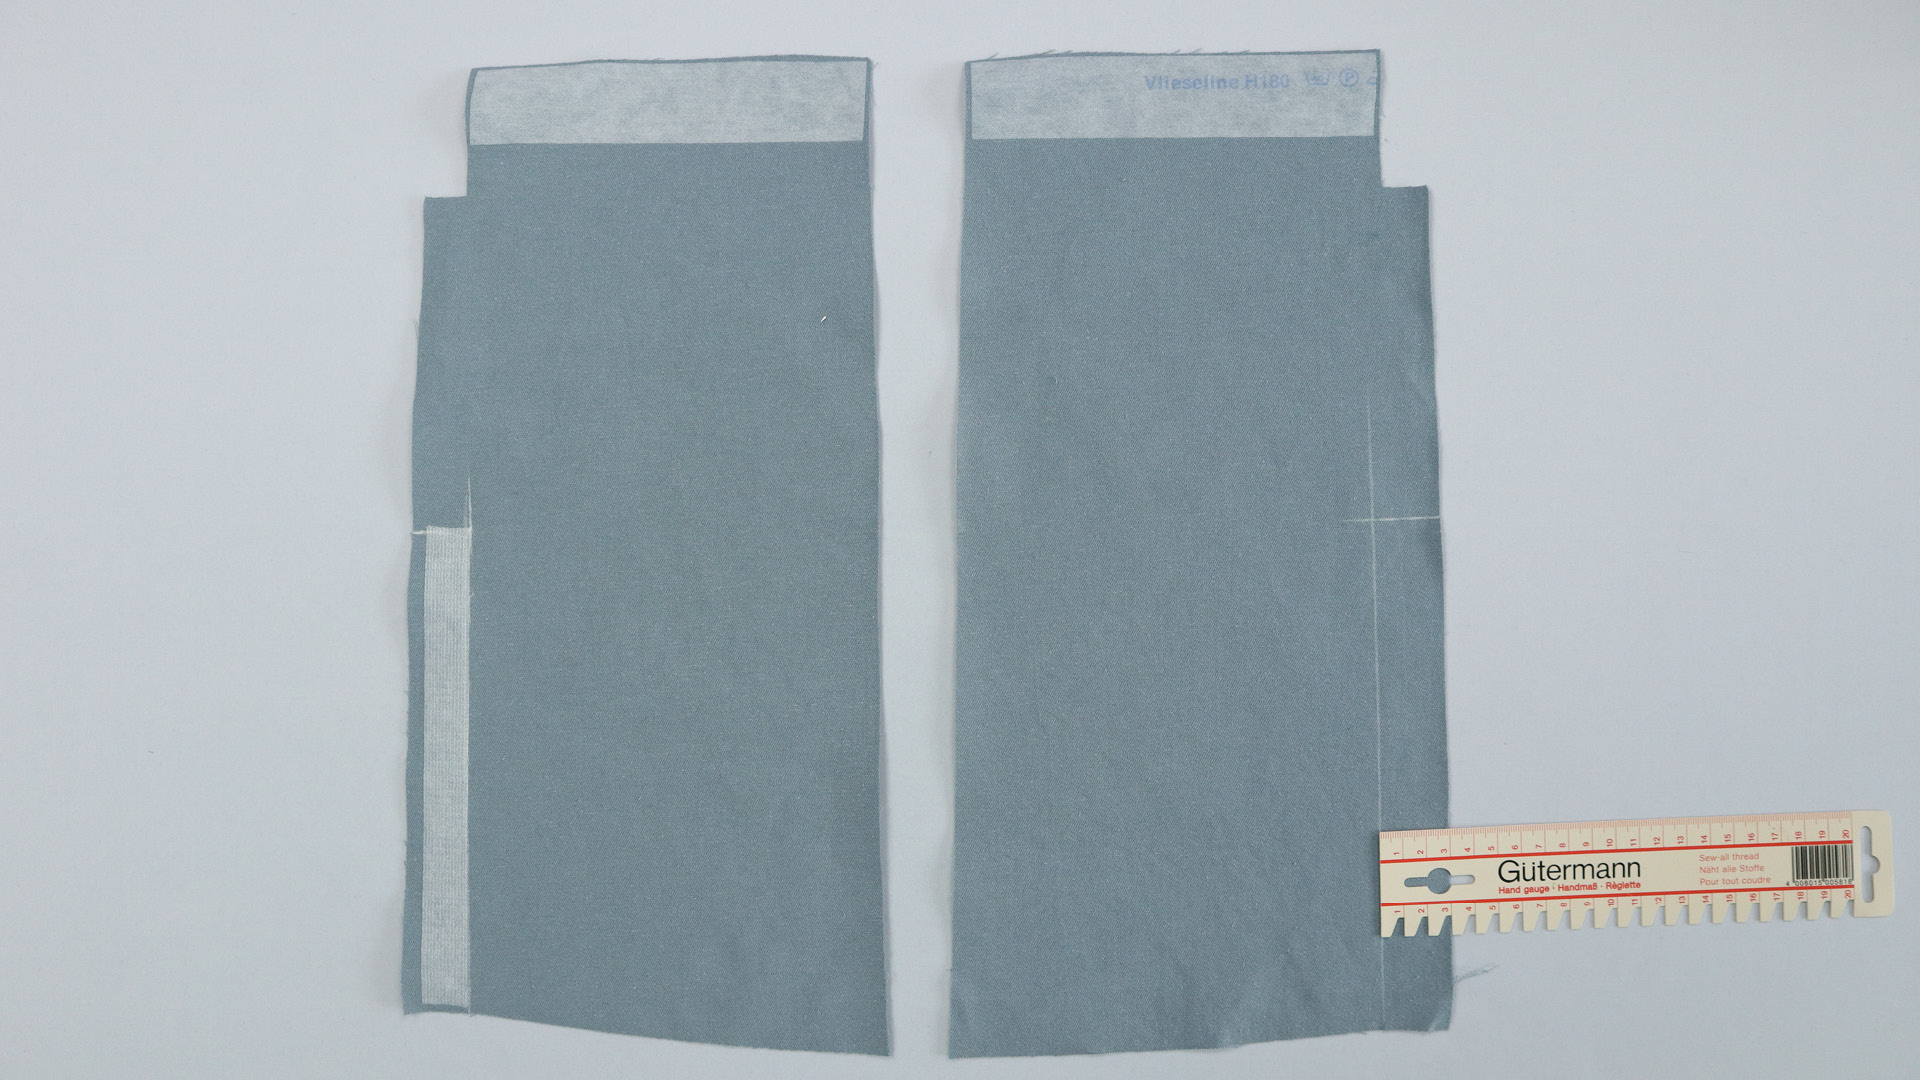
The top and side pocket openings are reinforced. There is a pattern piece for the top pocket opening and I used Vlieseline T20 for the side opening. However, you can also cut a matching strip from the interfacing that you use for the flaps, underlap etc.. Place the interfacing strip so that its inner edge is 3 cm from the outer edge of the pocket.
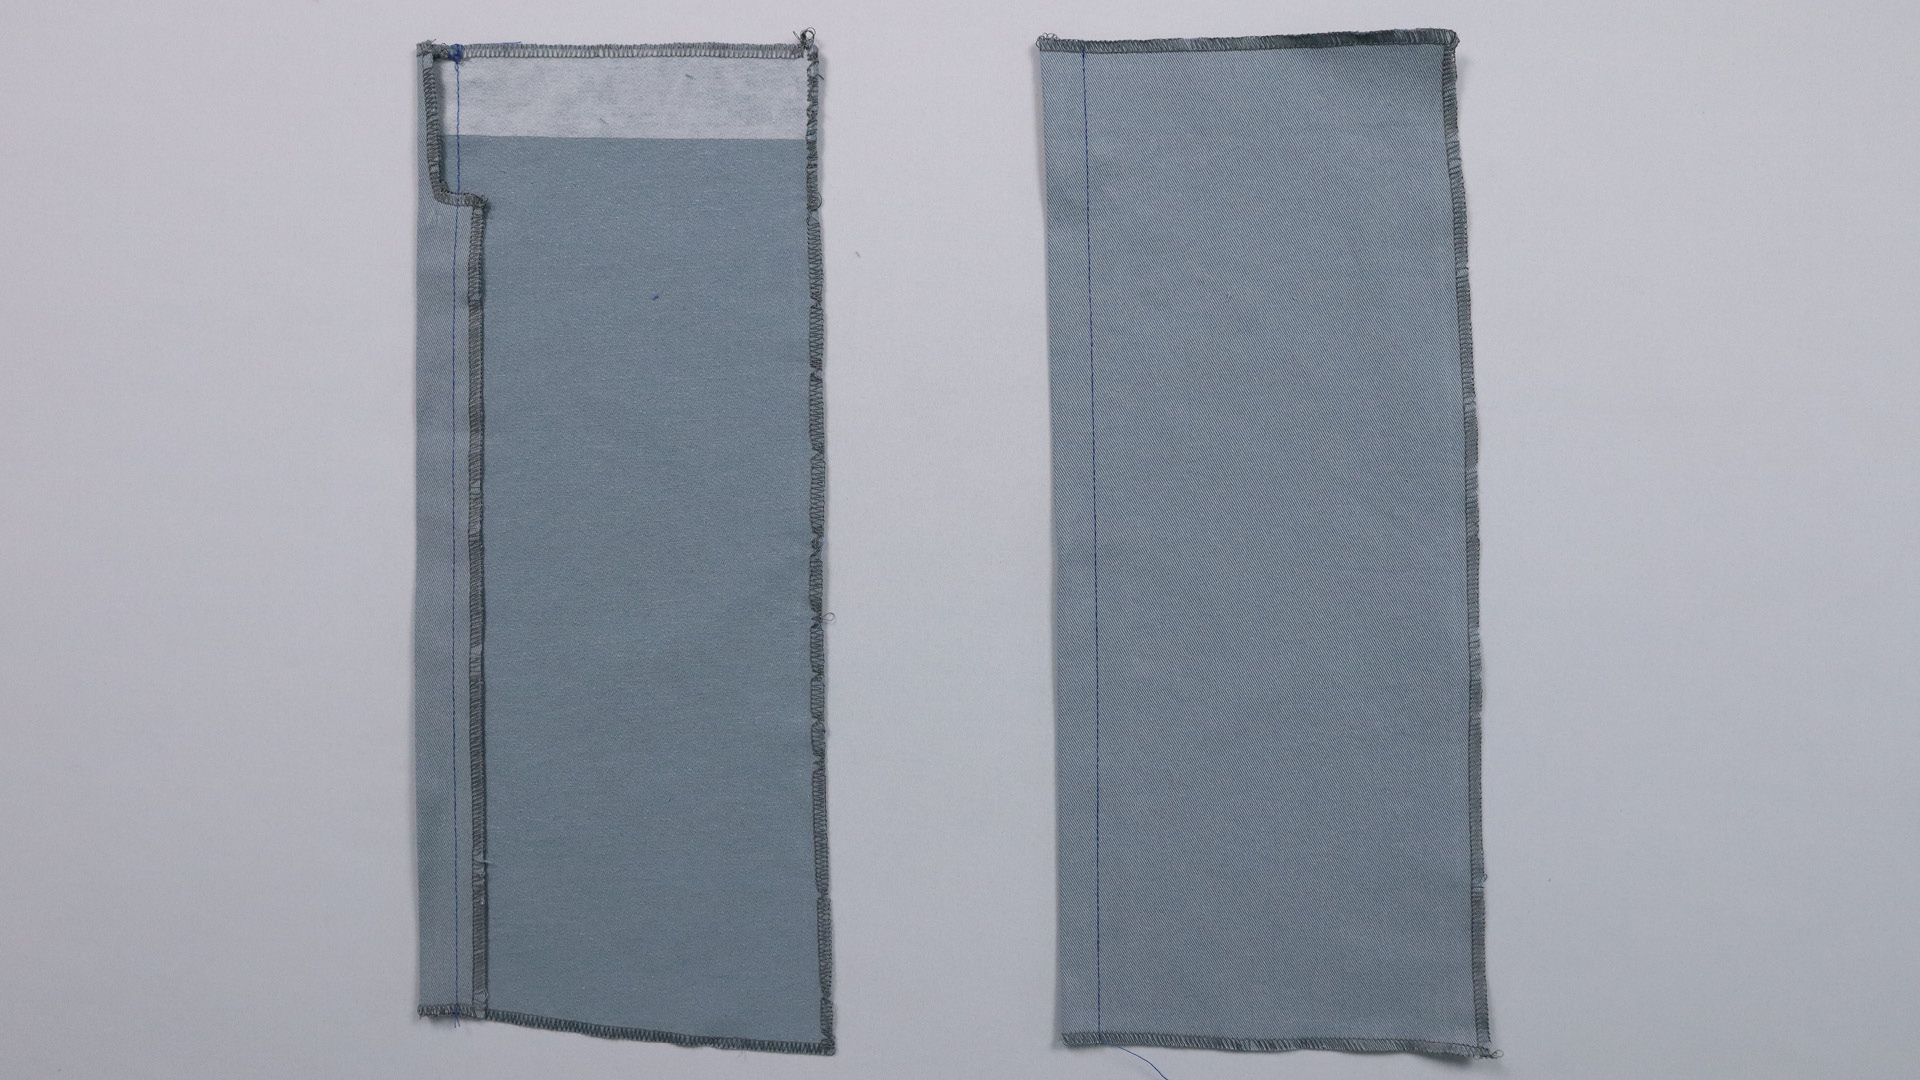
The pockets are serged on all four sides. Then the pocket is pressed inwards on the side with the opening according to the notches and topstitched along the entire length at a distance of 16 mm from the outer edge.
Tip
If you are wondering why the seam allowance is narrower at the top, here is the explanation: 1 cm seam allowance would actually be sufficient for the entire area of the upper pocket. But then you would only be sewing through one layer of fabric when topstitching 16 mm wide in the upper area, which results in a less attractive stitch pattern depending on the machine and thread. If the seam allowance were wider up to the top edge, the pocket would be very thick in the area where the top edge is sewn over in the next step and may be difficult to work with. As this area, and therefore a possibly less attractive stitch pattern, is covered by the flap, we have opted for the narrower seam allowance for easier processing.
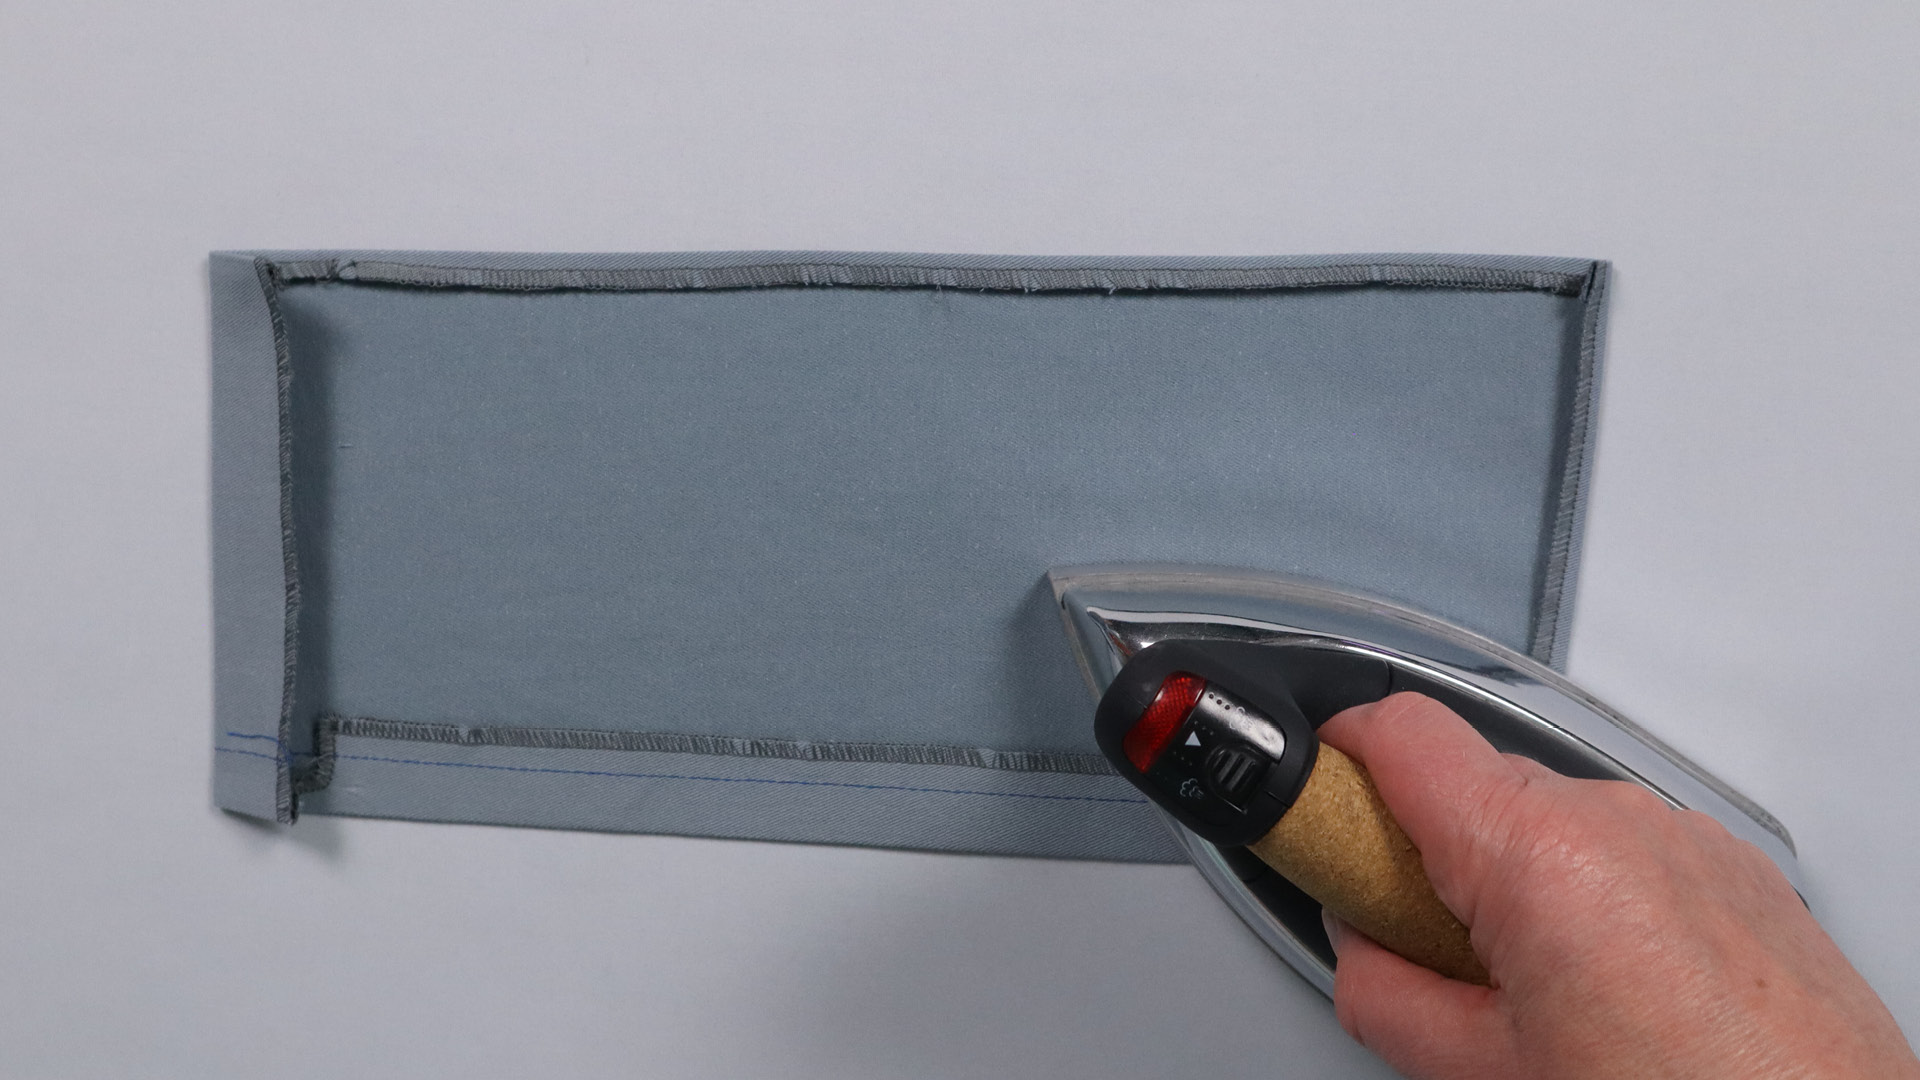
The top pocket opening is pressed inwards at the side notches, as are the seam allowances on the long side and the bottom edge.
The upper pocket opening is then topstitched 16 mm from the upper edge.
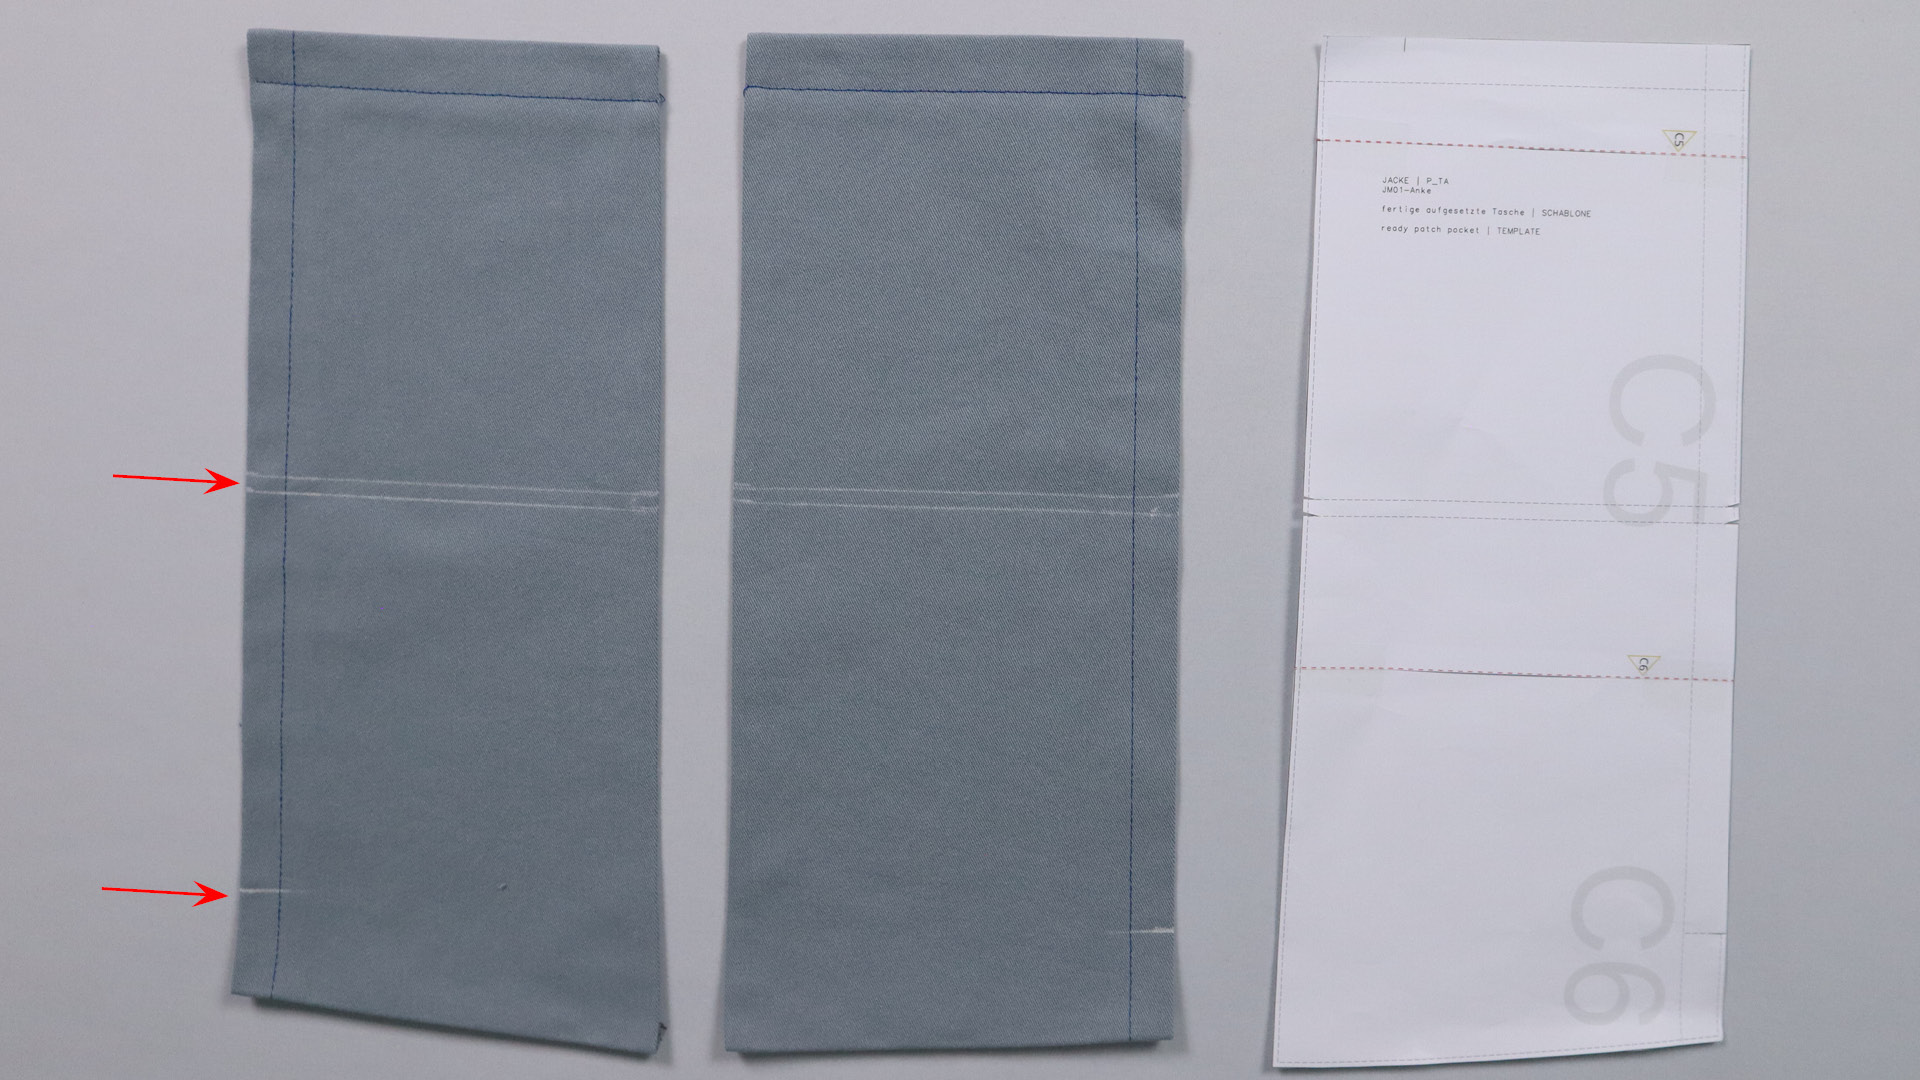
I use the template to mark the topstitching between the upper and lower pocket and the lower end of the side pocket opening.
Now the pockets are stitched to the front pieces. I first transfer the markings from the pattern to the two front pieces.

Then I pin the prepared pockets to the front pieces. I start at the front edge, then pin the bottom edge and the outer side. Check again that the pockets are arranged symmetrically on both front pieces!
On the wrong side of the fabric, I pin the prepared circles to the opening ends of the pockets to prevent them from tearing out.
I then topstitch the upper pocket, as shown in the picture.
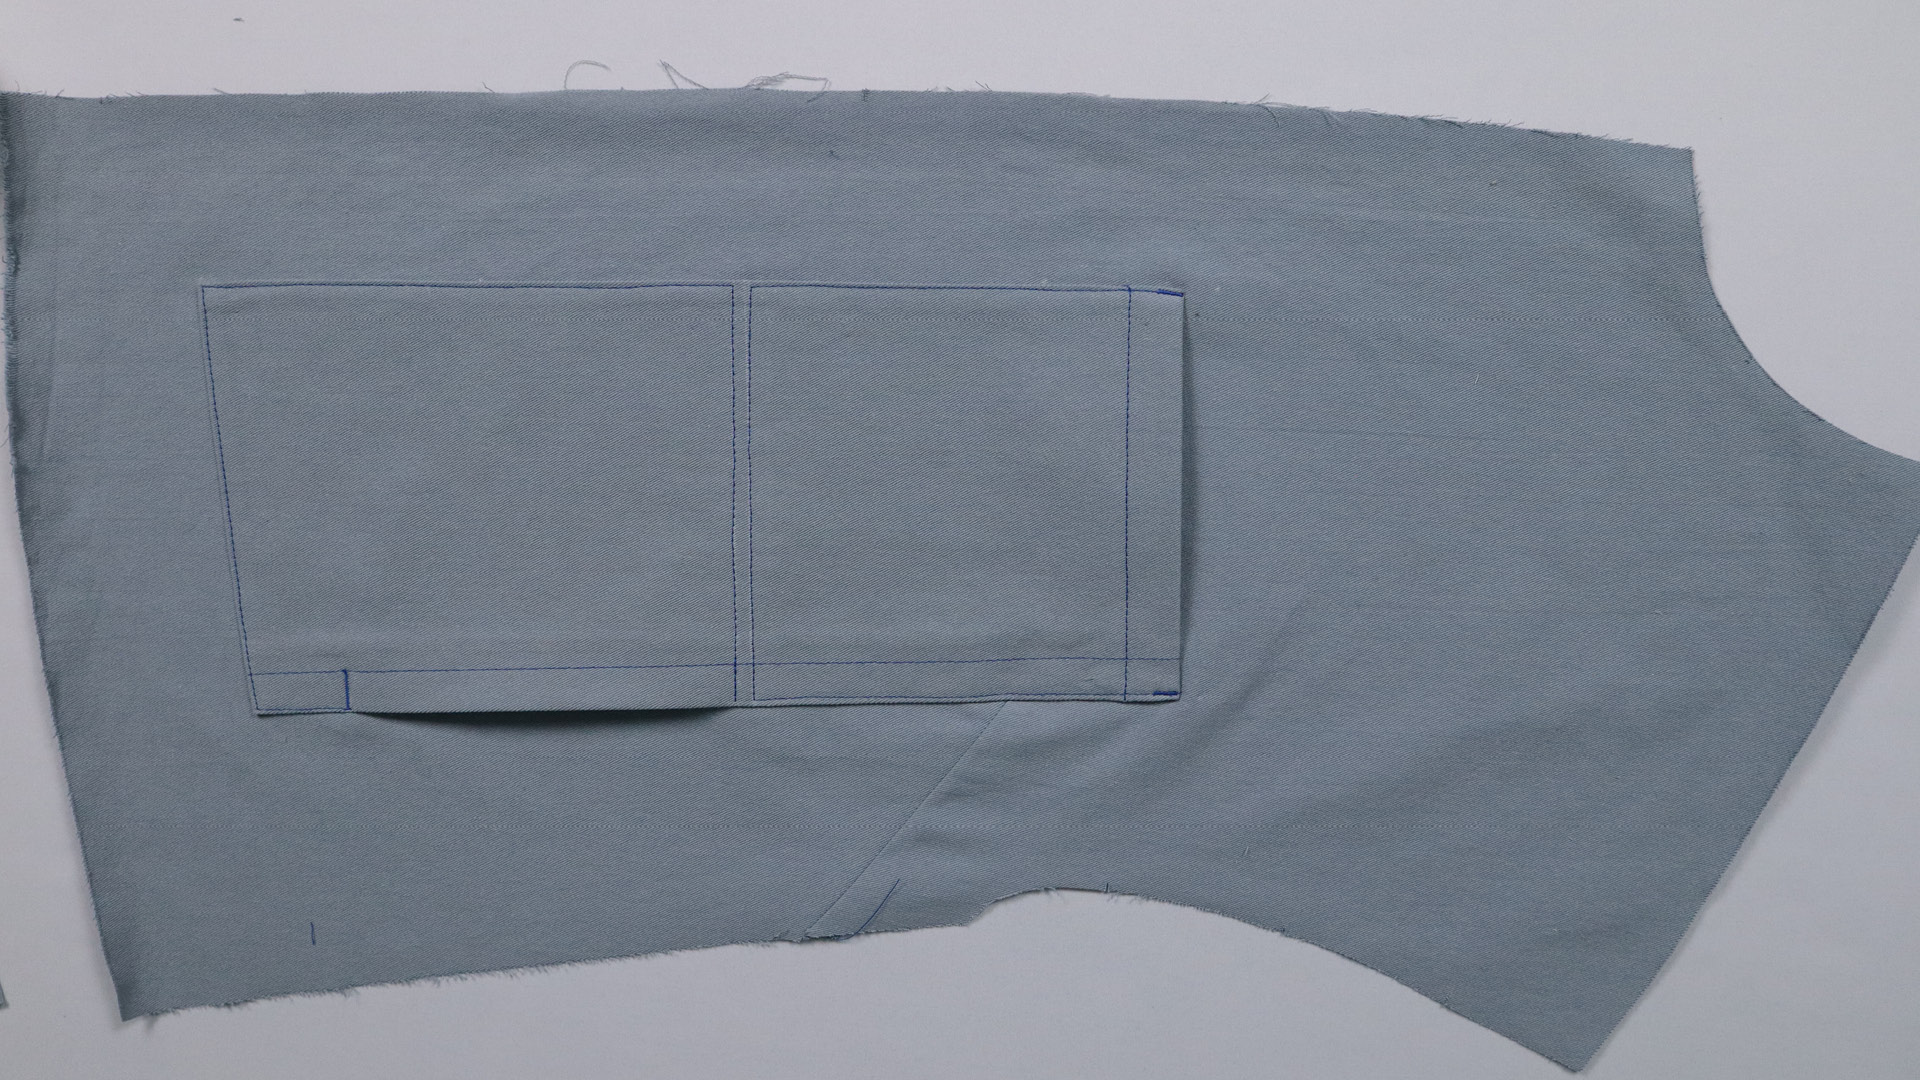
The side opening of the lower pocket remains open. Carefully lock the seams at the side and upper pocket openings, e.g. with bartacks or multiple forward and backward stitches.
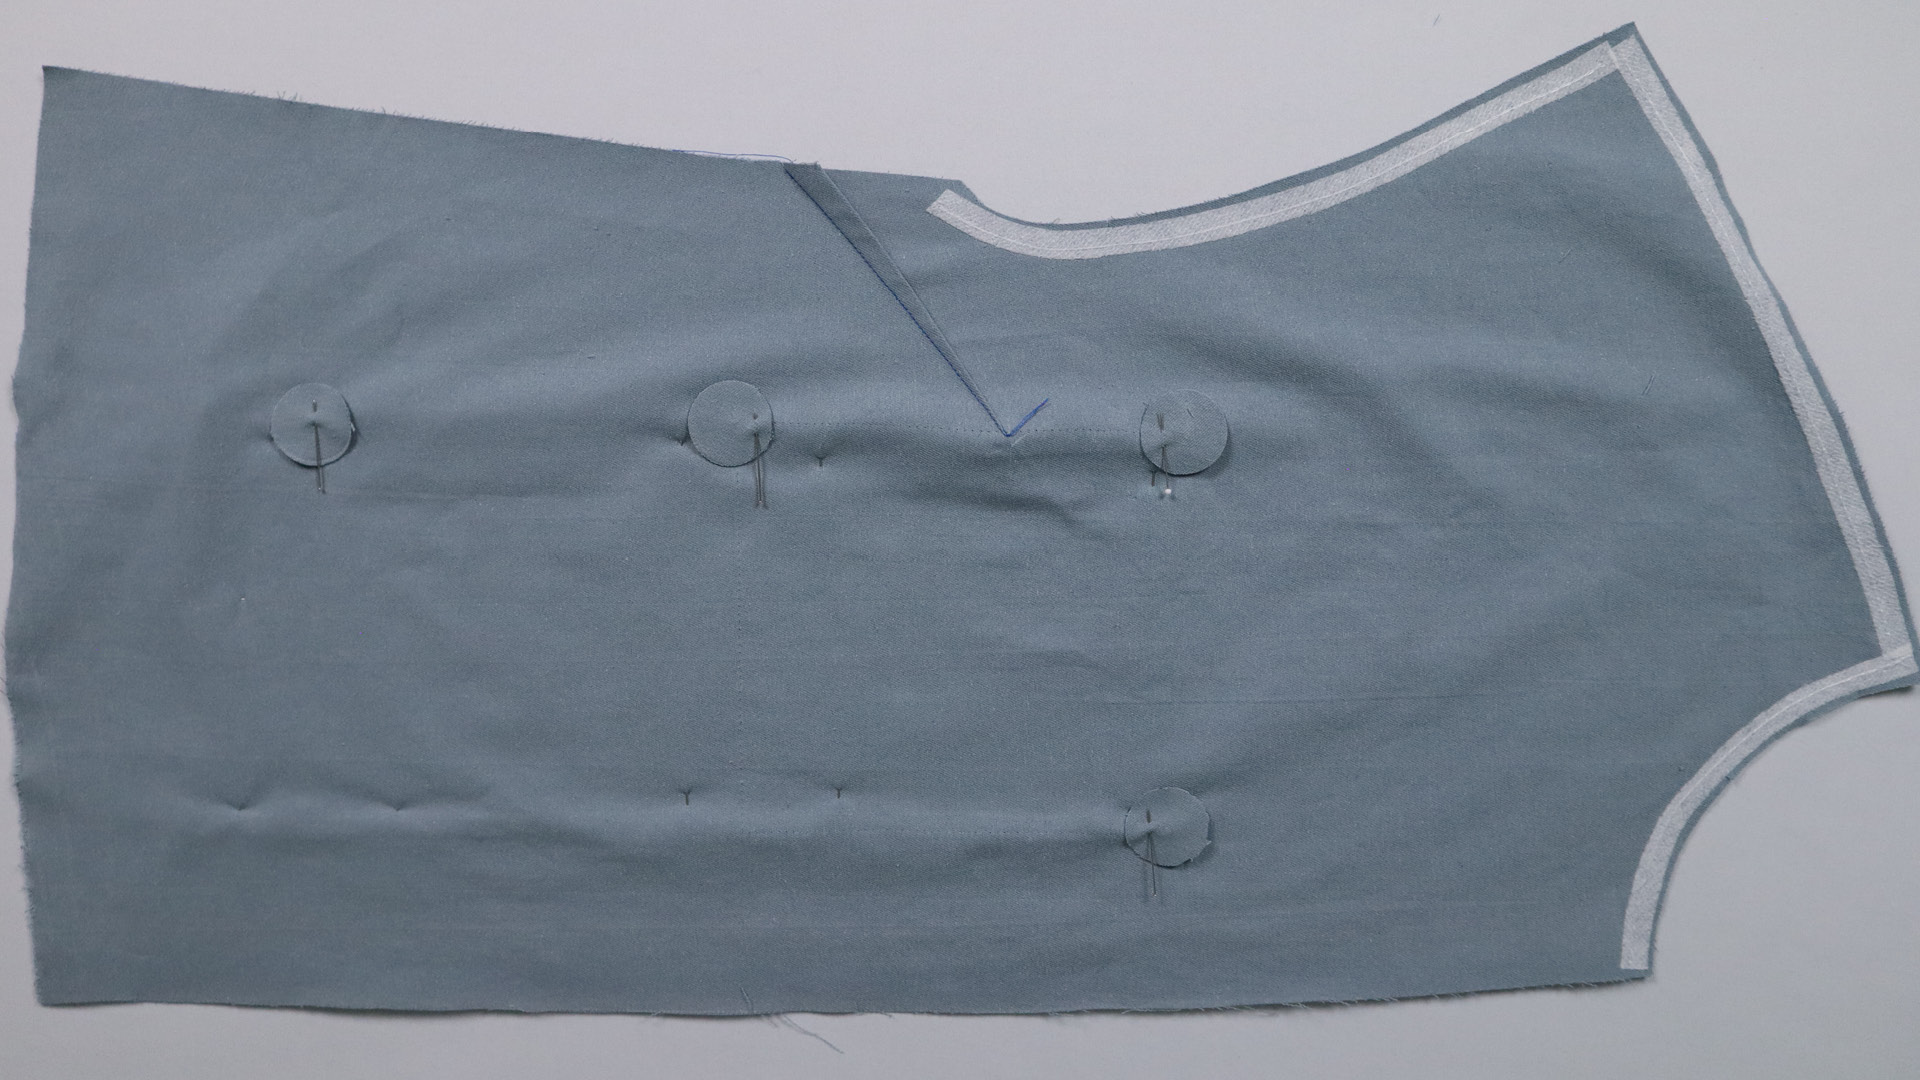
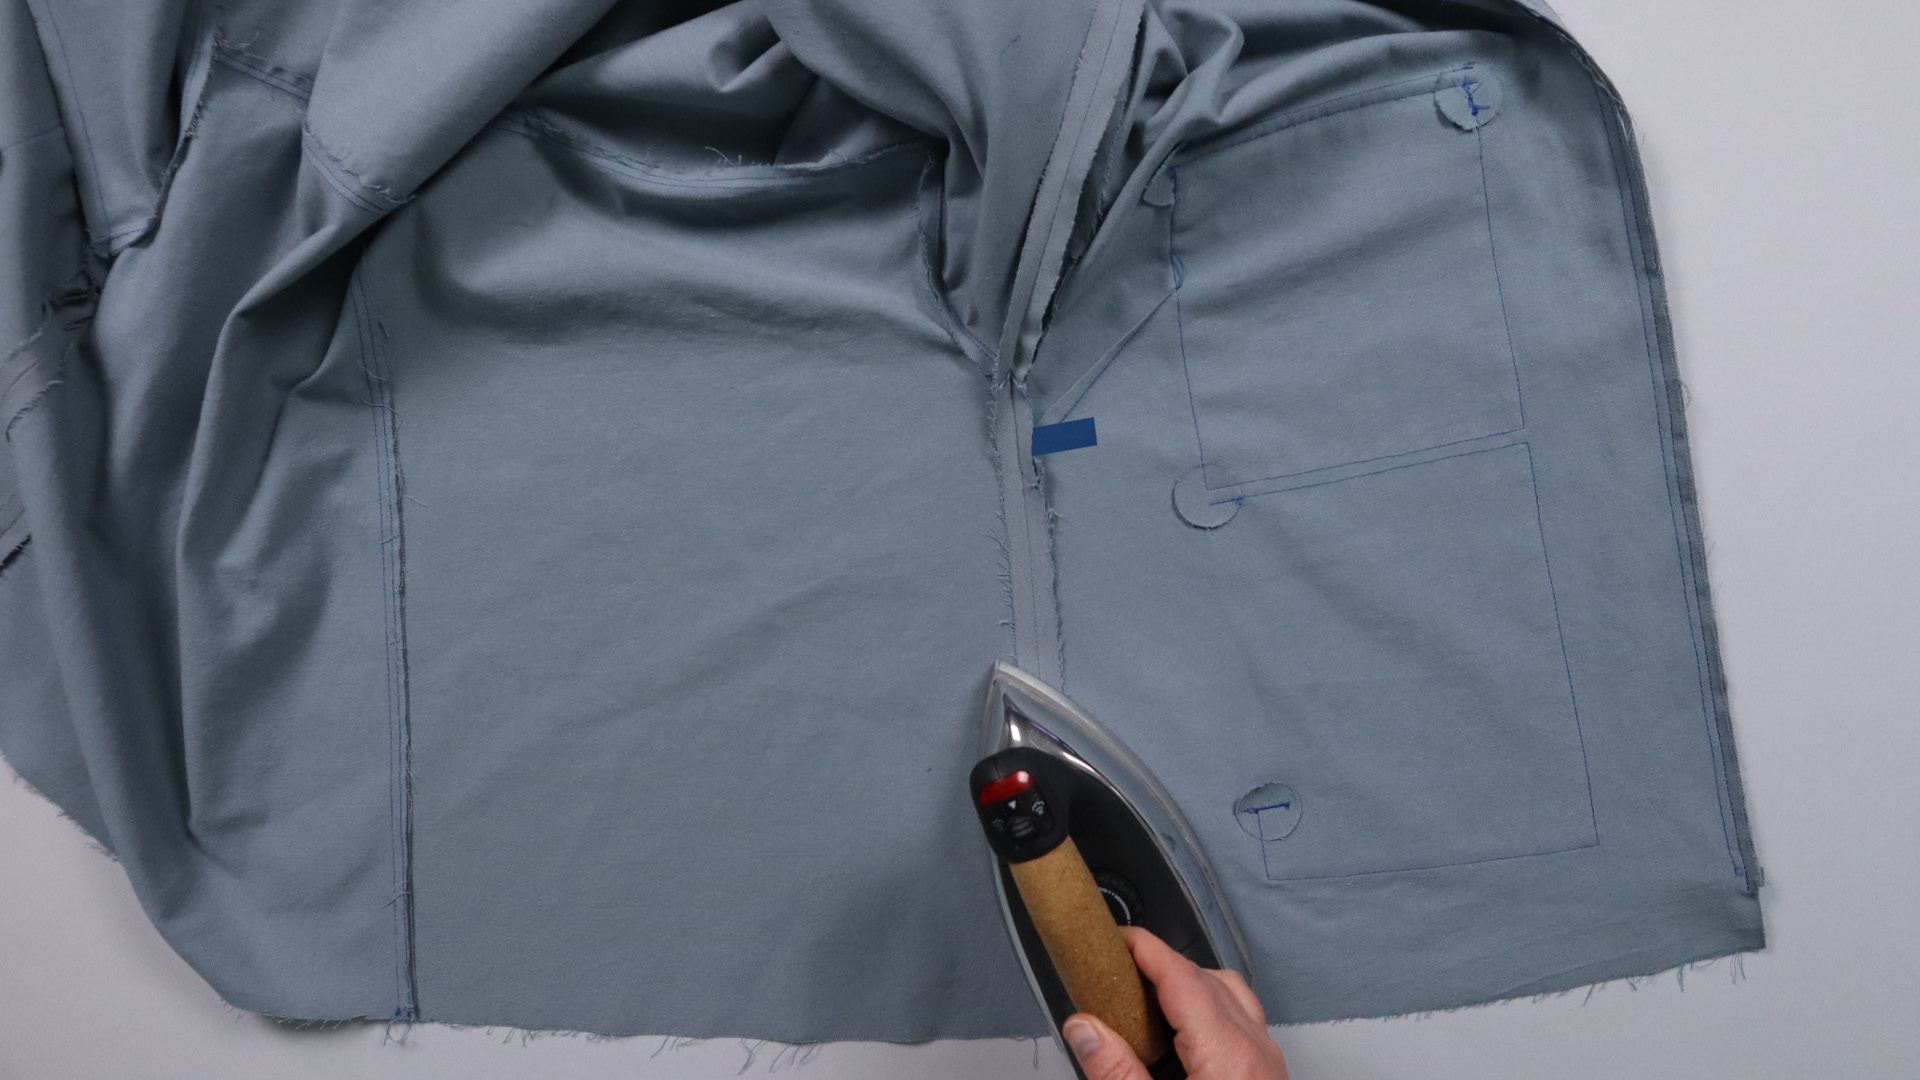
Sew pocket flaps onto the jacket with hood
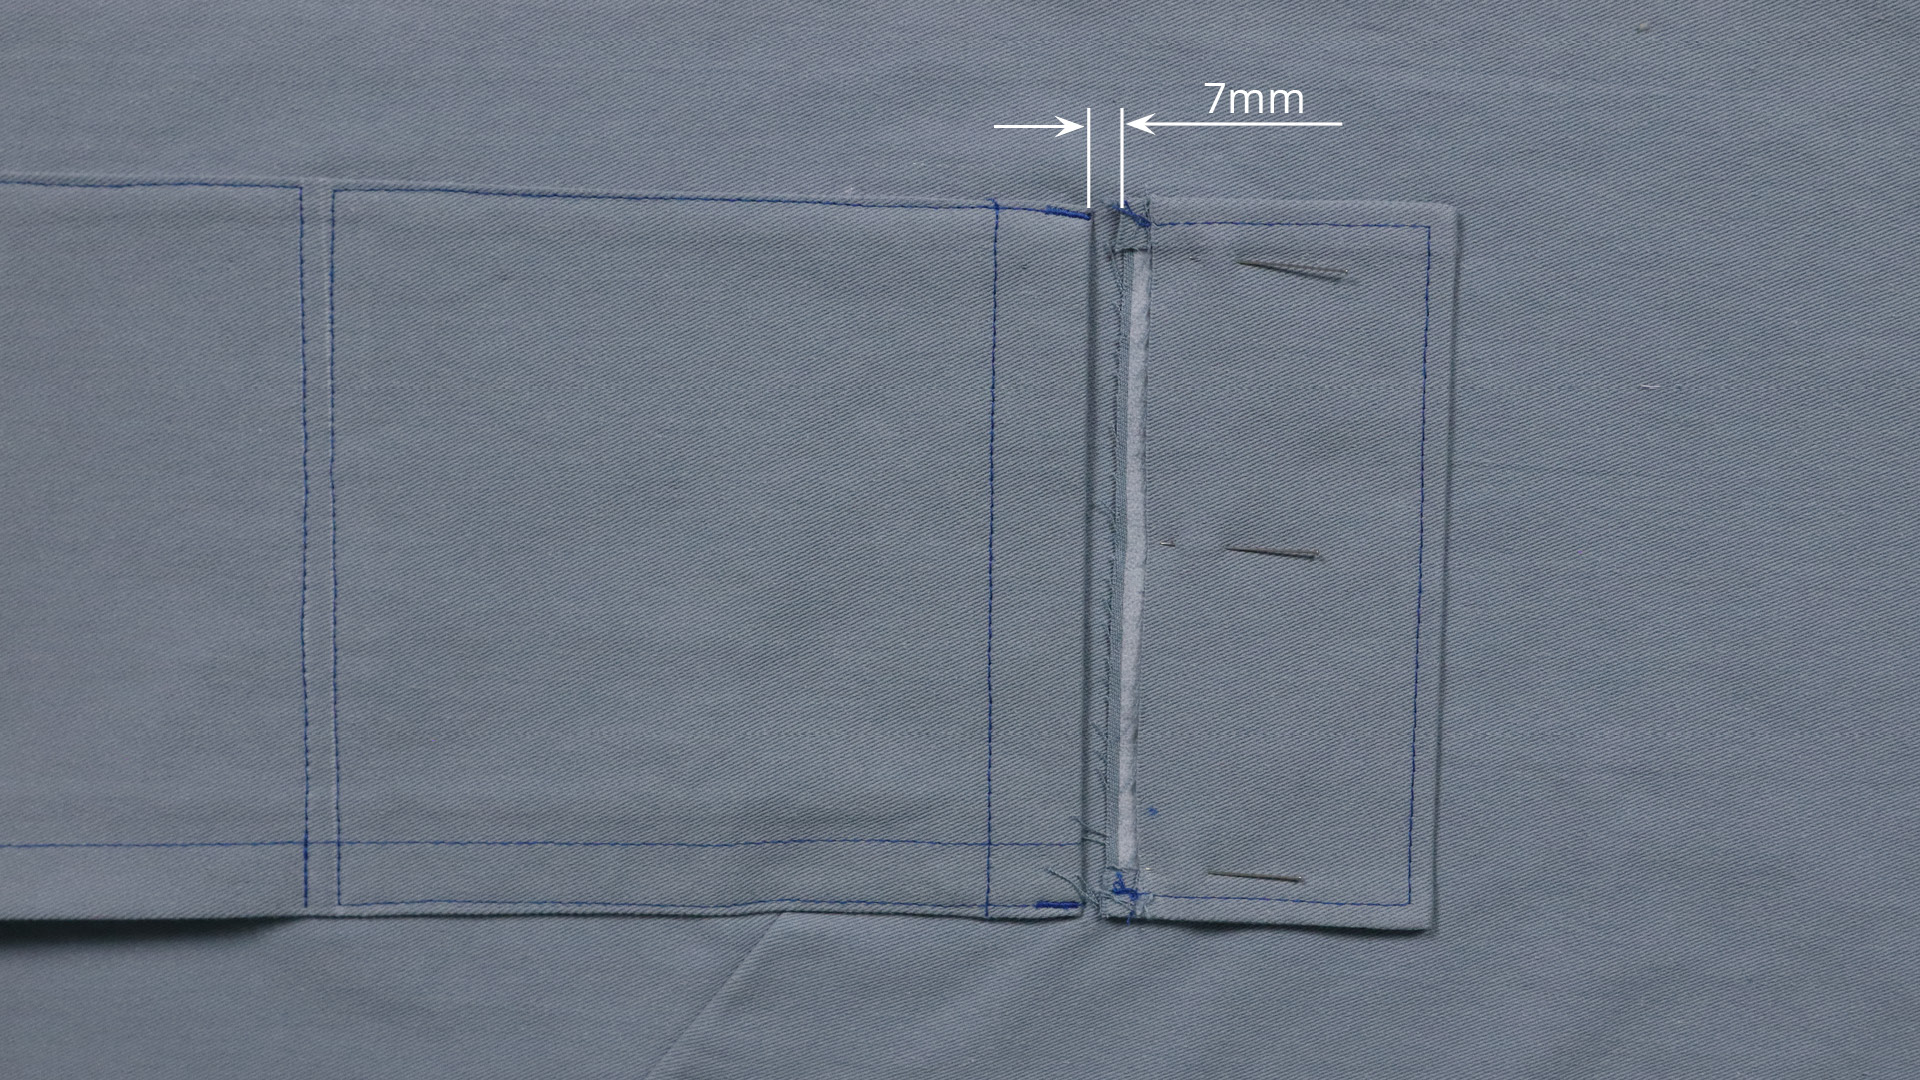
The upper corners of the sewn-on pocket flaps are marked on the front pieces for orientation. To make sure that the pocket flap is parallel to the pocket, you should use the finished pocket as a guide and not necessarily the markings if there are slight differences. Place the protruding cut edge of the flap pocket parallel to the top edge of the pocket at a distance of 7 mm and pin it in place. The side that will later be on the outside lies on the front part.
Note the notches on the flaps and in the pattern section of the pockets so that the correct flap is on the correct side of the jacket. As you have probably already noticed, they are slightly asymmetrical and should therefore be sewn on the correct side of the jacket.
Now sew the flaps onto the jacket with a 5 mm gap to the protruding cut edge, then fold them down and iron them.
Then topstitch them 7 mm from the top edge.
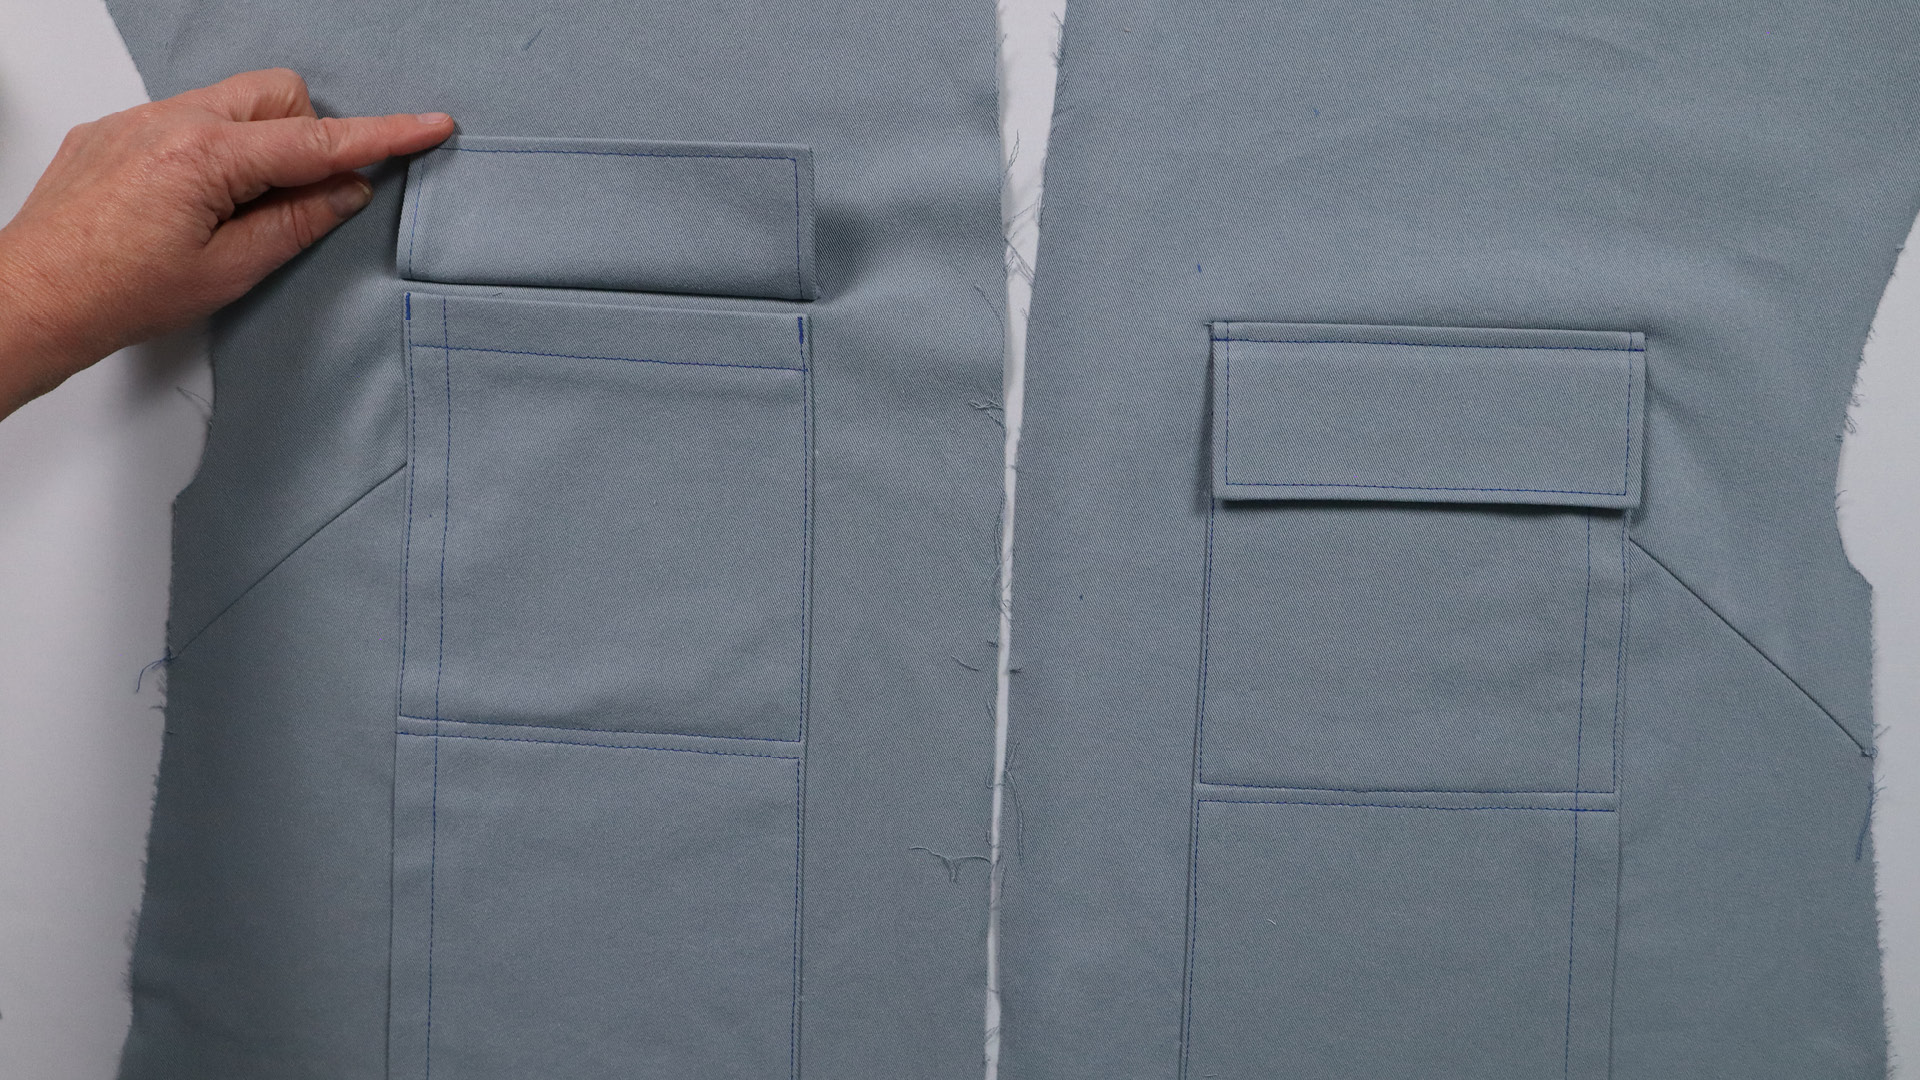
This is what the finished pocket flaps look like. You can’t see any of the seam allowance when you squat the flap.
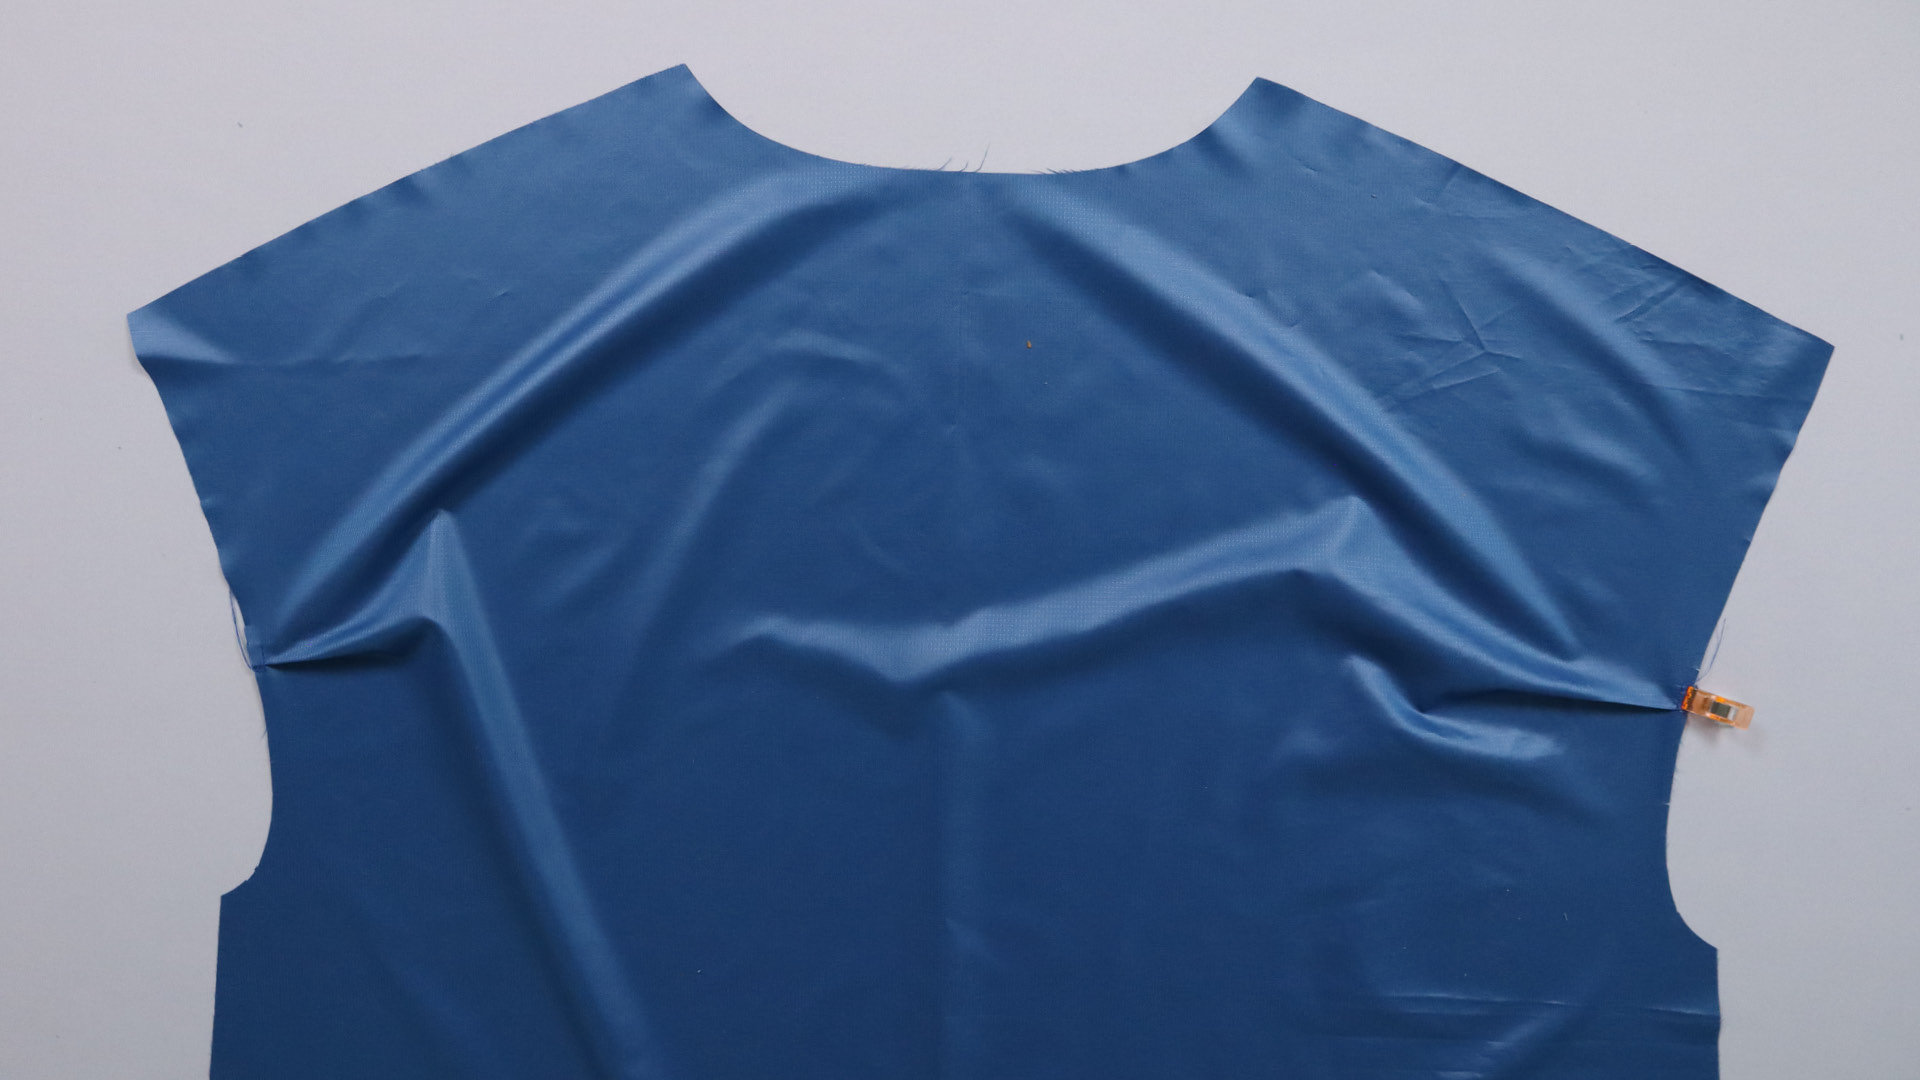
Sew the back with yoke and join to the front pieces
If not already done, secure the neckline and armholes with bias tape.
Center back
The two back pieces are placed right sides together at the center back and sewn together.
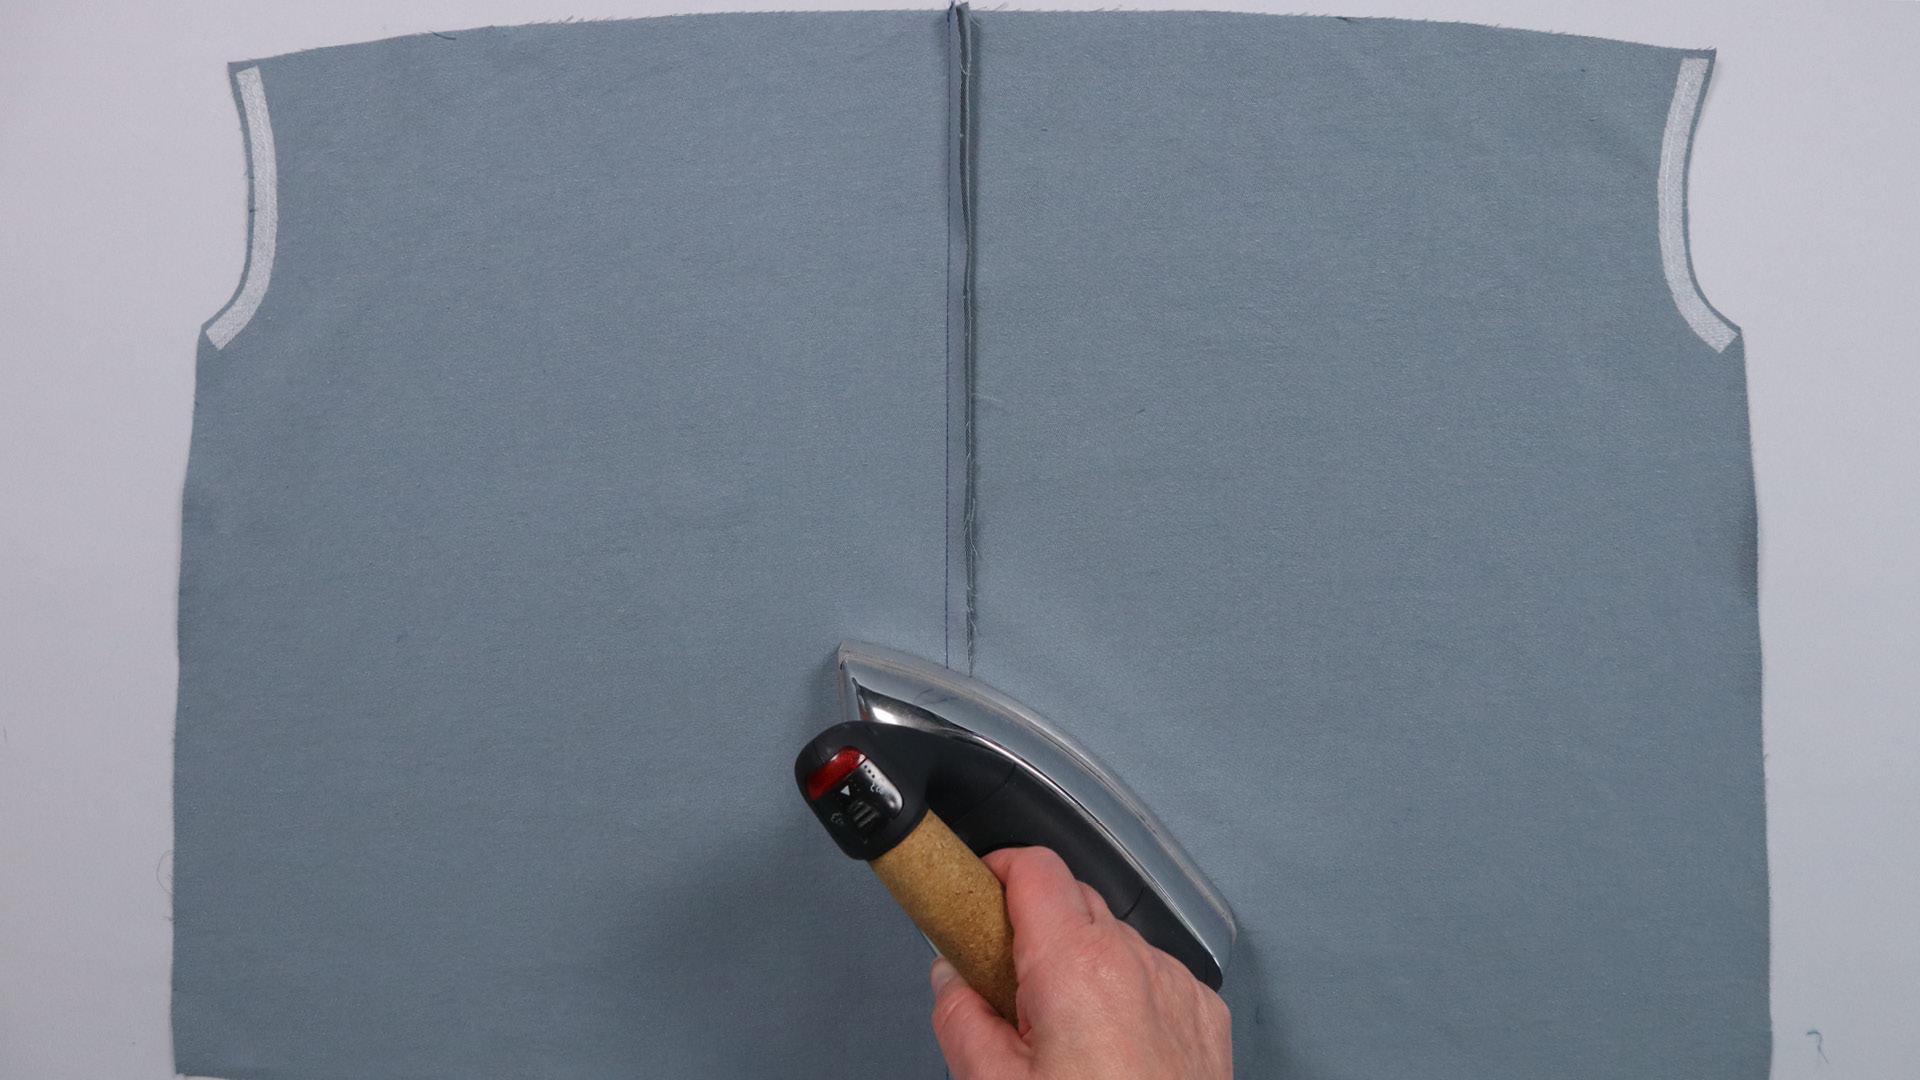
Then press the seam allowances to one side and topstitch from the right side at the desired distance from the seam. I have decided on 7 mm.
Sew on yoke
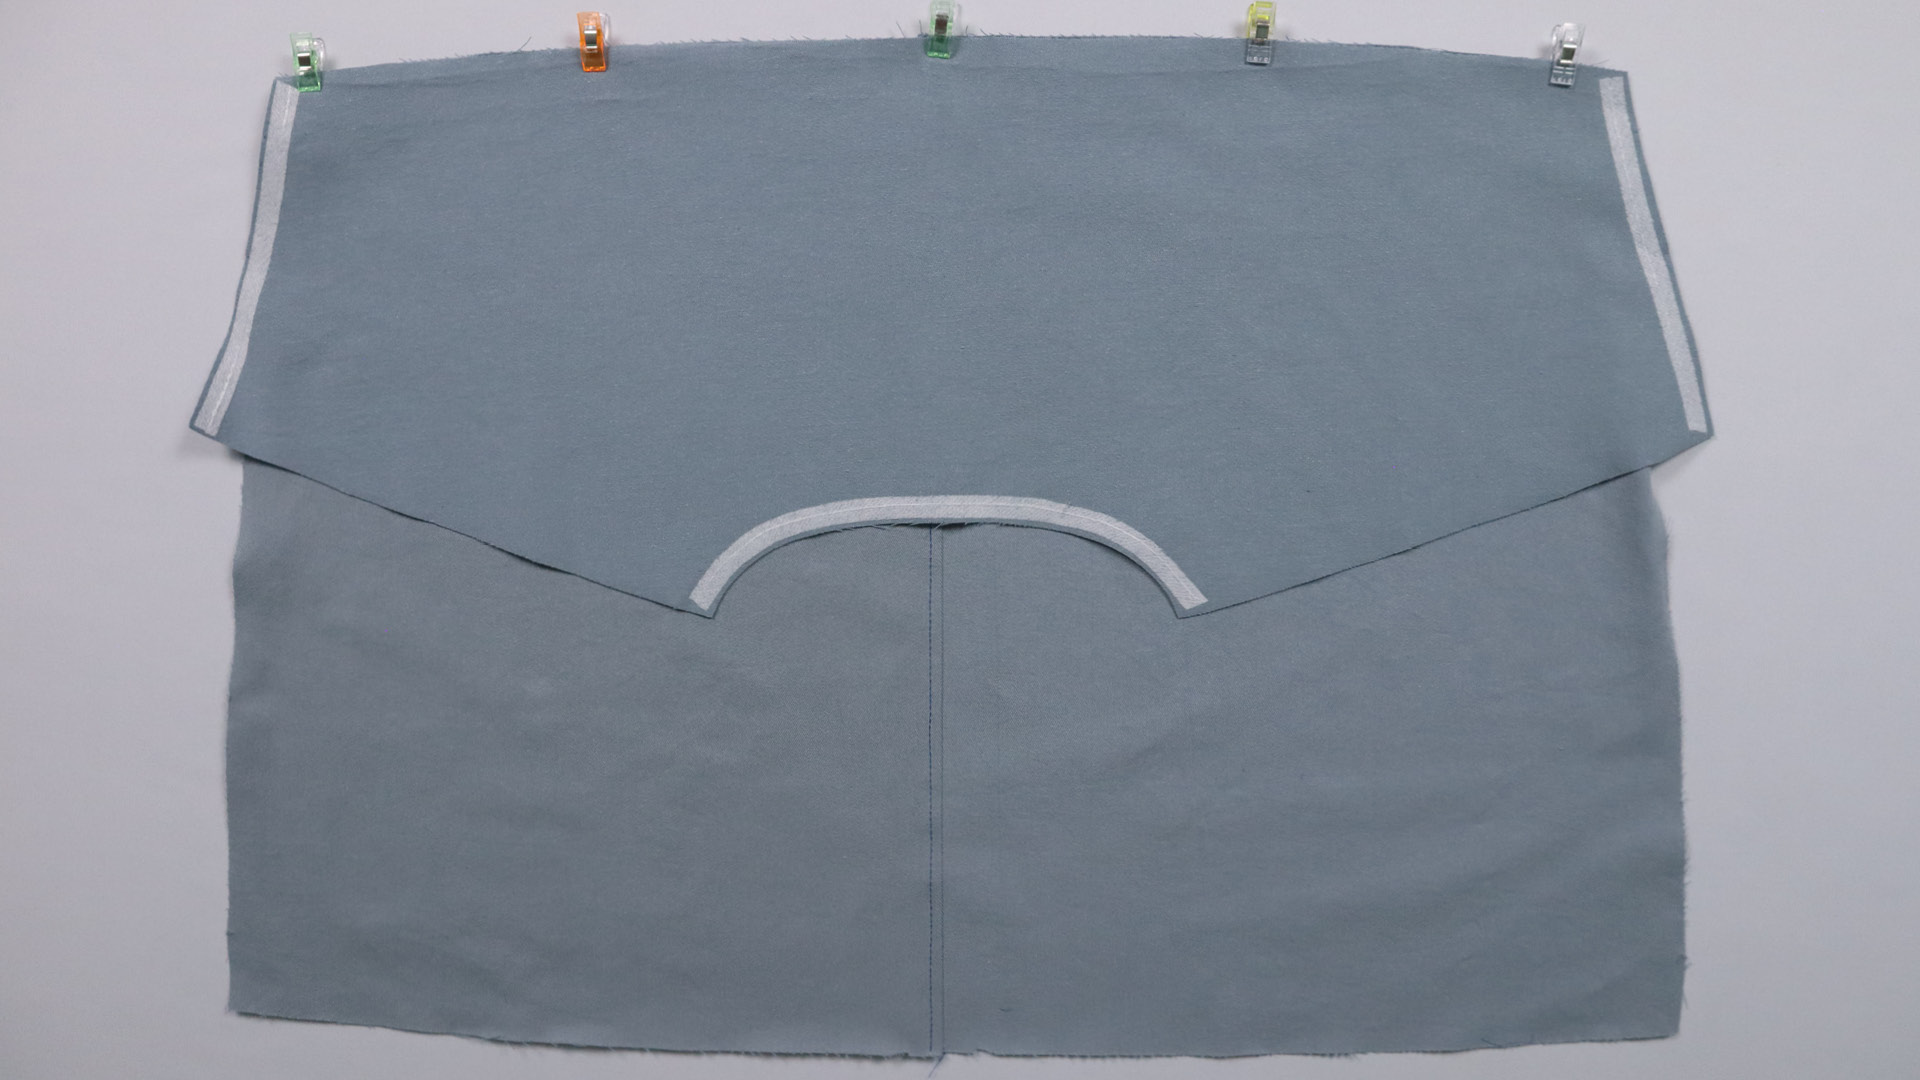
Now place the bottom edge of the yoke right sides together on the top edge of the back piece you have just sewn and sew the two pieces together.
Press the seam allowances upwards towards the yoke and topstitch from the right side.
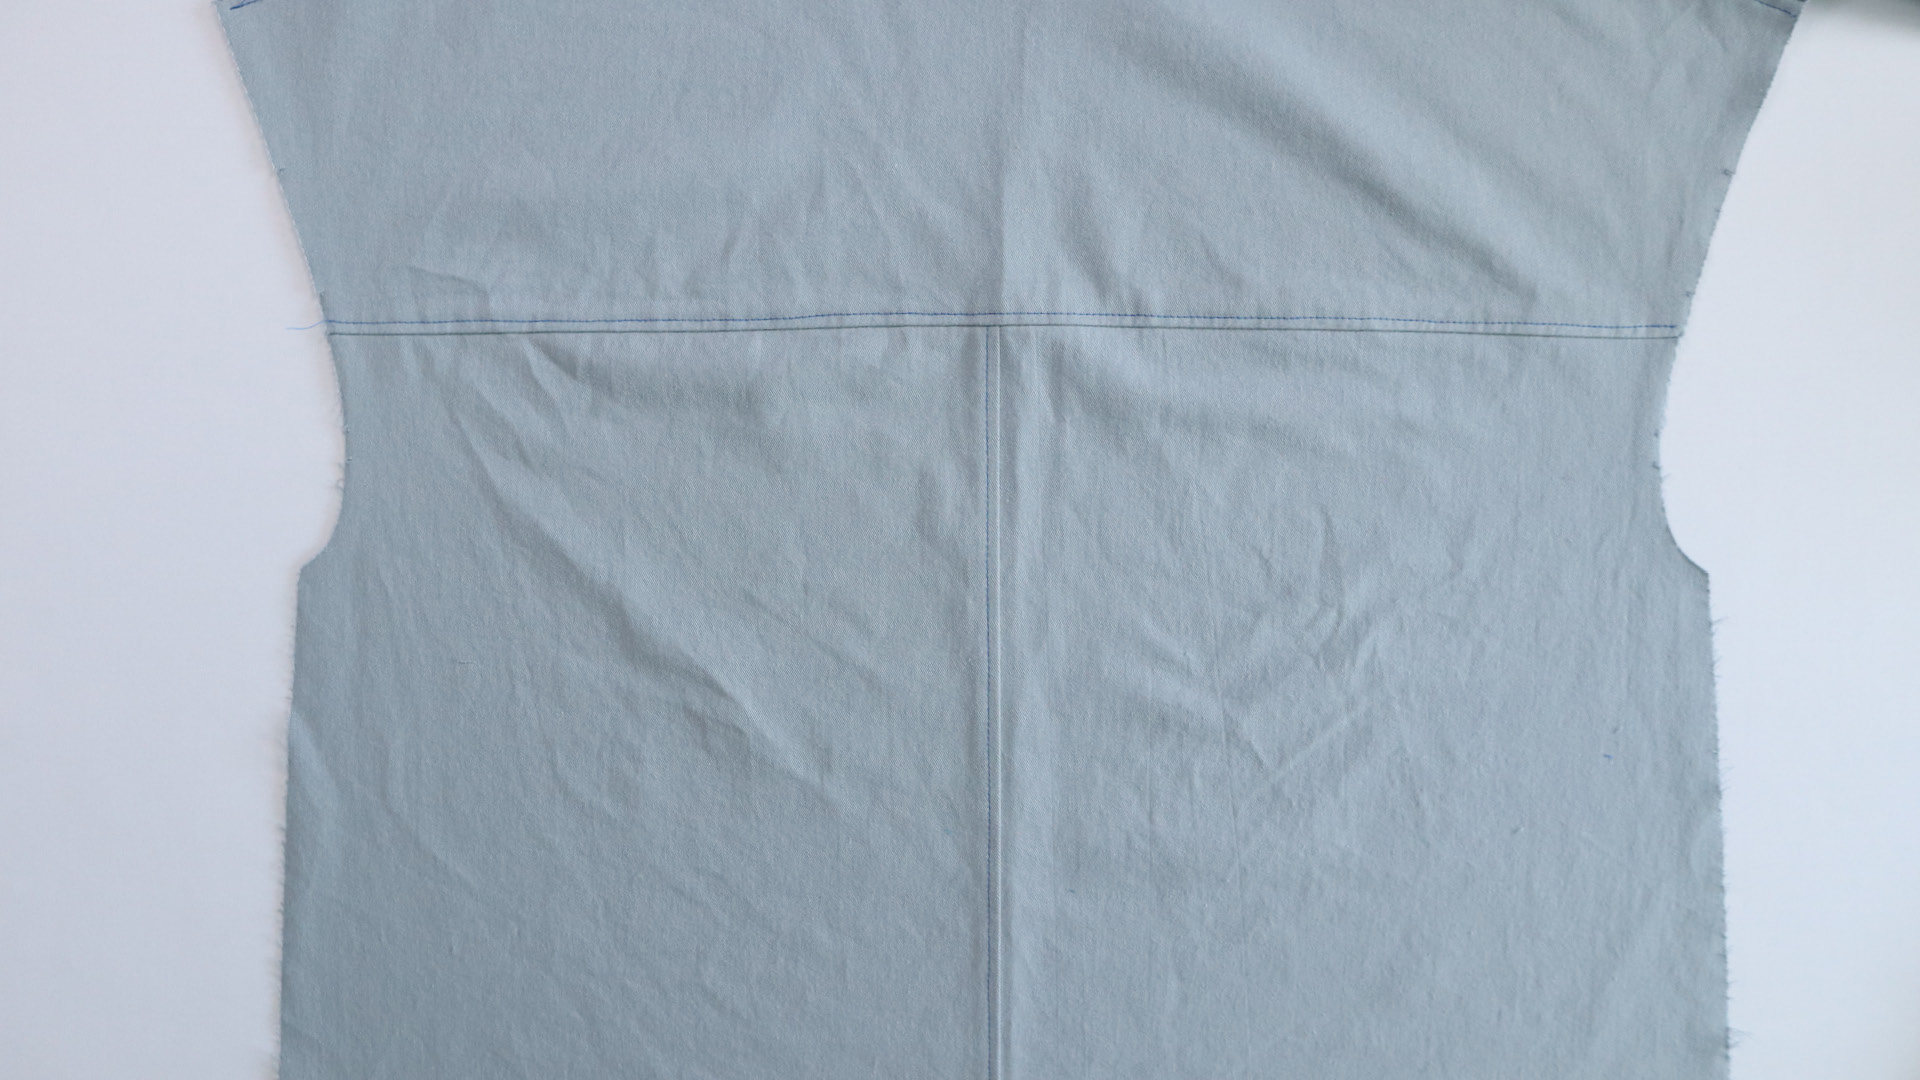
Close the shoulder seams
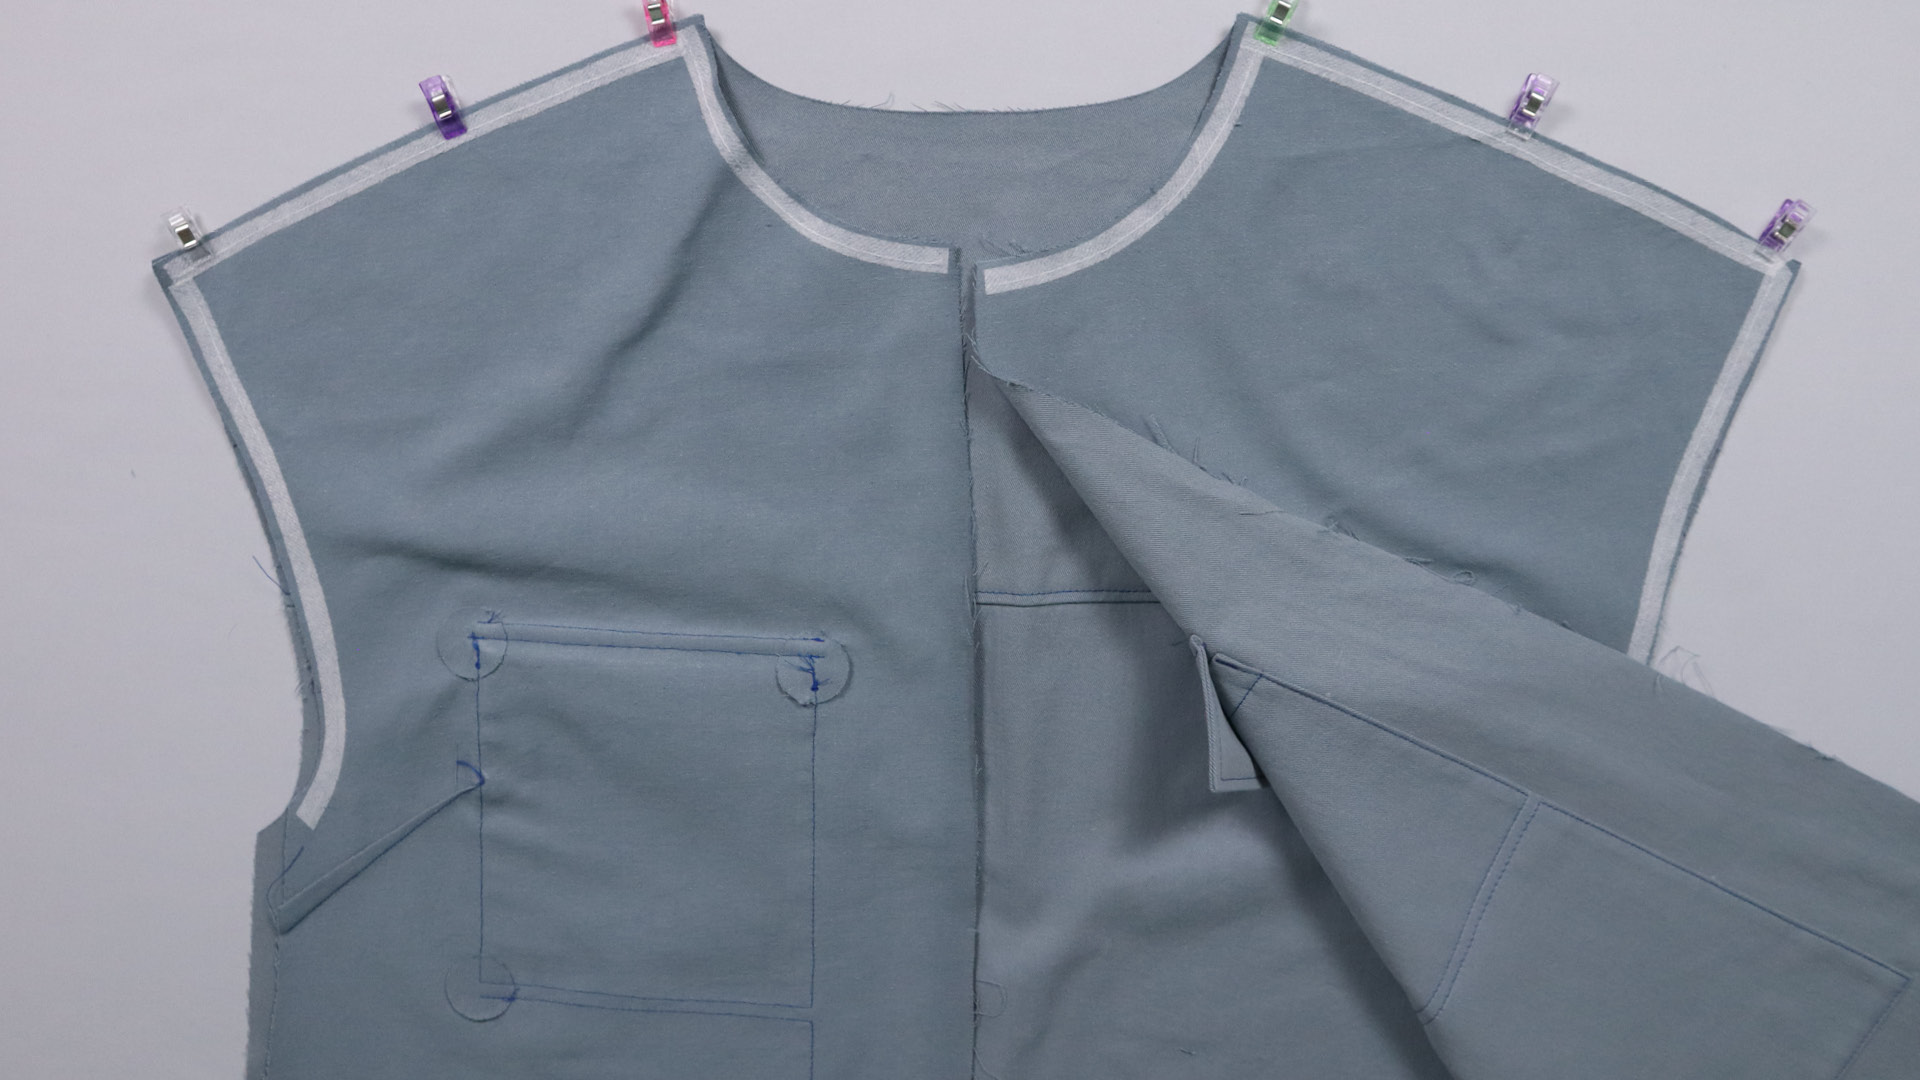
I pin the front pieces to the front edges of the yoke and sew them in place.
The seam allowances are also pressed towards the yoke and topstitched from the right side.
Sew hood
Sew buttonholes or insert eyelets
First transfer the position of the buttonholes from the pattern to the right side of your fabric if you have not already done so. Reinforce the area on the wrong side of the fabric with a piece of interfacing measuring approx. 2 x 3 cm and, if necessary, place another piece of fabric under the hood piece on the wrong side before sewing the buttonhole.
 The buttonhole positions are marked.
I recommend a buttonhole that has straight bars at the beginning and end.
Alternatively, you can of course make eyelets or sew the buttonhole using a different technique. In any case, make sure that it matches the size of your ribbon or cord. The marking in the pattern matches the pattern piece for the ribbon exactly.
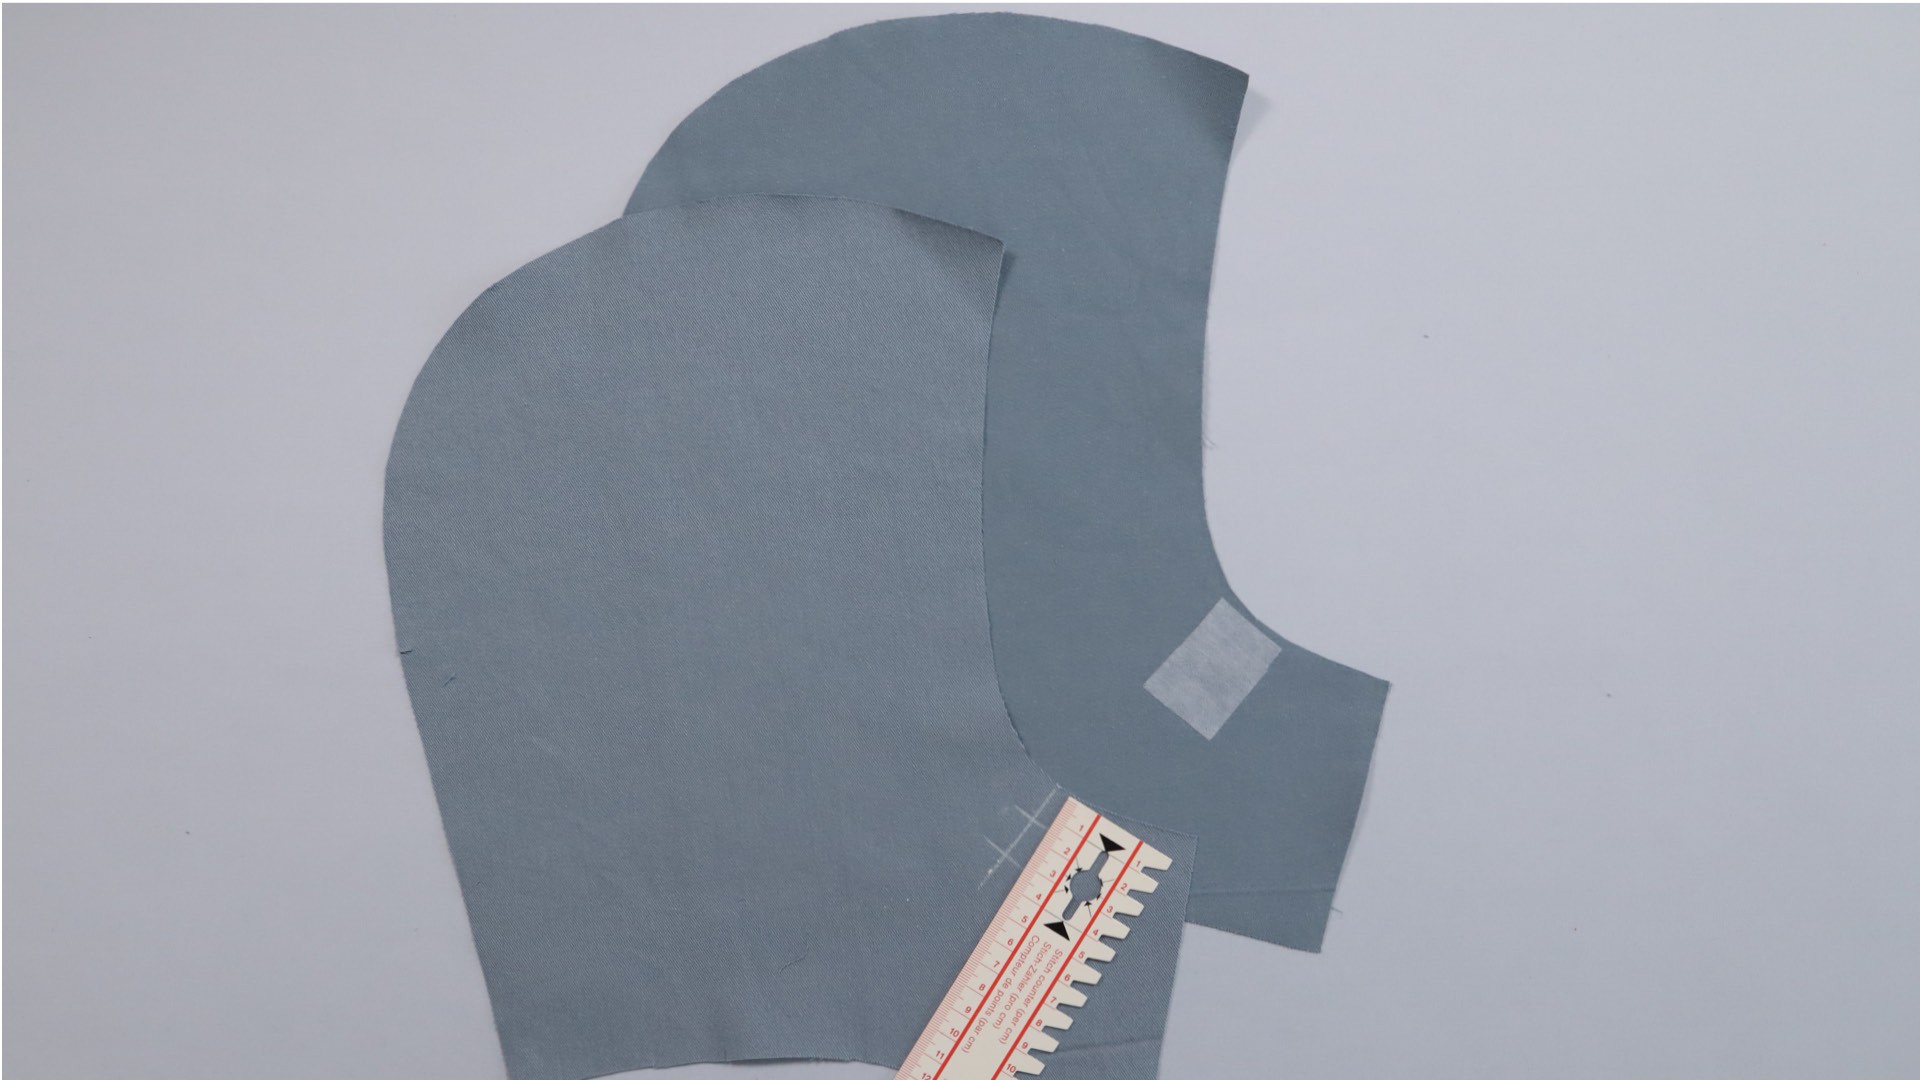
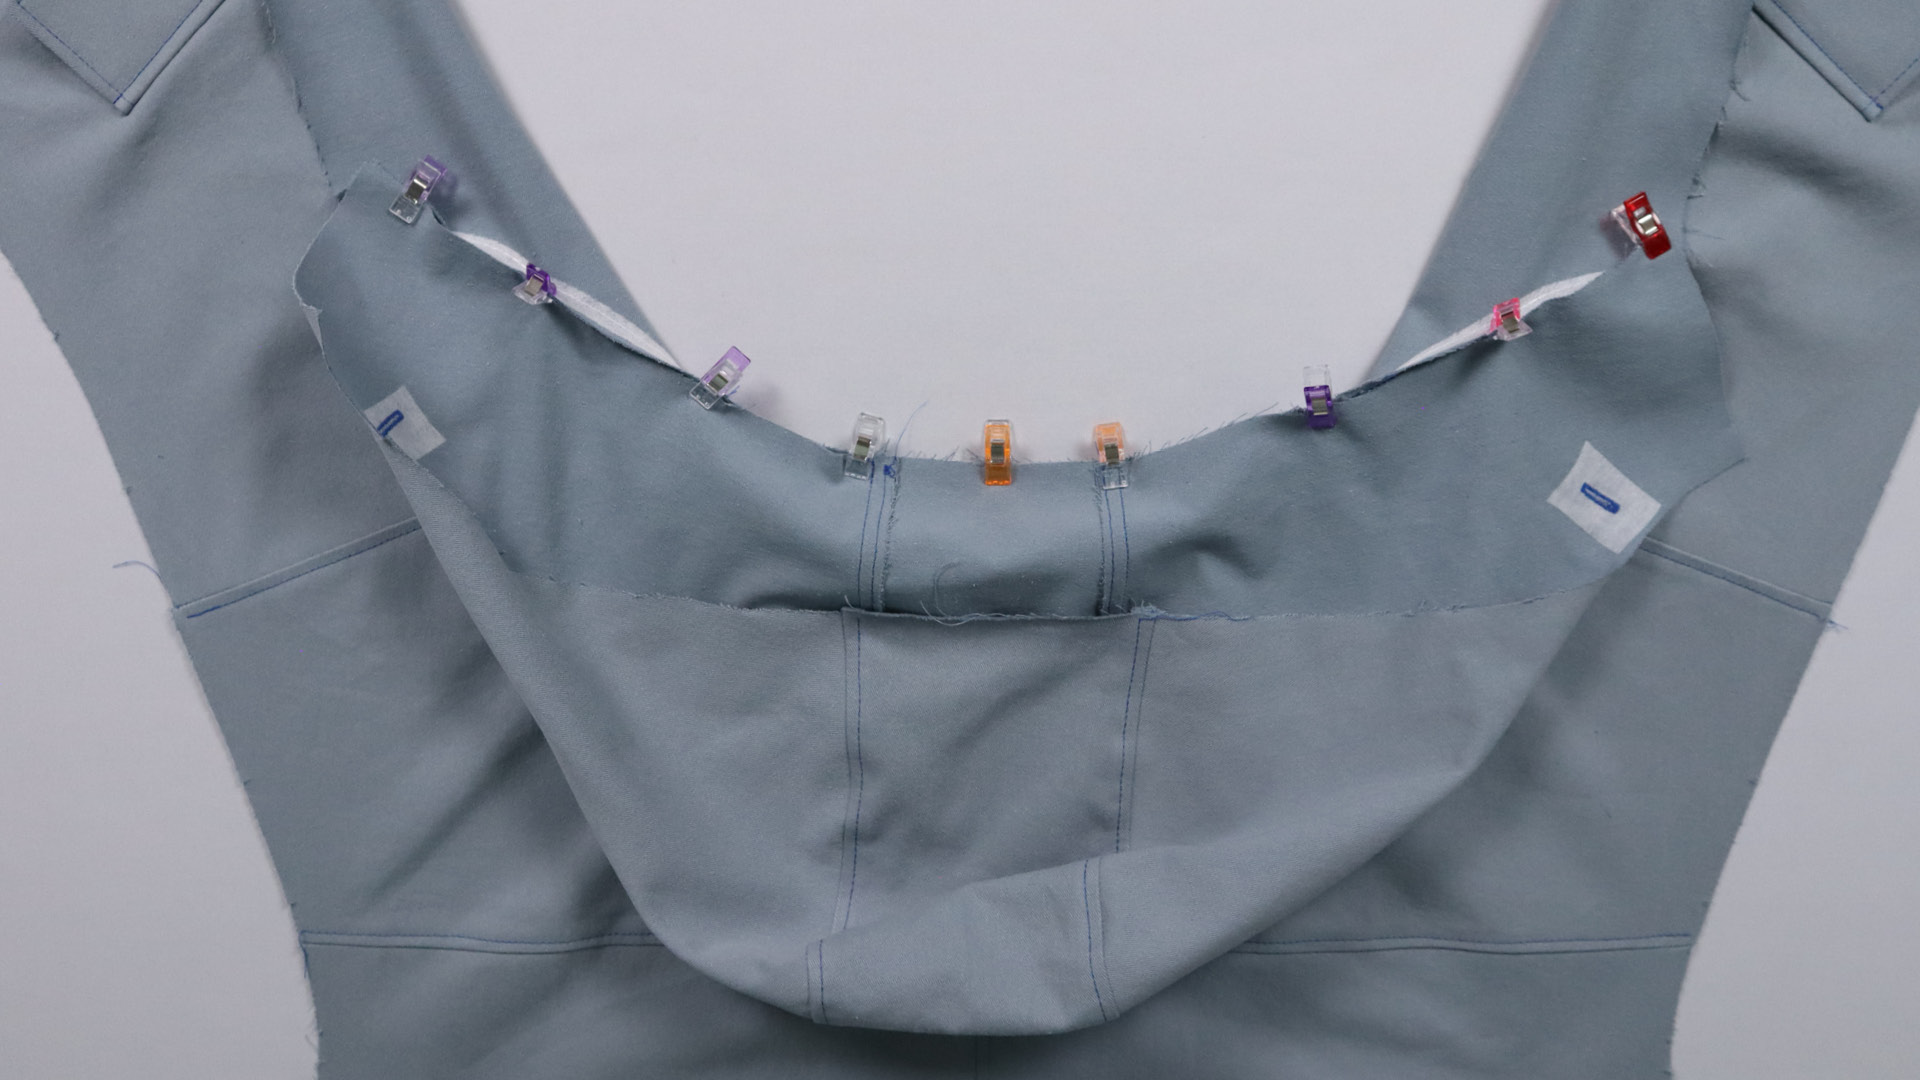
Connecting hood parts

Now join the side hood pieces to the center piece. Pay attention to the notches when you pin the center strip to the side pieces, right sides facing.
This step is a little tricky due to the curve of the hood. So take enough time for pinning and sewing and keep laying the fabric of the center strip flat so that you don’t sew in any creases.
Here I sew a connecting strip into the curve on both sides, to which the hood lining will later be attached.
I press the seam allowances to the center strip and topstitch them close to the edge from the right.
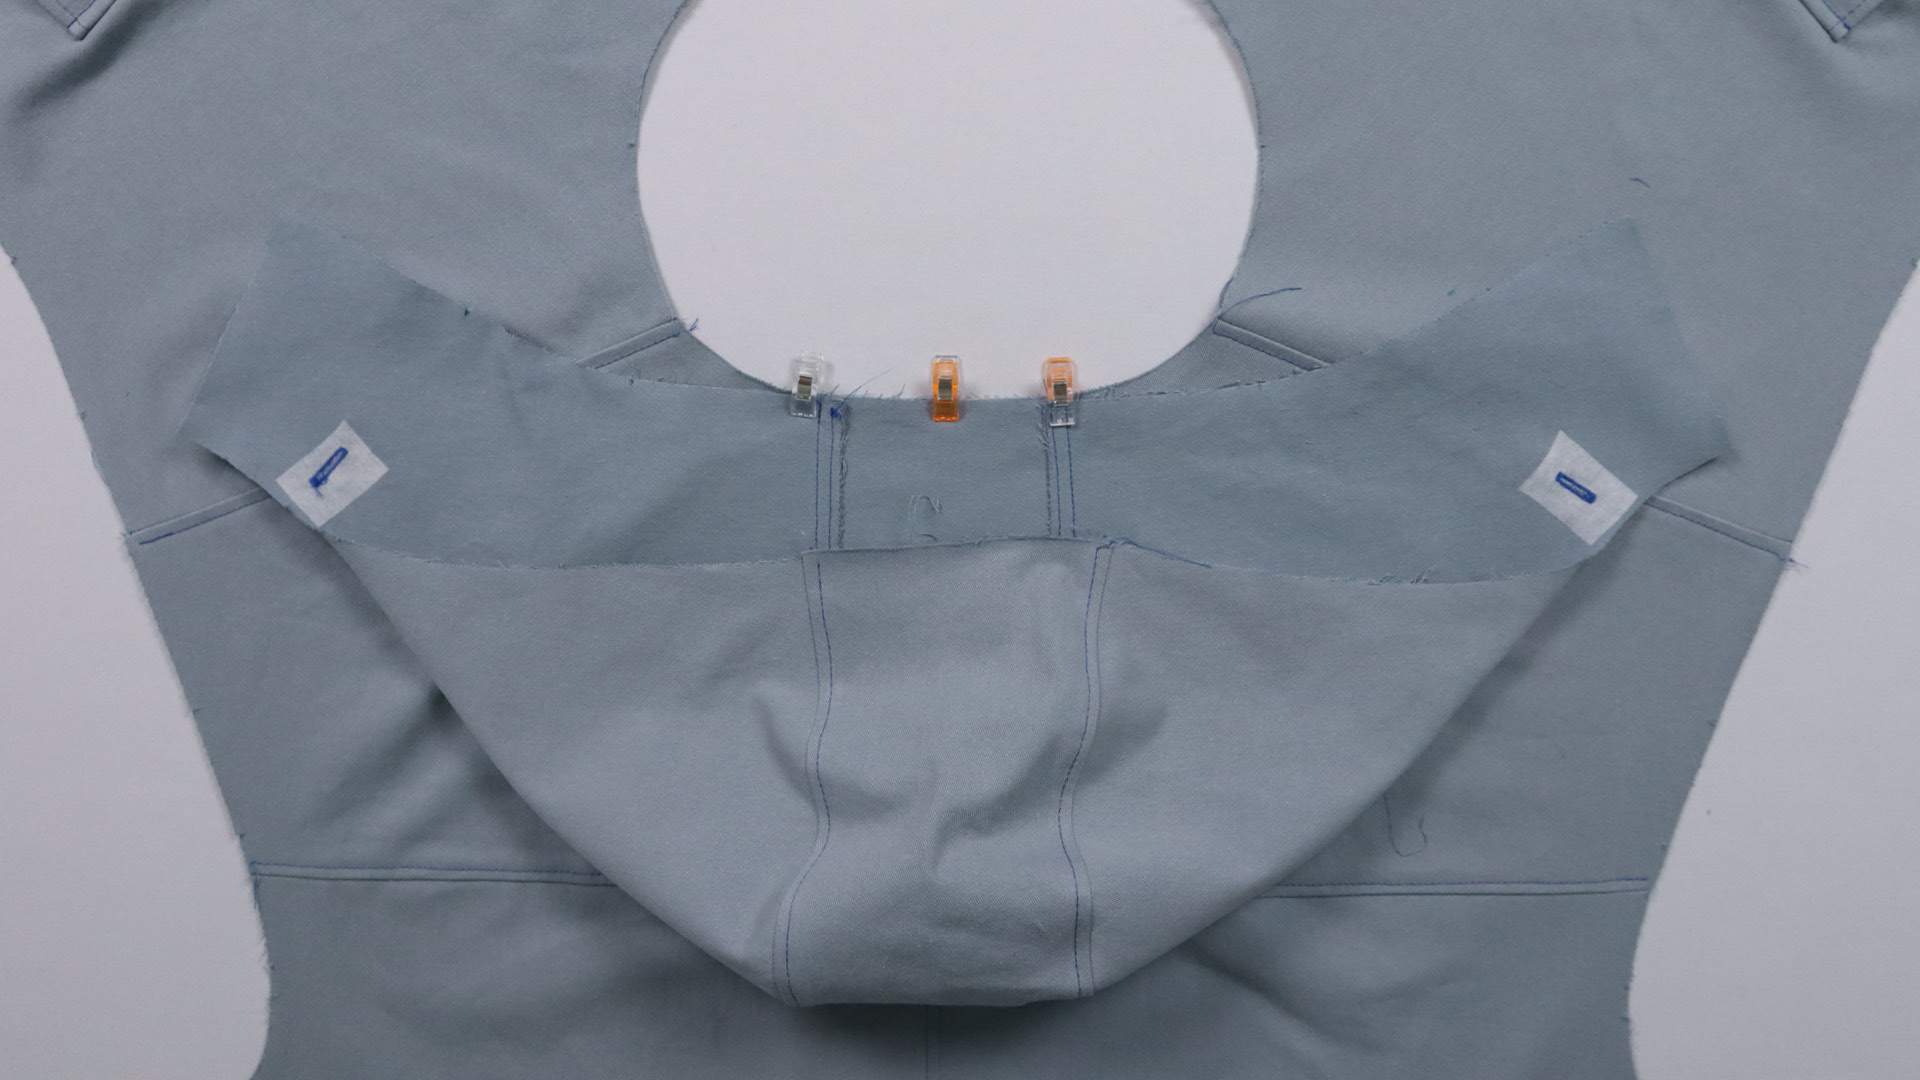
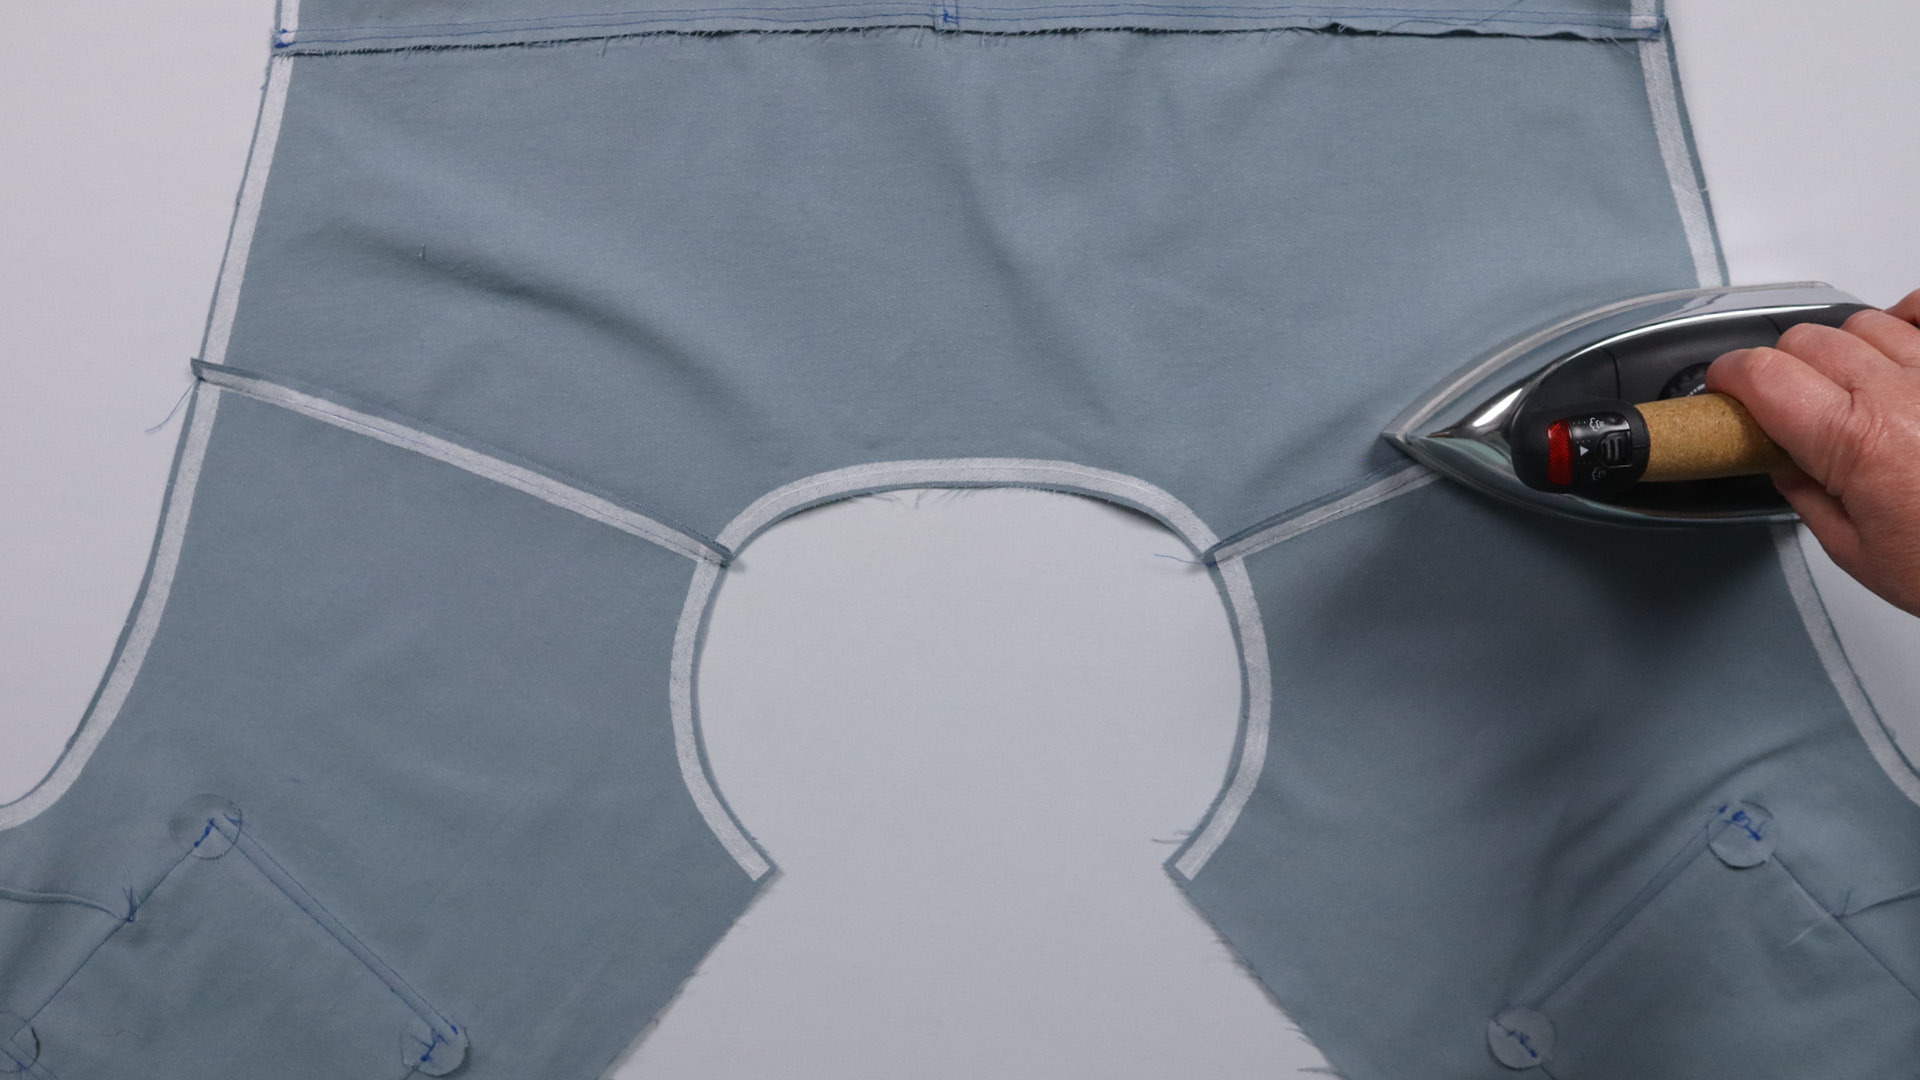
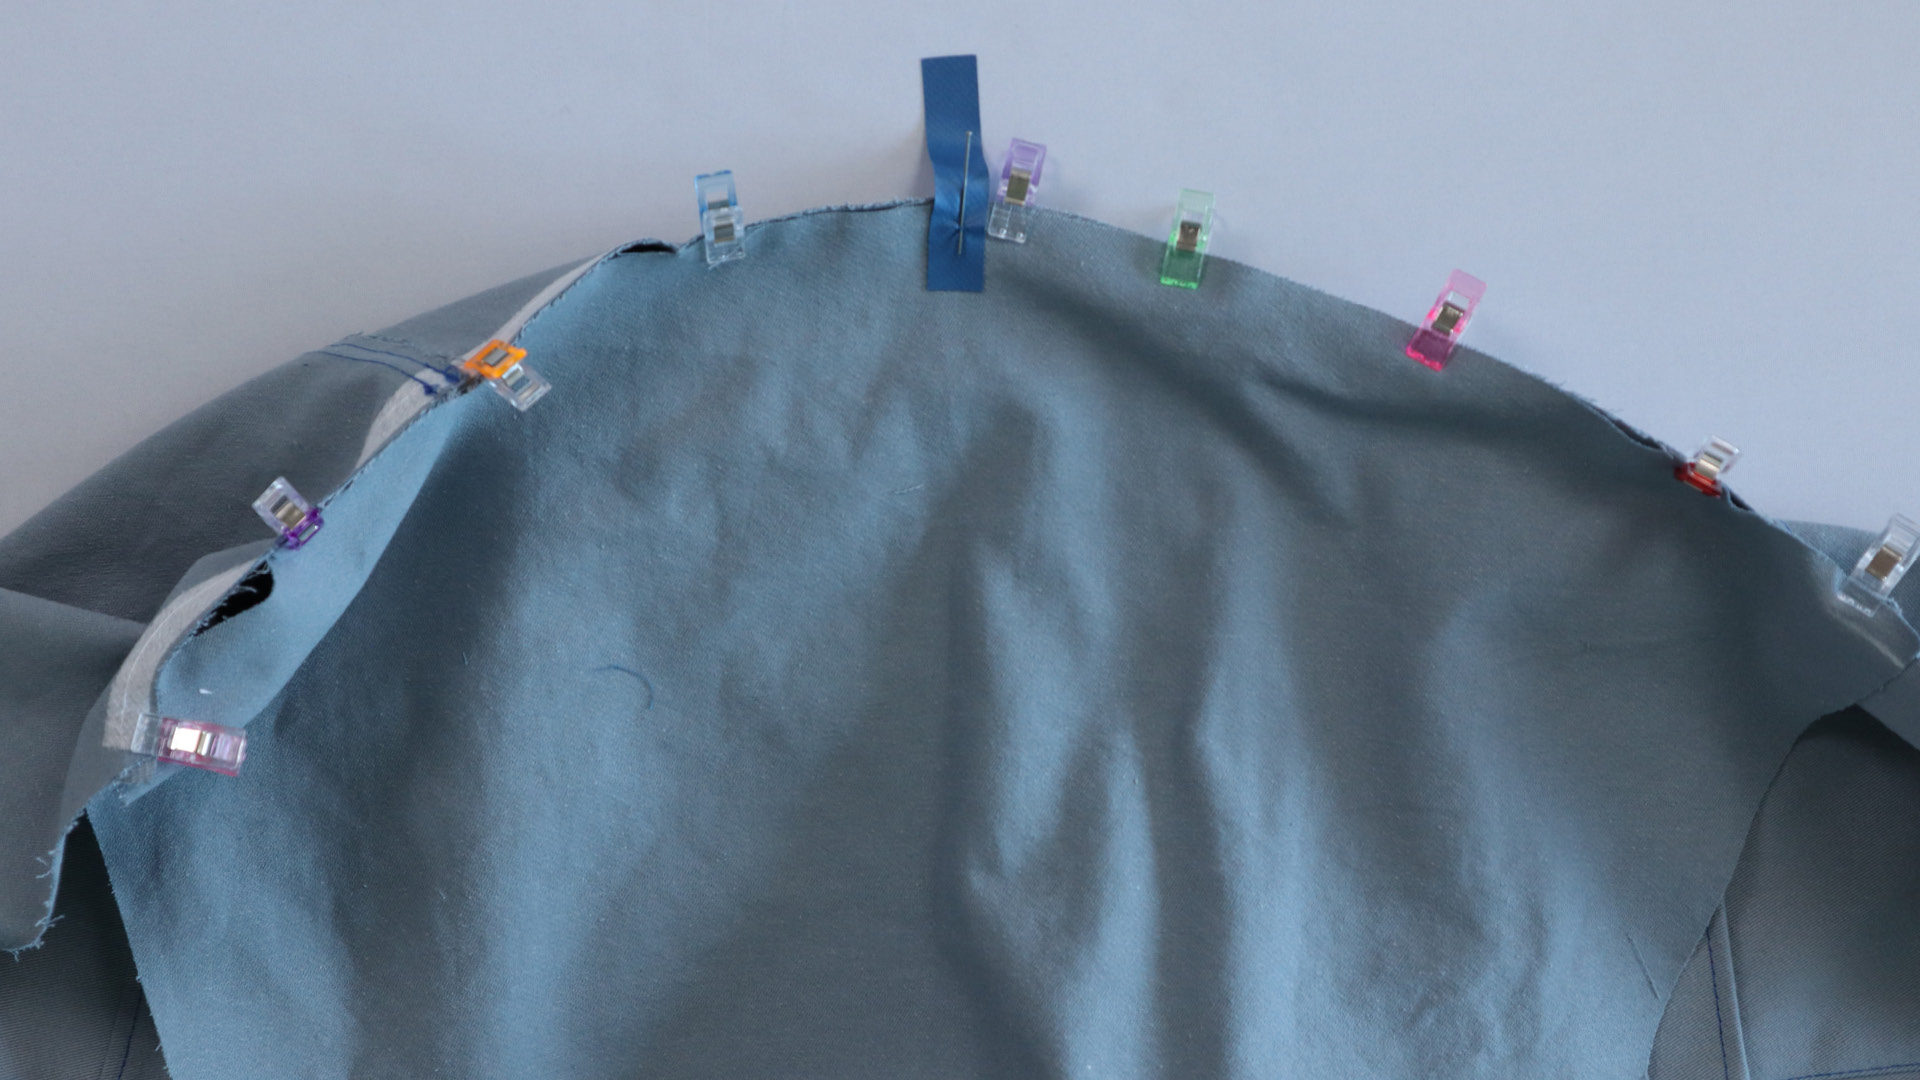
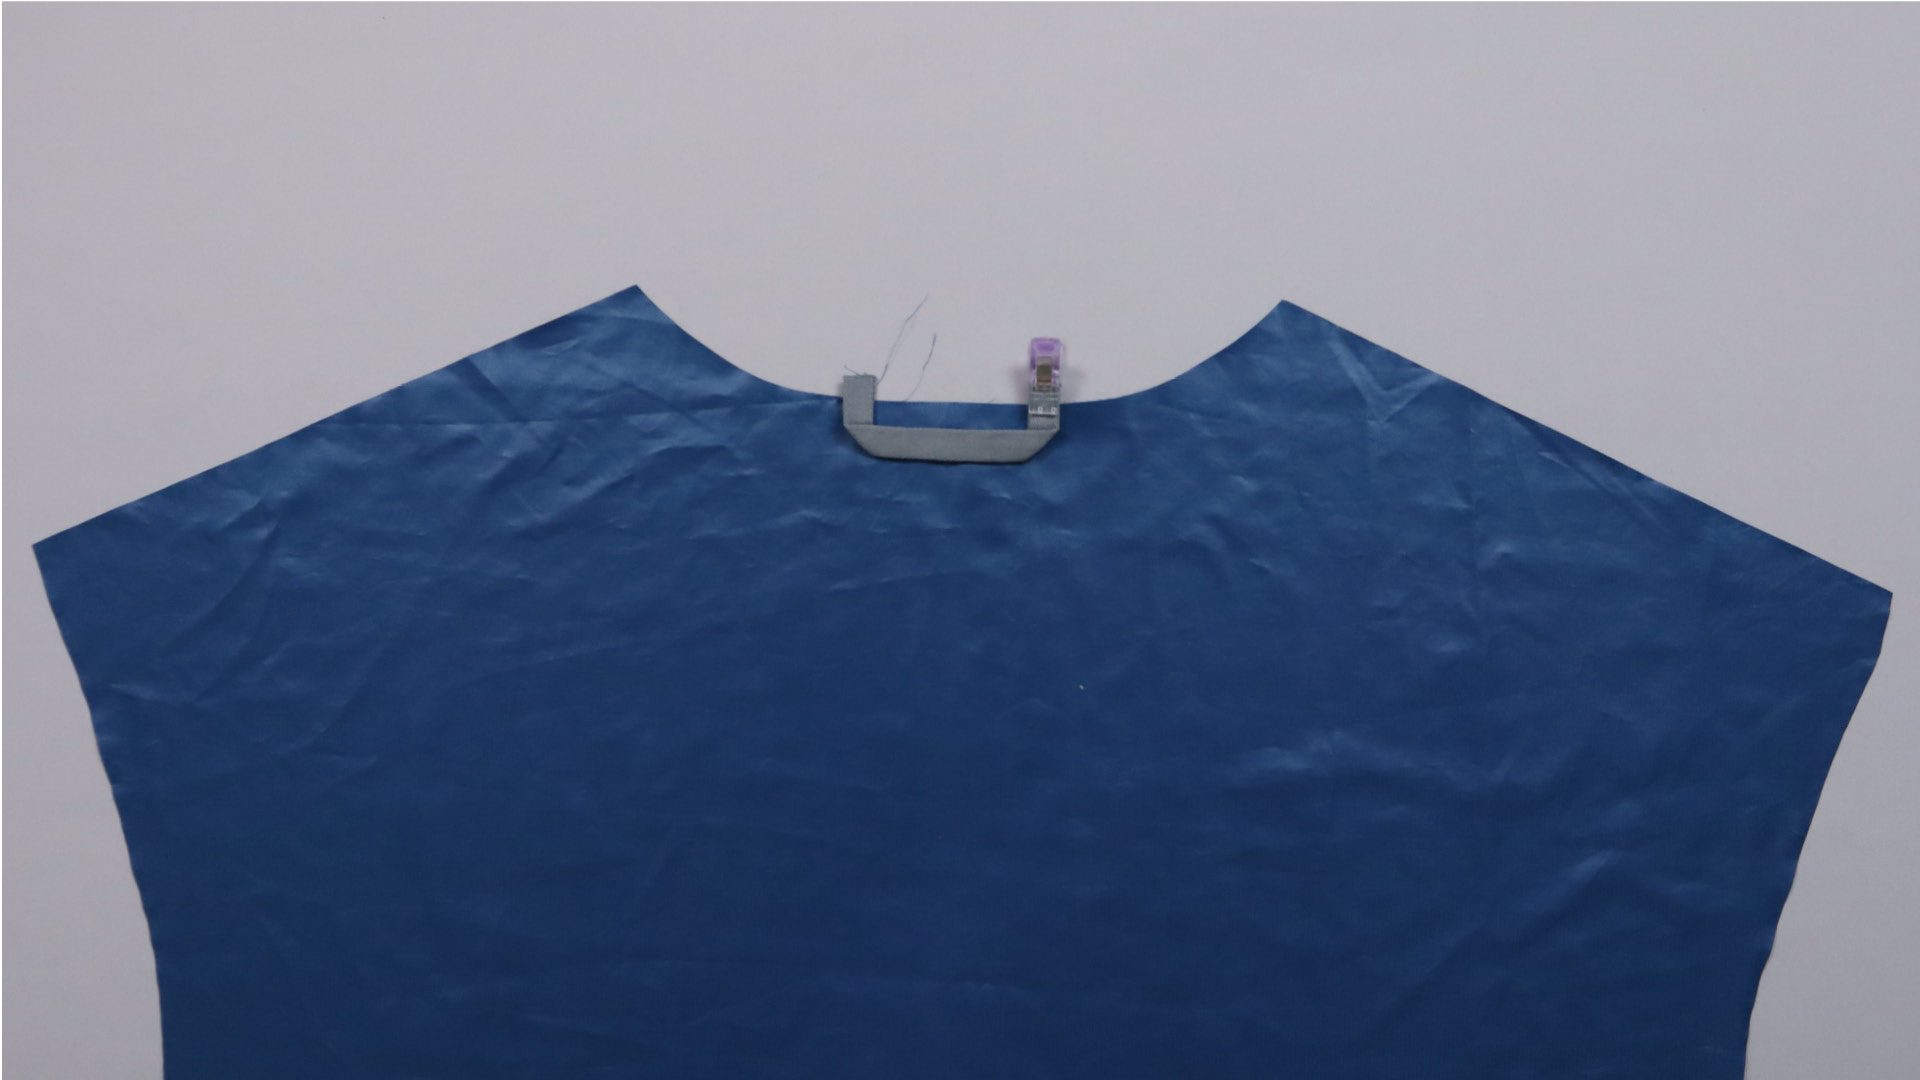
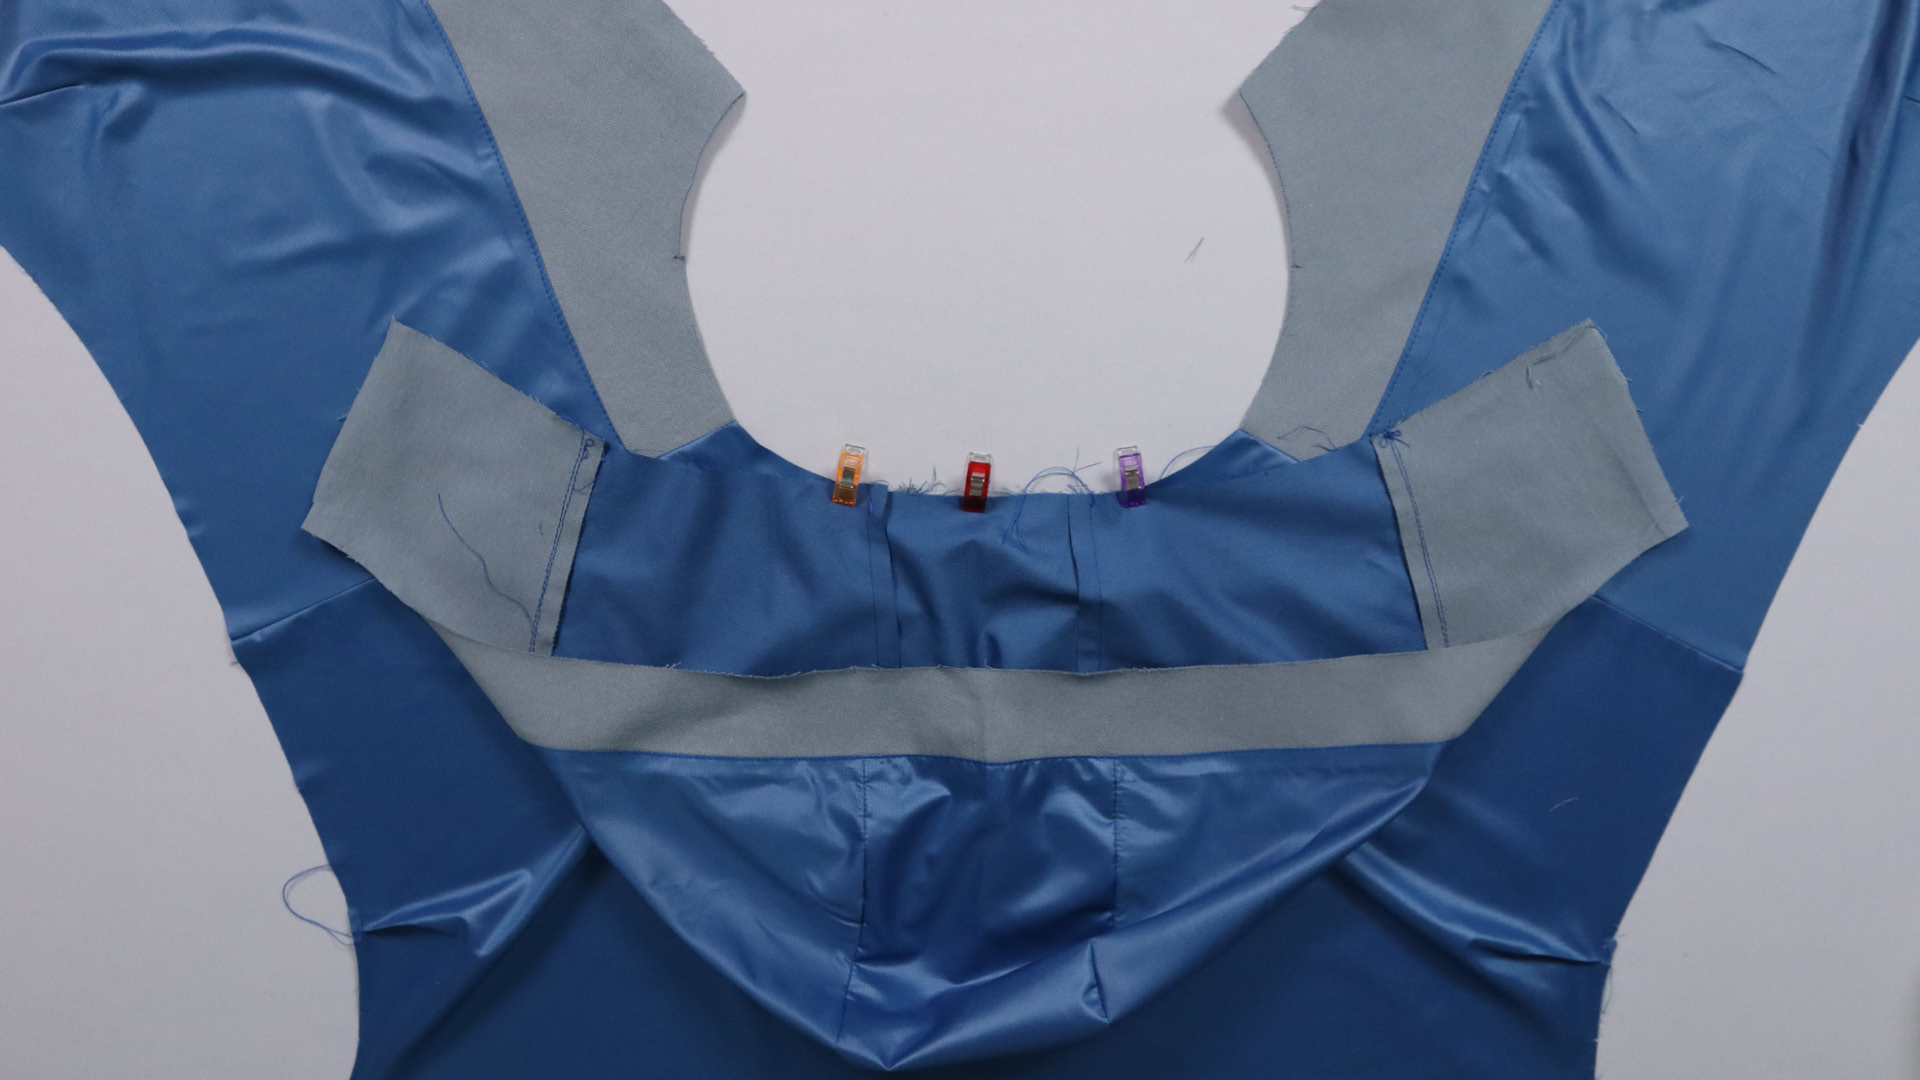
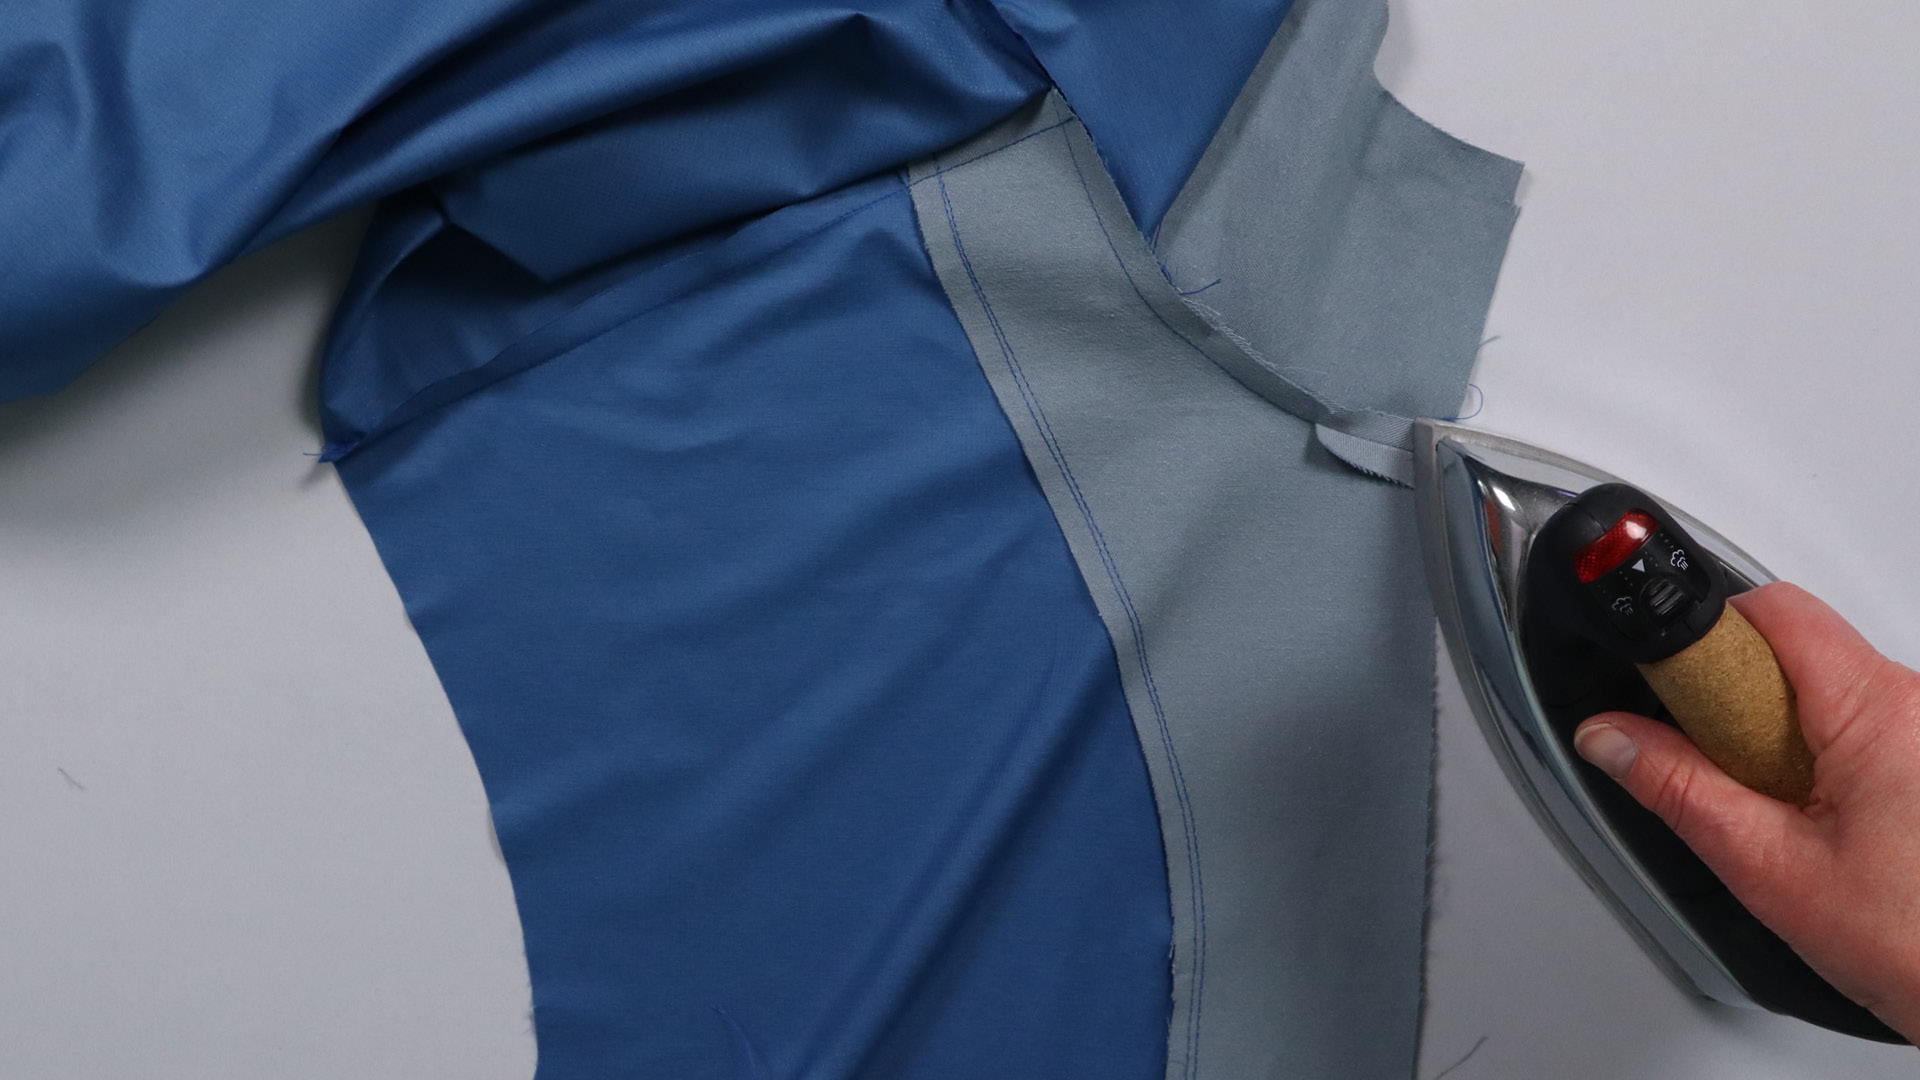
Starting at the center back, I pin the hood to the neck hole.
Pin the entire lower edge of the hood to the body according to the markings and sew the two together.
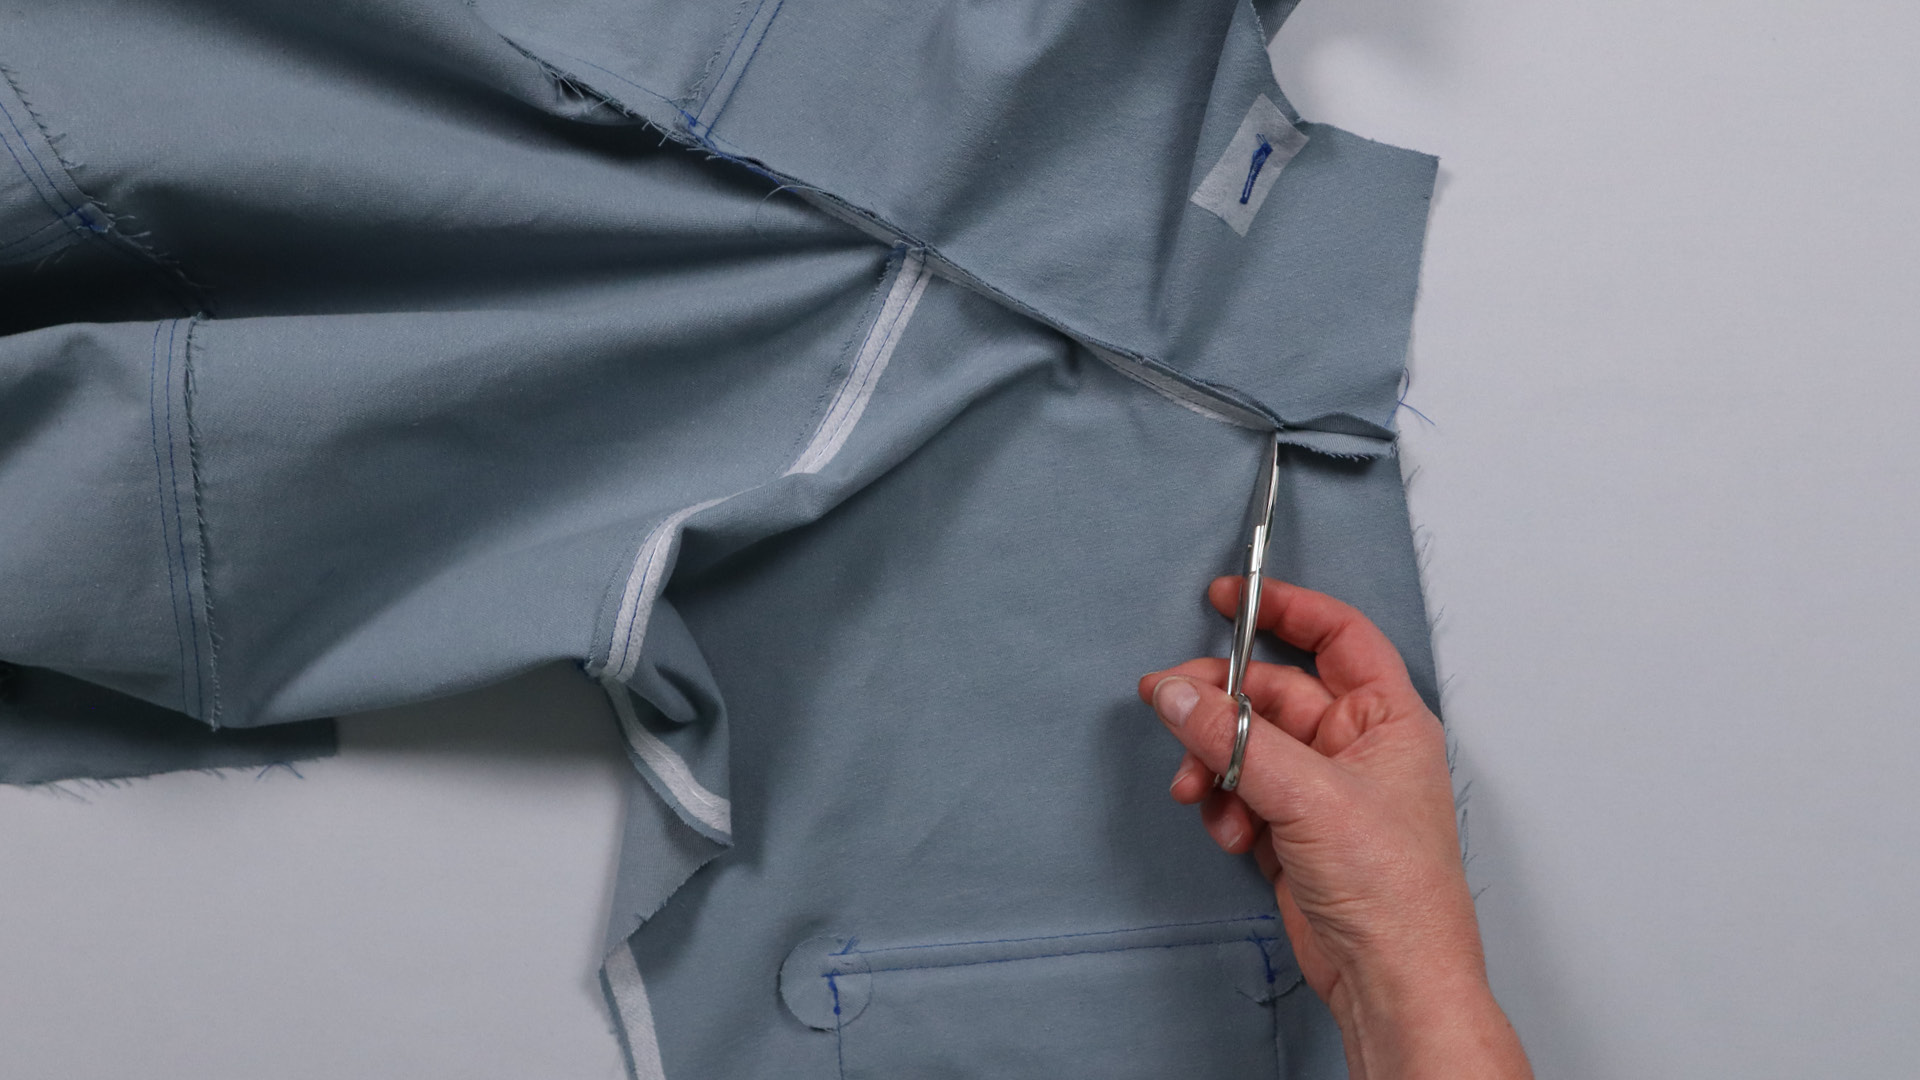
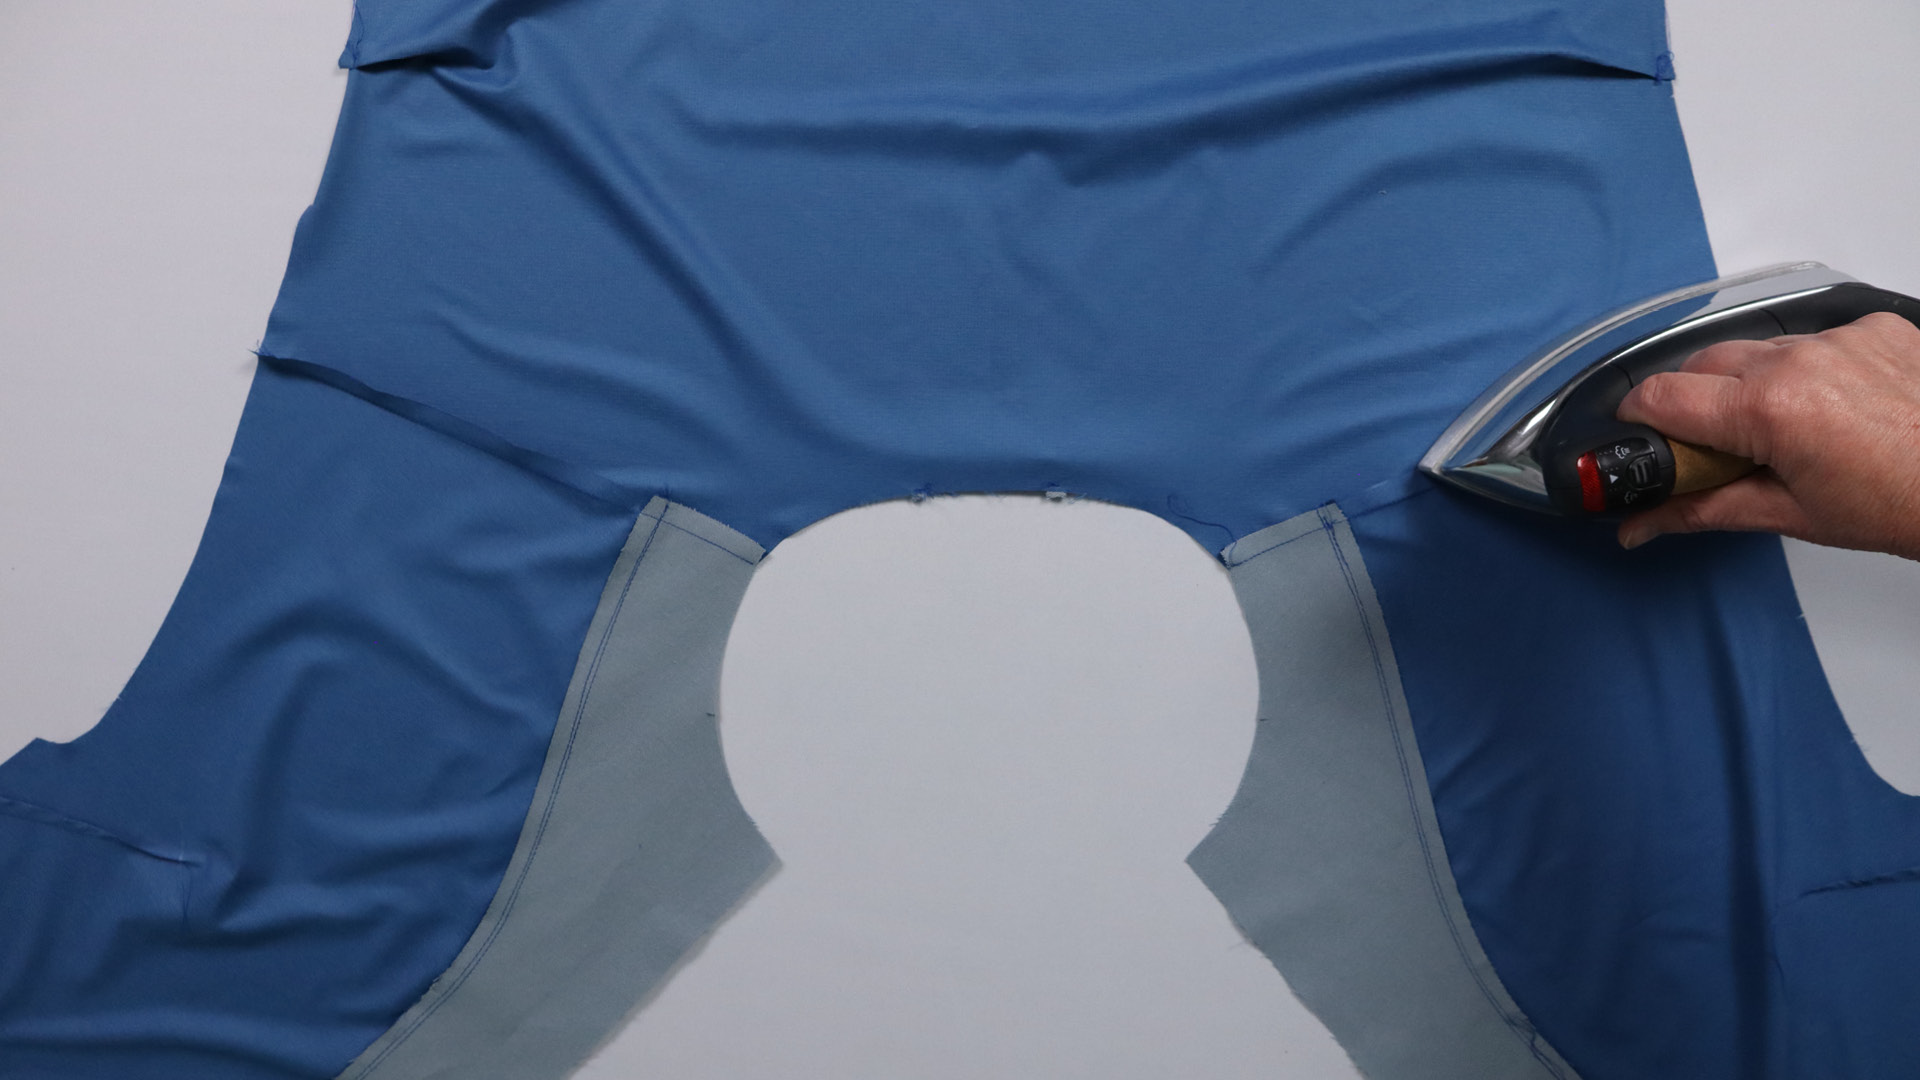
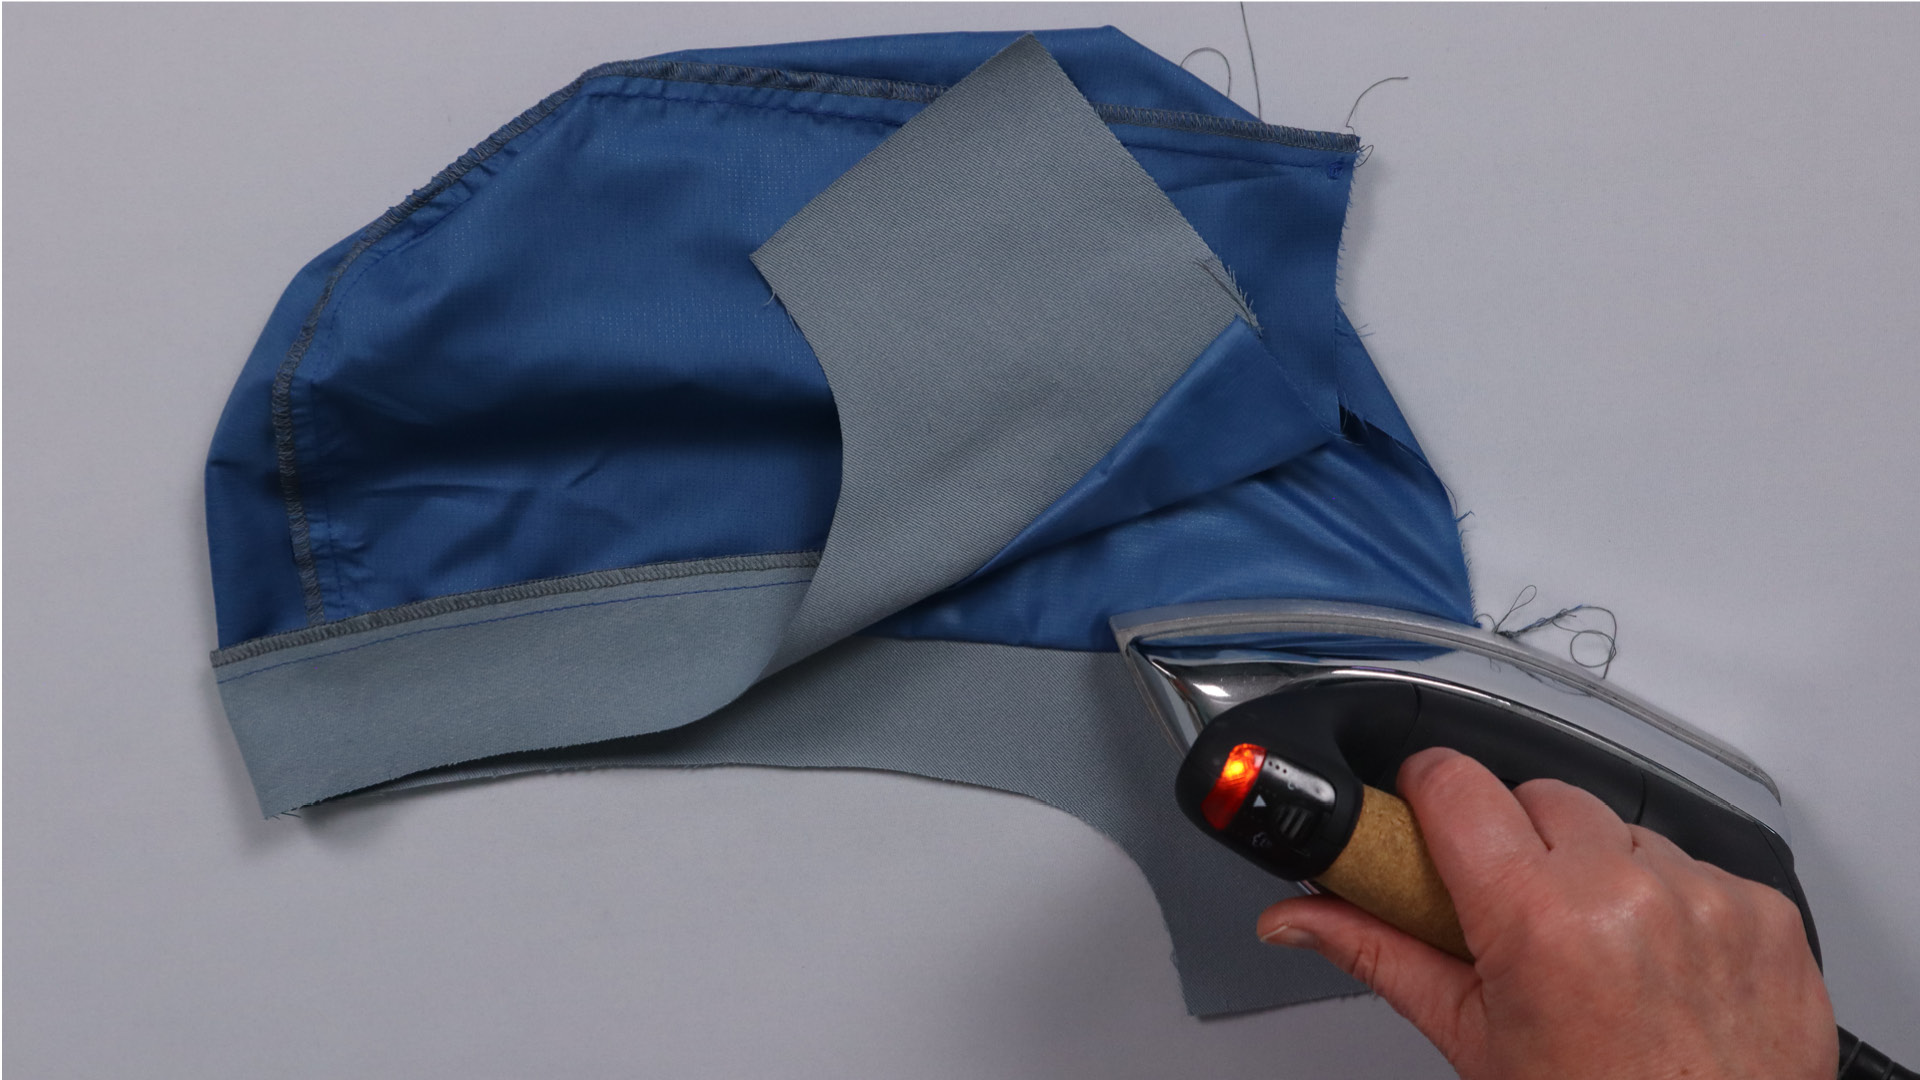
Then cut the seam allowance of the body approx. 4.5 cm from the front edge on both sides and press the seam allowances apart.
Press the seam allowances in the remaining curve towards the hood.
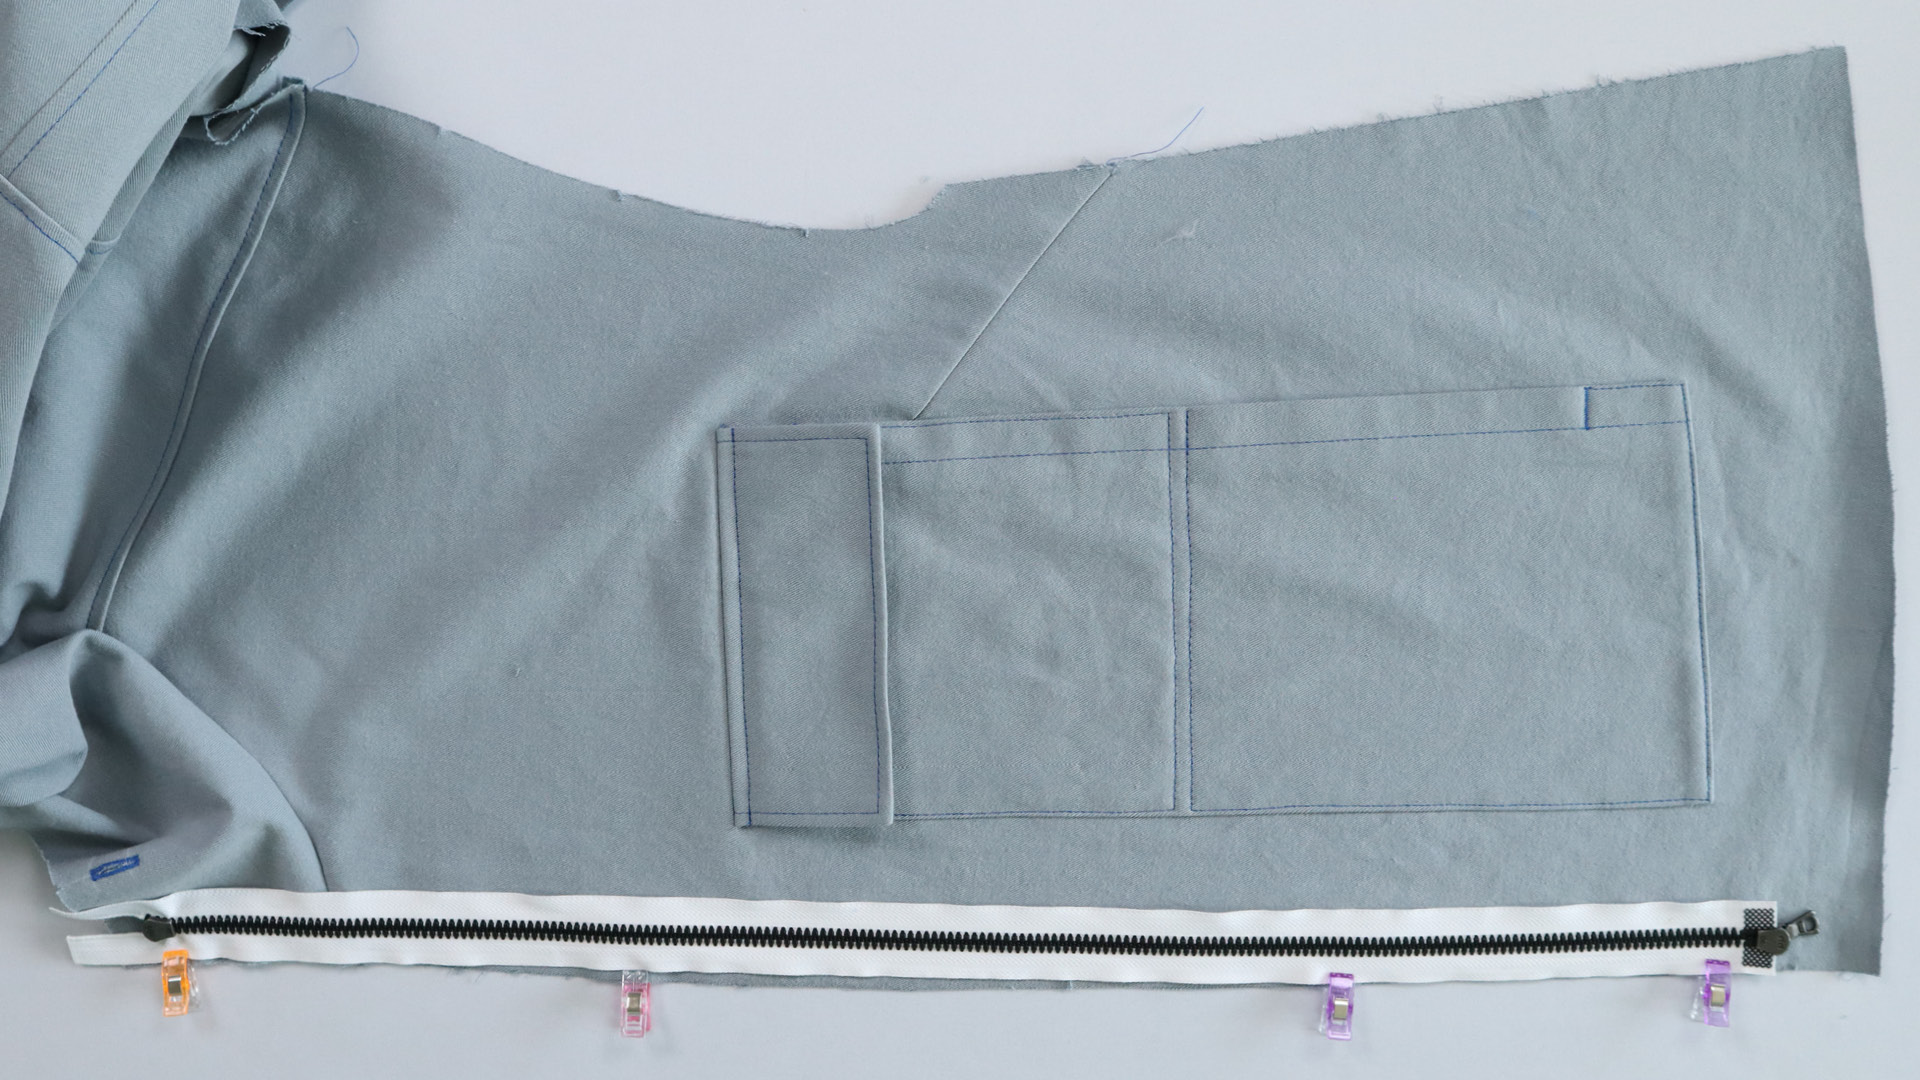
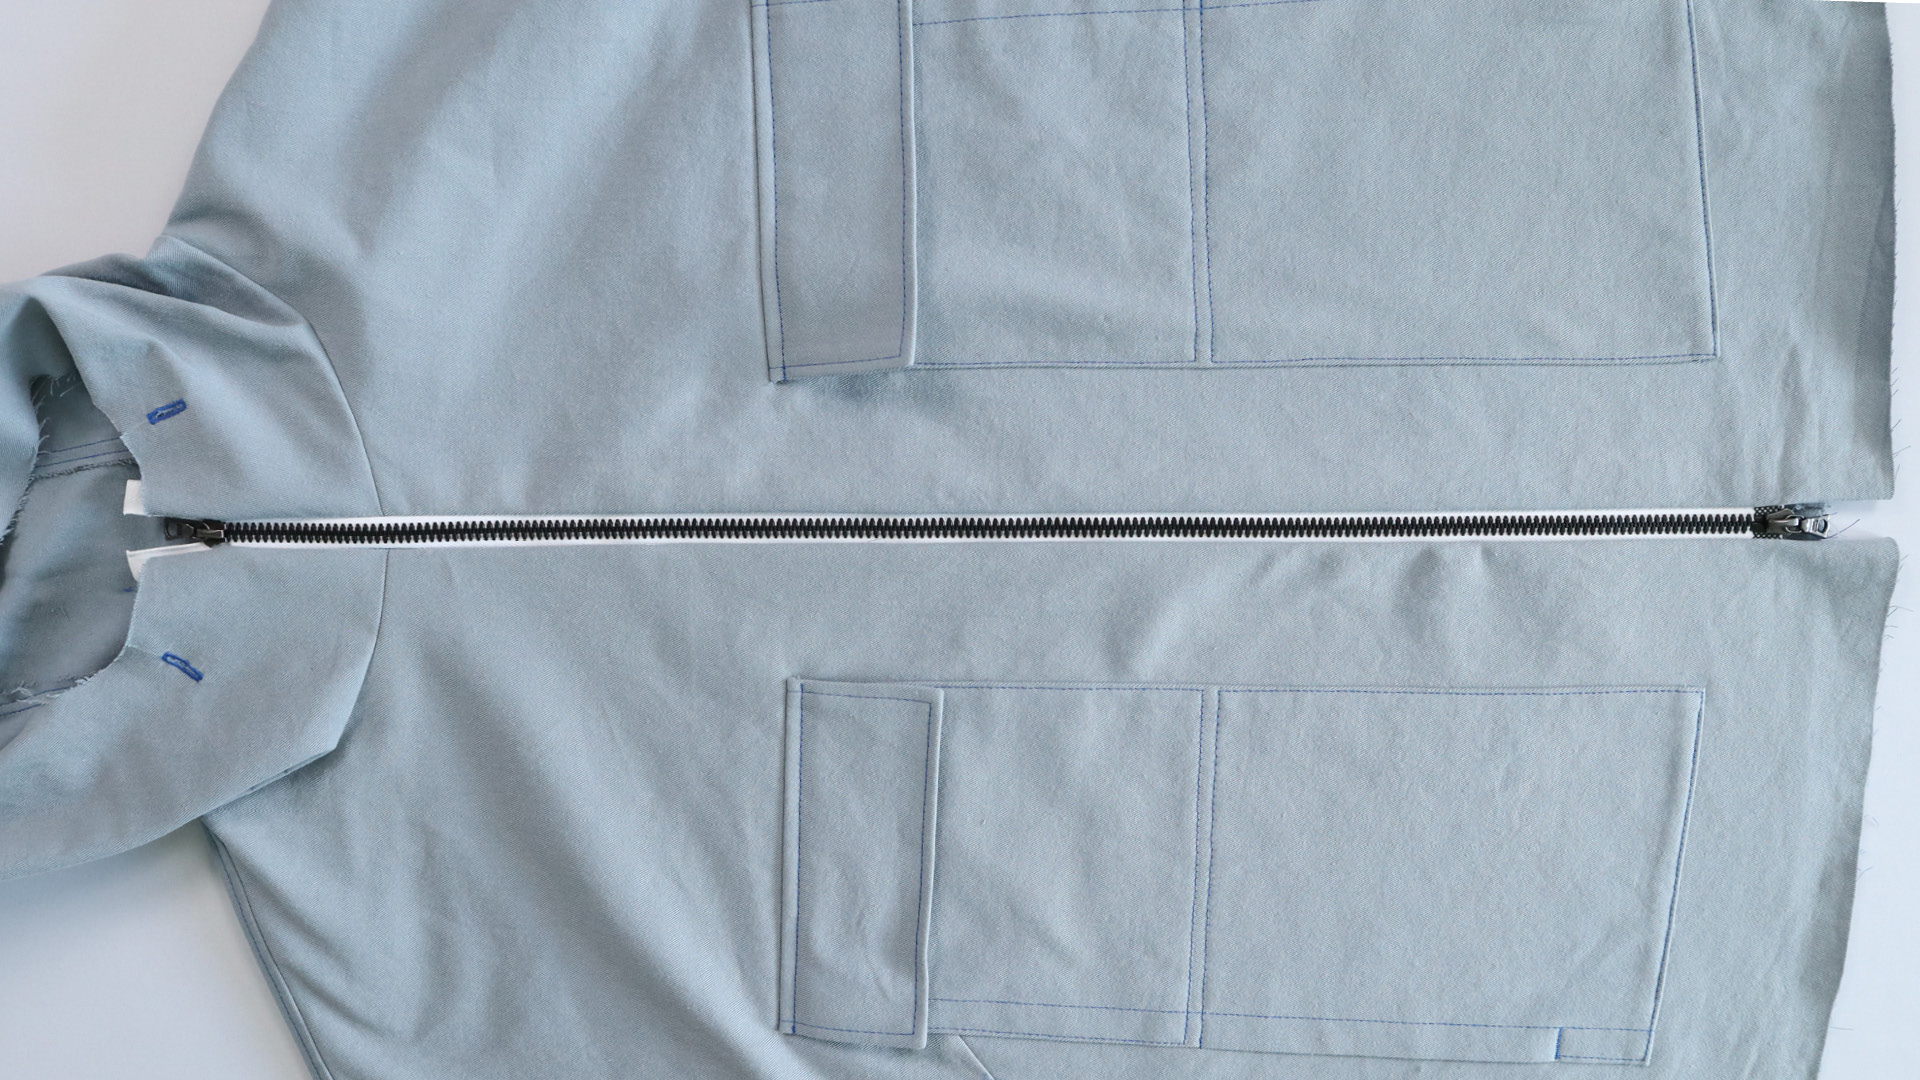
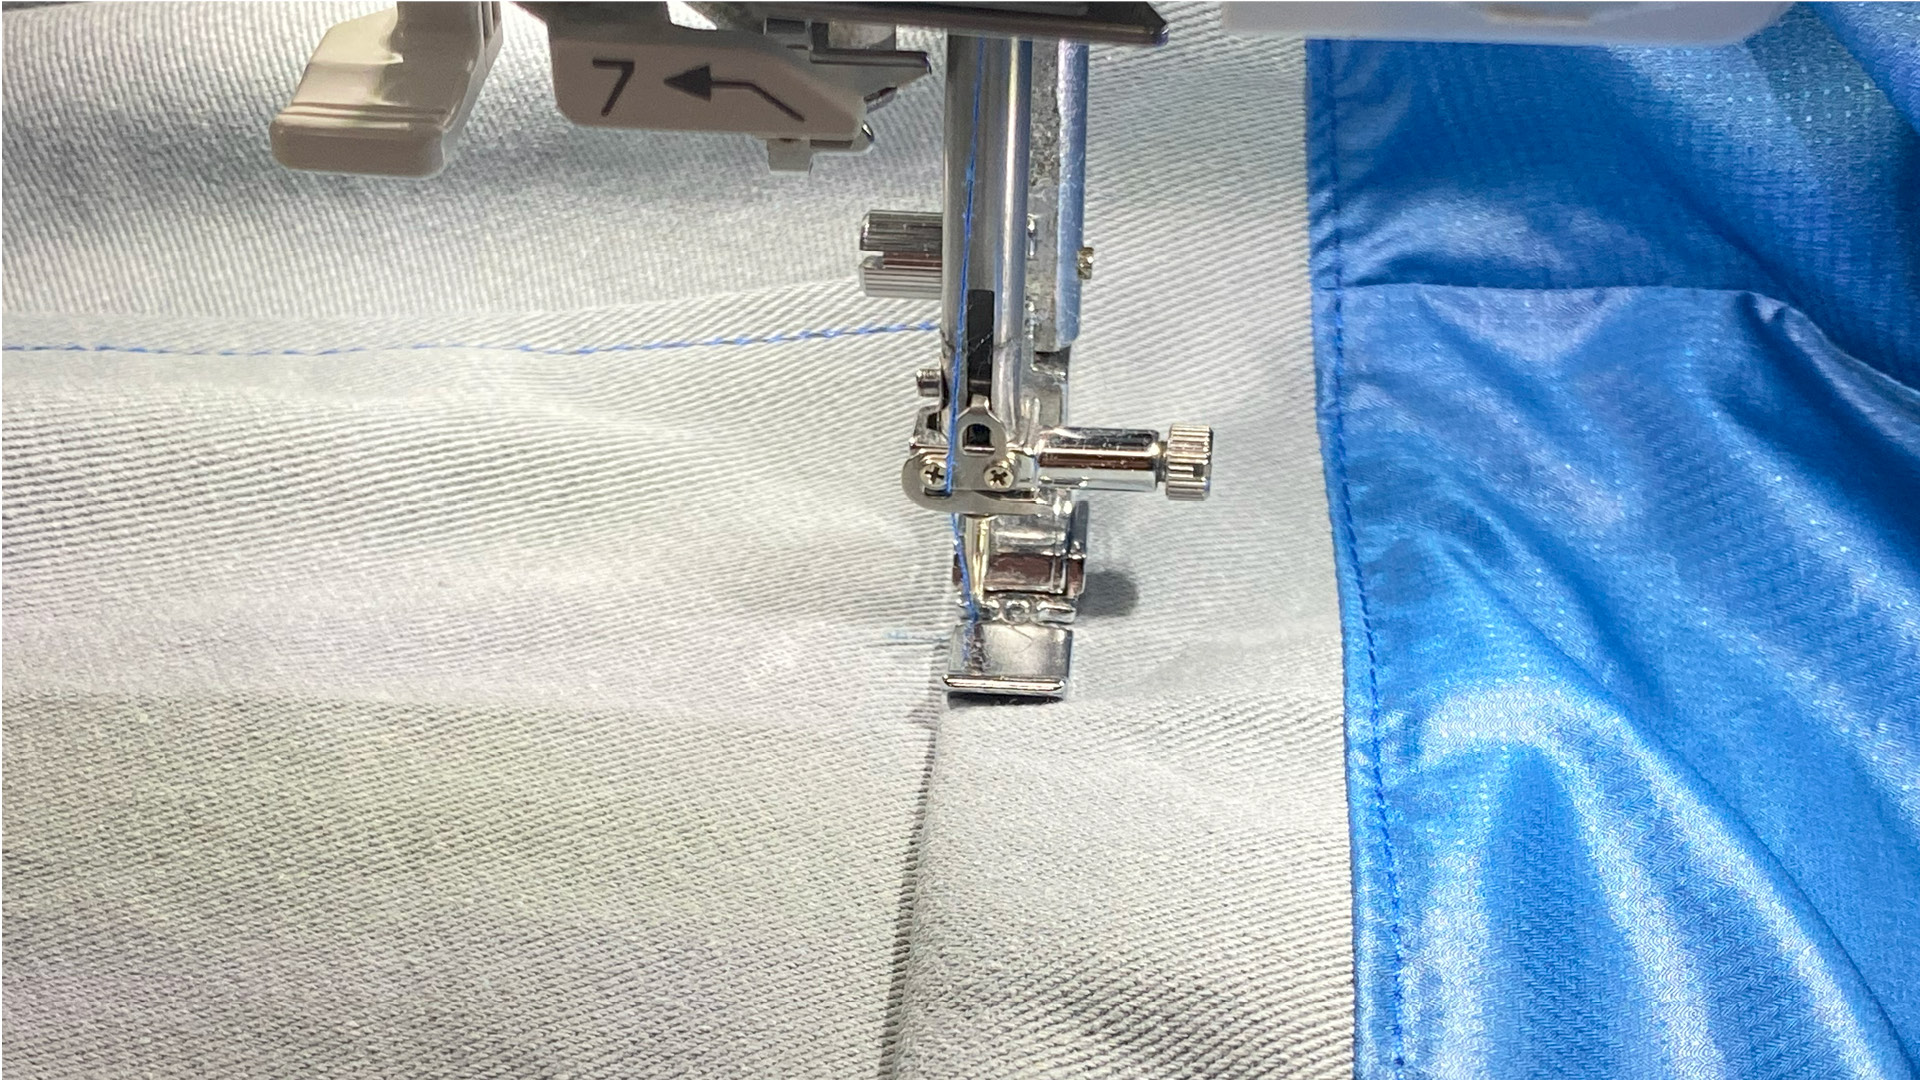
Sew zipper to the outer jacket with hood
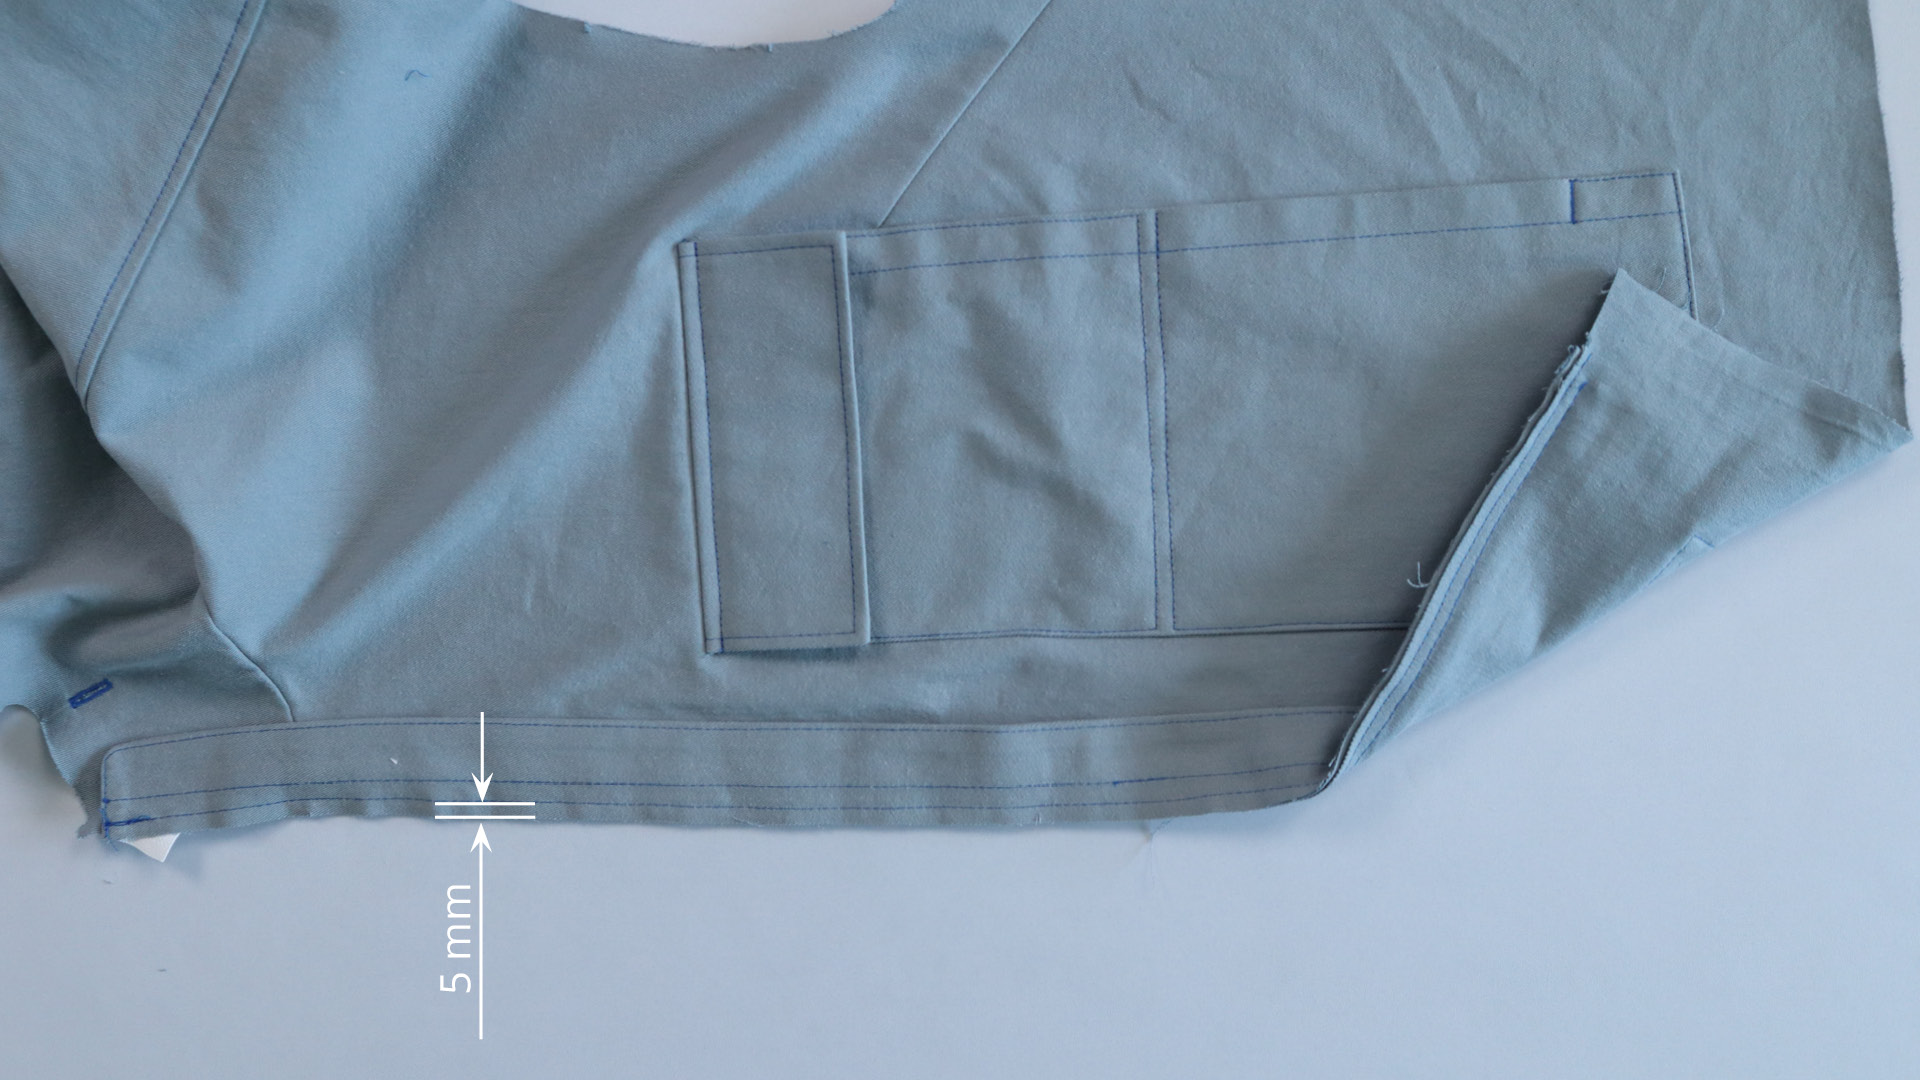
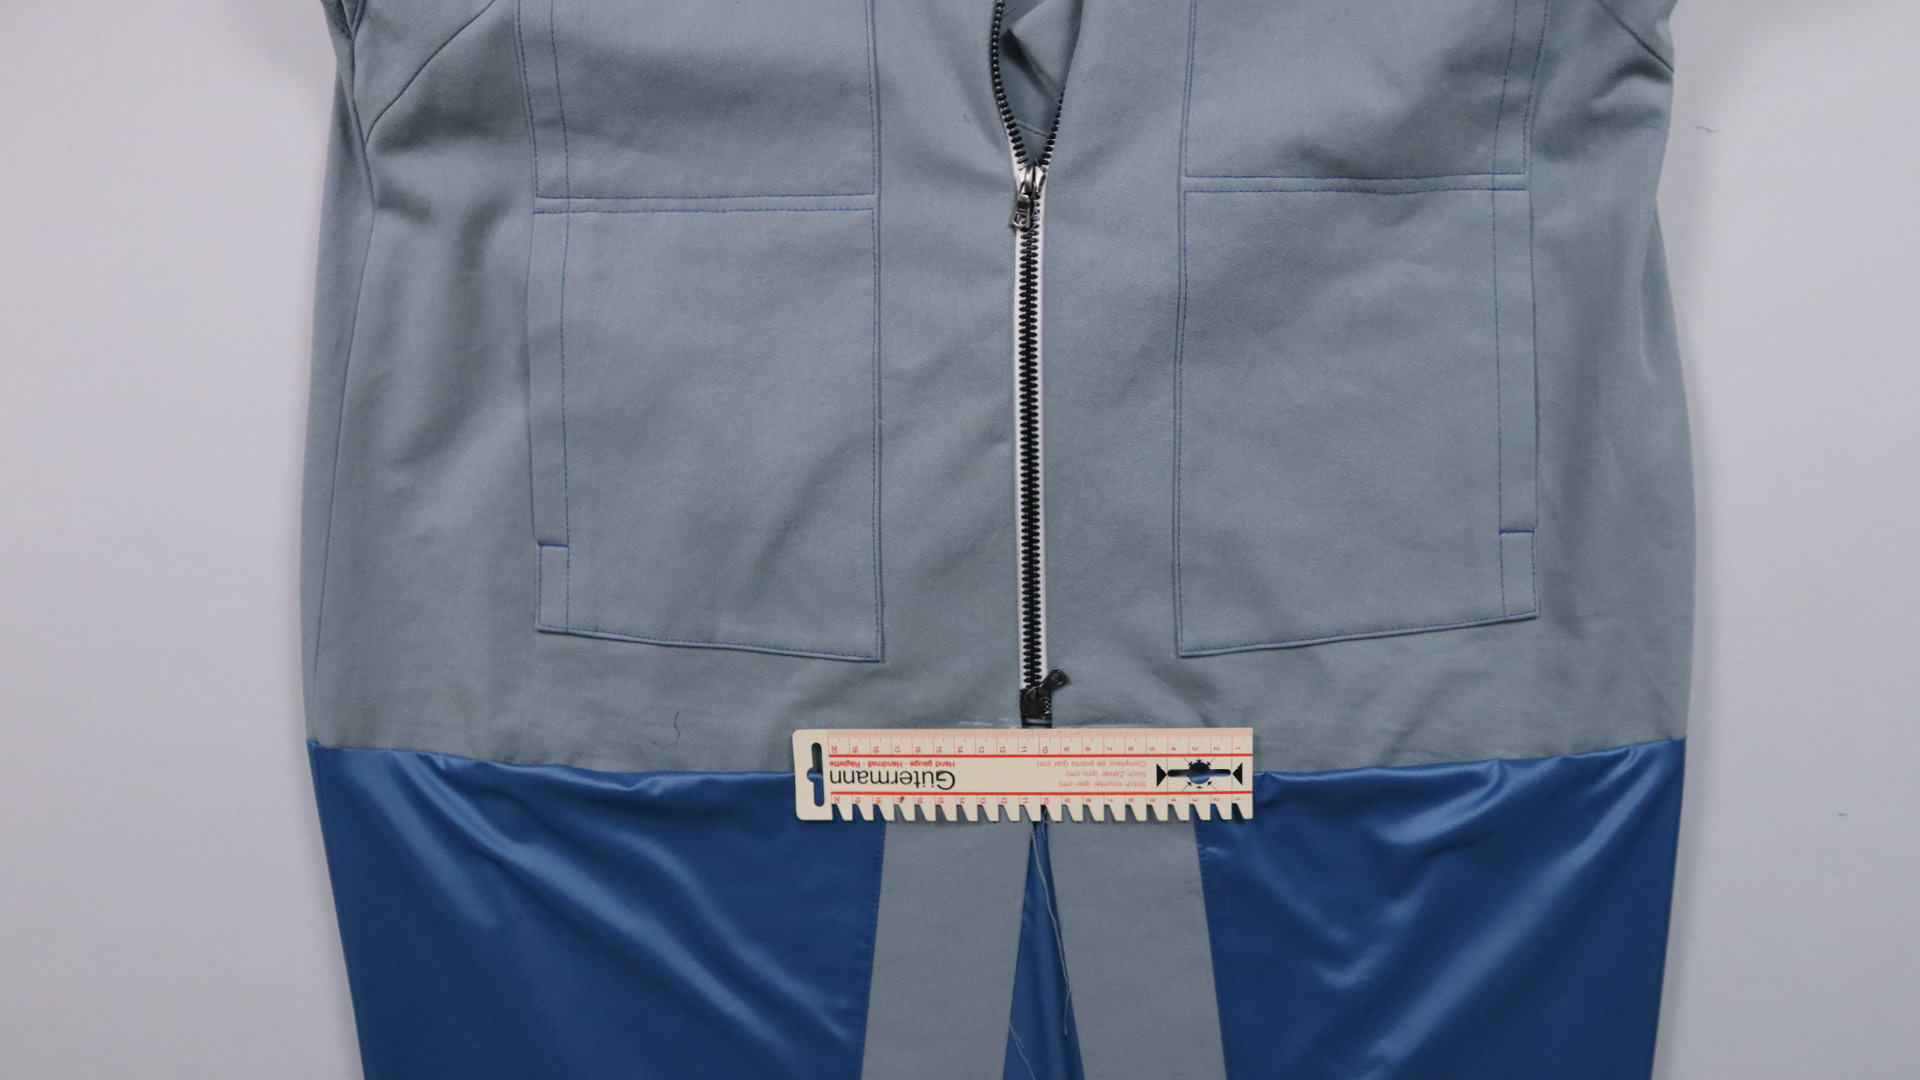
There are markings in the pattern 13 mm from the upper edge and 3 mm from the lower folded edge. The zipper is placed between these markings; the zipper tape then overlaps at the top and possibly also at the bottom.
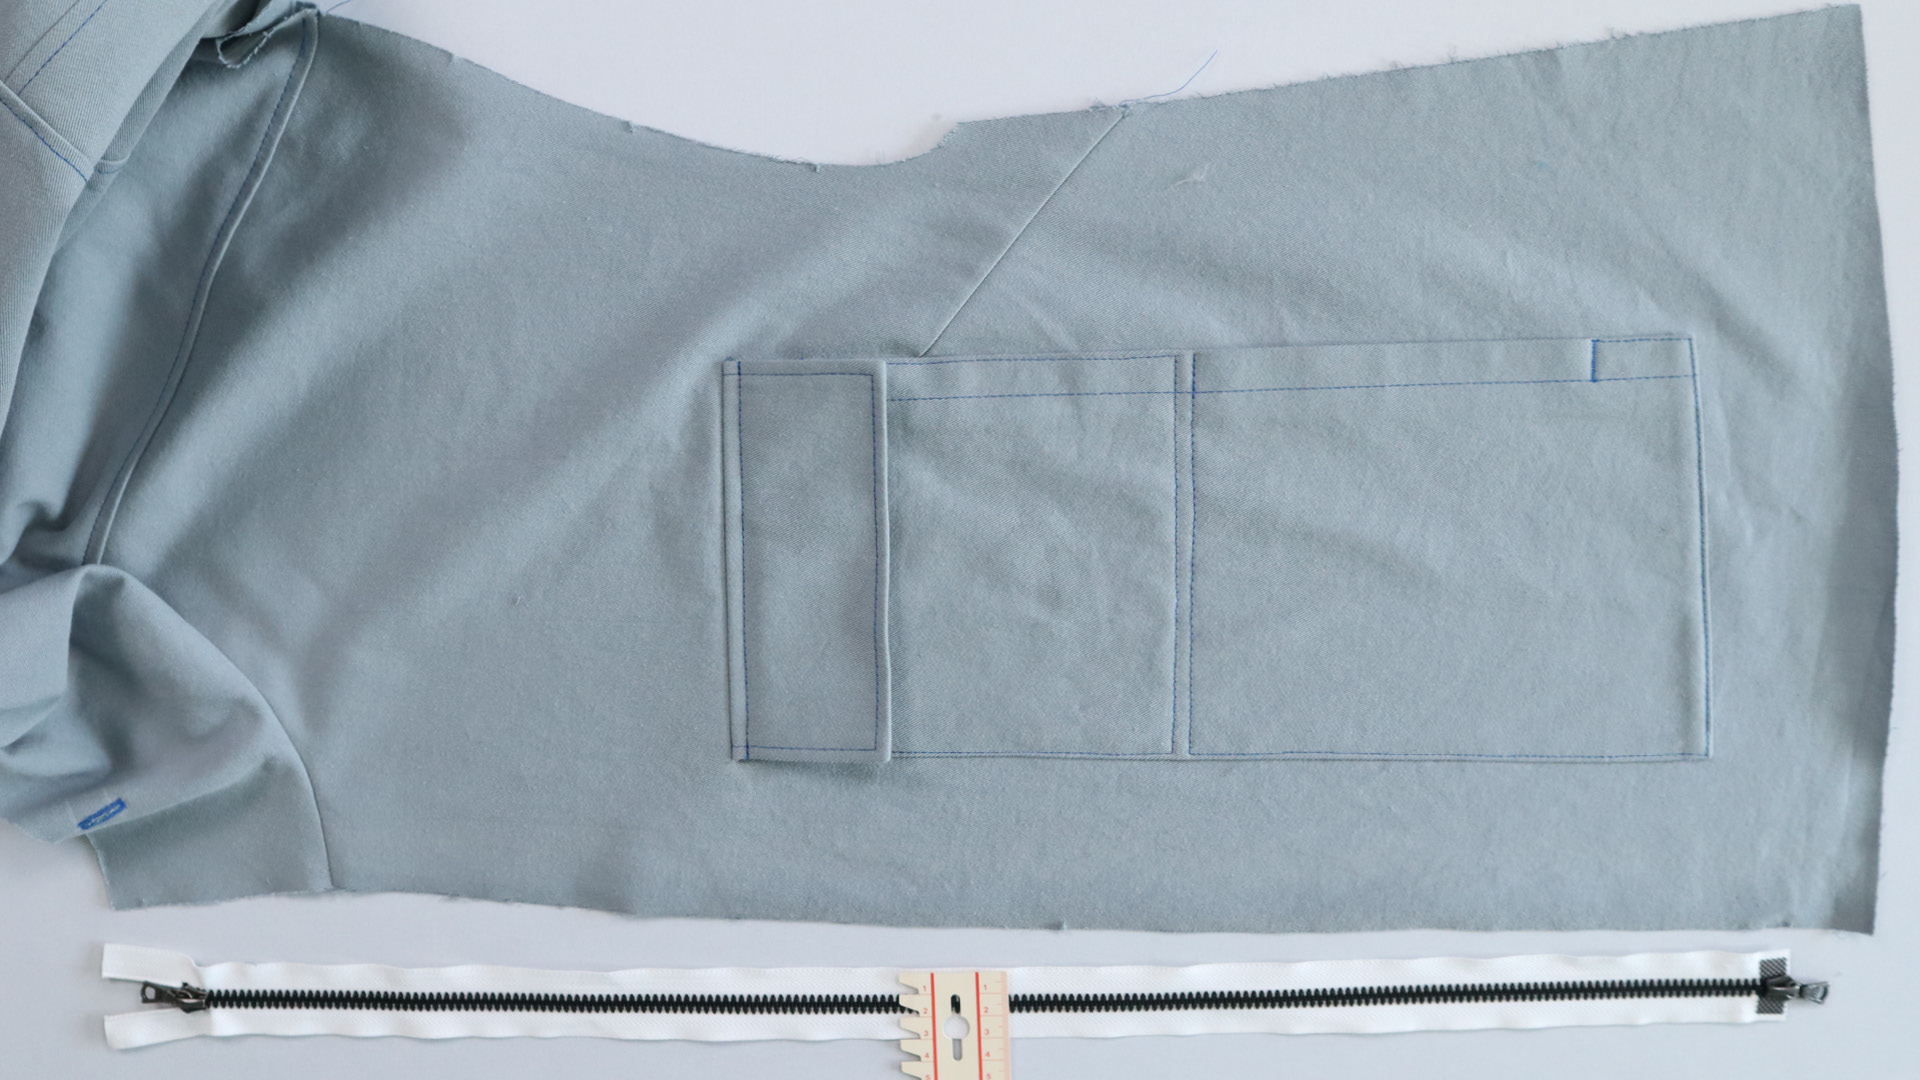
After sewing in, 7 mm of the zipper tape including the teeth or spiral should be visible on both sides, i.e. 14 mm in total. If your closed zipper including the tape is 3 cm wide, there will be 16 mm left minus the 14 mm, i.e. 8 mm on each side. To ensure that the seam allowance of 1 cm is maintained, the zipper must be positioned 2 mm away from the front edge.
I pin the zipper to the left front piece, right sides facing.
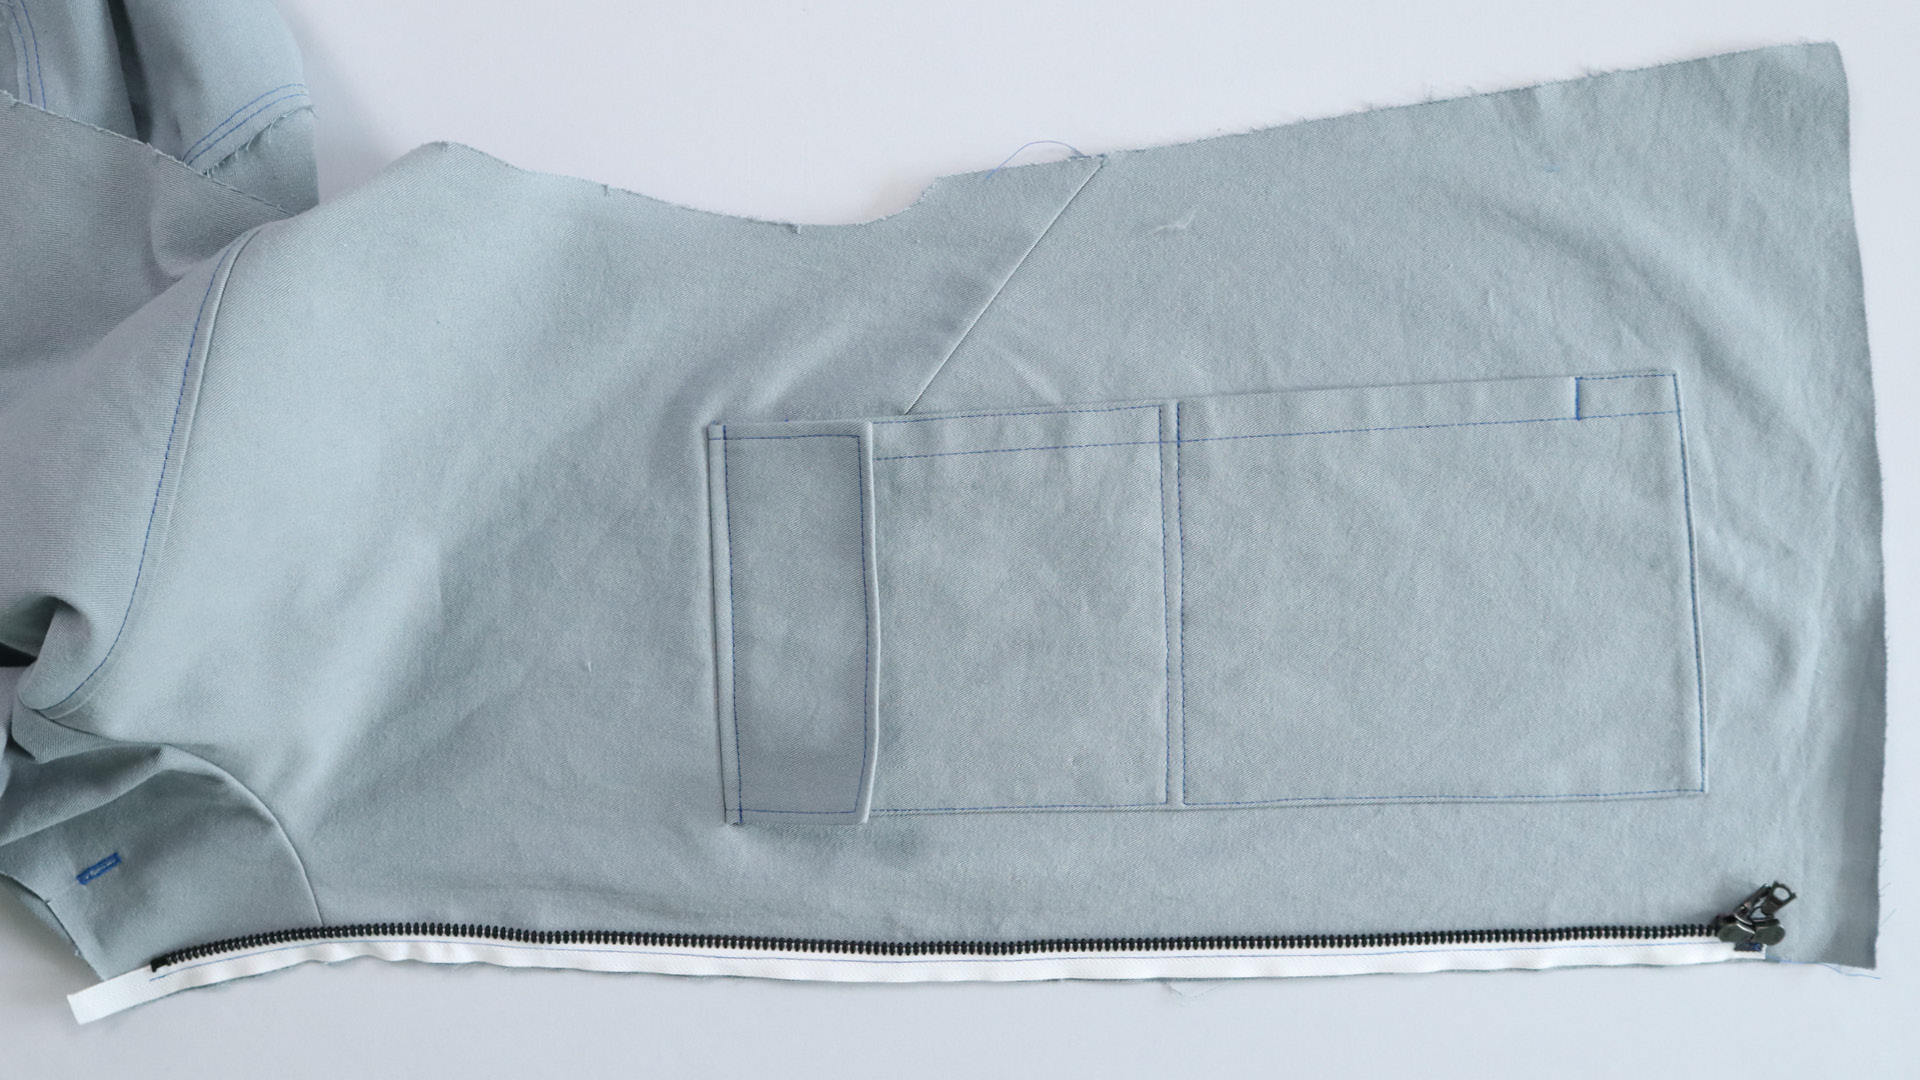
Then I sew from the beginning of the zipper (not the beginning of the tape) to the bottom. I split the zipper for sewing on and choose a long stitch.
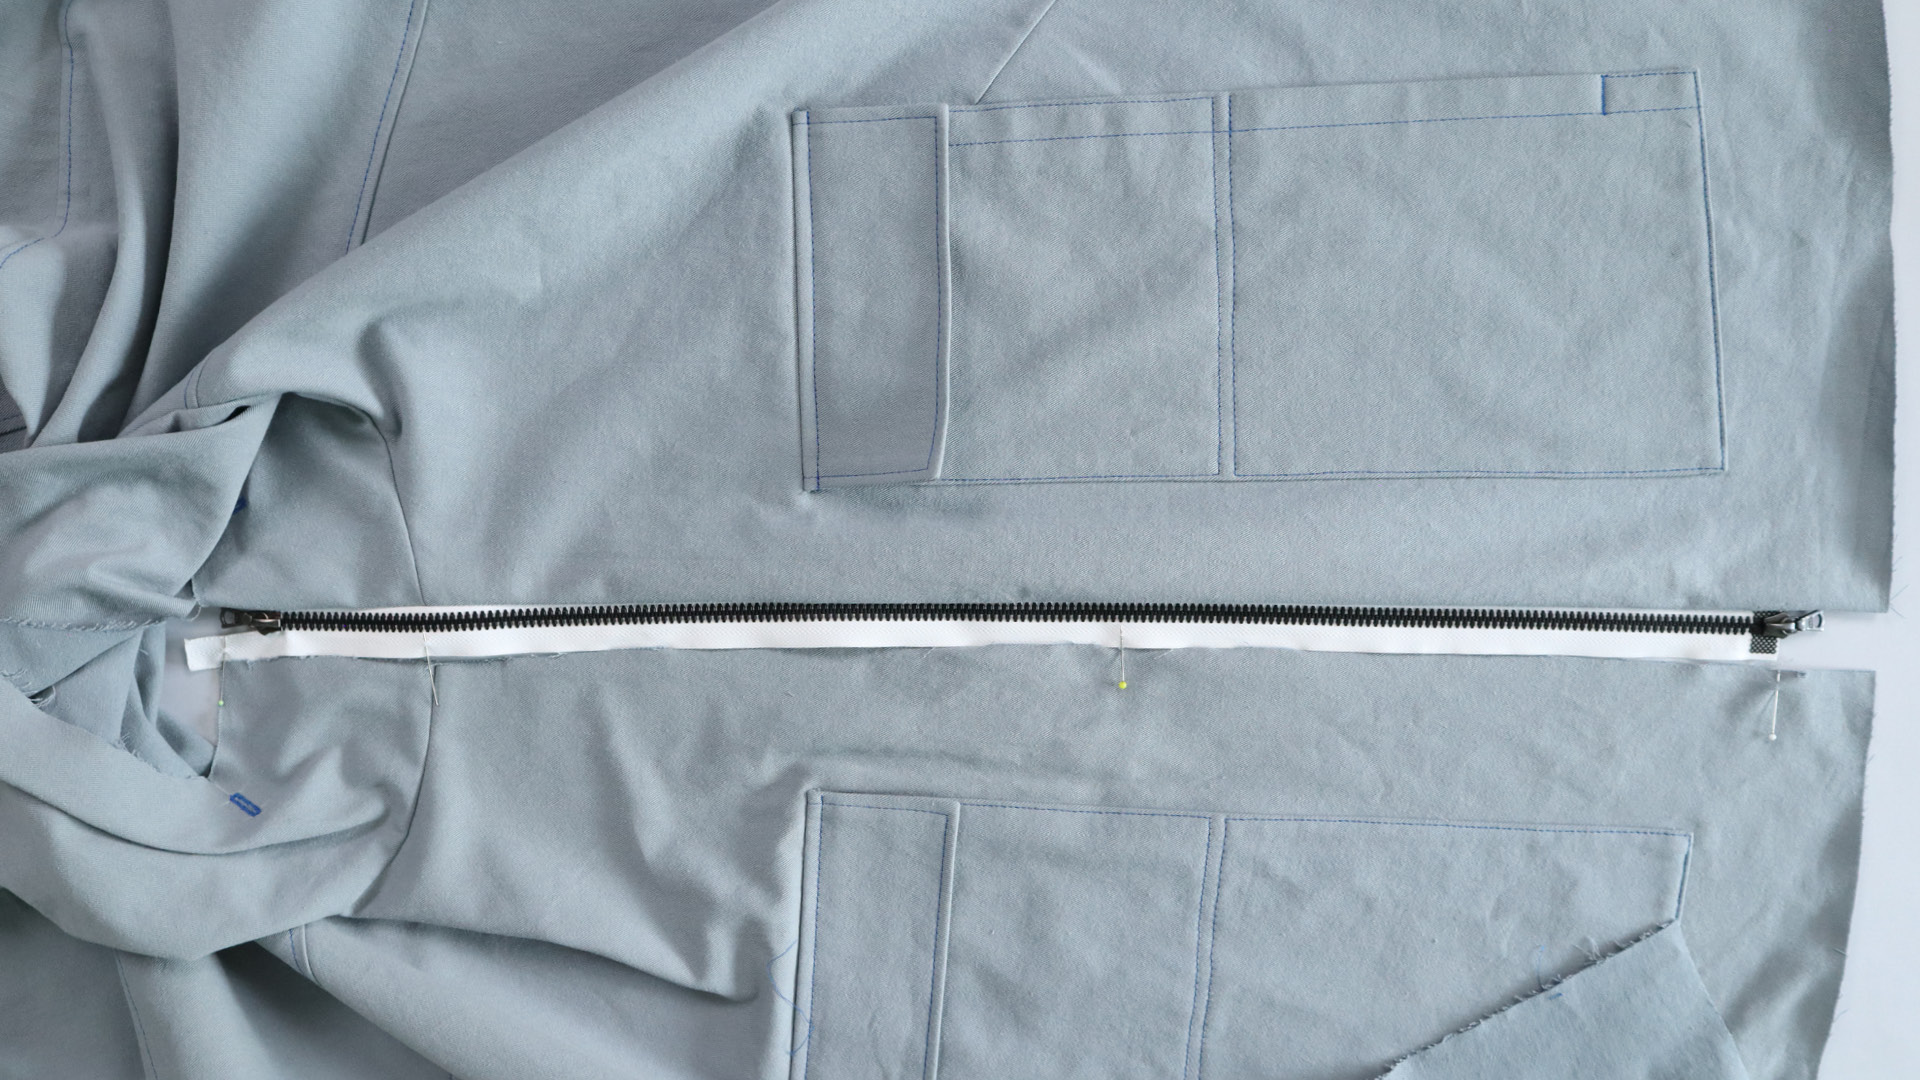
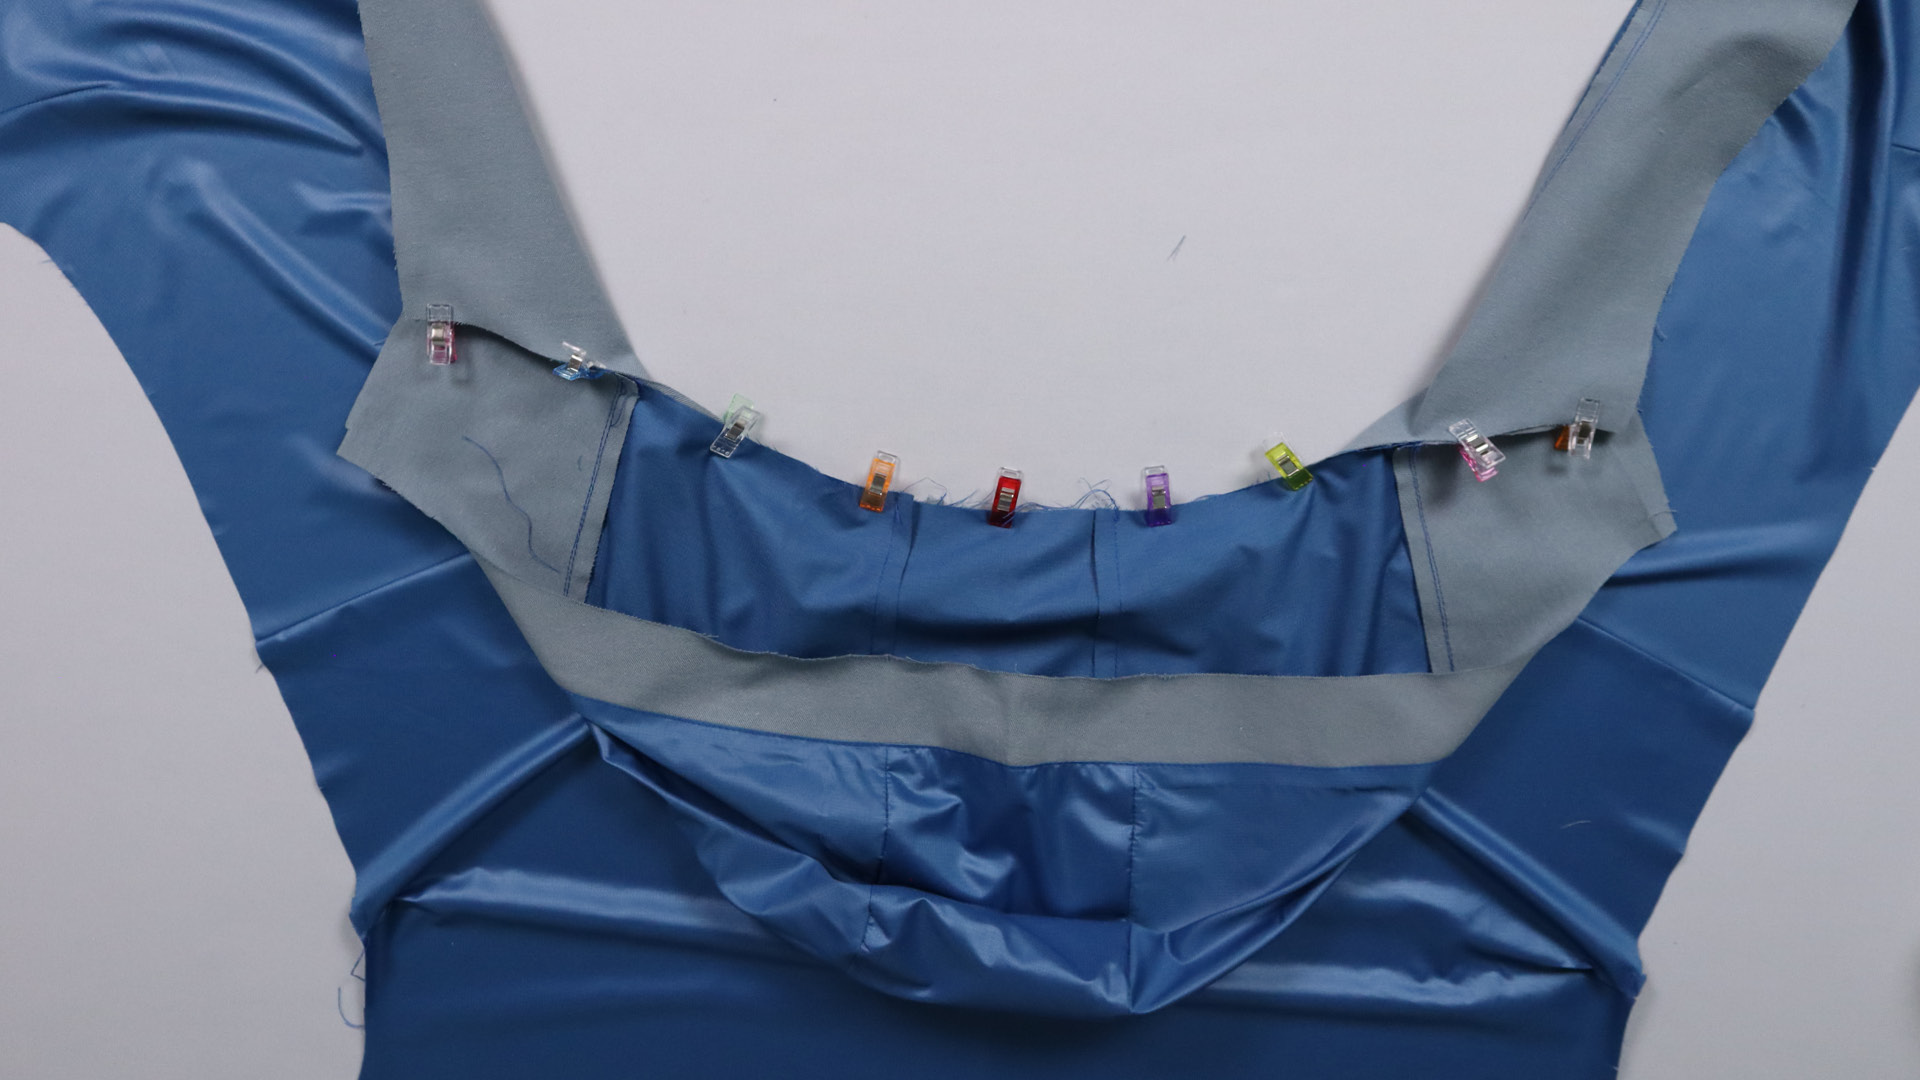
I close the zipper again and mark the positions of the top and bottom of the zipper on the right side of the jacket. I transfer the position of the hood attachment seam to the right zipper tape.
Then I pin the zipper onto the right front piece, right sides together, paying attention to the markings from the previous step.
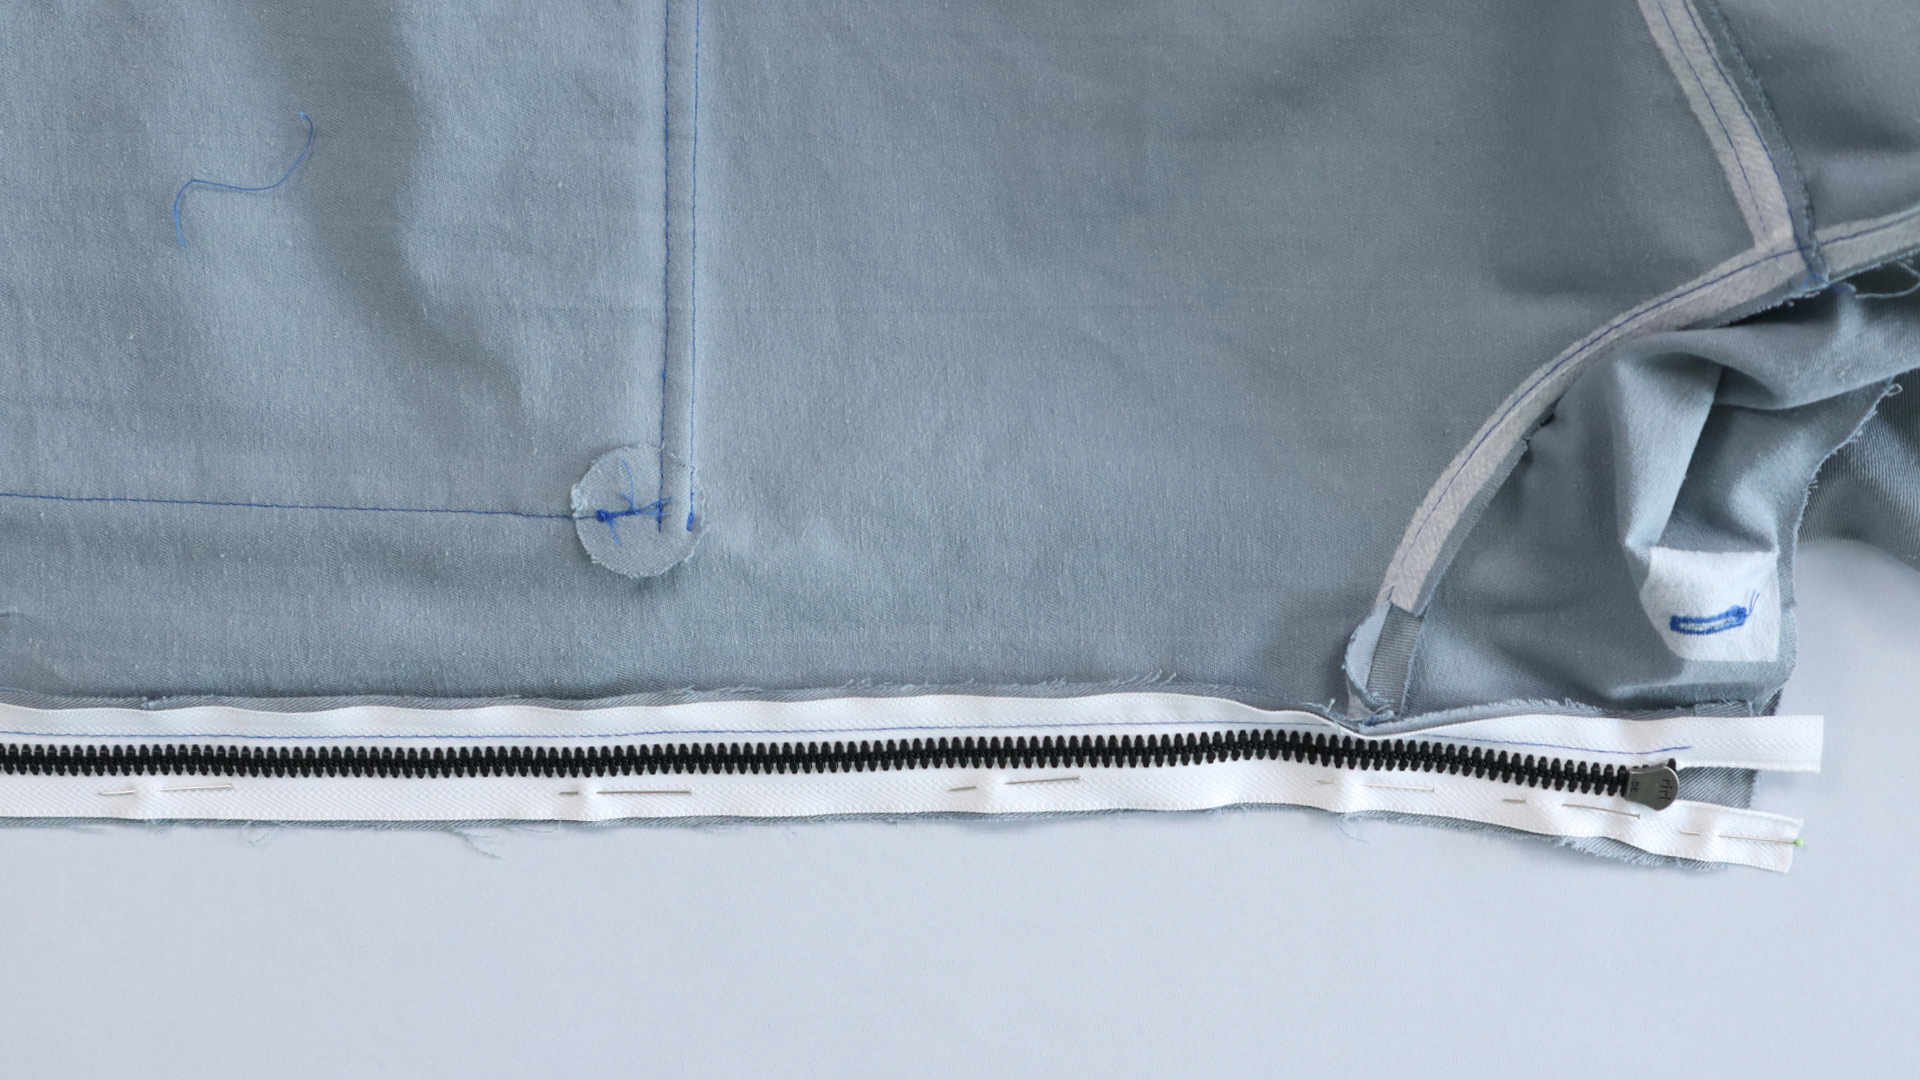
After sewing in, I check whether the seams, hood edge and hem edge meet.
At the top end, I fold the excess ribbon to the side and pin it in place. Leave at least 1 cm free for the seam allowance on the hood.
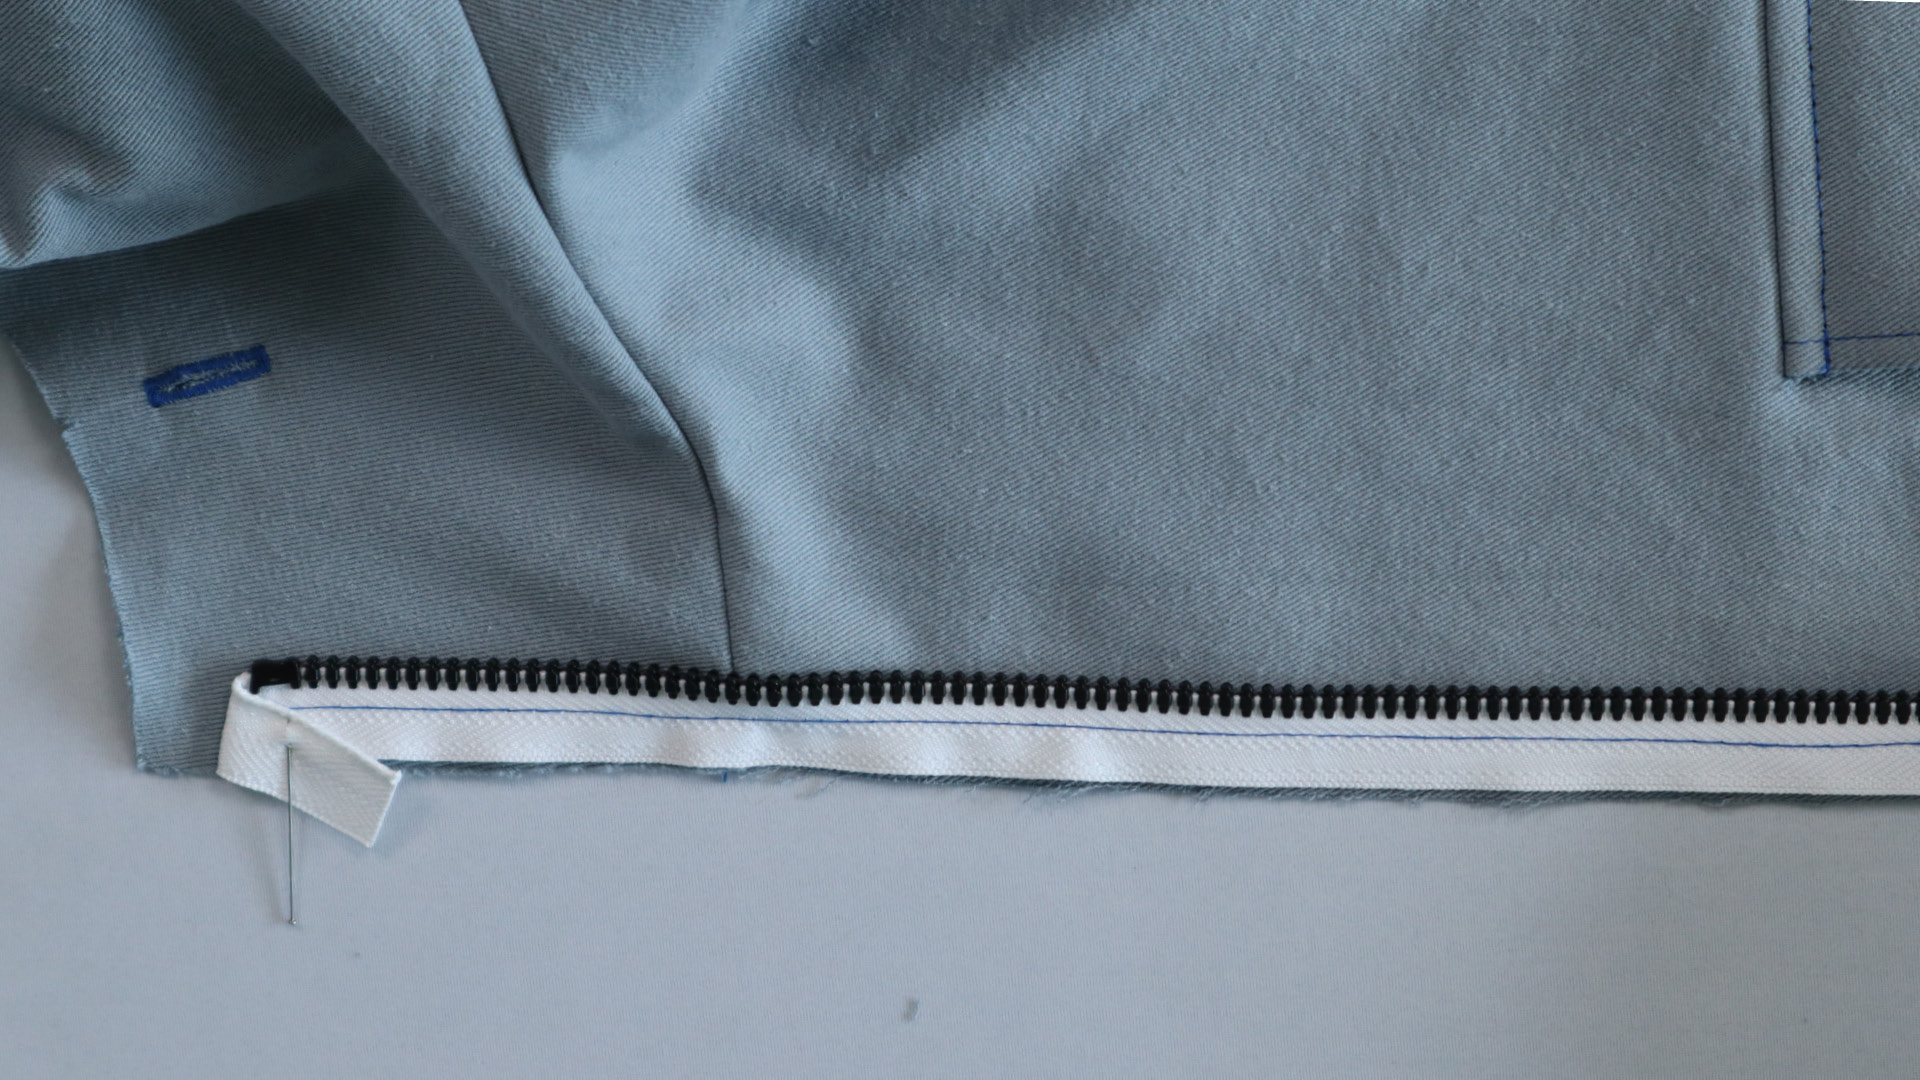
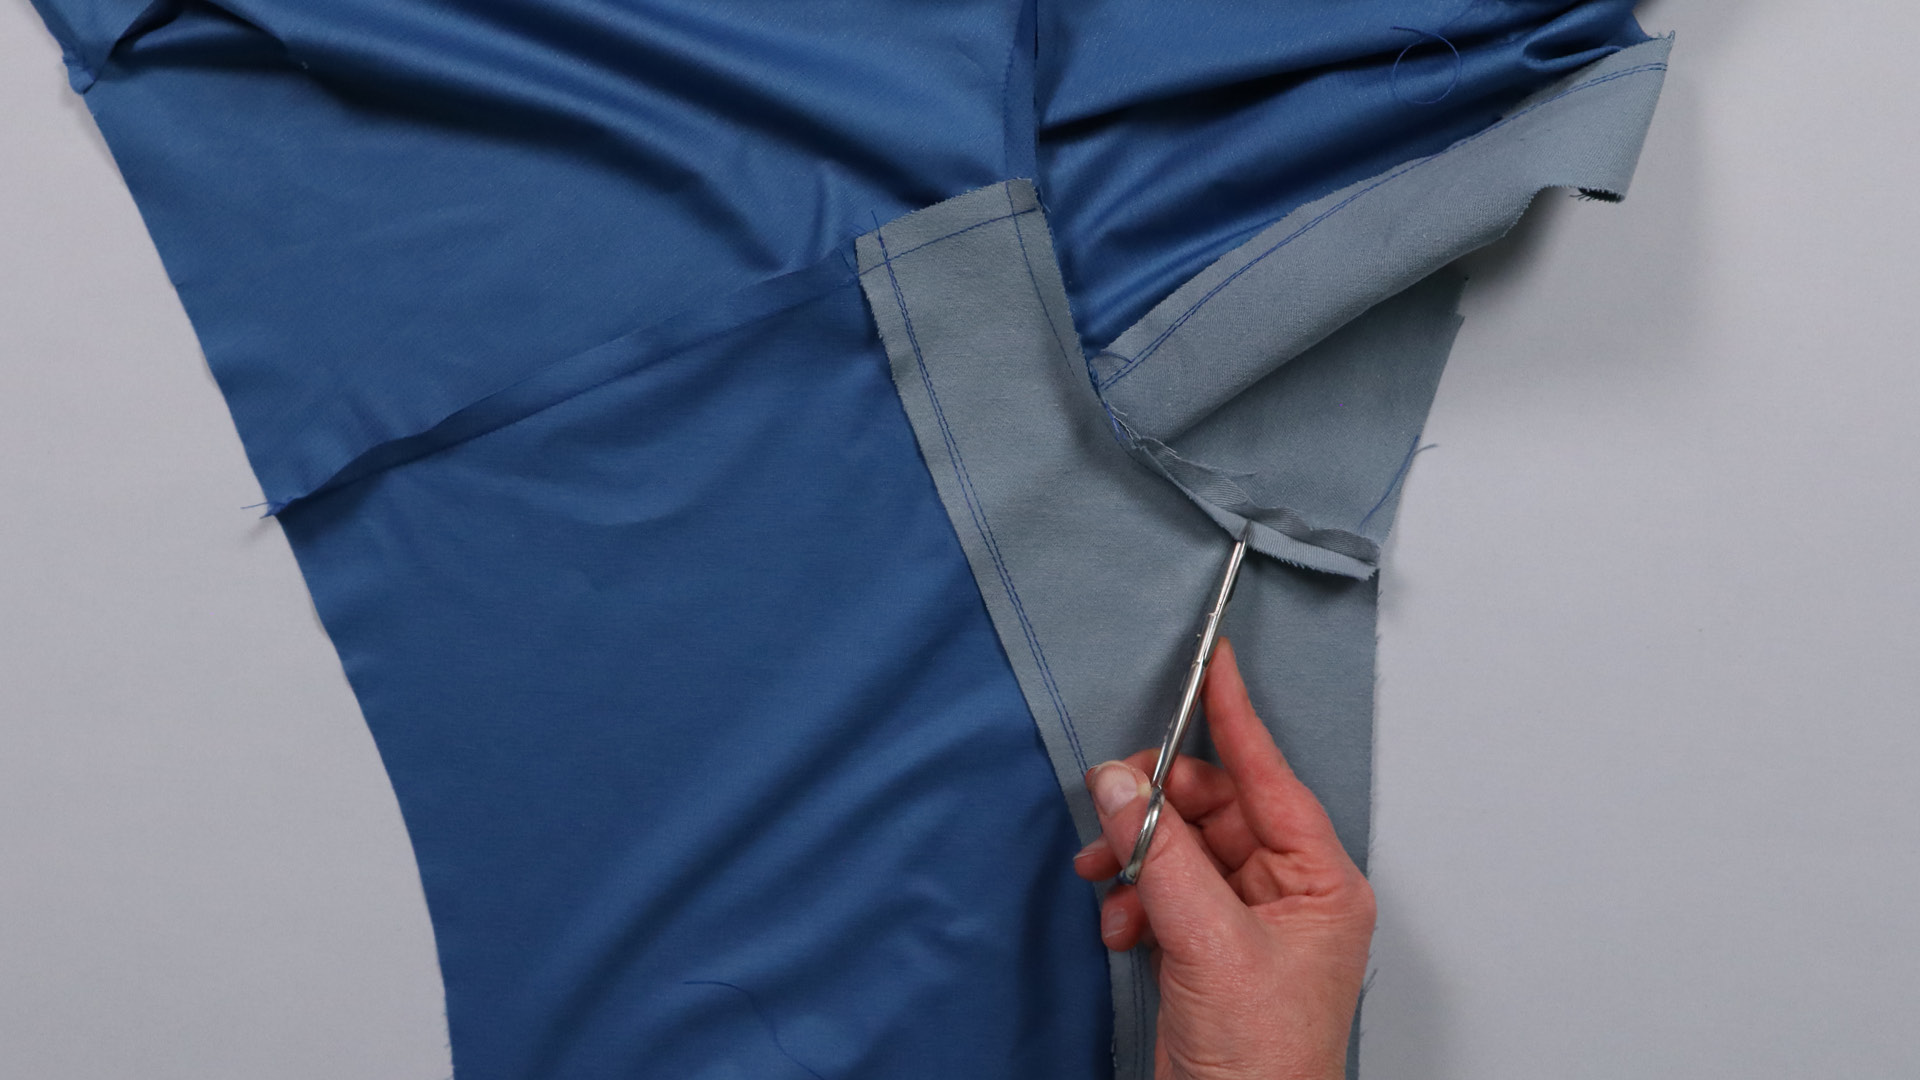
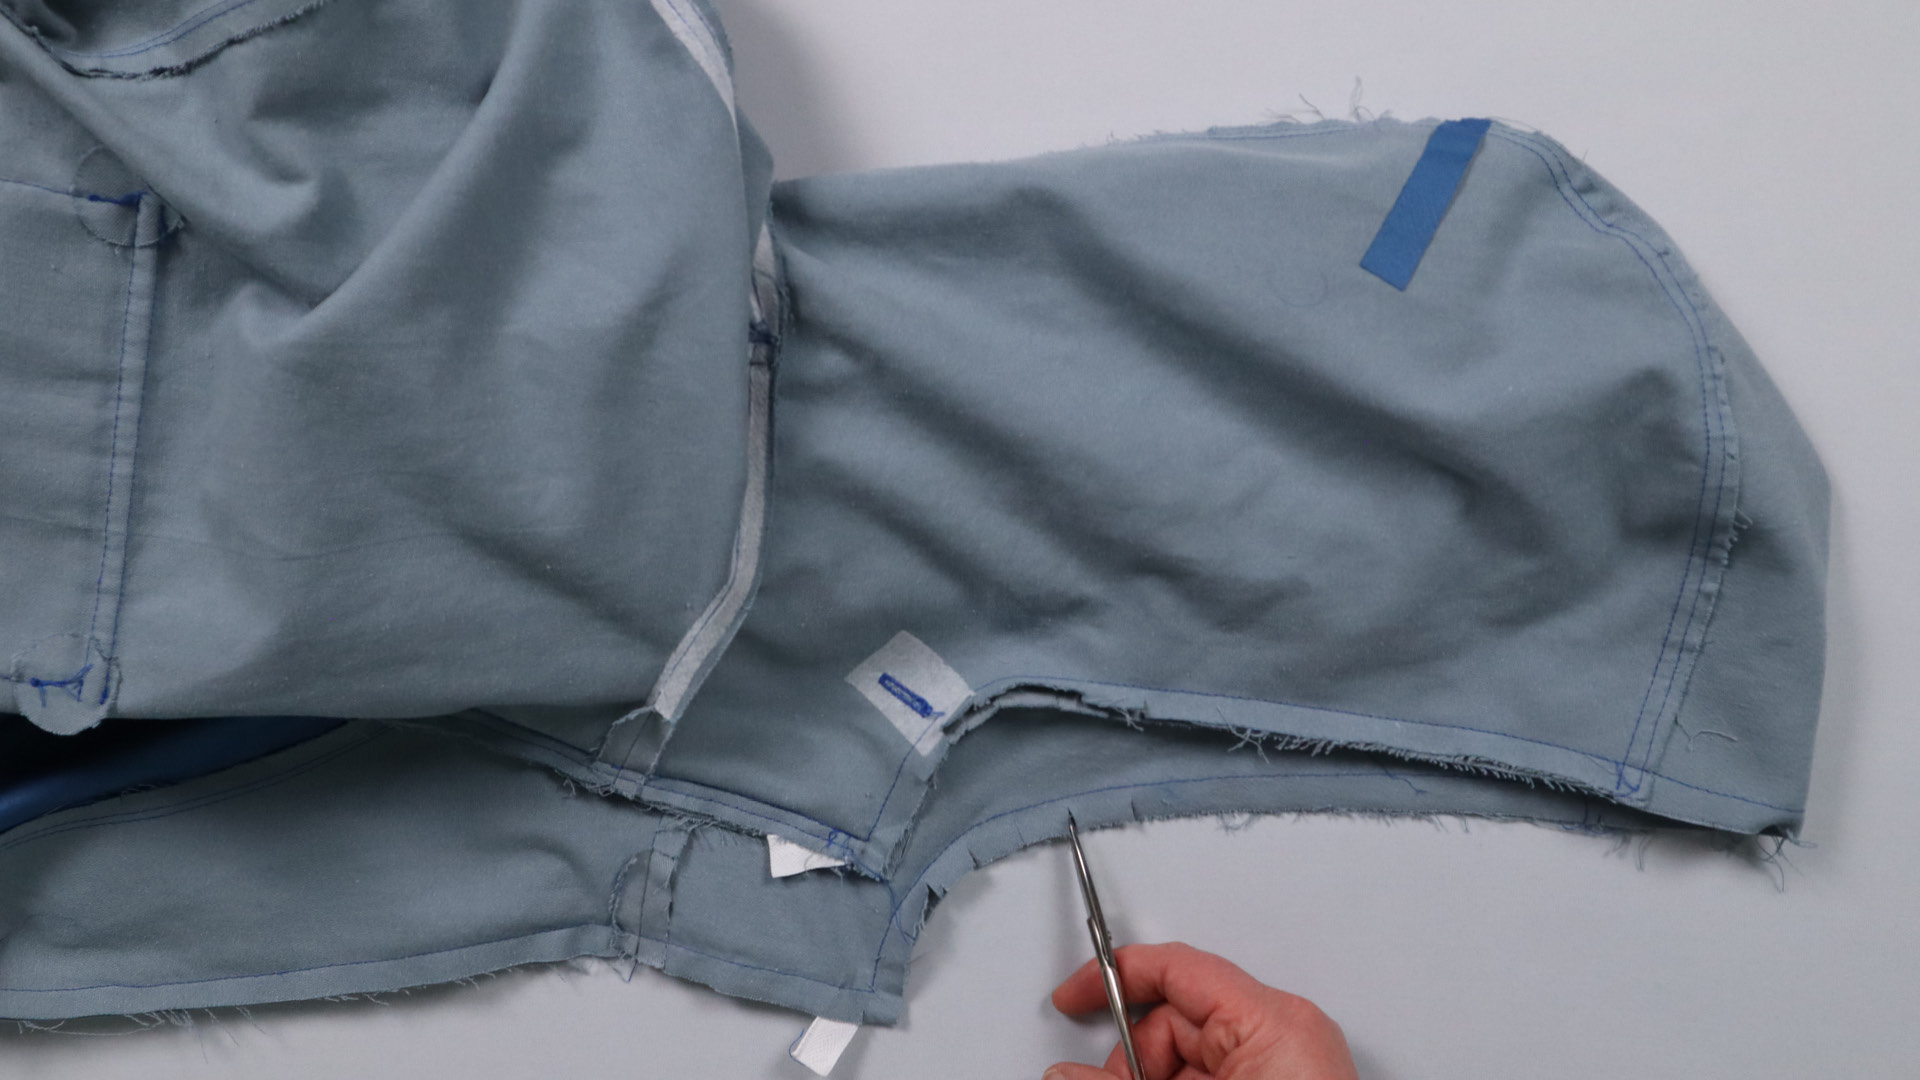
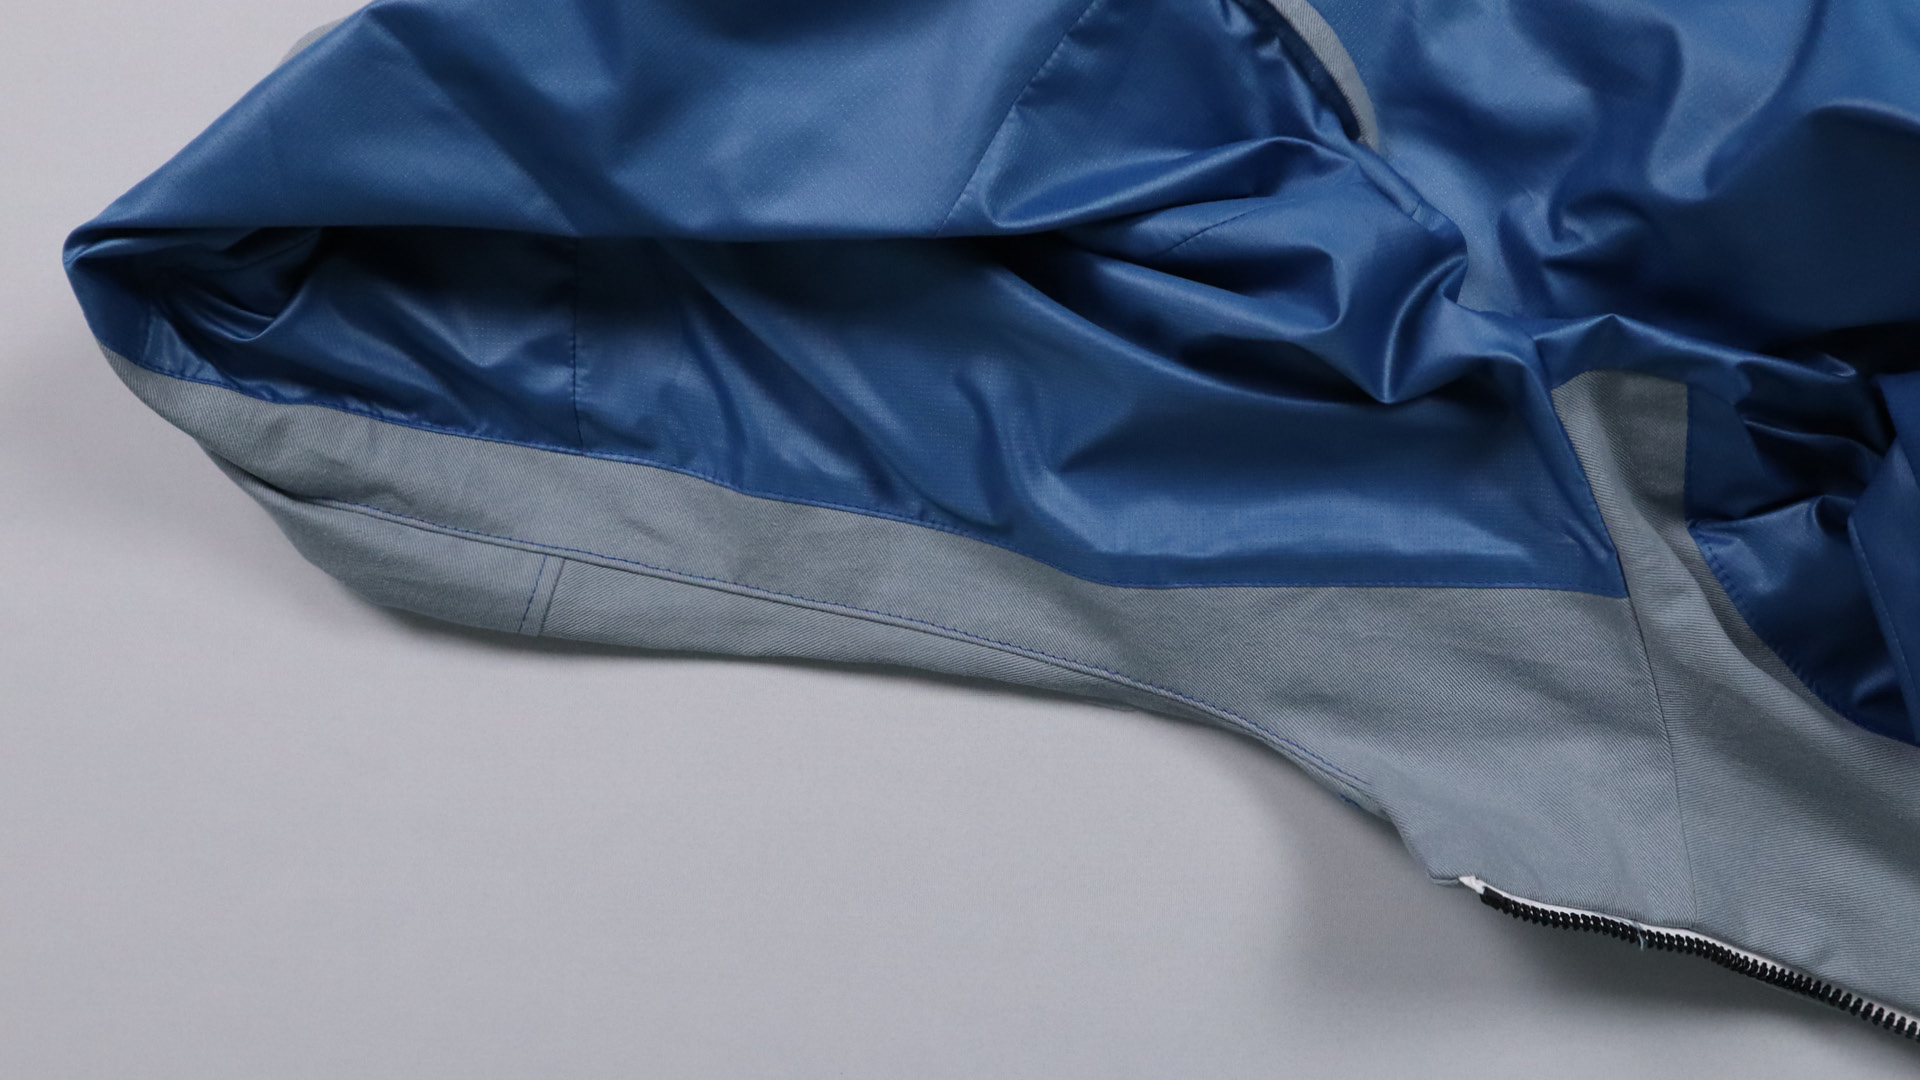
Prepare the underlap
If you are using a very soft or stretchy fabric, I recommend reinforcing the outside of the underlap with a suitable interlining first. If your outer fabric is very thick, you can also use a thinner fabric for the underside. Bear in mind that if the zipper is not fully closed, it will be visible later when the jacket is opened a little.

Lay both parts of the underlap right sides together and pin the short sides, the curves and the long side in between together.
Then sew both parts together and cut back the seam allowances in the curves so that they can be shaped well.
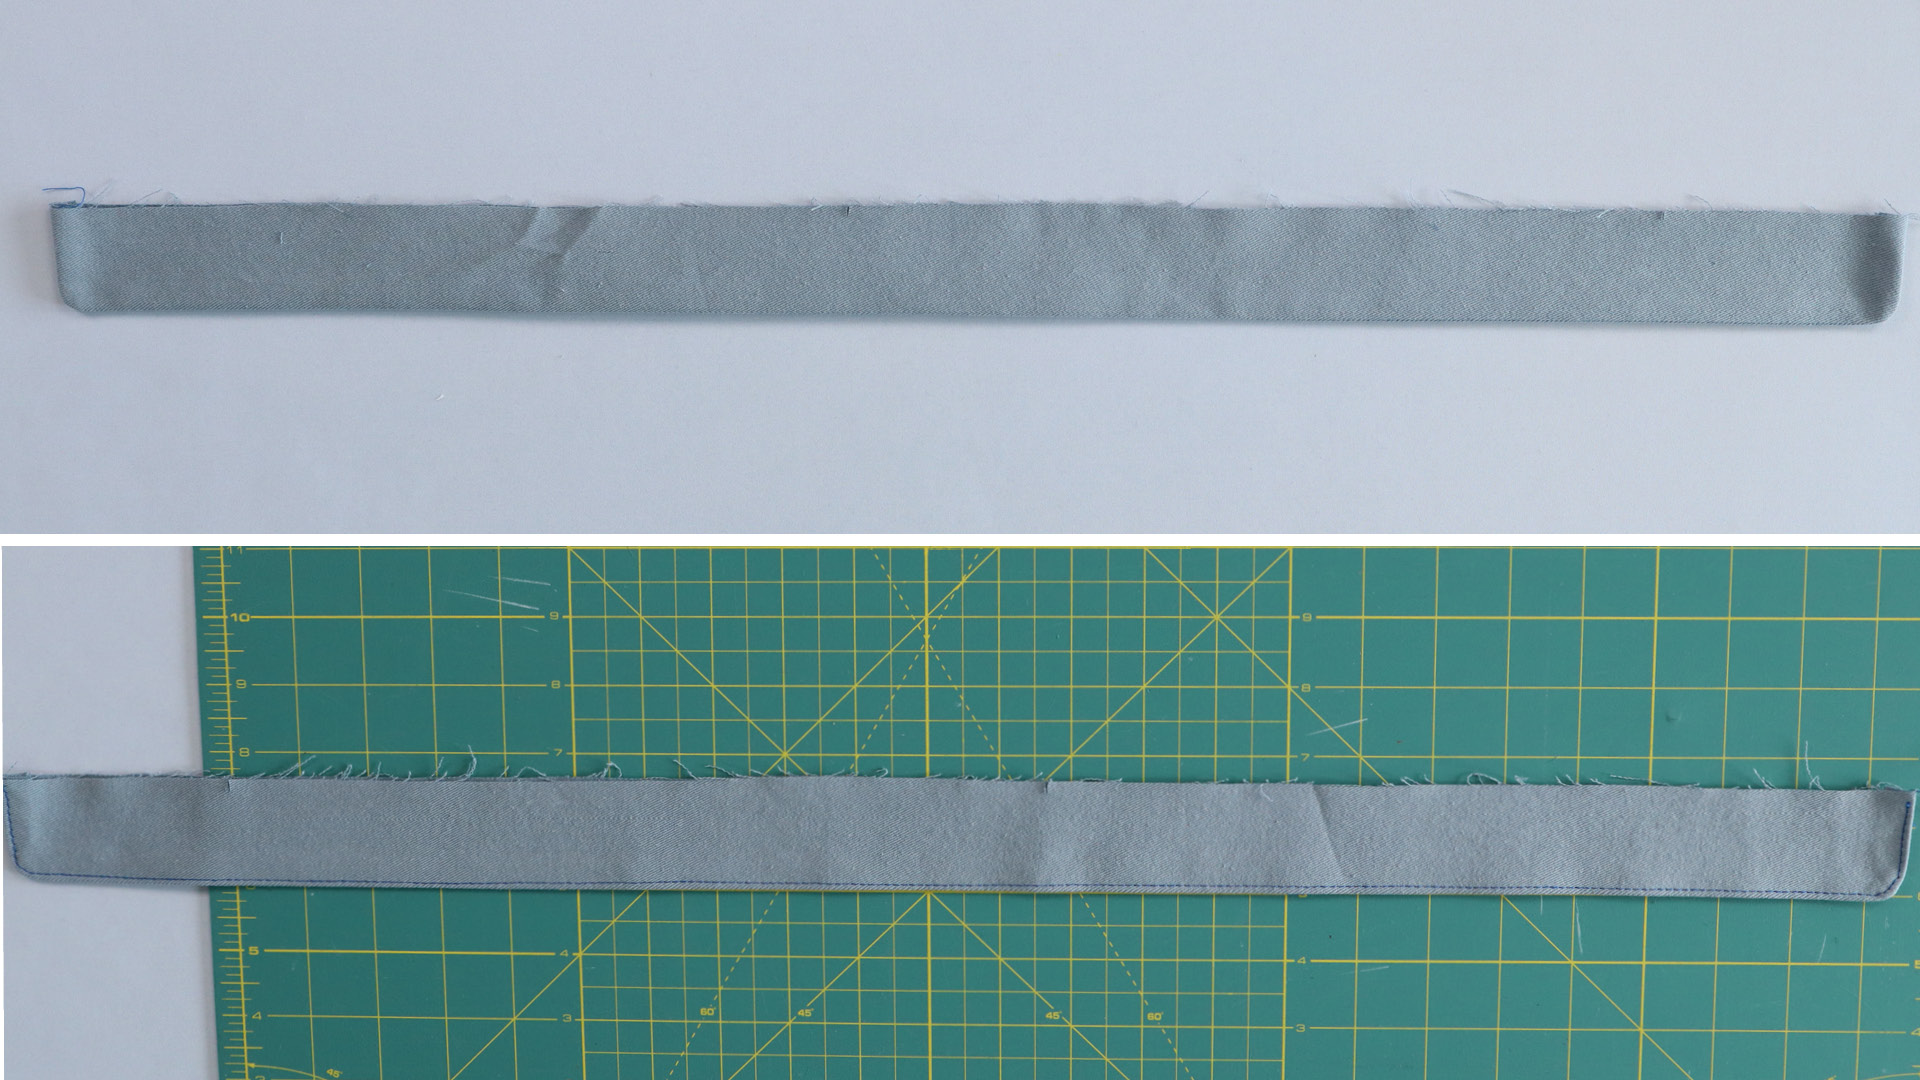
Press the seam allowances open, turn the underlap and press it again. Then place it on the zipper and check whether the length fits. If this is the case, you can topstitch the underlap from the outside (the one with the reinforcement, if you have ironed one on) close to the edge. If something has shifted at the back edge, you can straighten it out.
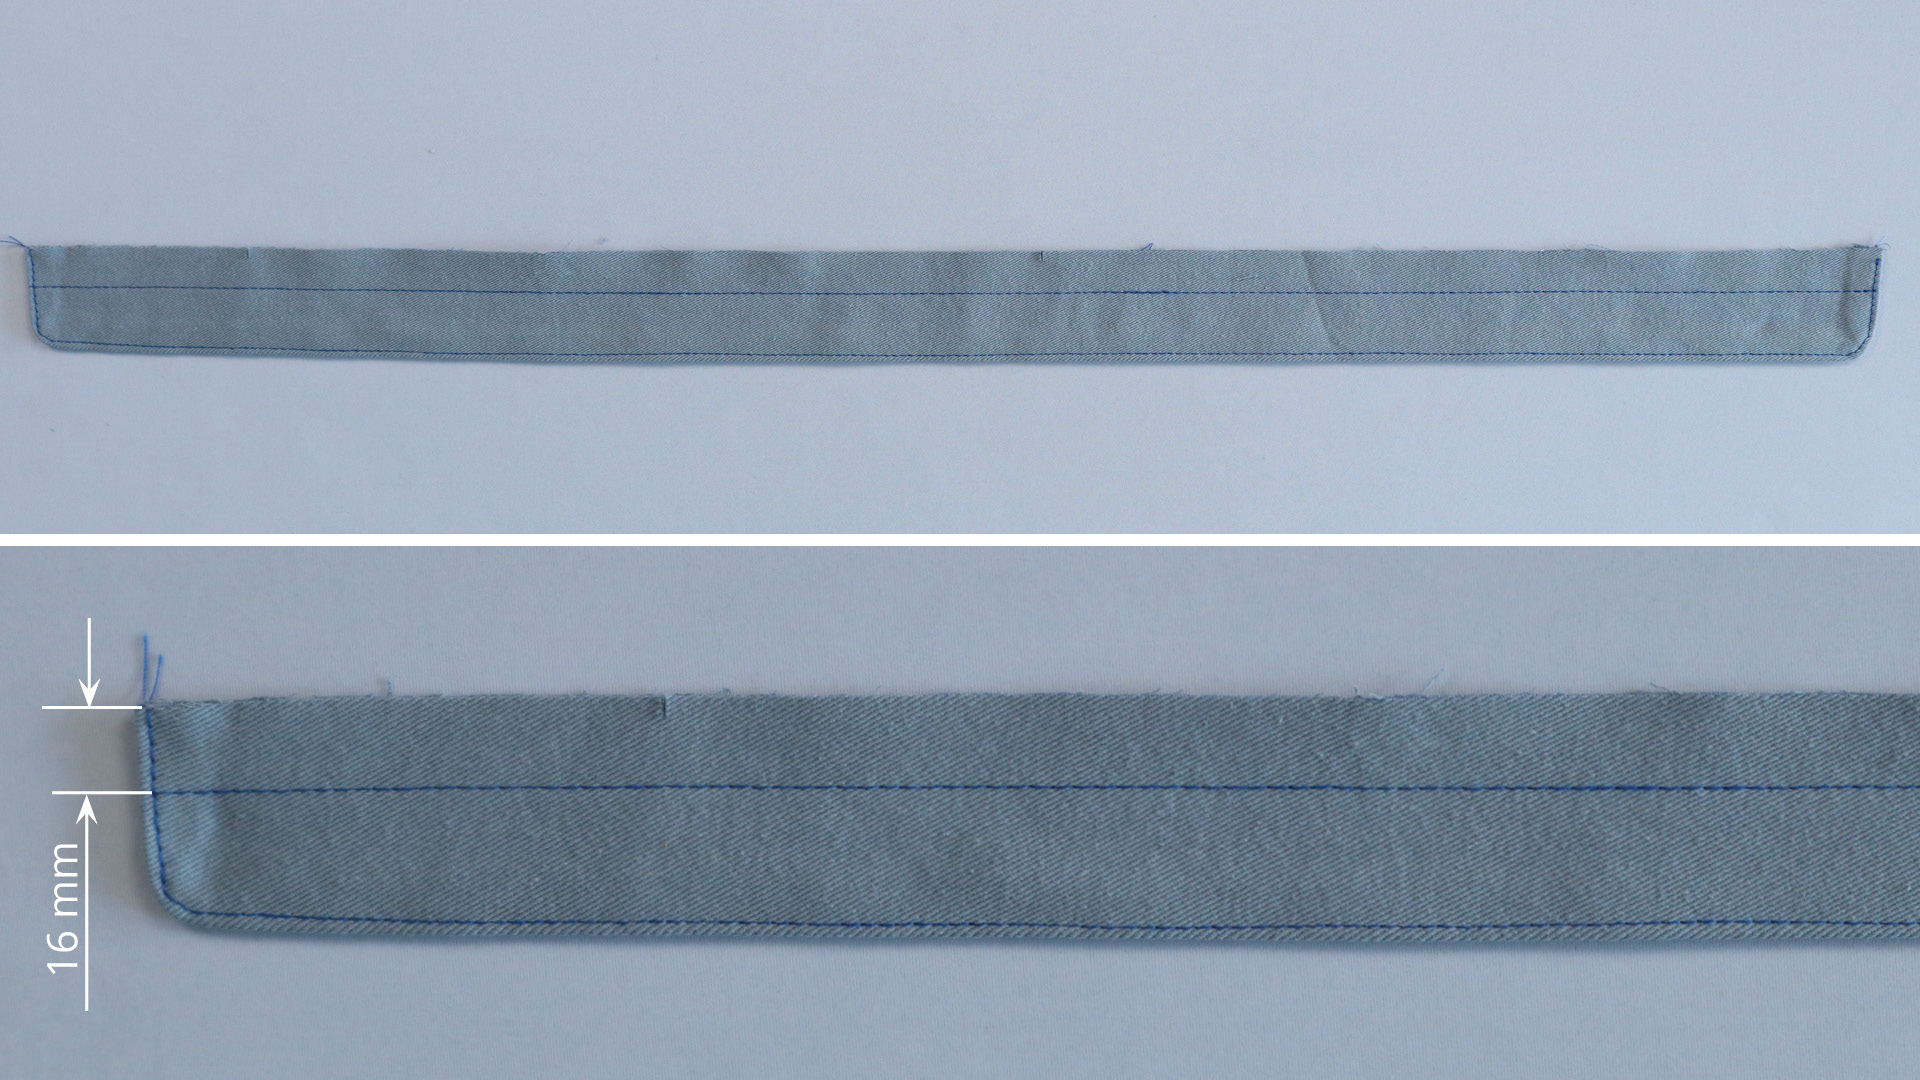
I have also sewn a longitudinal seam 16 mm from the front edge. This is to prevent the underlap from getting caught in the zipper.
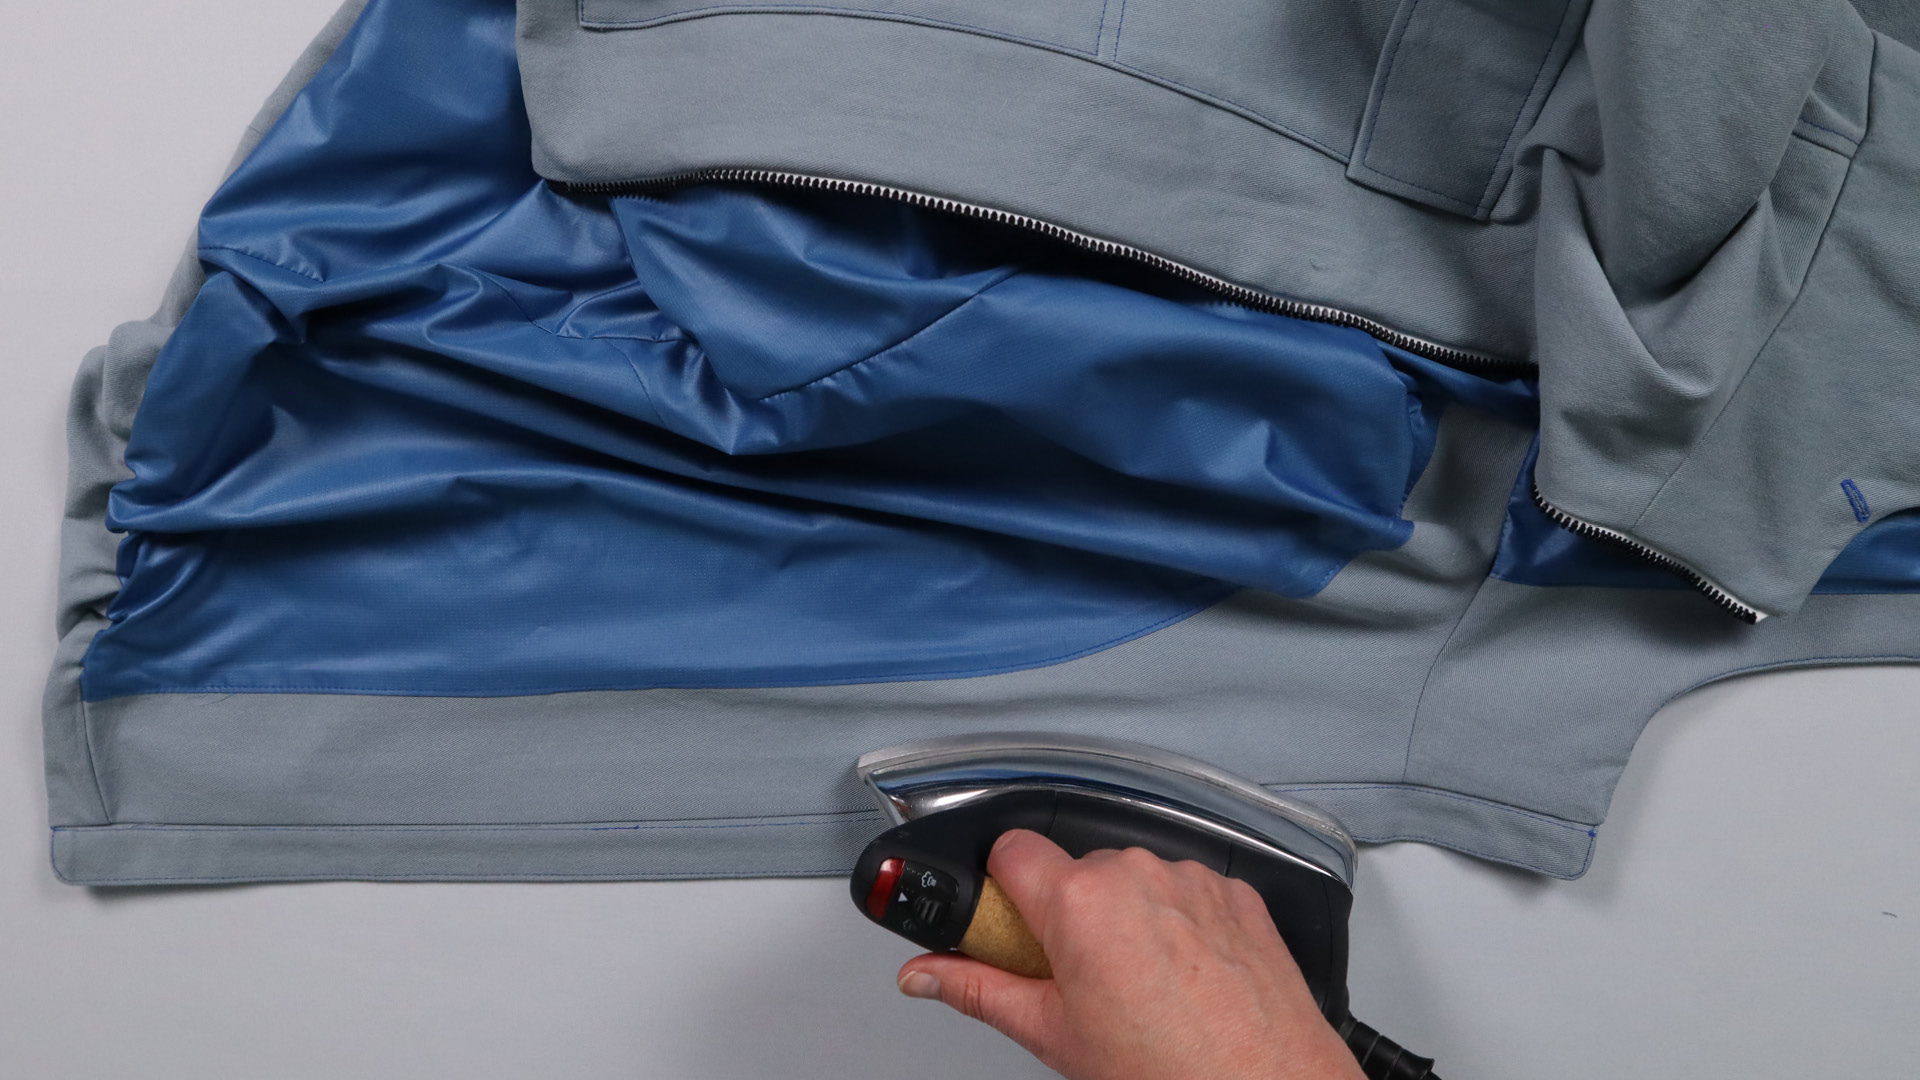
Sew the underlap to the jacket with hood

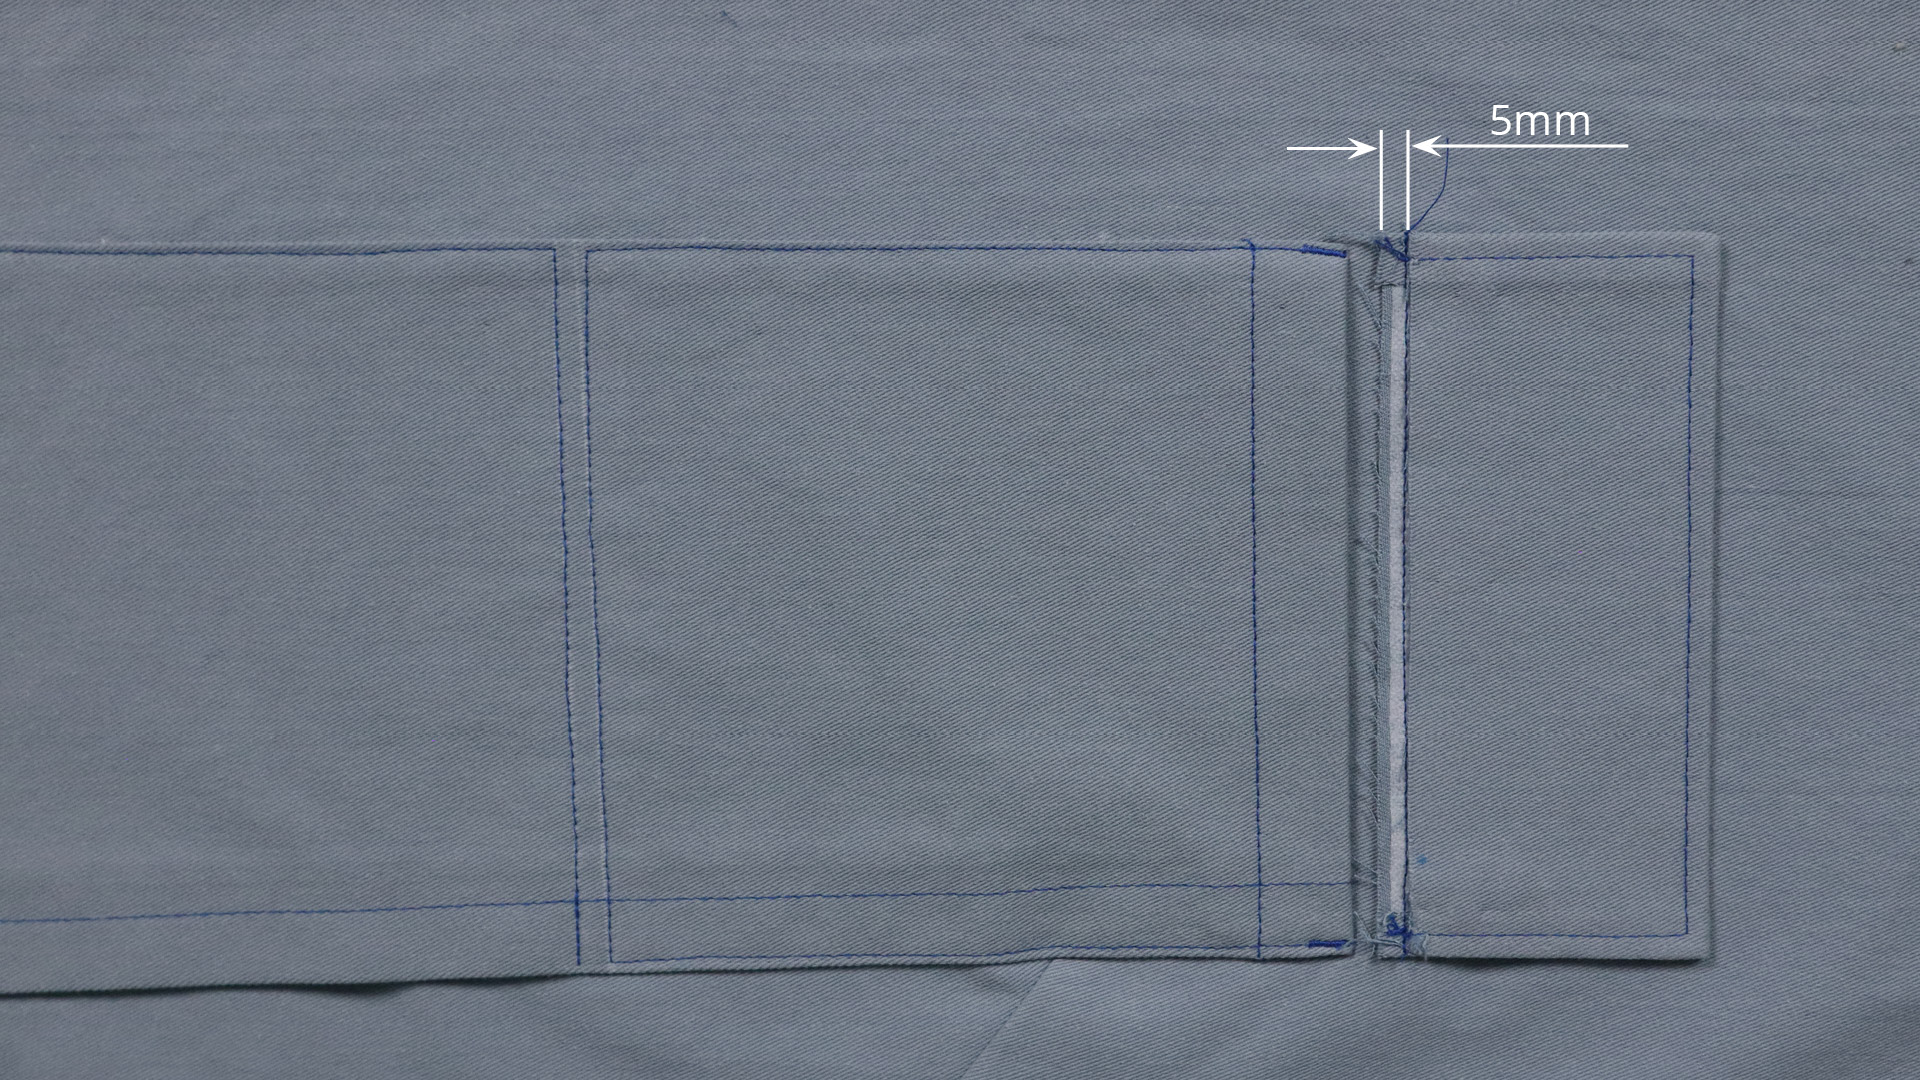
Now sew the underlap on the left front piece onto the zipper. To do this, place it on the front piece with the side that will later be visible from the outside, so that the zipper lies in between.
The underlap just covers the zipper at the top and bottom. Make sure that 1 cm seam allowance remains free at the top end and sew it on with a 5 mm gap to the front edge.
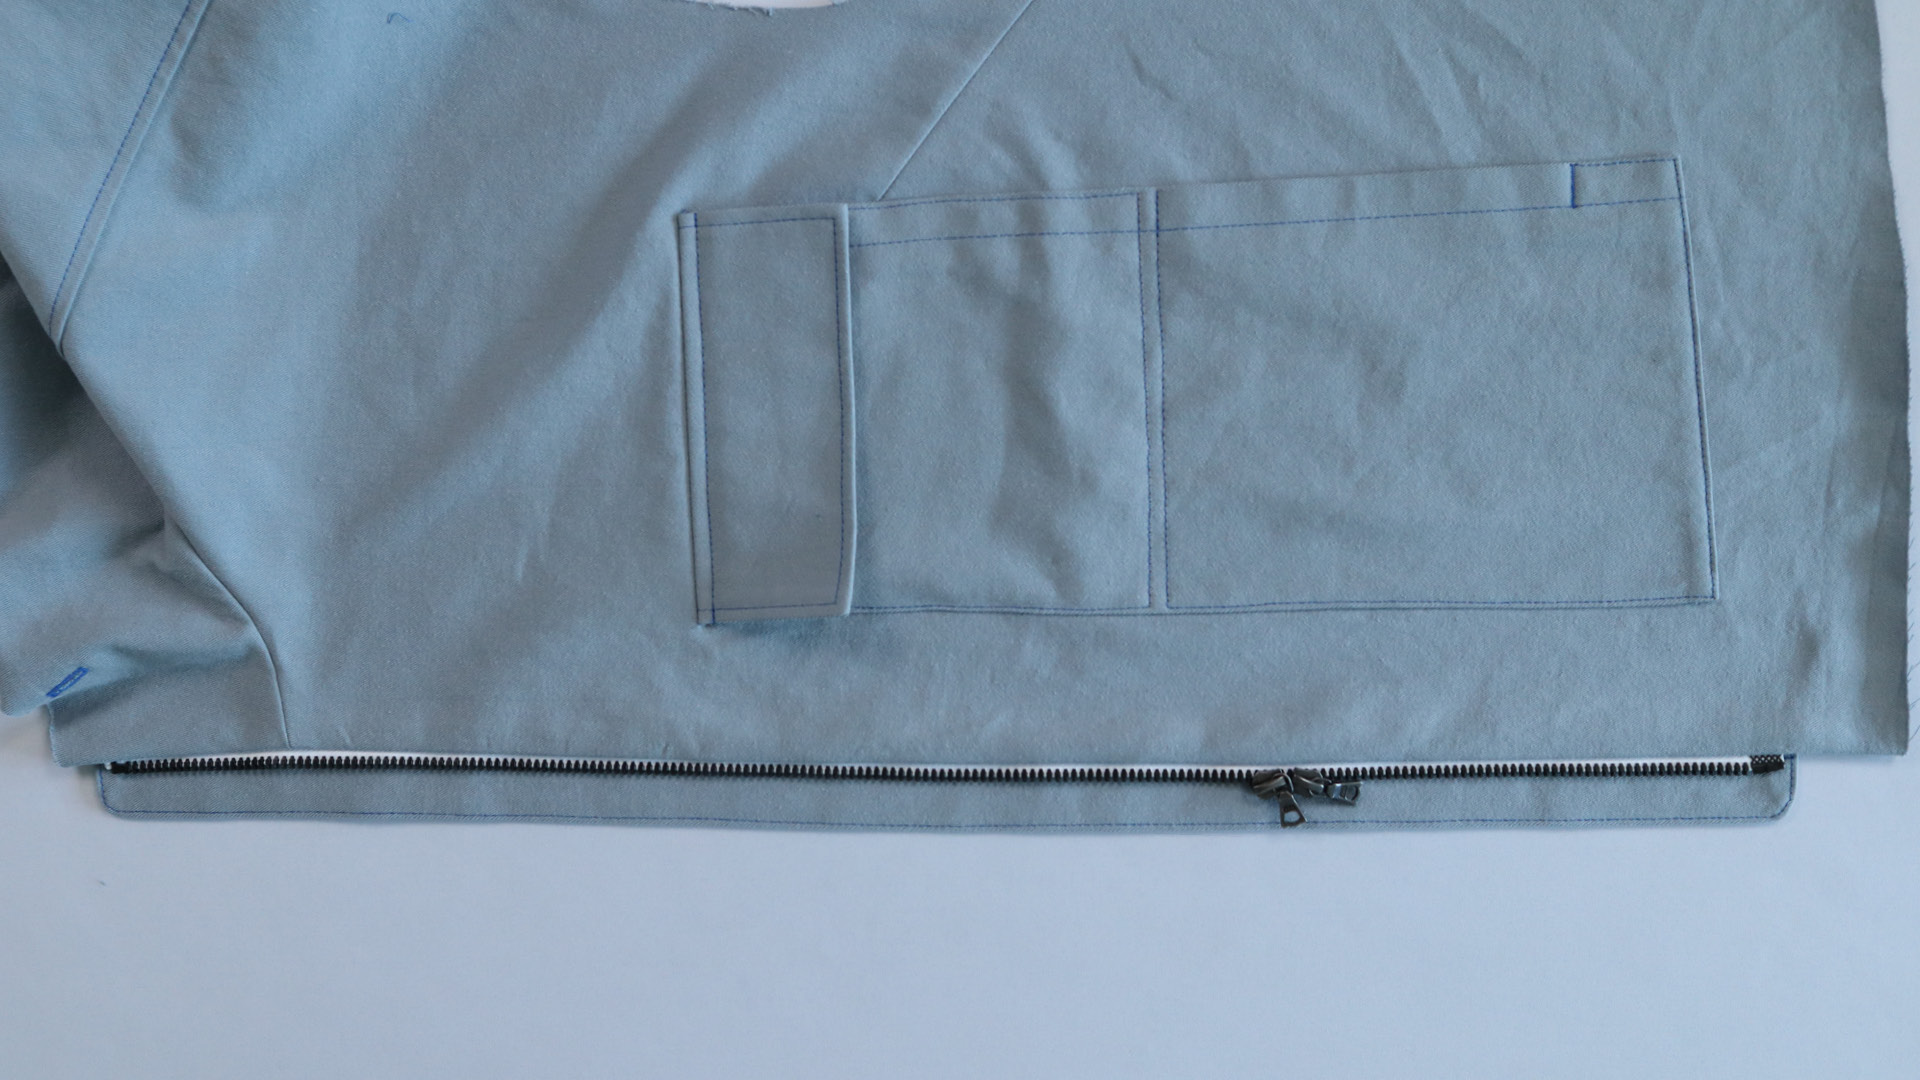
This is what the sewn-on underlap looks like.
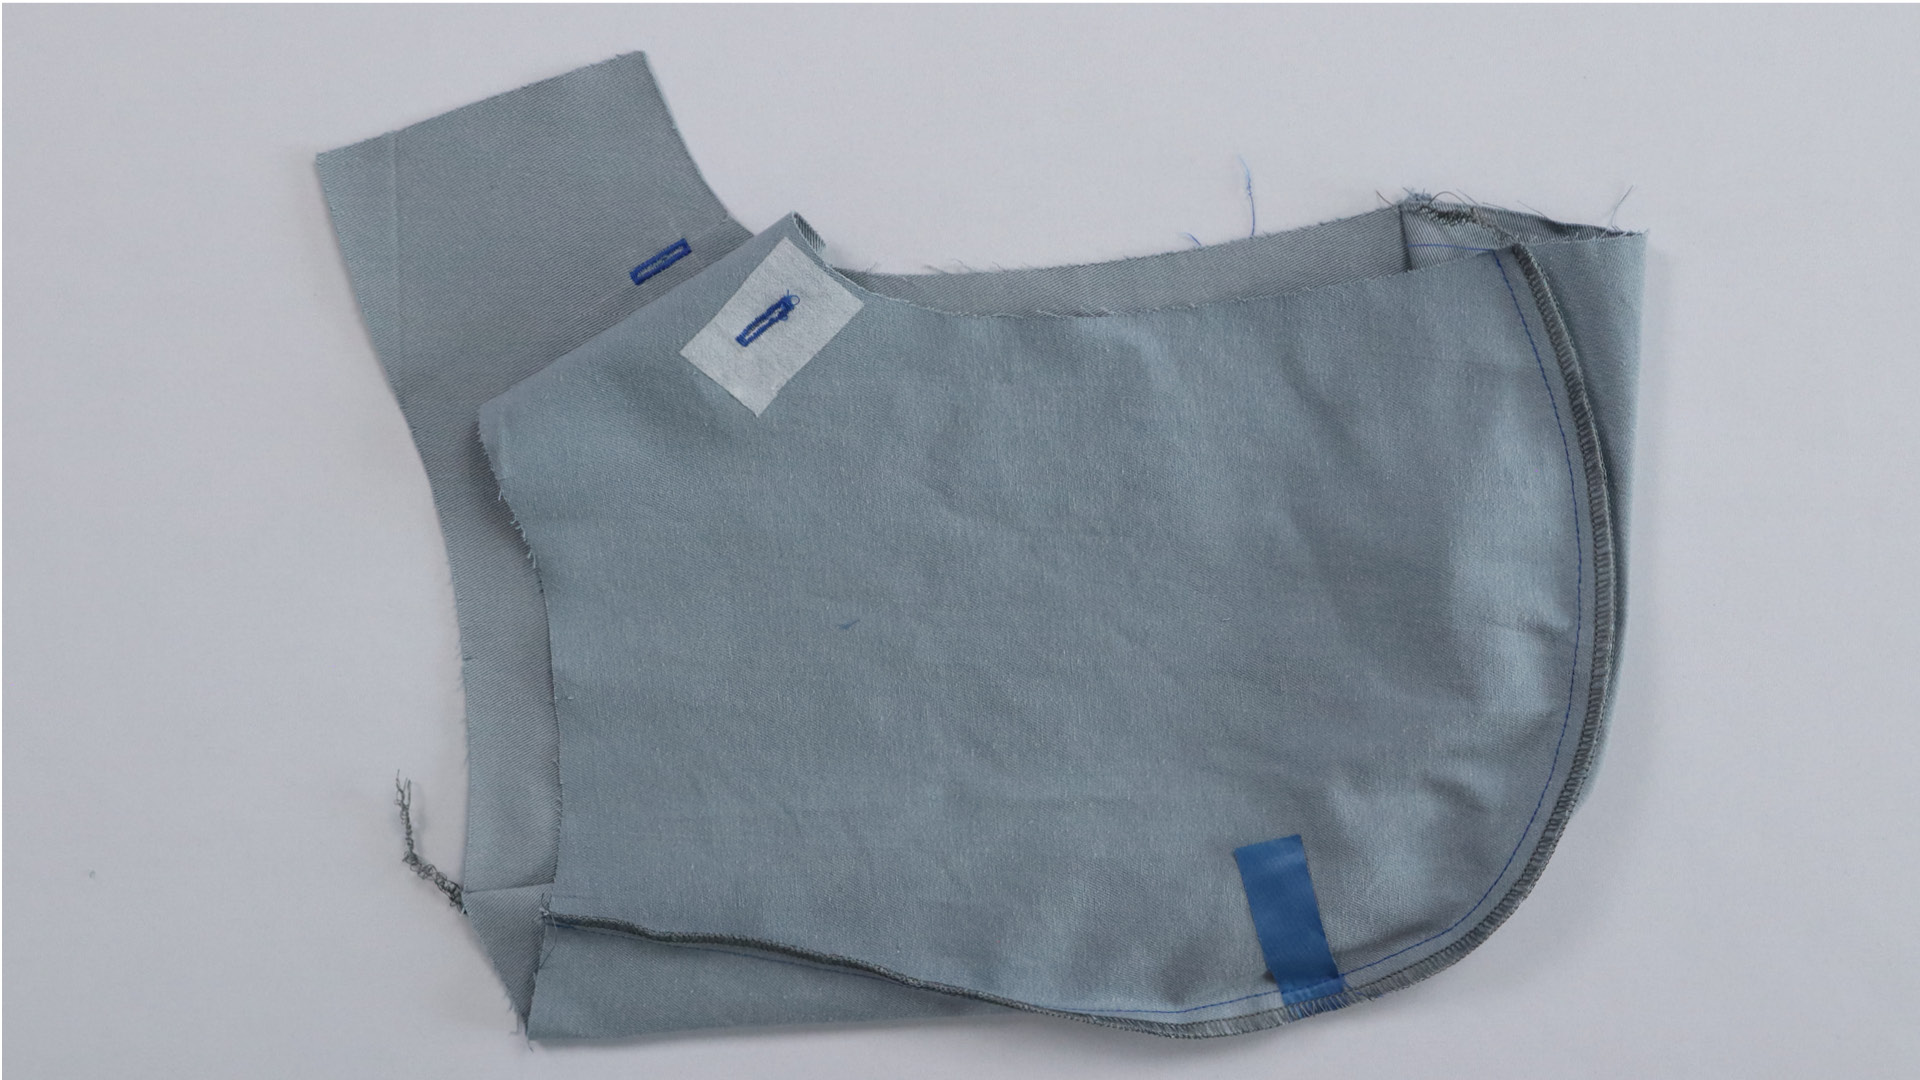
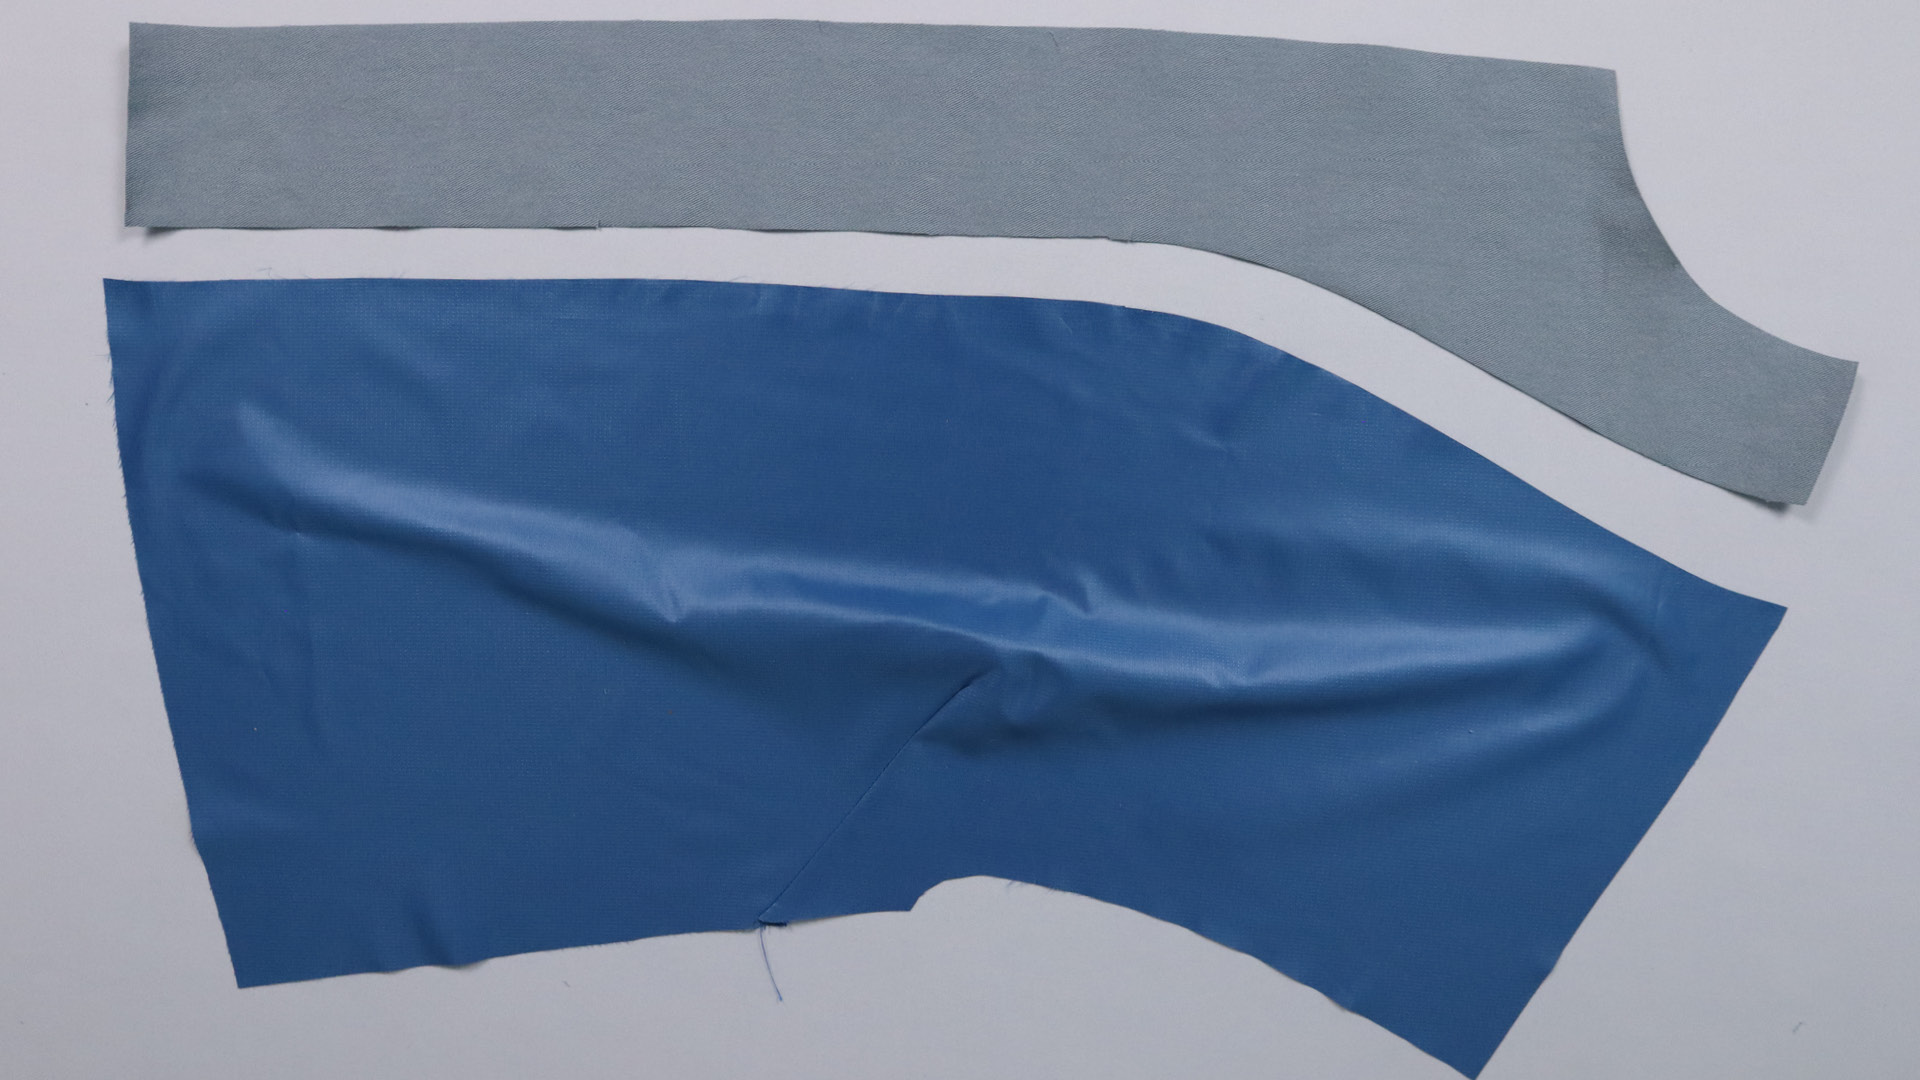
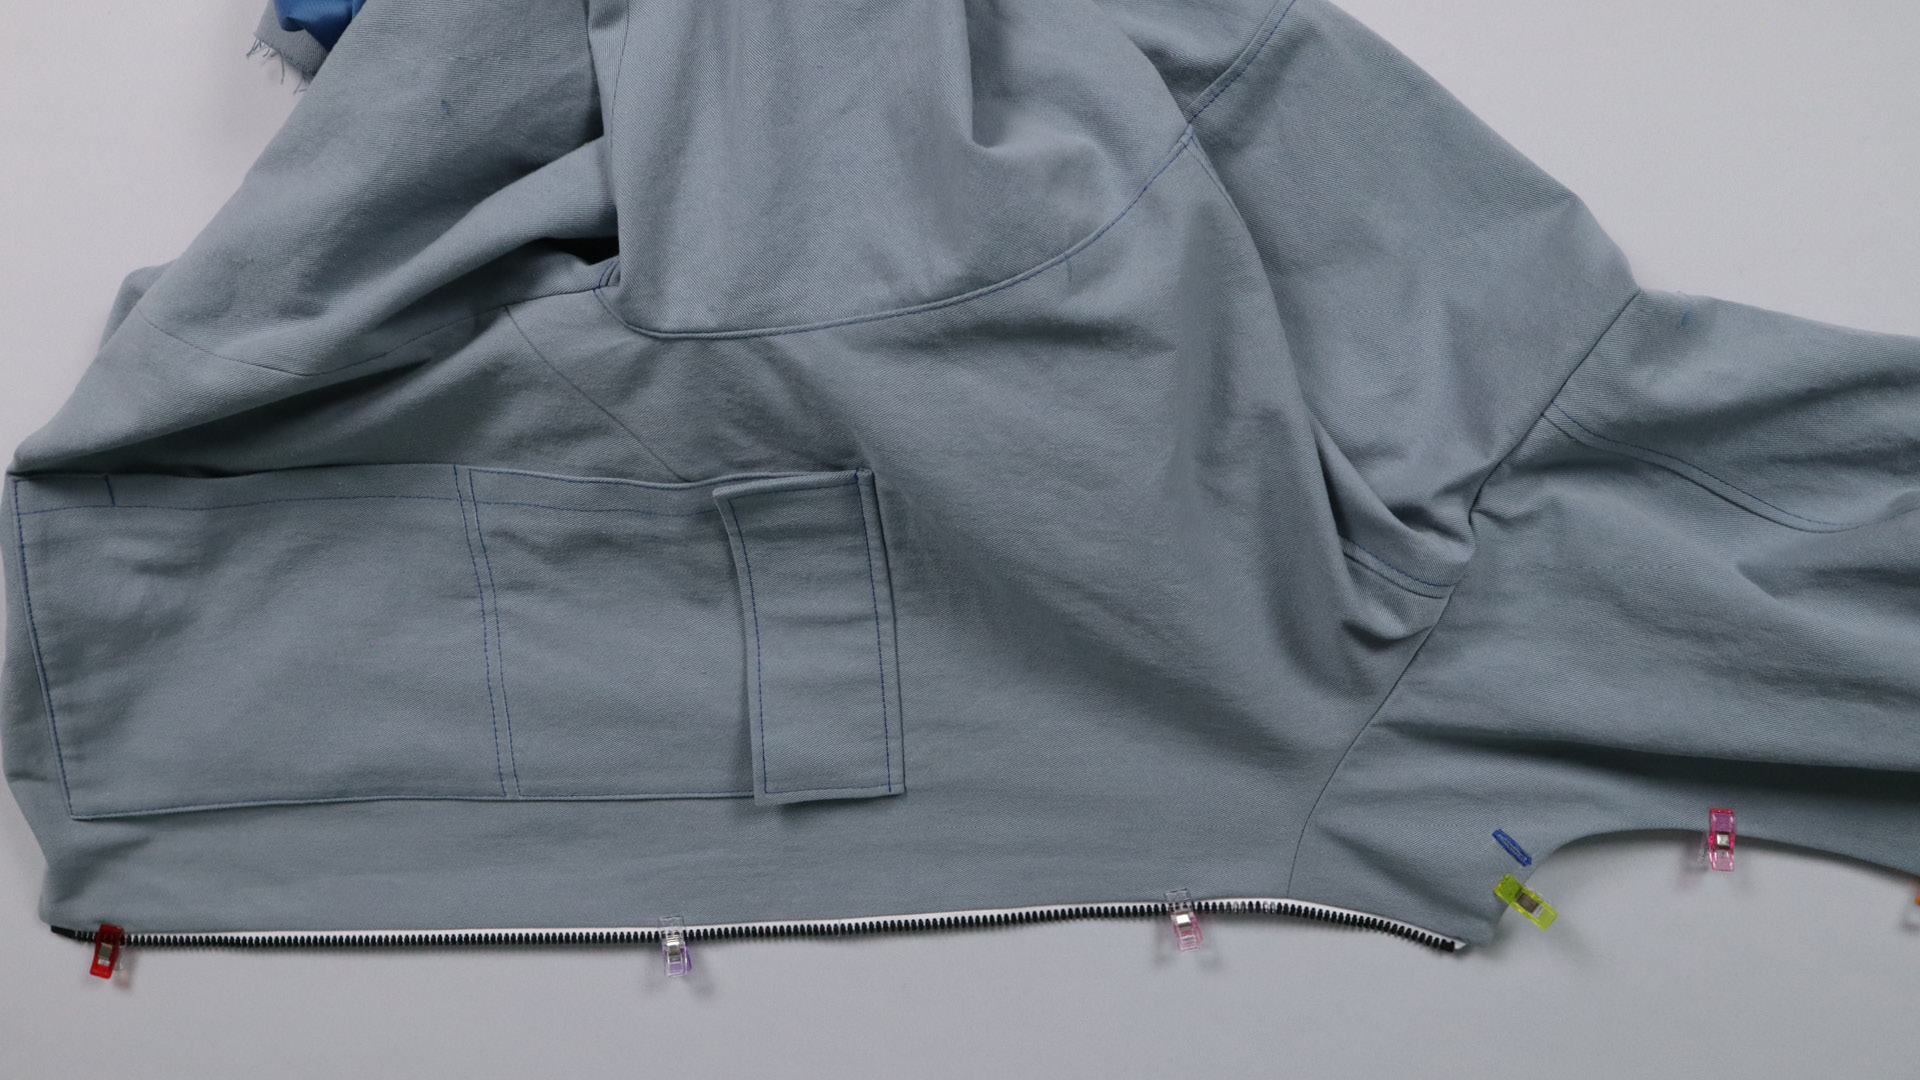
Prepare and sew on sleeves with tab
Fixing parts
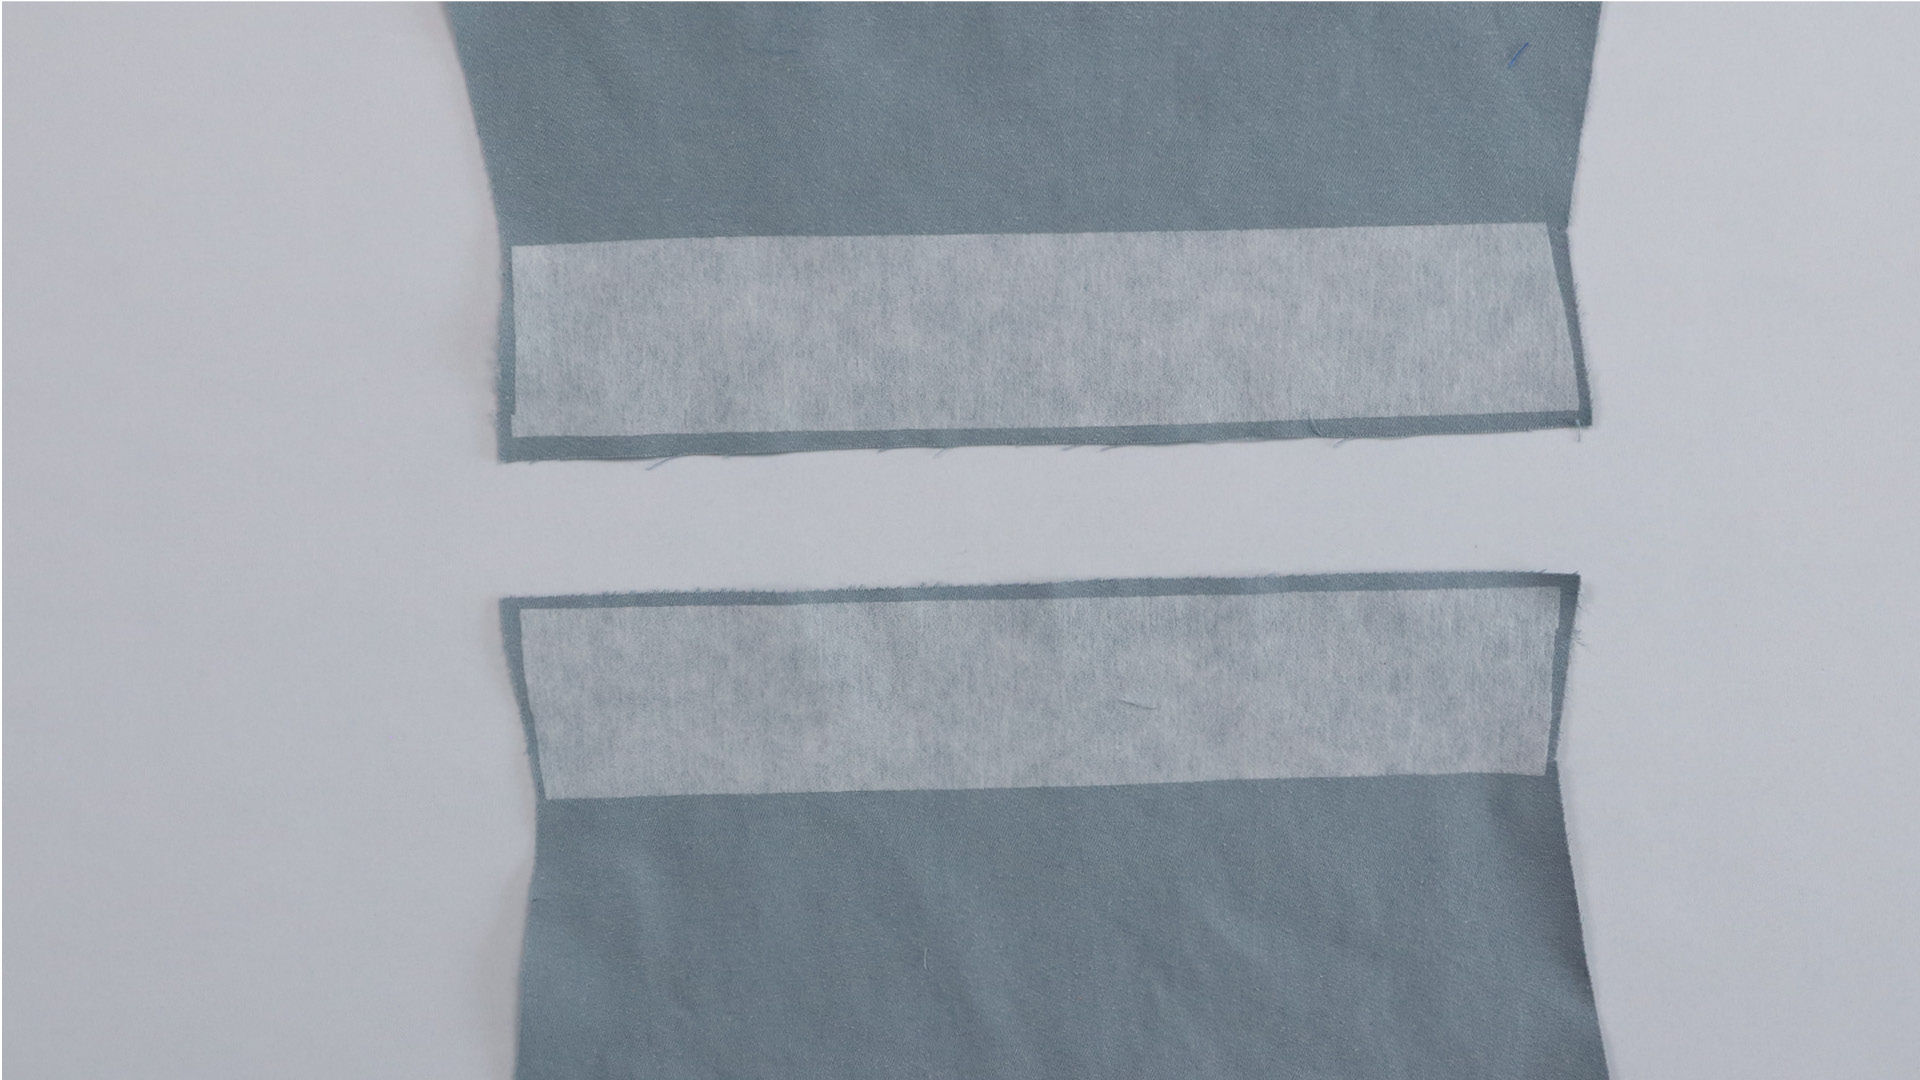
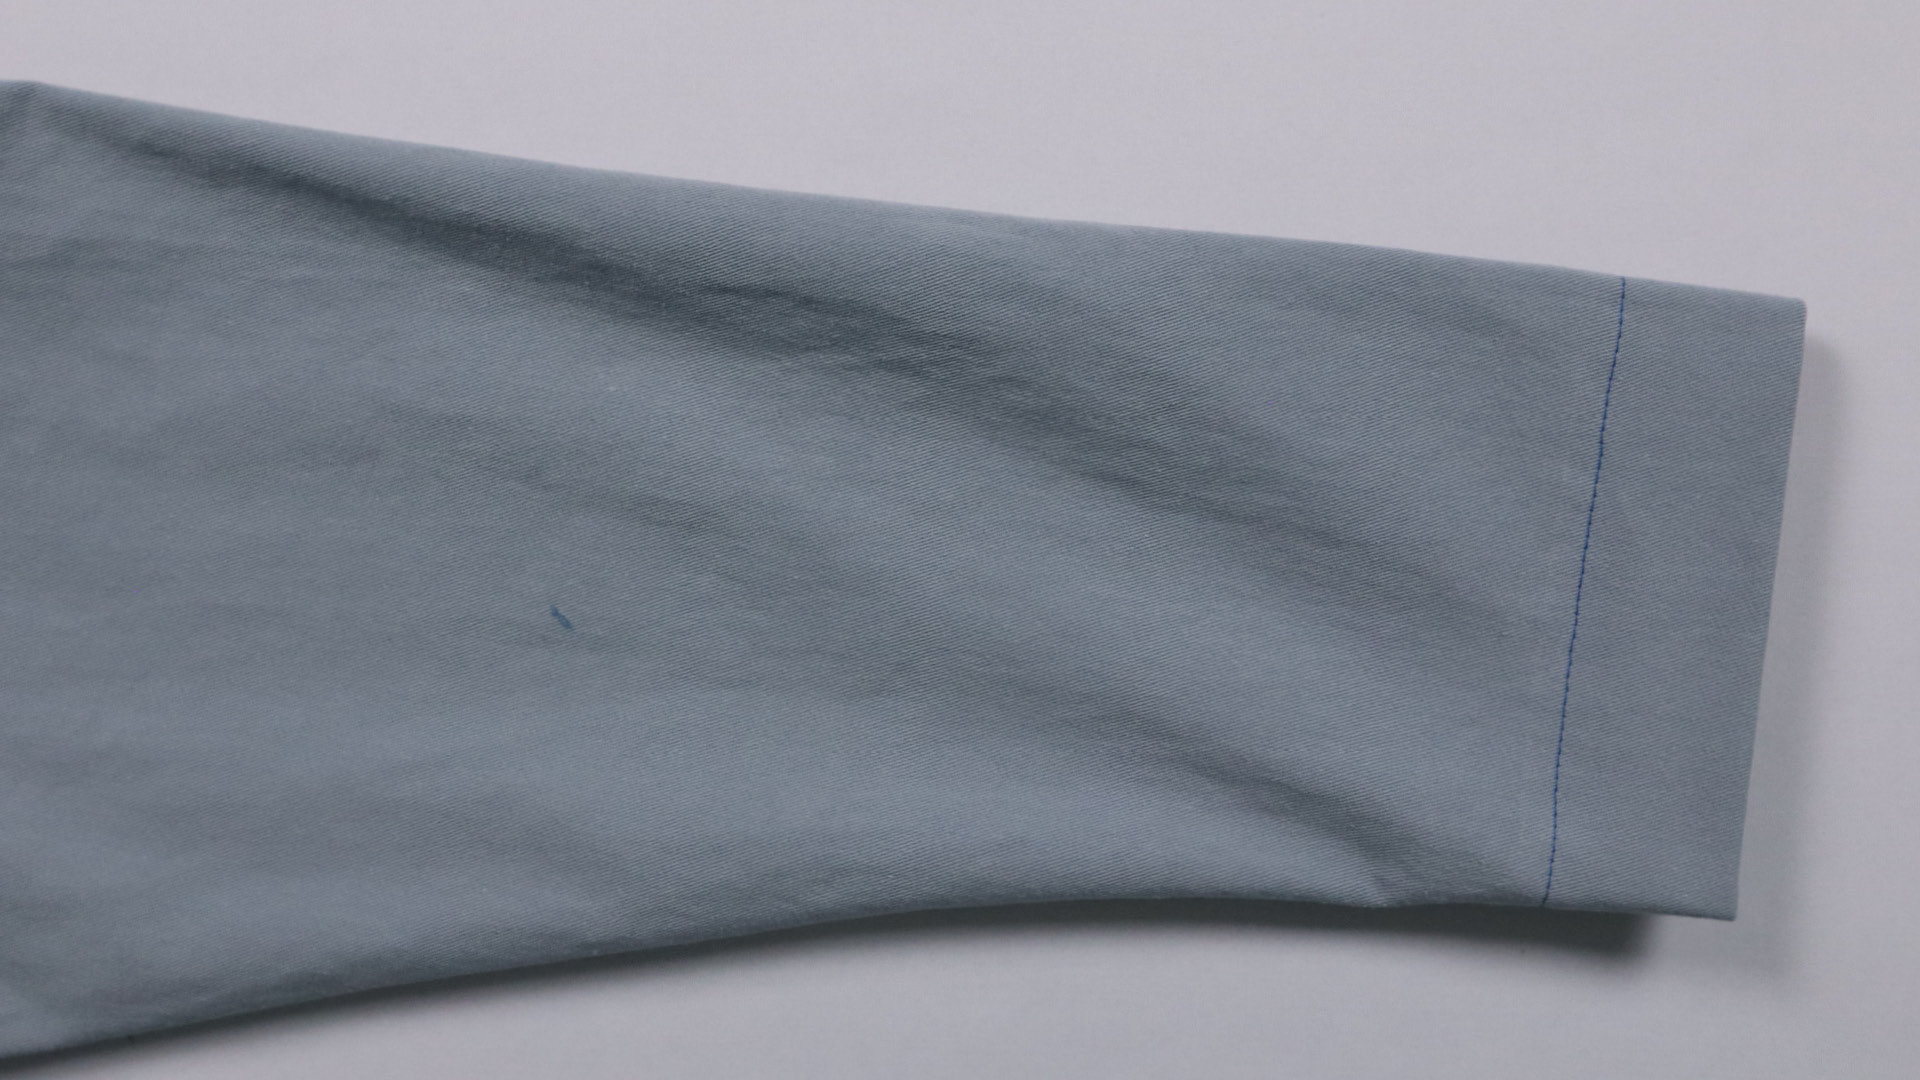
If not already done, iron the interfacing onto the sleeve hems.
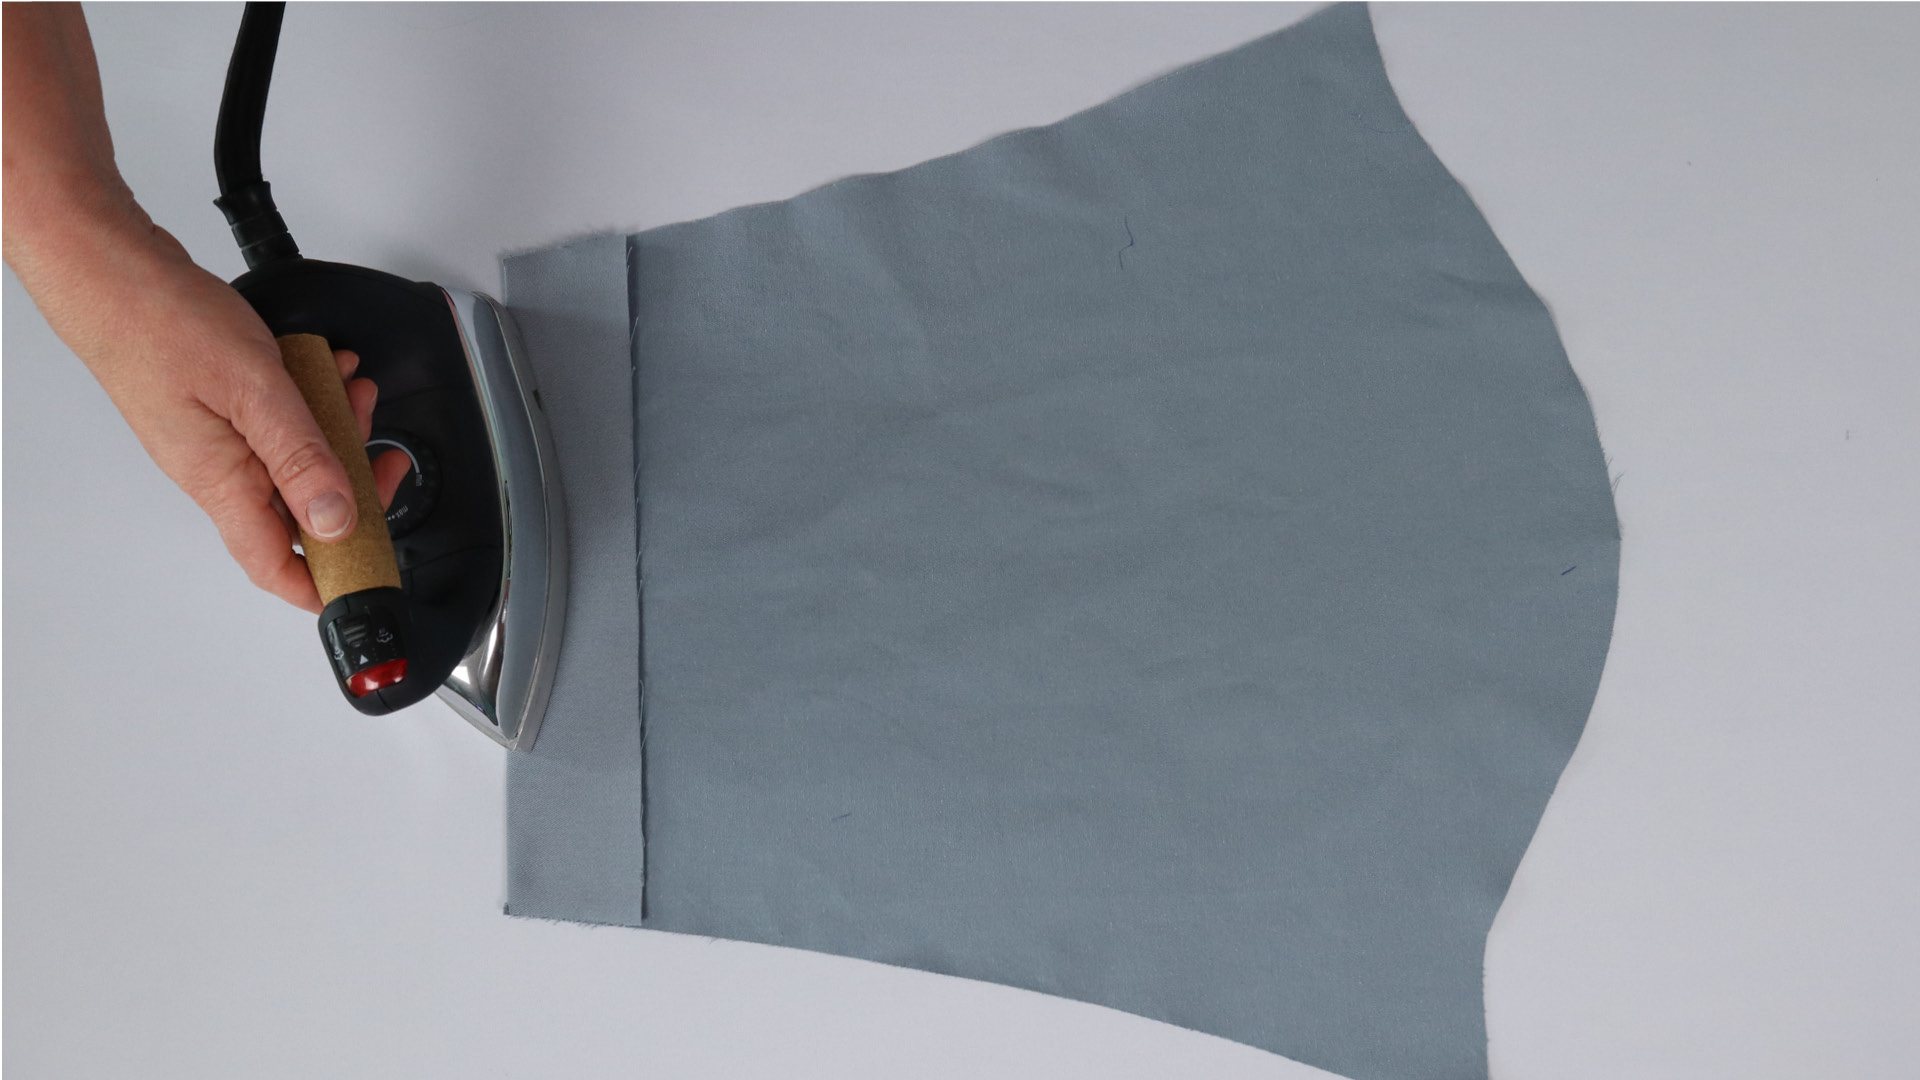
The sleeve hems are then ironed at the notches, wrong sides facing.
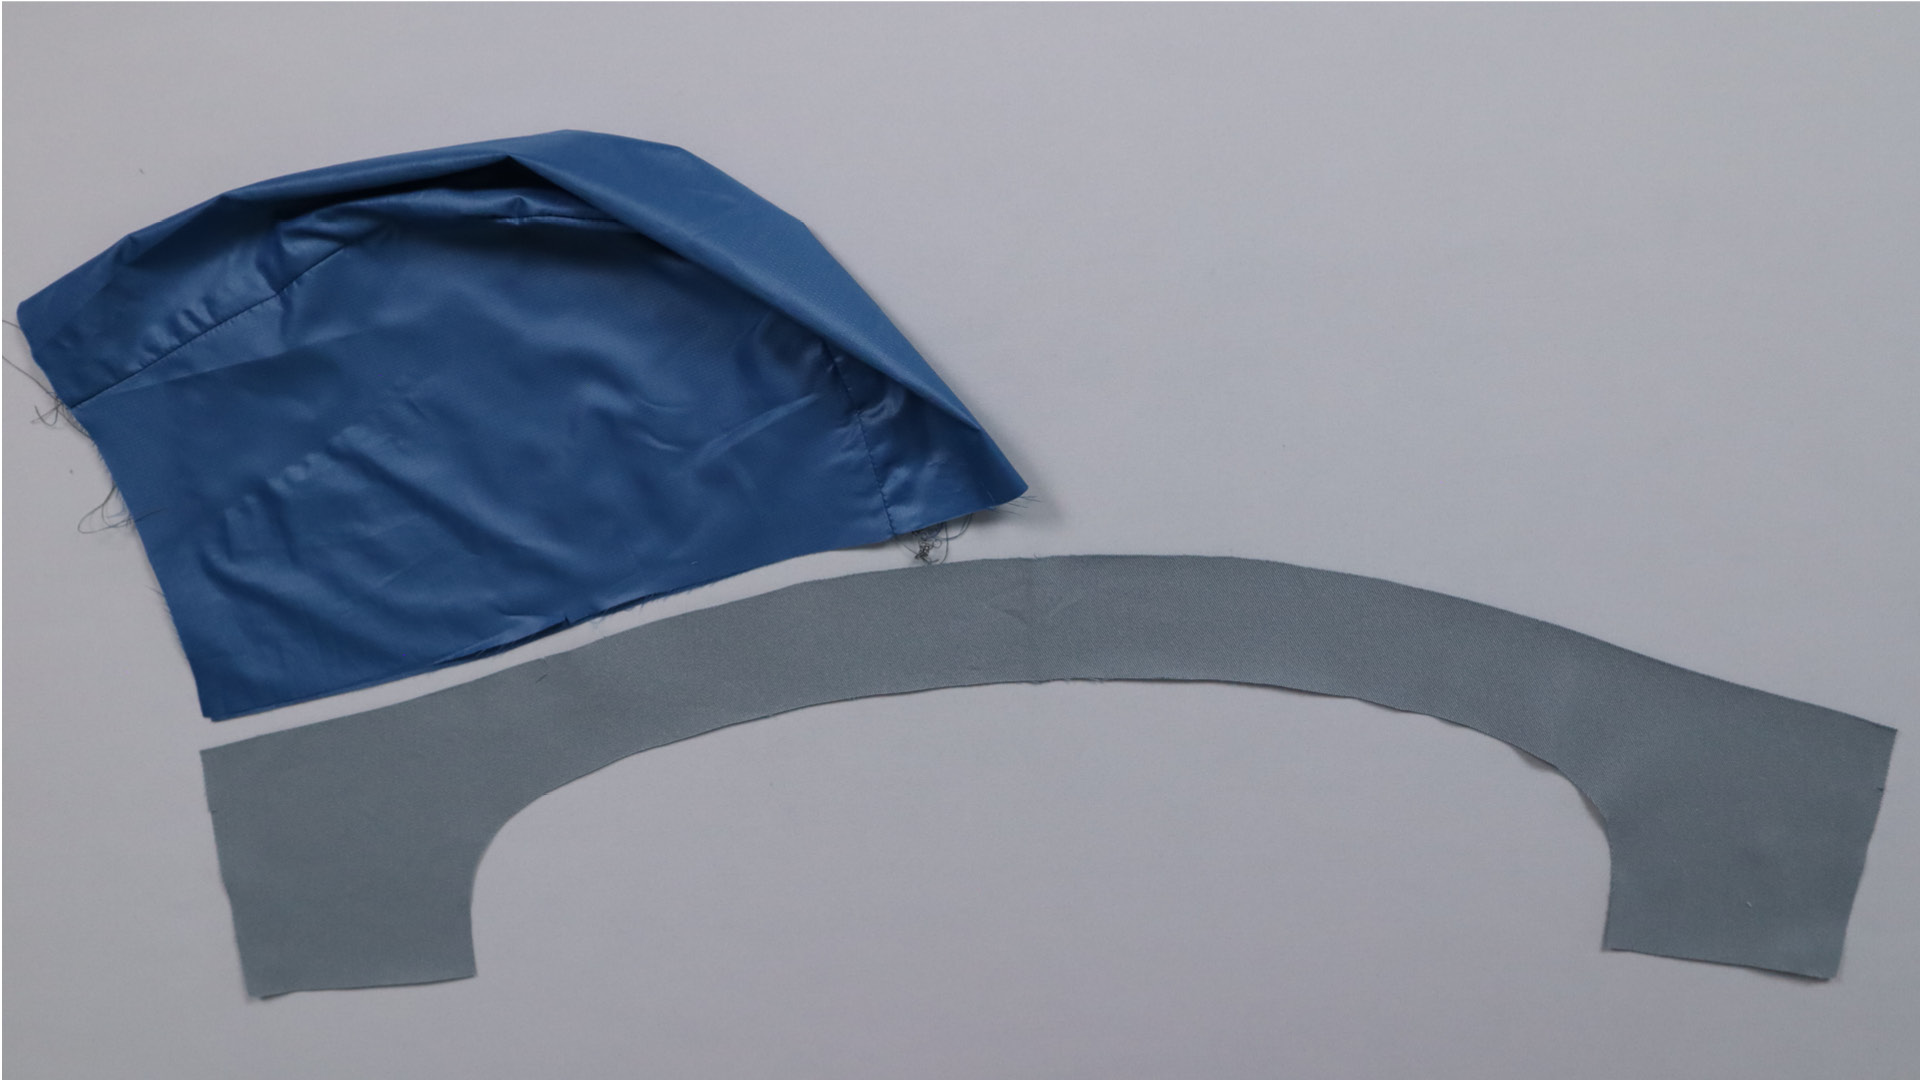
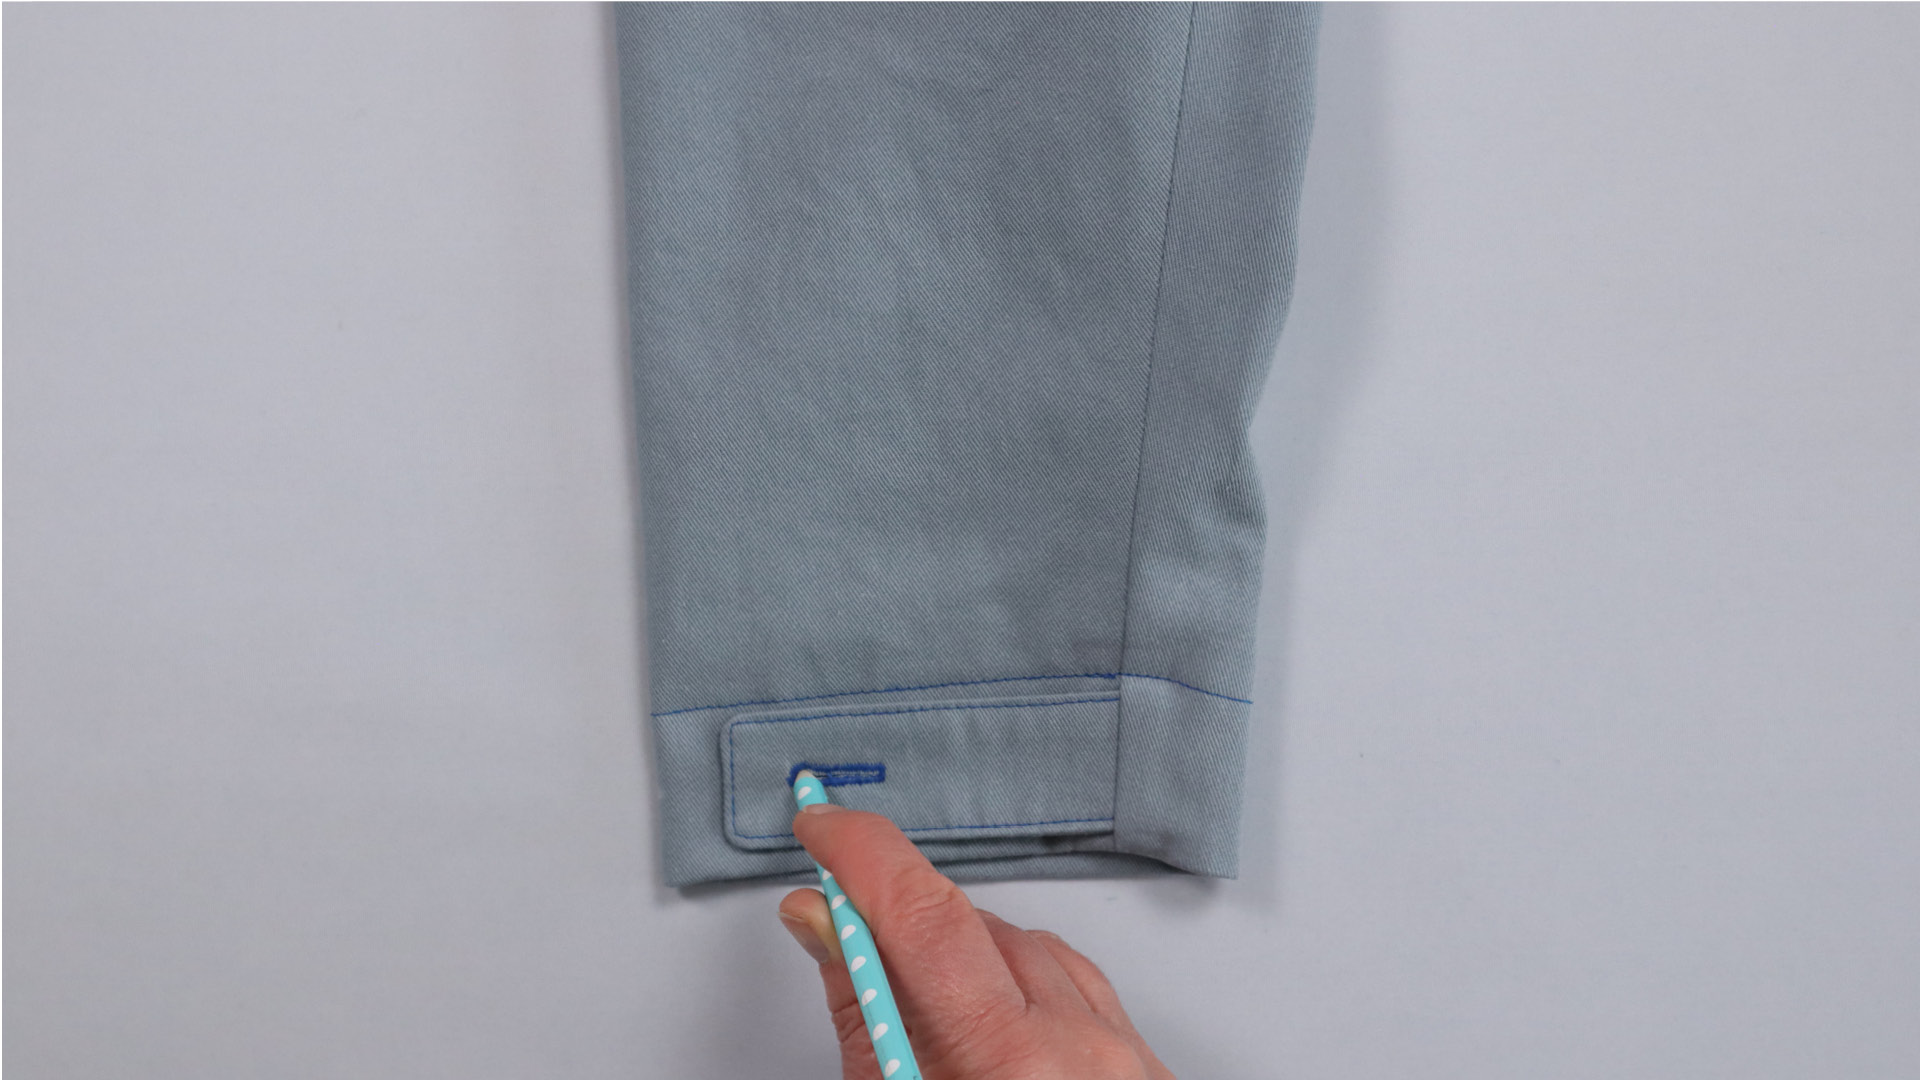
You have a total of four parts for the tabs, two of which are identical. Fasten the outer sides of the tabs, i.e. two identical parts, and mark which side is the fastened side from the outside if necessary.
Sew tabs
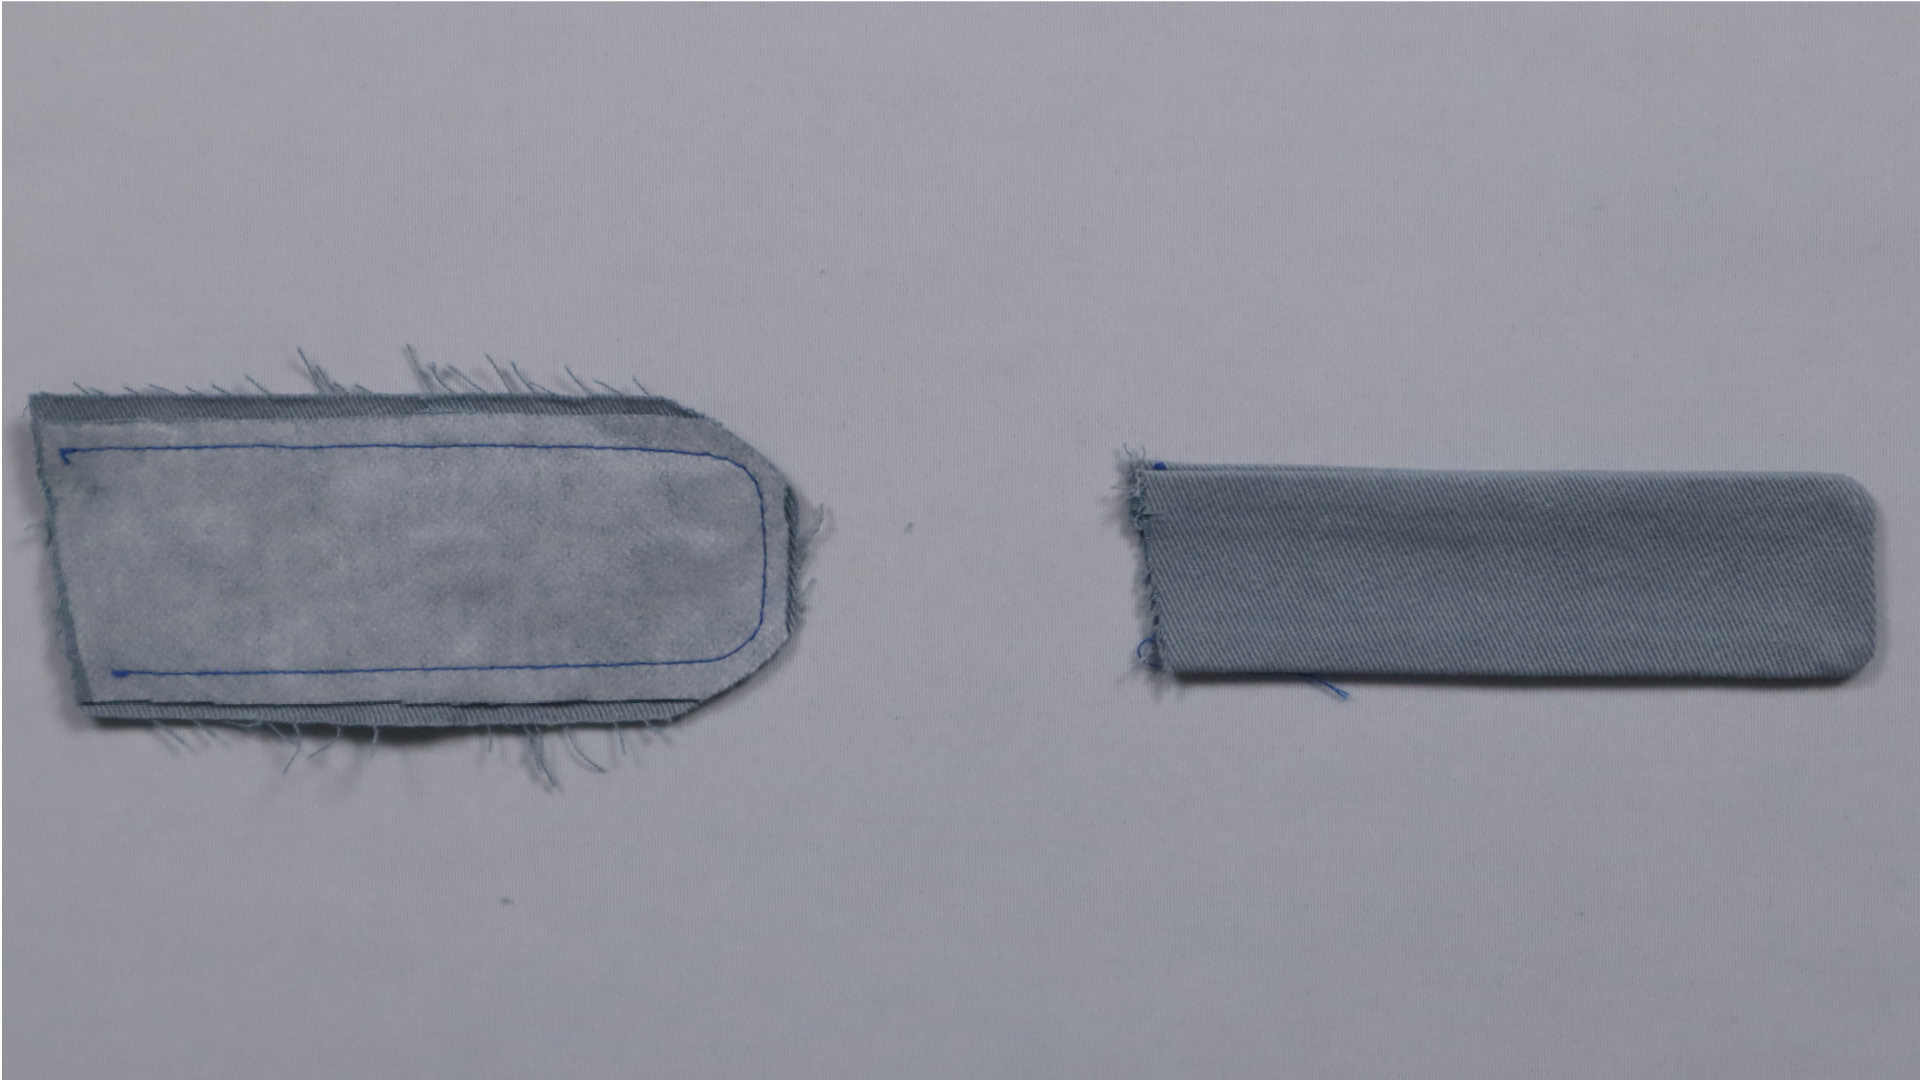 Before turning, the seam allowances of the sleeve tabs are cut back.
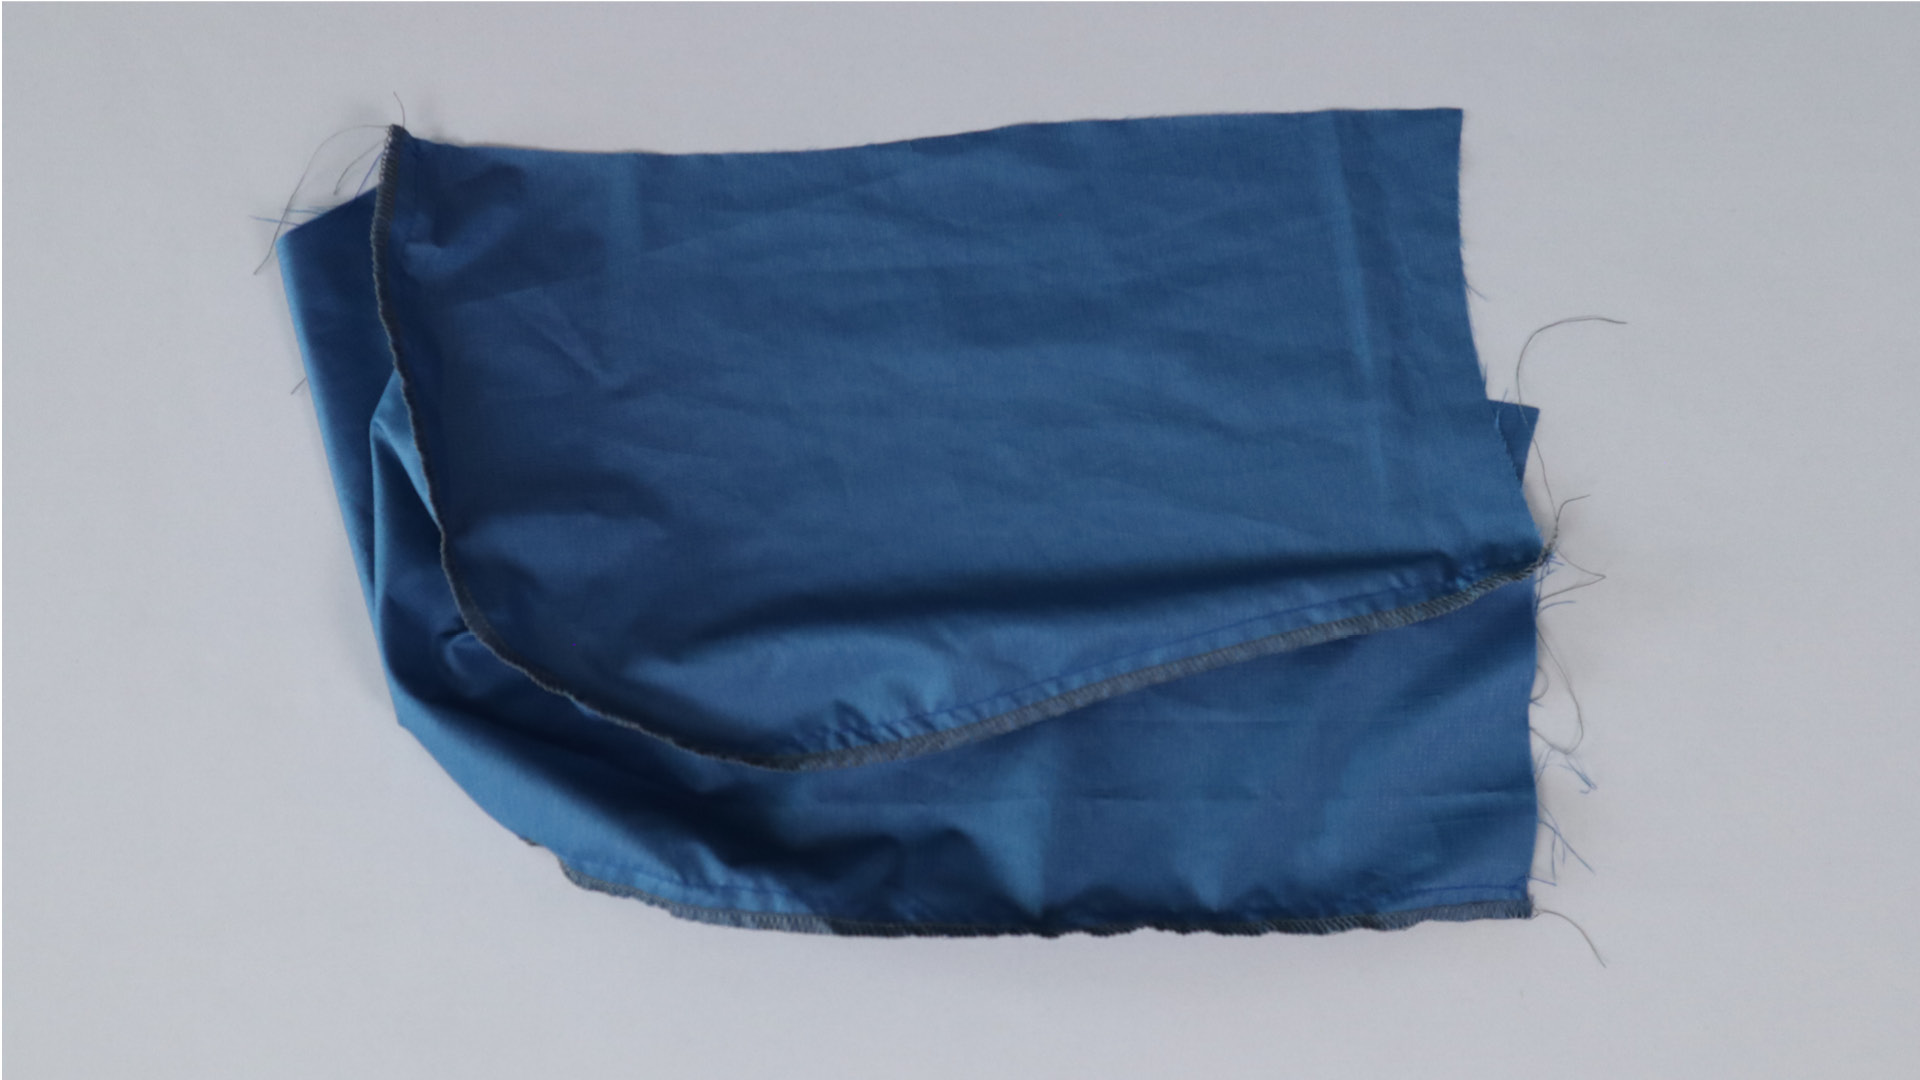
Now place two pieces – one with and one without interfacing – right sides together and sew the two long sides and the rounding together. The slanted short side, which will later lie in the seam, remains open.
First press the seam allowances open and cut them back at the curve before turning the tabs over and pressing again. The previously sewn edges are now topstitched close to the edge. Make sure that the side of the fabric with the interfacing is on top.
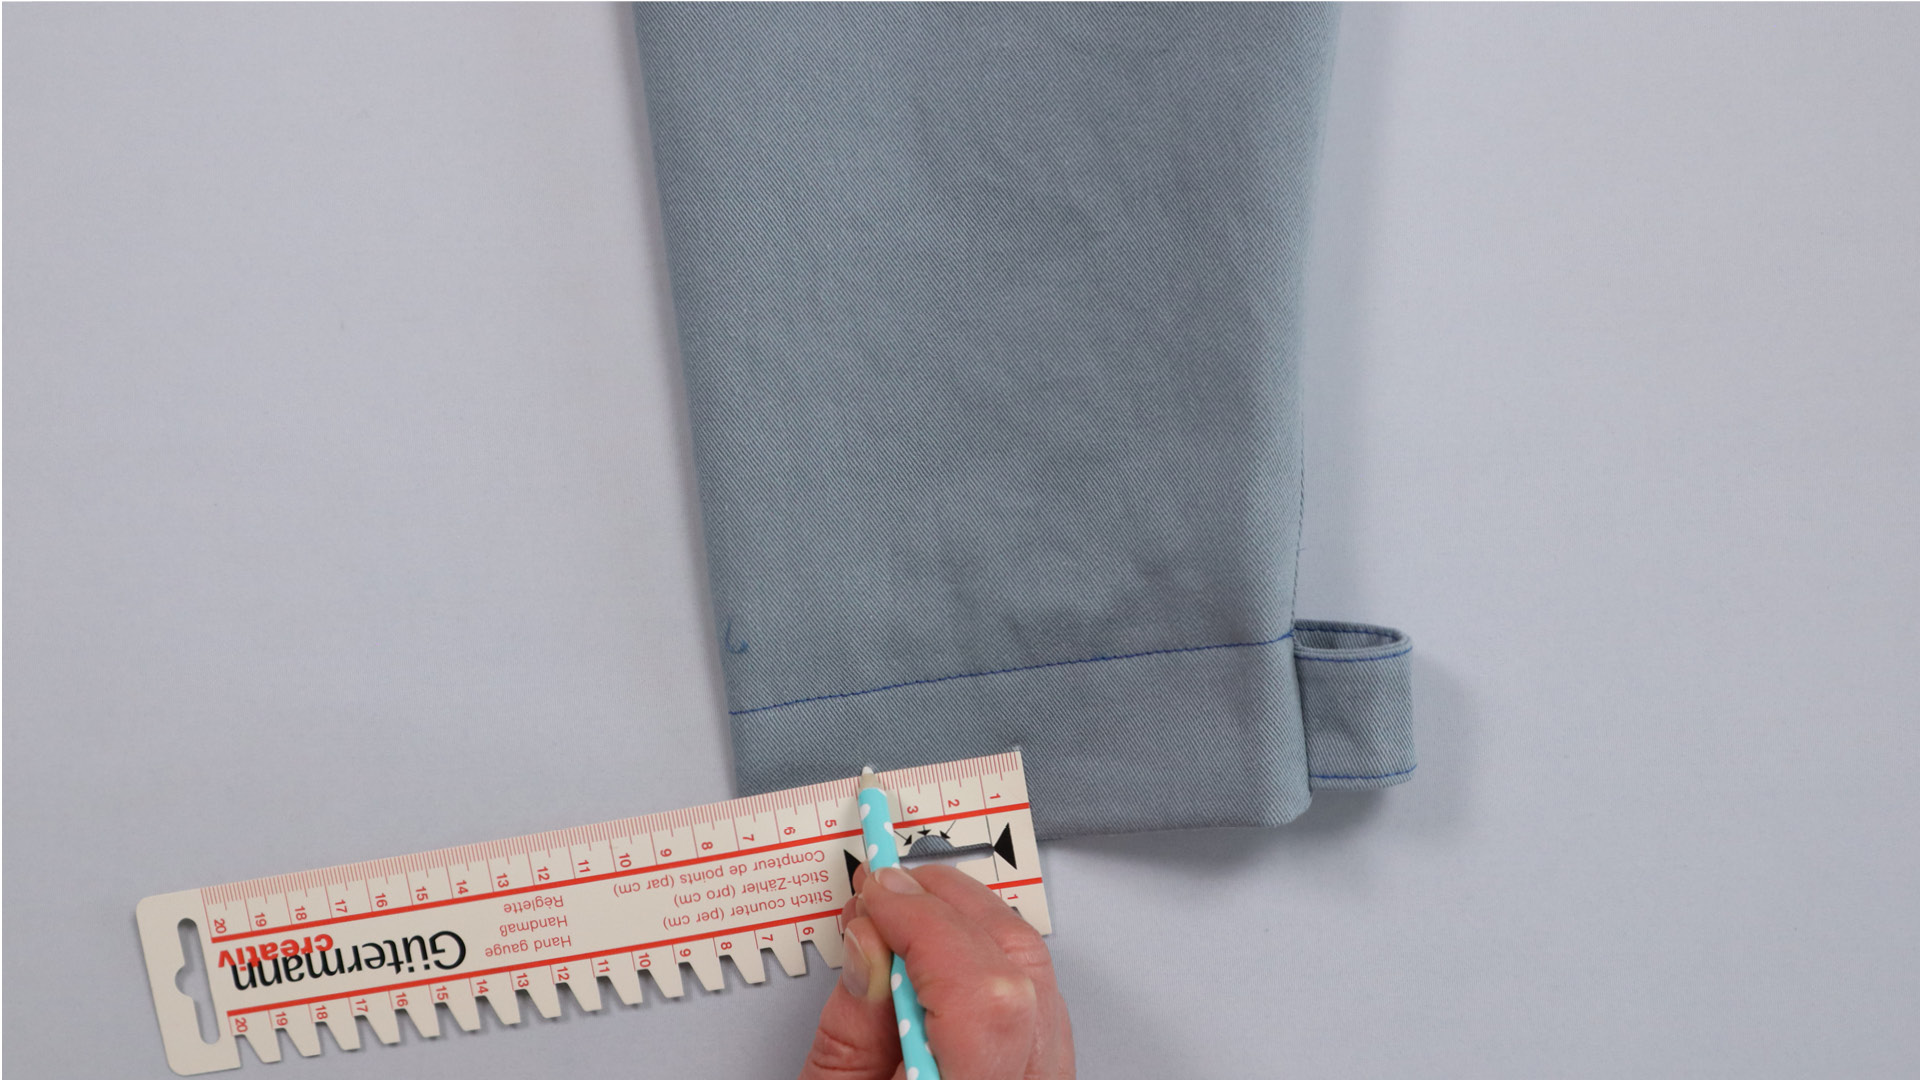
The buttonhole is then worked in. You can use the template to help you find the correct position. The length of the buttonhole depends on the diameter of your buttons.
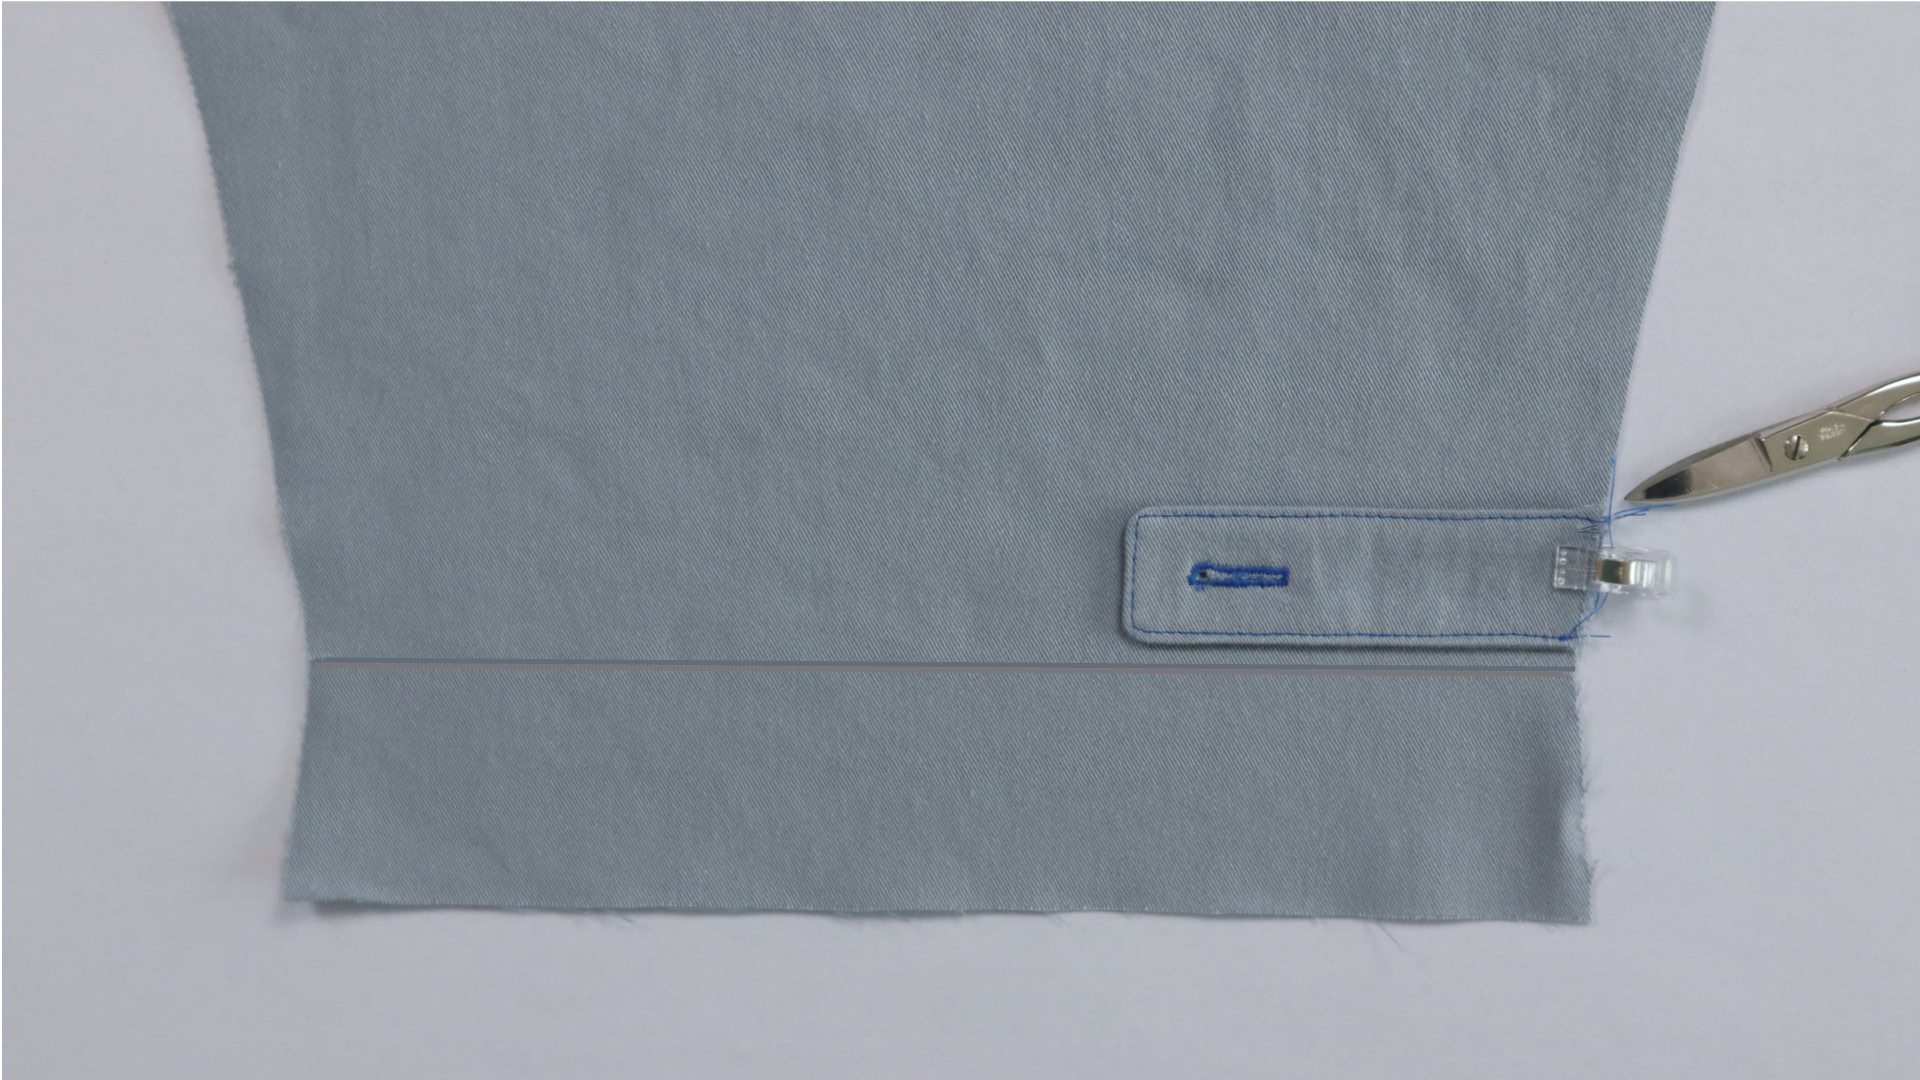
The tabs are now placed between the notches on the back sleeve seam and sewn in place within the seam allowance with an auxiliary seam. Make sure that they are parallel to the hem edge.
Tip: If you place the tab on the sleeve so that the pretty side of the buttonhole is visible, it will go from the back to the front of the finished jacket. If you place the tab on the sleeve with the beautiful buttonhole side facing downwards, it will go from the front to the back of the finished jacket, just as you know it from the cuffs on blouses. In this example, the beautiful buttonhole side is visible. On the finished jacket, the flap then goes from the back to the front.
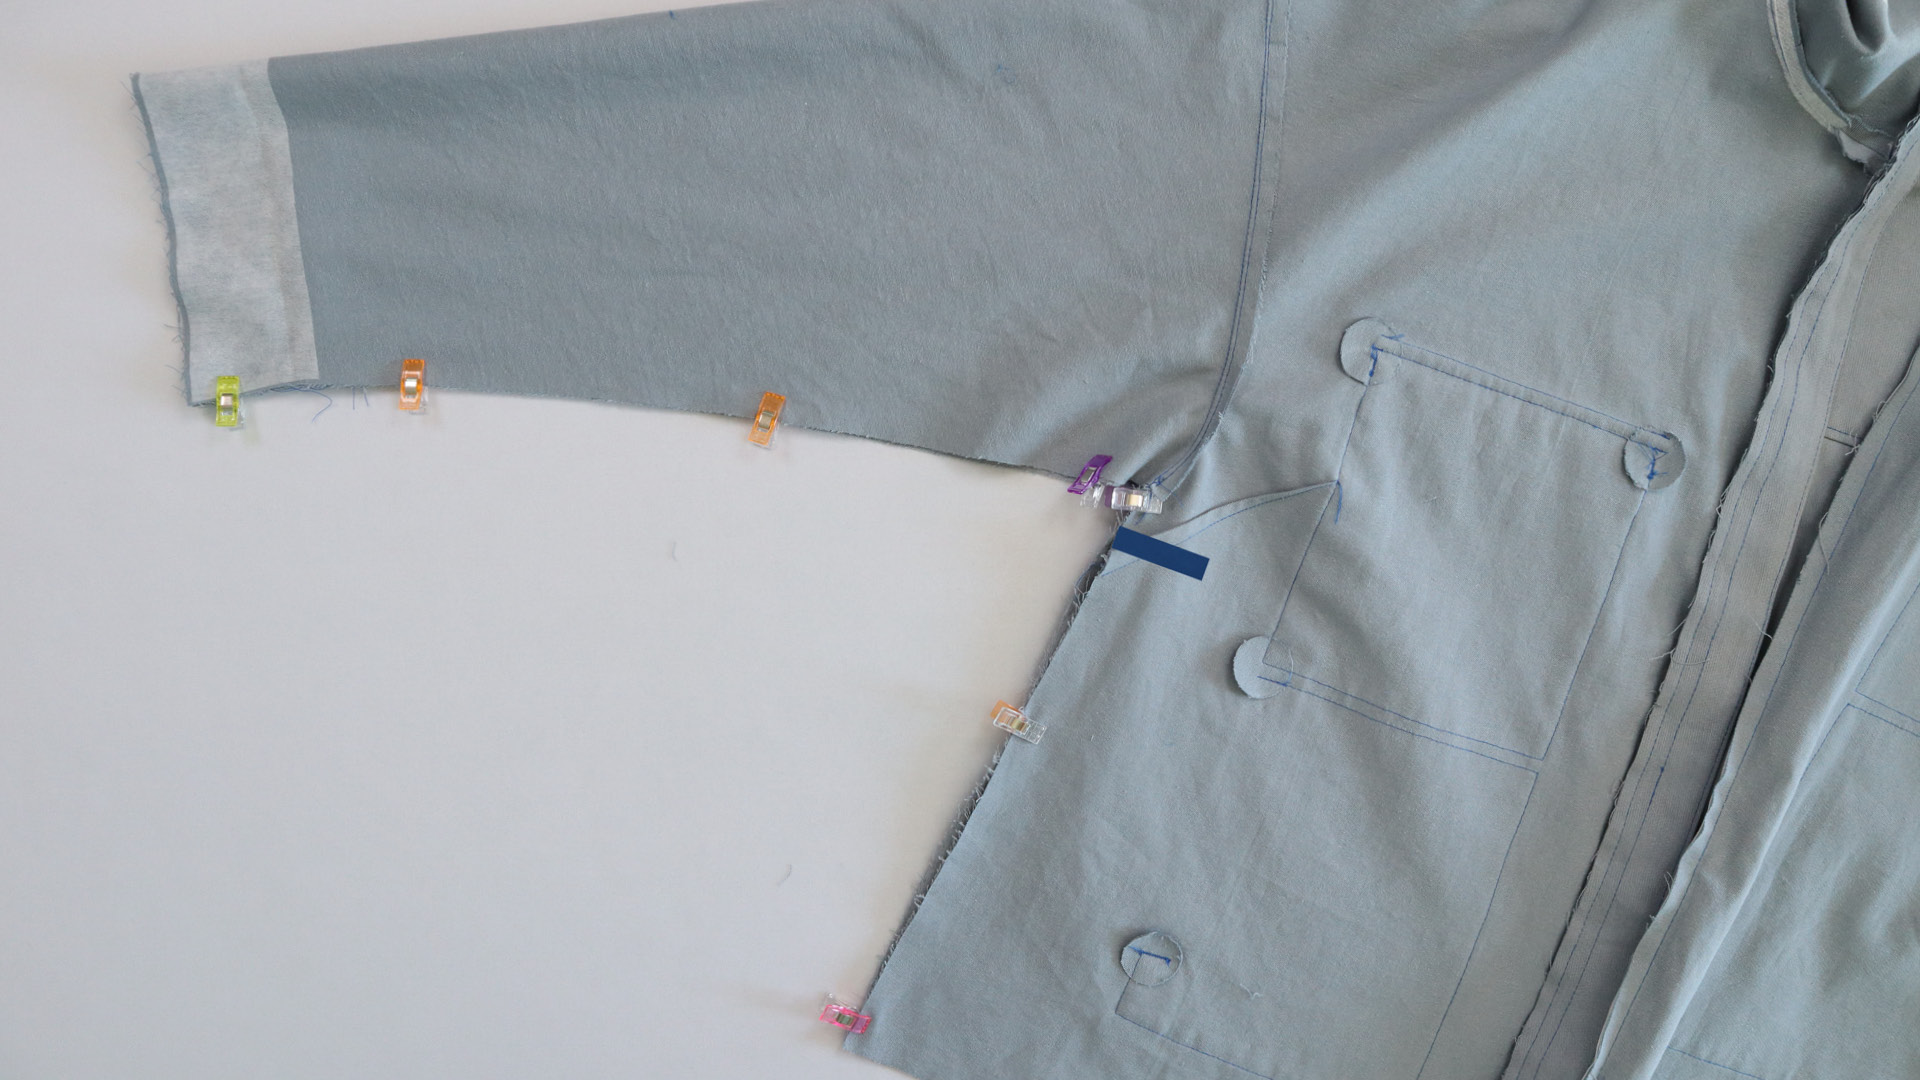
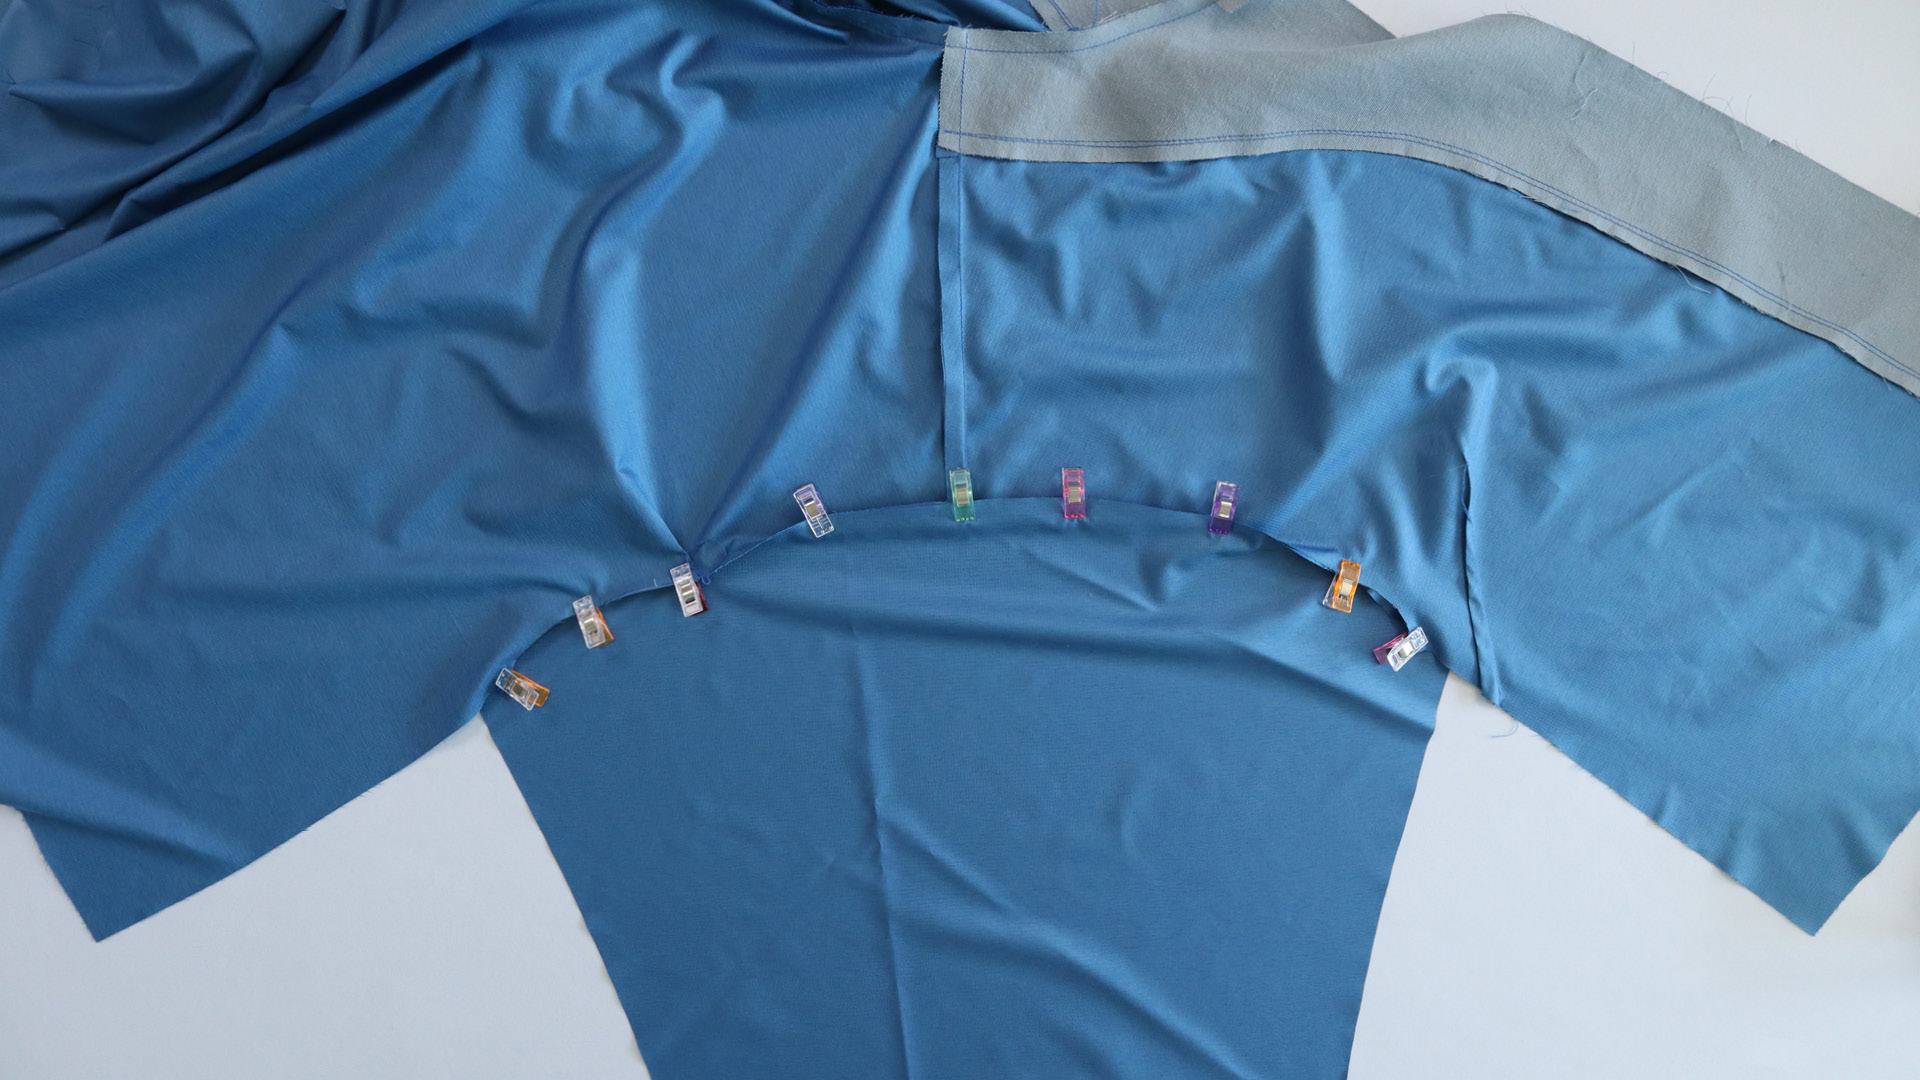
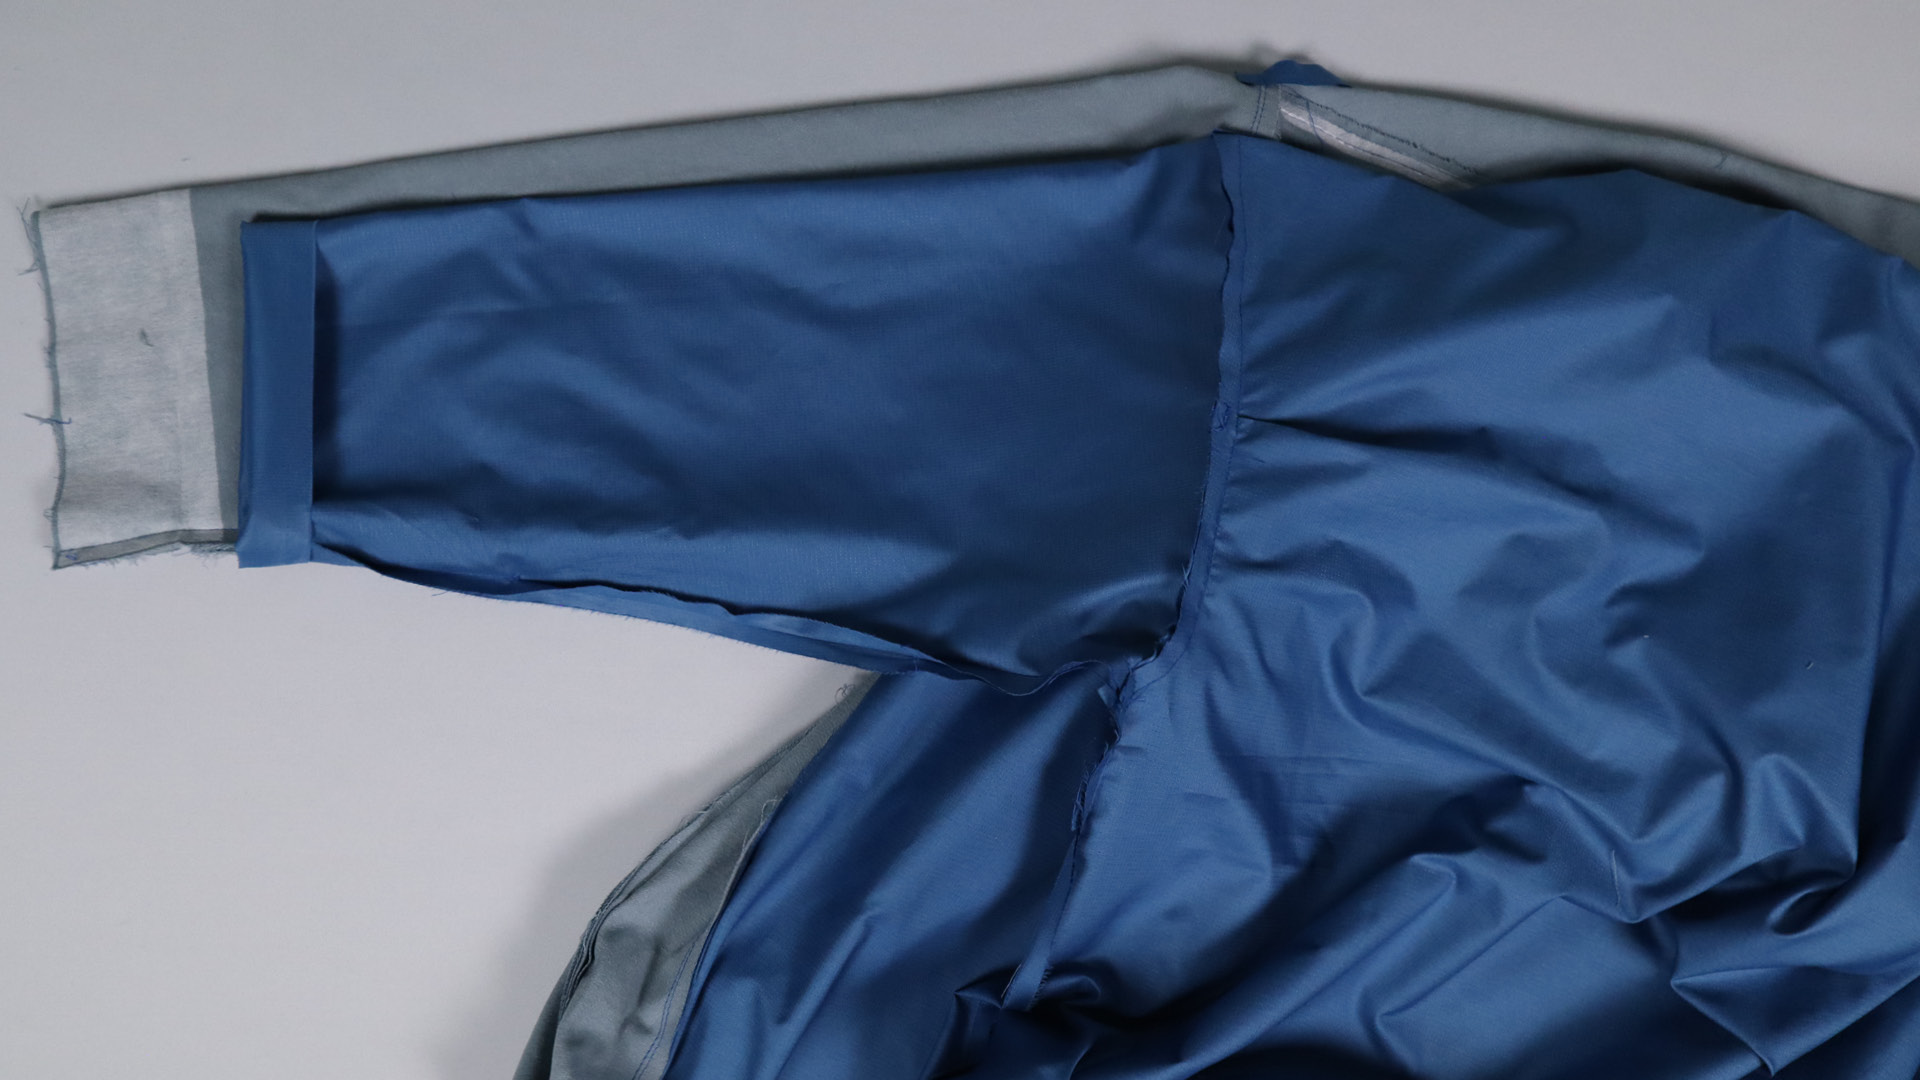
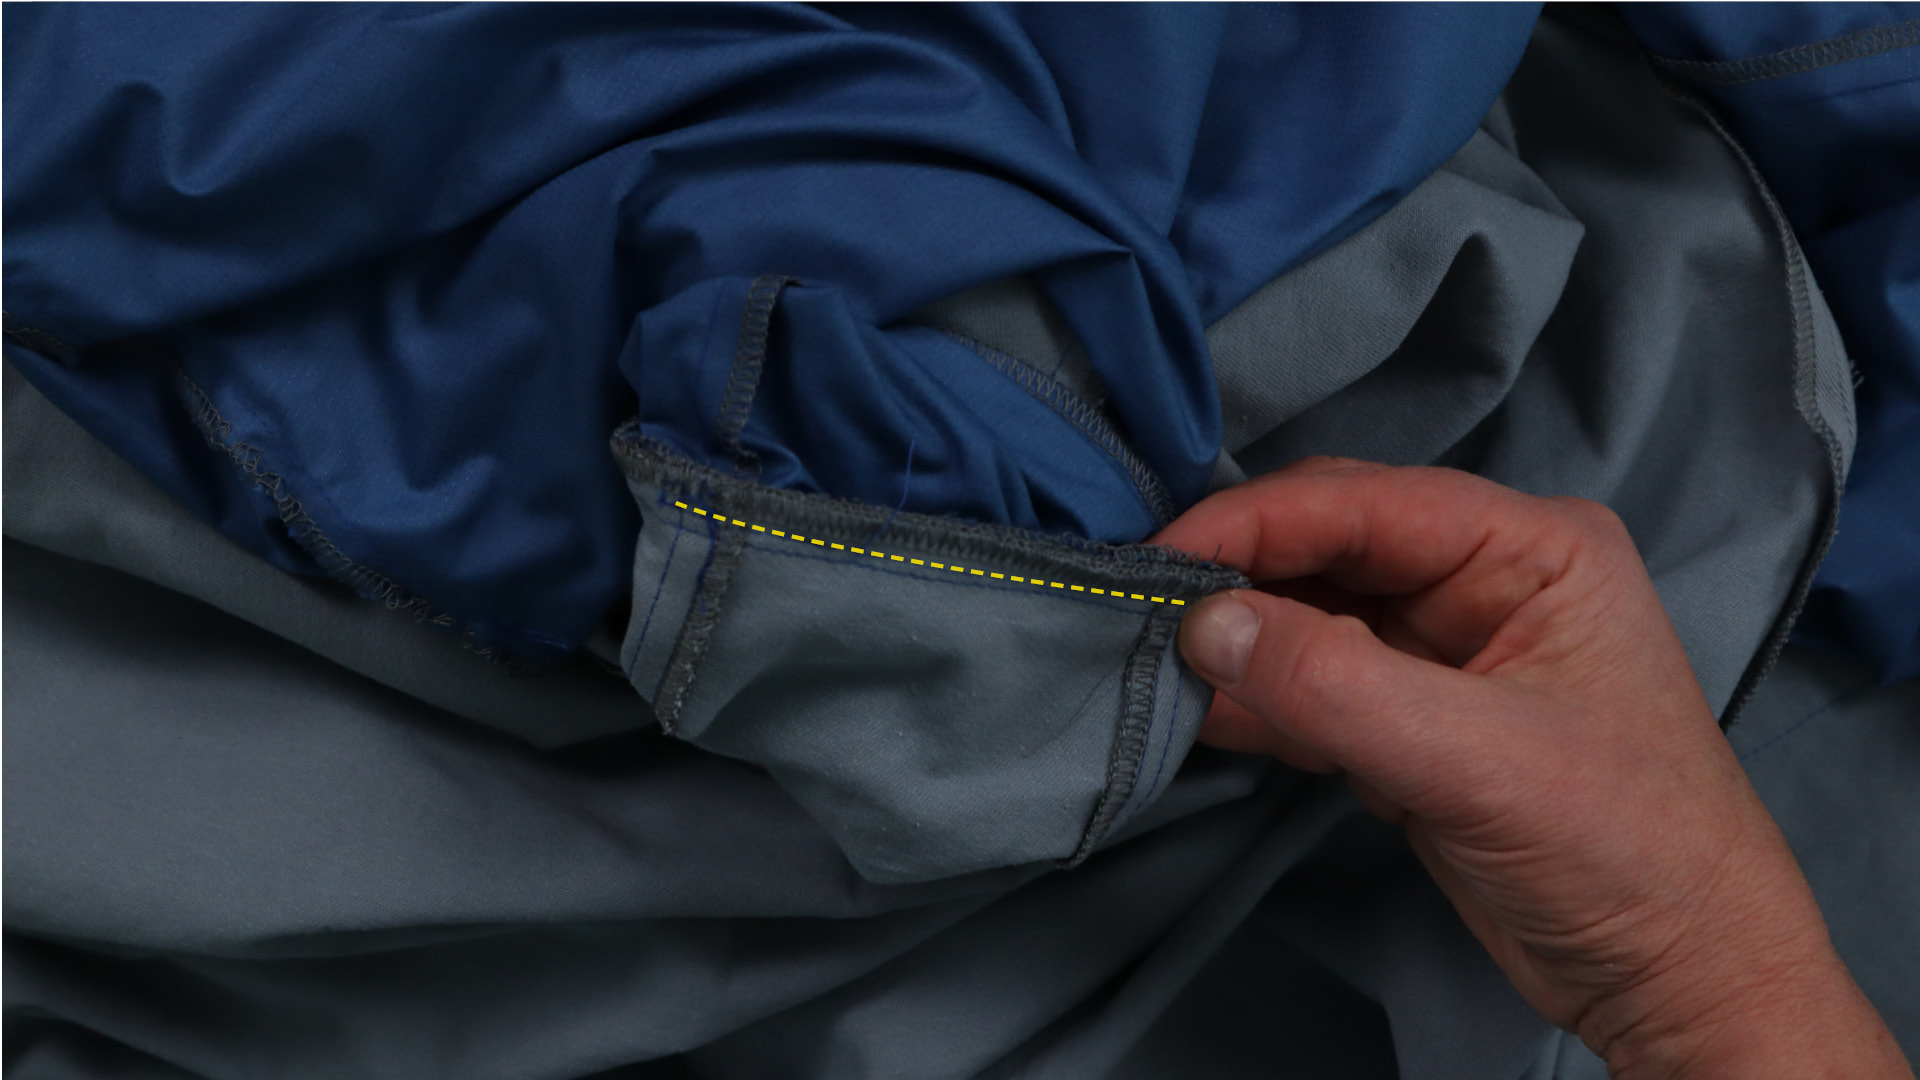
Sew the sleeves to the front and back
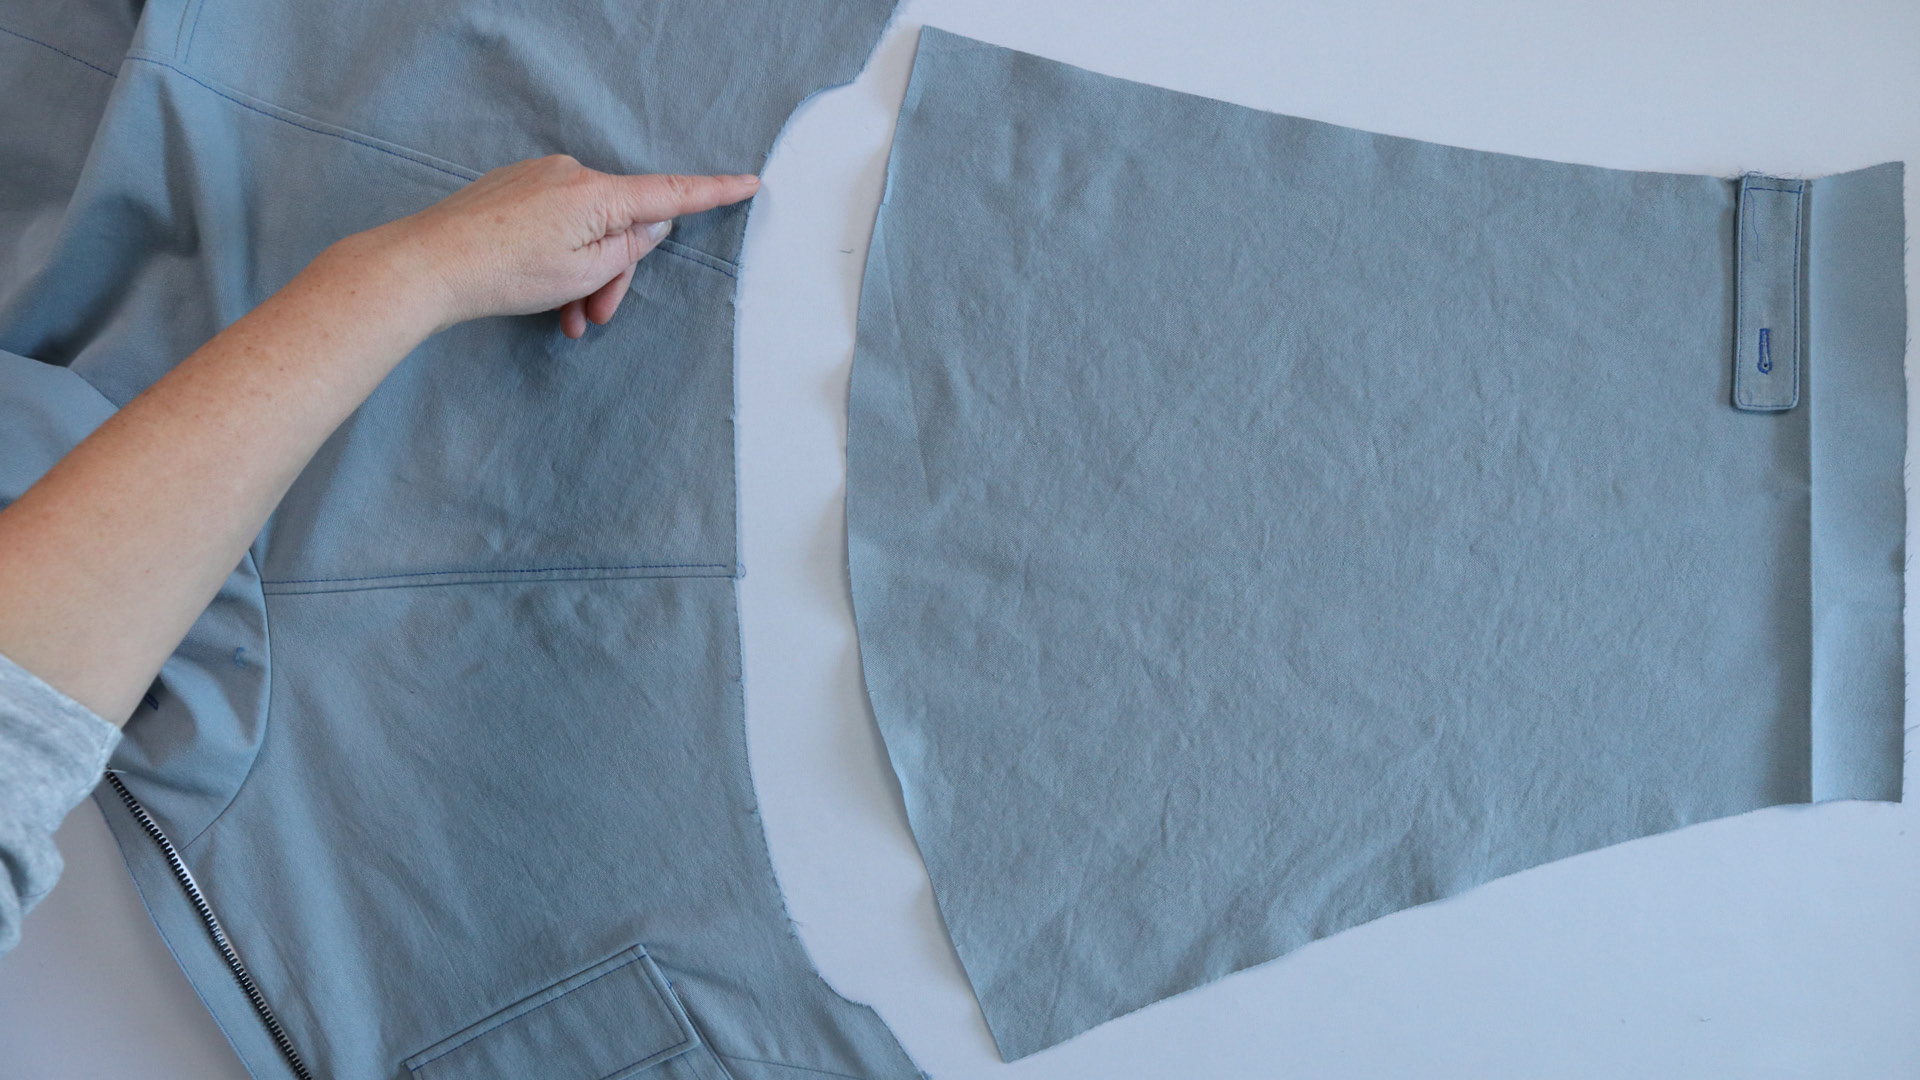
The sleeves are now sewn to the front and back of the jacket with hood with the armhole right sides together. Pay attention to the notch markings on both parts. I am pointing here to the two markings close together on the back of the jacket.
Pin the sleeves to the jacket and pay attention to the seam allowances at the beginning and end of the seam. As you can see in the picture, the sleeve edge protrudes slightly beyond the side edge of the jacket.
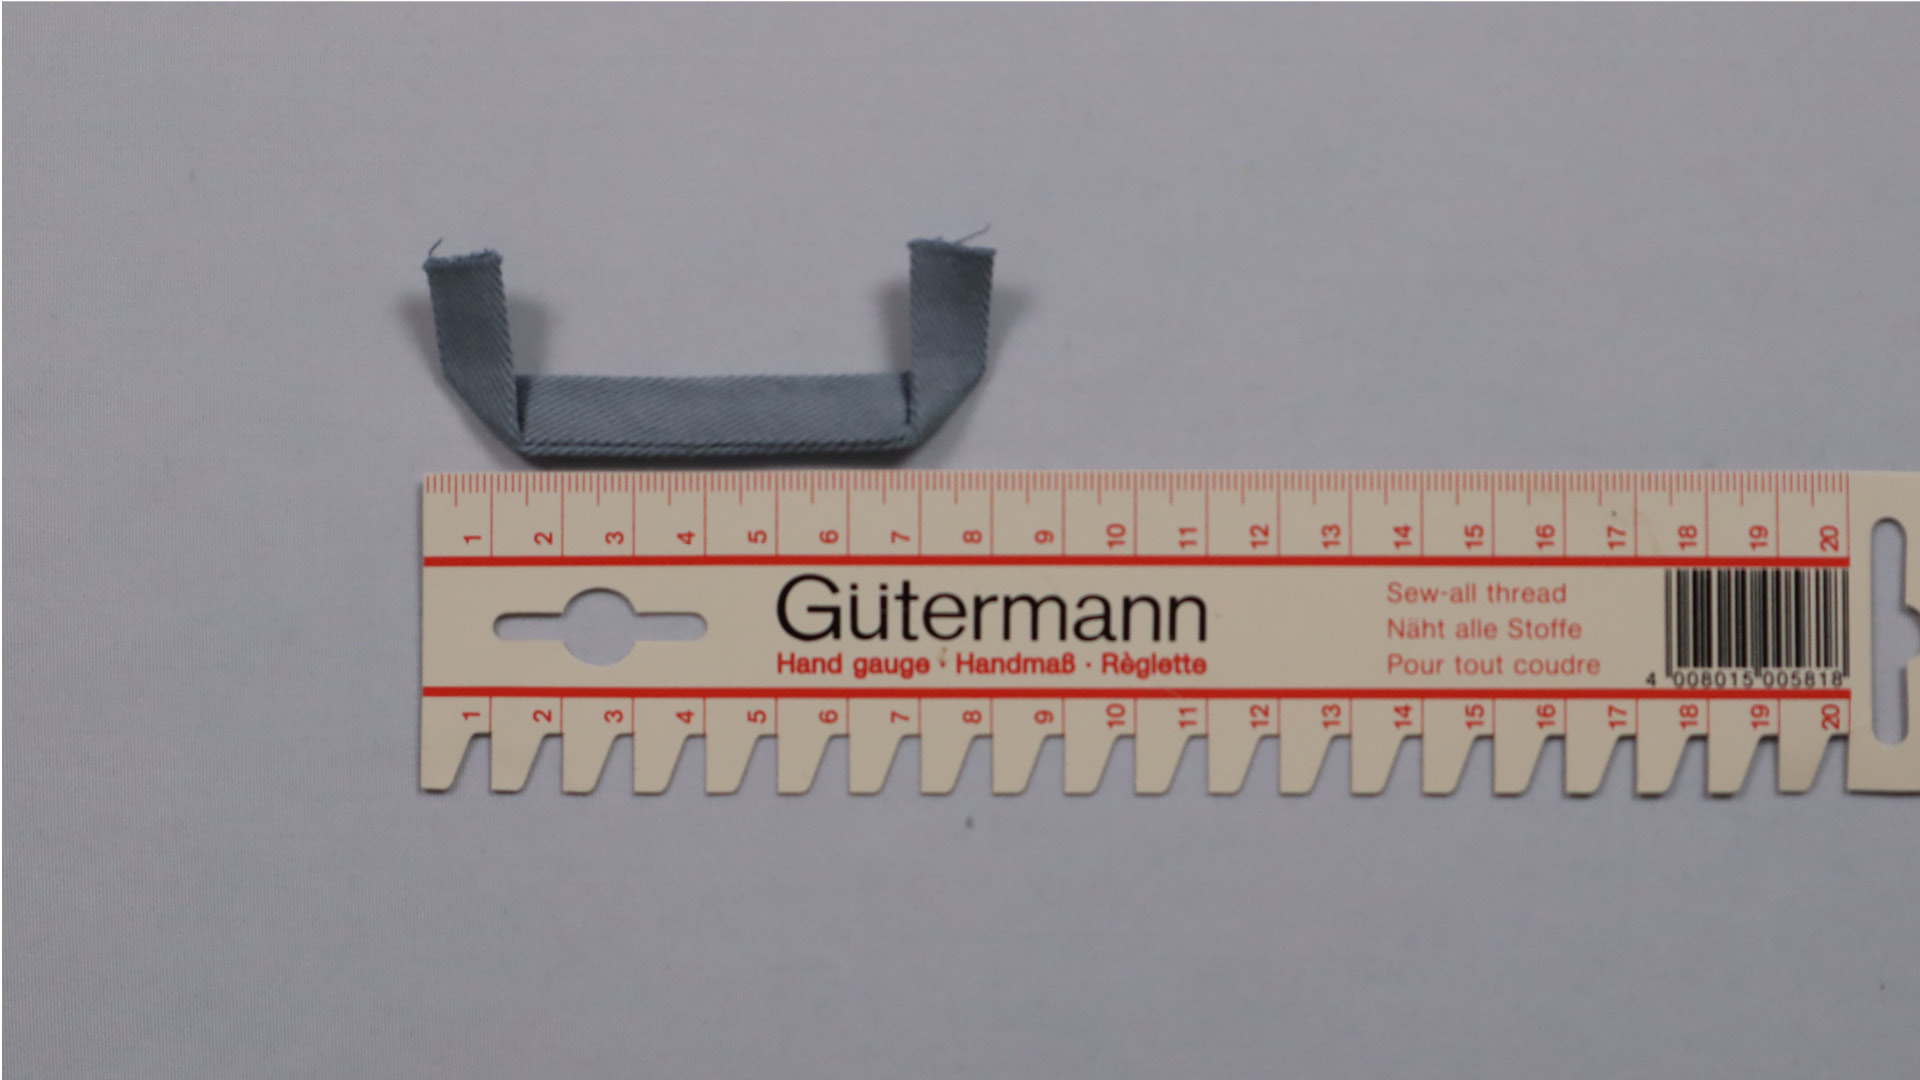
A connecting strip is sewn into the shoulder point, which will later be used to join the jacket to the lining fabric. Place the strip on the armhole so that it is at right angles to the seam. It overlaps the sleeve by approx. 2 cm and is sewn into place. On the other side, it protrudes approx. 4 cm beyond the raw edges.
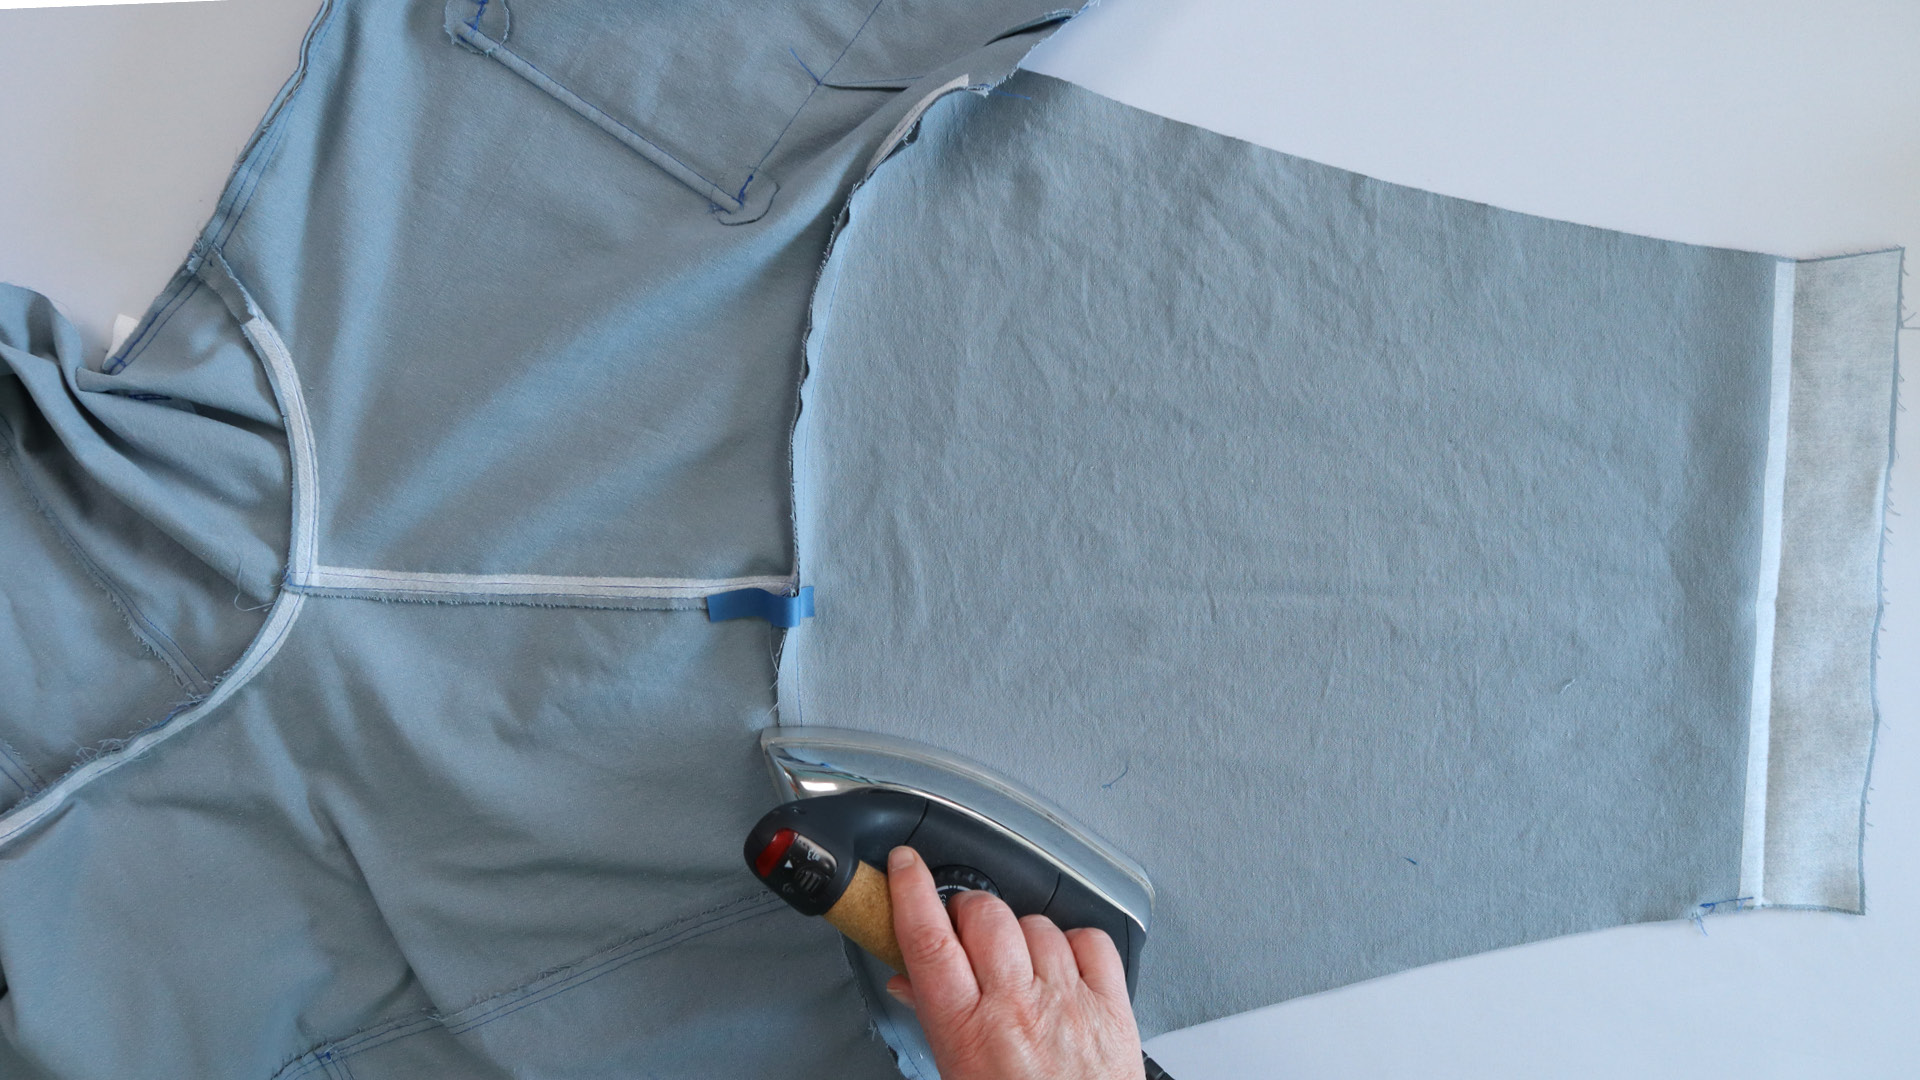
Press the seam allowances towards the front and back and topstitch from the right side.
I recommend topstitching close to the edge, which works best in the lower curve.
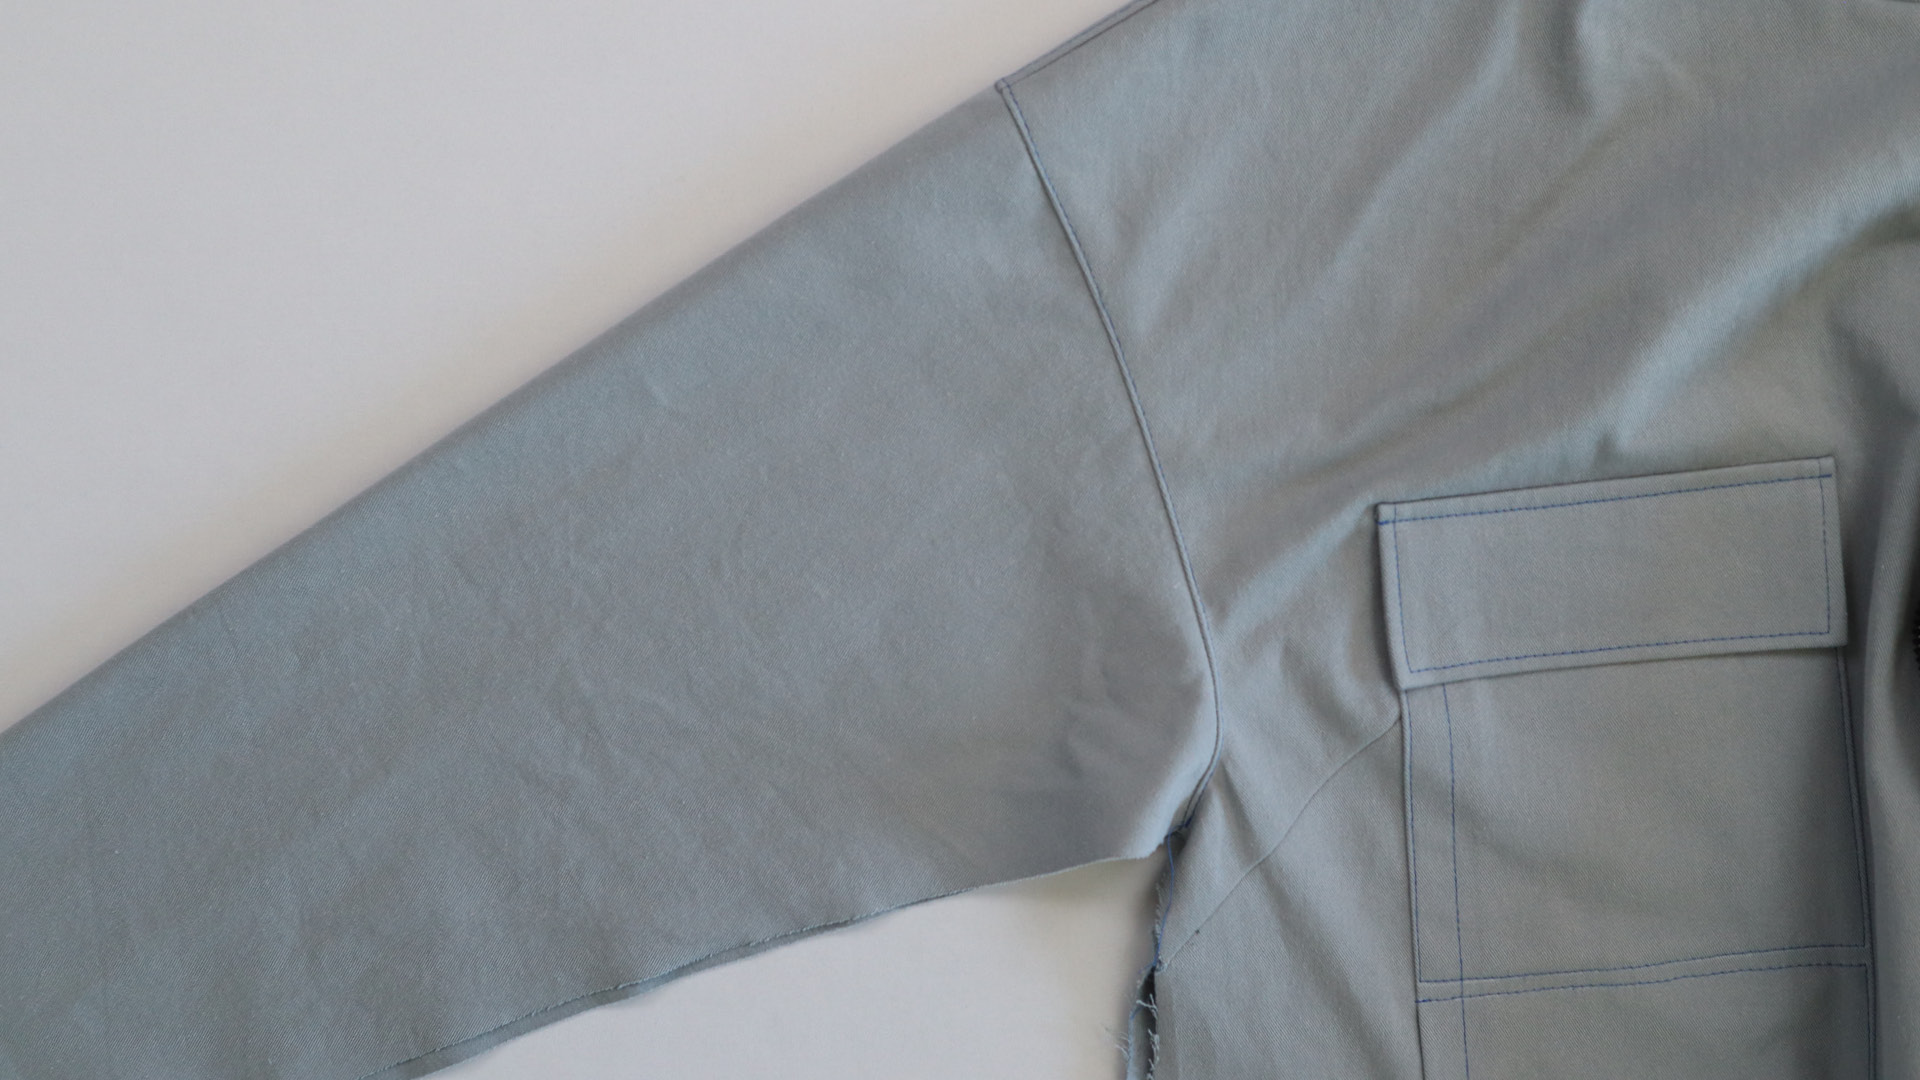
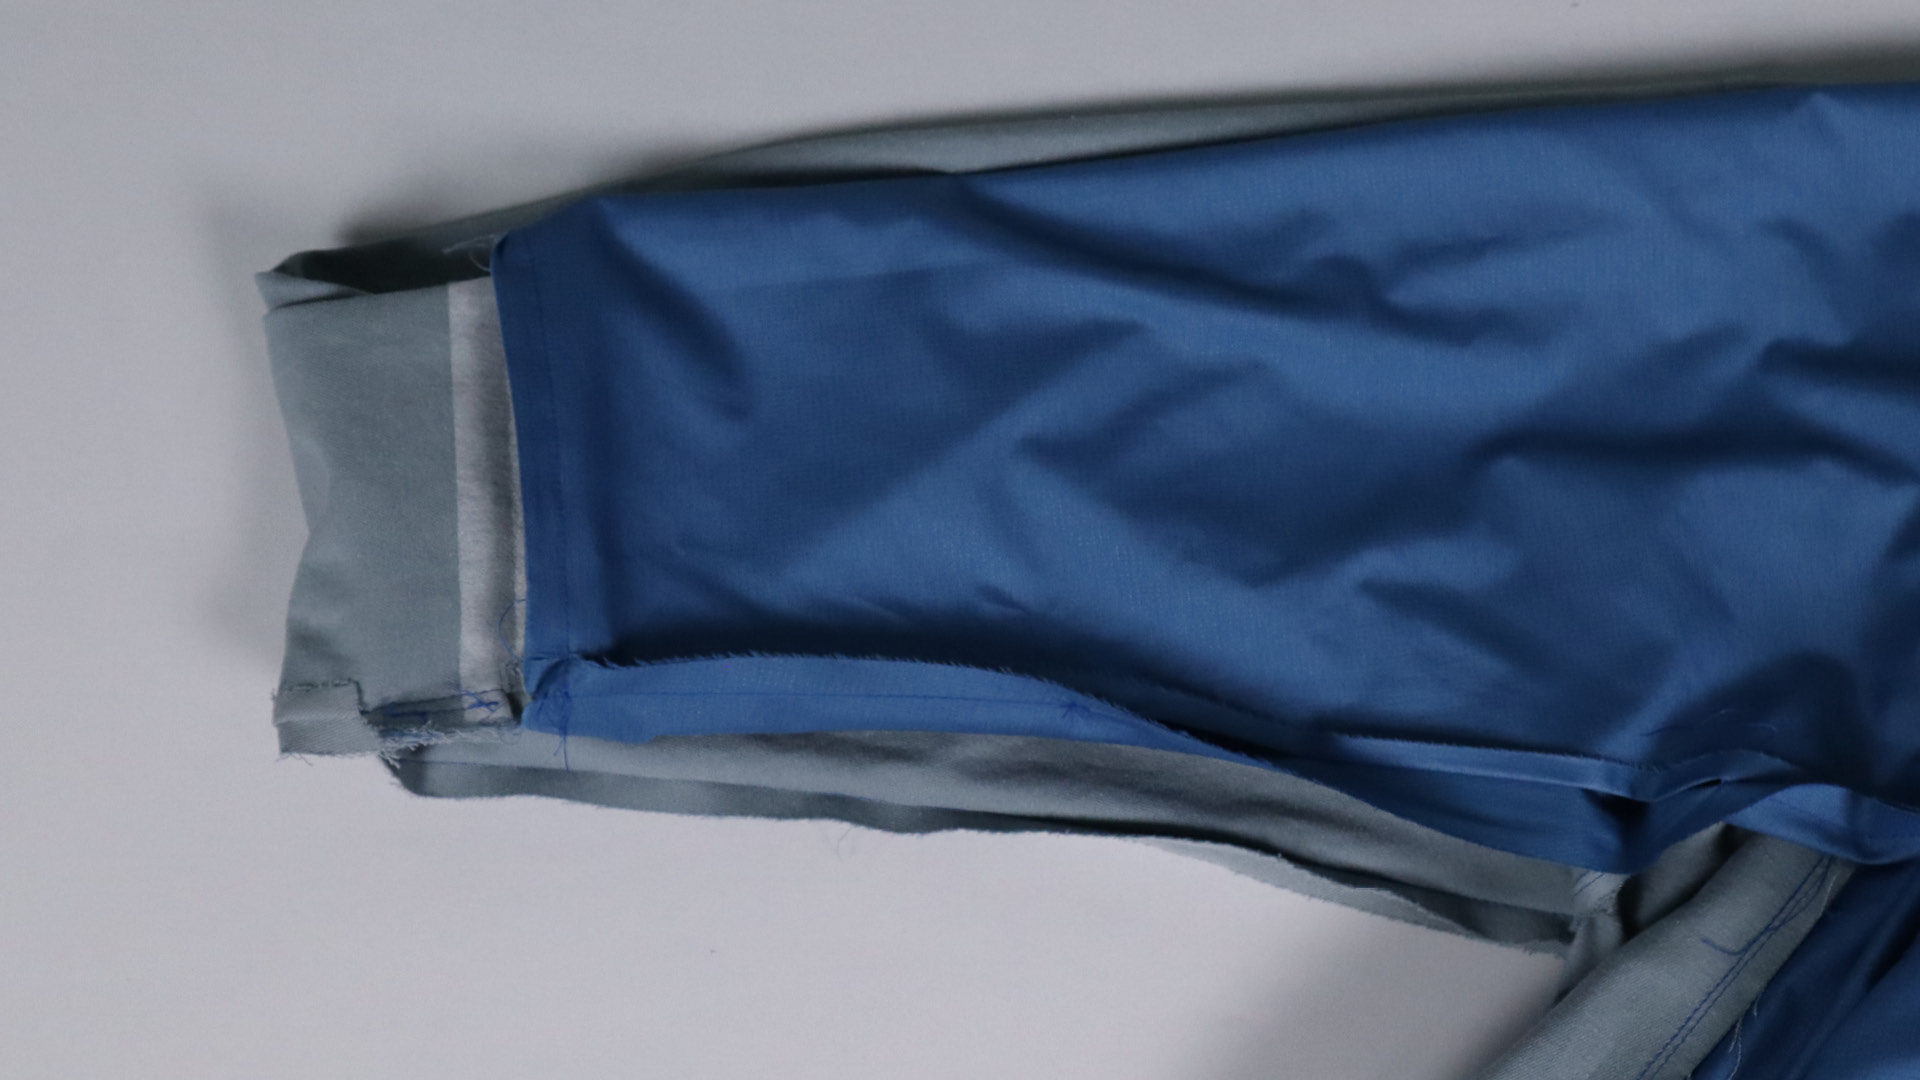
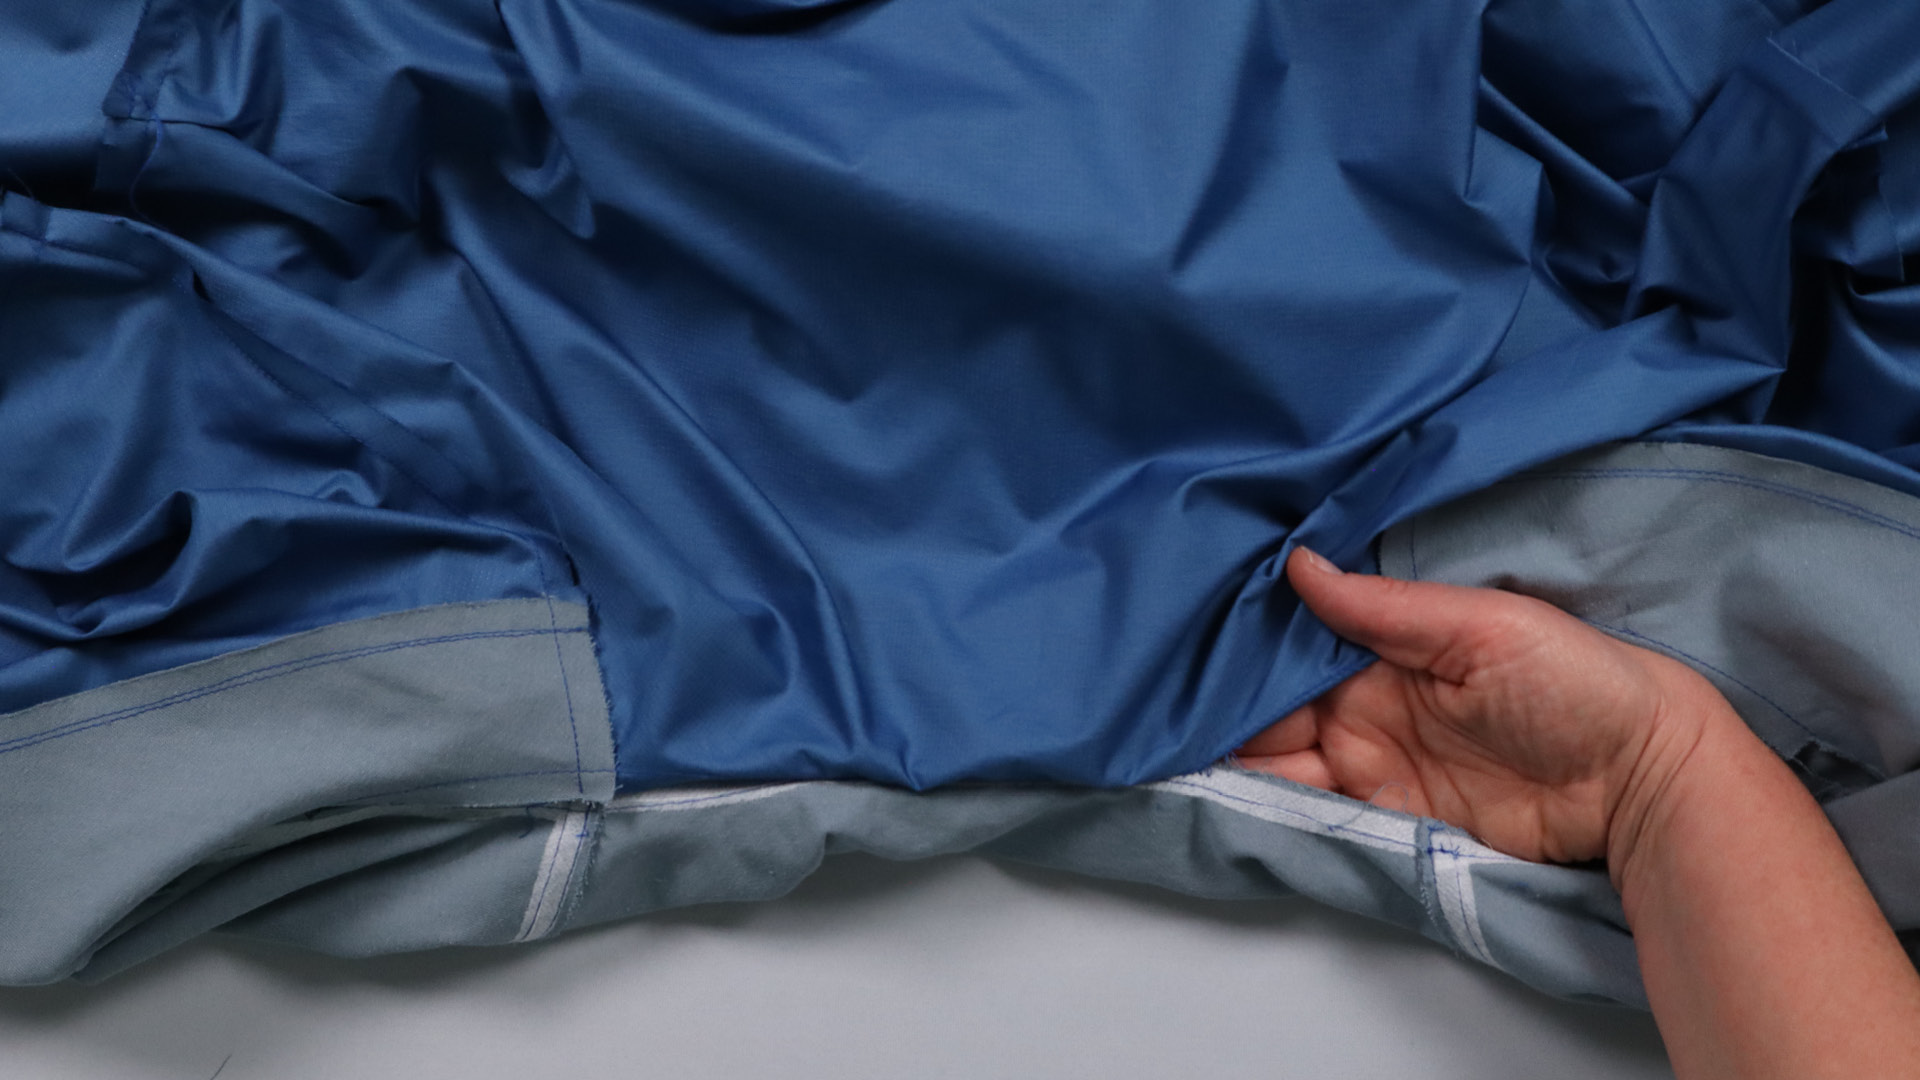
Close side and sleeve seams
The side and sleeve seams are closed in one step. To do this, place the edges right sides together again and pin in place. Make sure that the shoulder seams of the sleeve meet exactly.
Another connecting strip is sewn into the side seam directly below the armhole, which will later connect the outer jacket to the lining jacket. It is placed at right angles to the seam and with the longer end towards the front.
Press the side seam allowances apart.
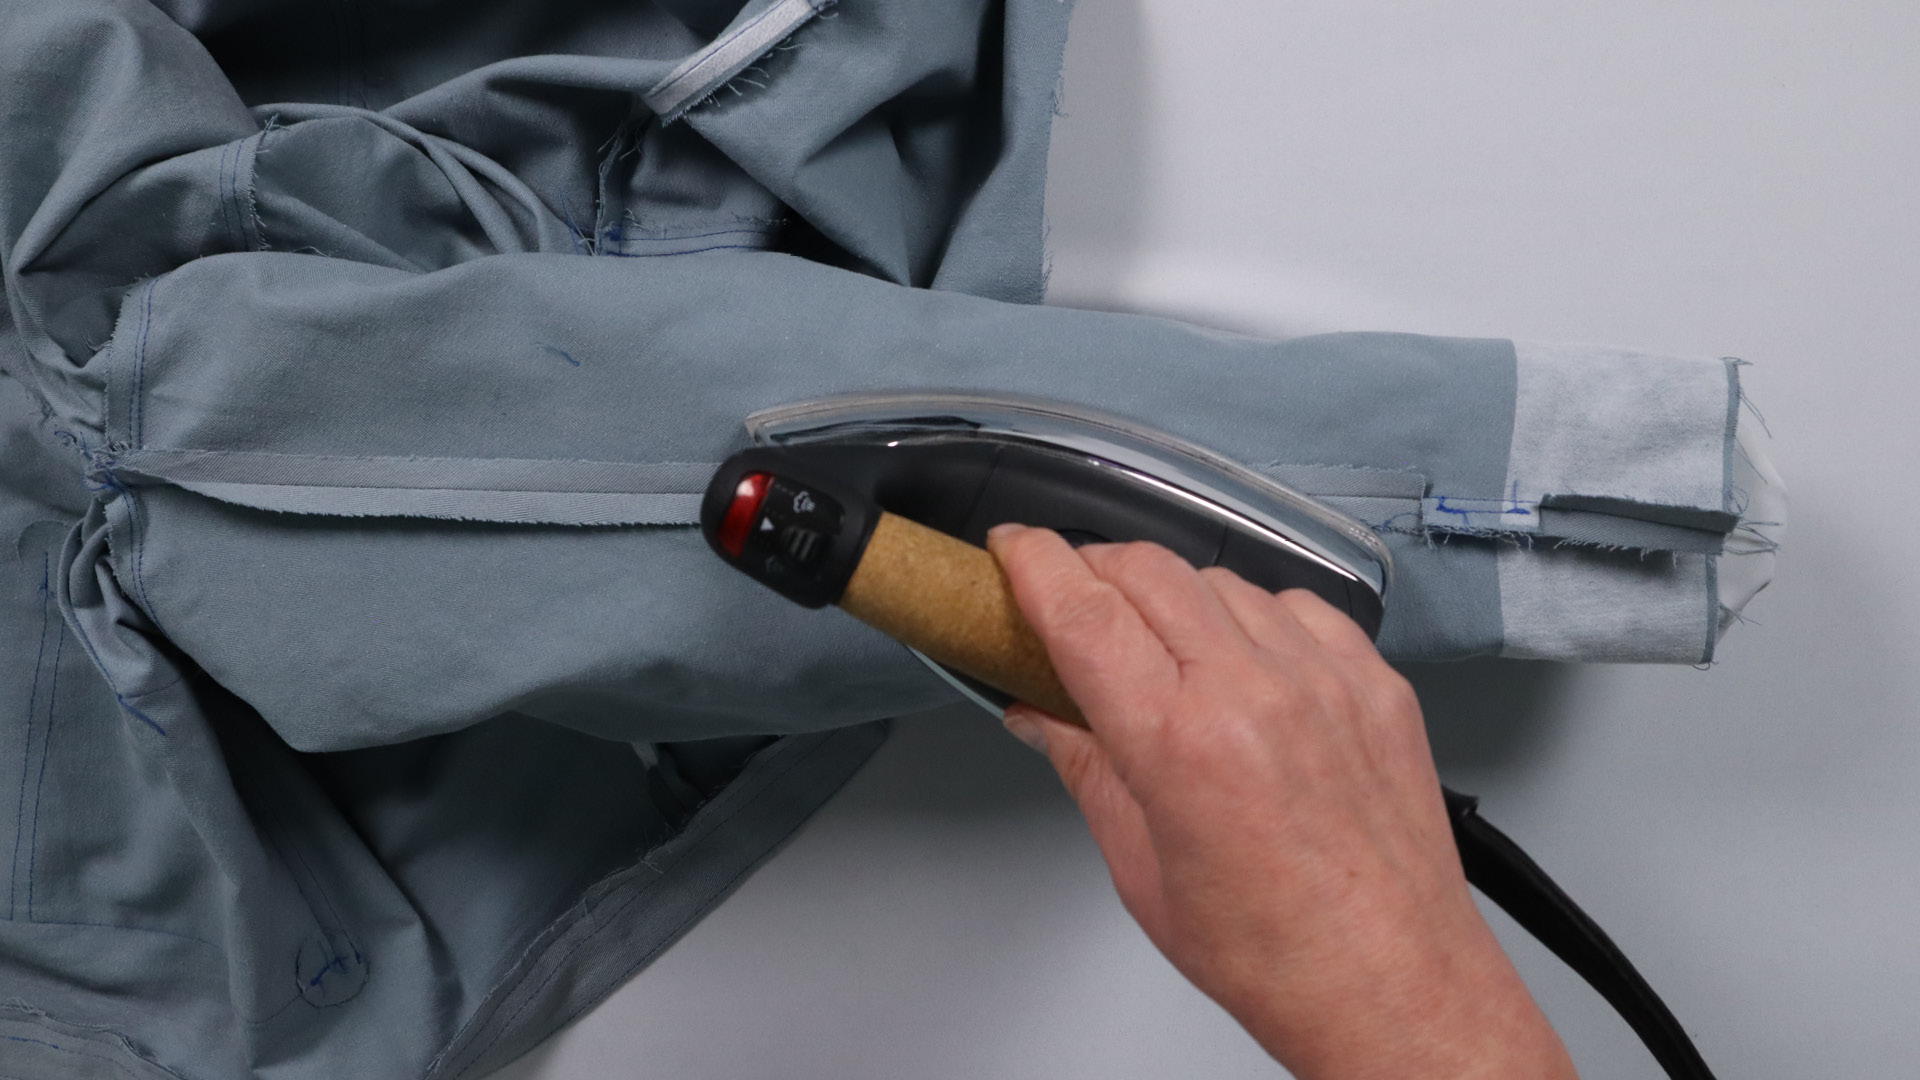
On the arm flap, I cut the seam allowances on the side where it is sewn on and press them open above and below as well.
I then turn the sleeve hem inwards again and iron the folded edge.
Sewing the inner lining of the jacket with hood
If your lining fabric is very frayed, I recommend neatening the lining pieces all the way around before sewing them together. Otherwise, you can neaten the seam allowances after sewing them together or cut them back with pinking shears.
In addition to the lining fabrics, you will also need the front facing and the hood facing. If you are using a very thin or soft fabric, these parts should be reinforced with a suitable interfacing that is not too firm.
Sew the front and back

First, sew the darts marked on the pattern to the front pieces and press them towards the shoulder seam.
The front pieces are then sewn to the facing.
Pay attention to the notches when you pin the lining right sides together on the facing.

I topstitch close to the edge on the lining.
Place the pleats on the back piece according to the markings and sew inside the seam allowance.
Then I prepare the hanging ribbon. I first fold it in half on the long sides, wrong sides together, and then fold the cut edges in again towards the center. Then I topstitch the open side close to the edge.
The ends are ironed vertically upwards so that the finished ribbon is approx. 8 cm wide.
The ribbon is then sewn to the center of the neck hole on the lining back within the seam allowances.
Close the shoulder seams

The shoulder seams of the front and back are placed right sides together and closed.
The seam allowances are ironed to the back.
Sew lining hood
The middle section of the hood is now joined to the two side sections. As with the outer fabric, the middle section is pinned to the side sections, paying attention to the notches. When sewing, make sure that the fabric is always smooth and that no creases form. Iron the seam allowances to the middle section.
The lining hood is then sewn to the back edge of the hood facing.

To do this, I pin them to the facing, right sides together, and sew together.
I press the seam allowances towards the lining and topstitch close to the edge.
Sew the hood to the lining jacket
I pin the lining hood to the neck hole, starting at the center back, right sides together.
When it is pinned along the entire length, I sew it on.
The seam allowance of the hood is also cut in on both sides approx. 4.5 cm from the front edge and ironed apart in the front area.
Press the remaining seam allowances towards the hood.
Insert sleeves
Now sew the sleeves to the front and back. Note the notch markings here too.
The pieces are also placed right sides together and flush at the edges. Press the seam allowances towards the sleeves.
Close side and sleeve seams

Lay the side and sleeve seams right sides together and pin in place, with the sleeve seams matching exactly.
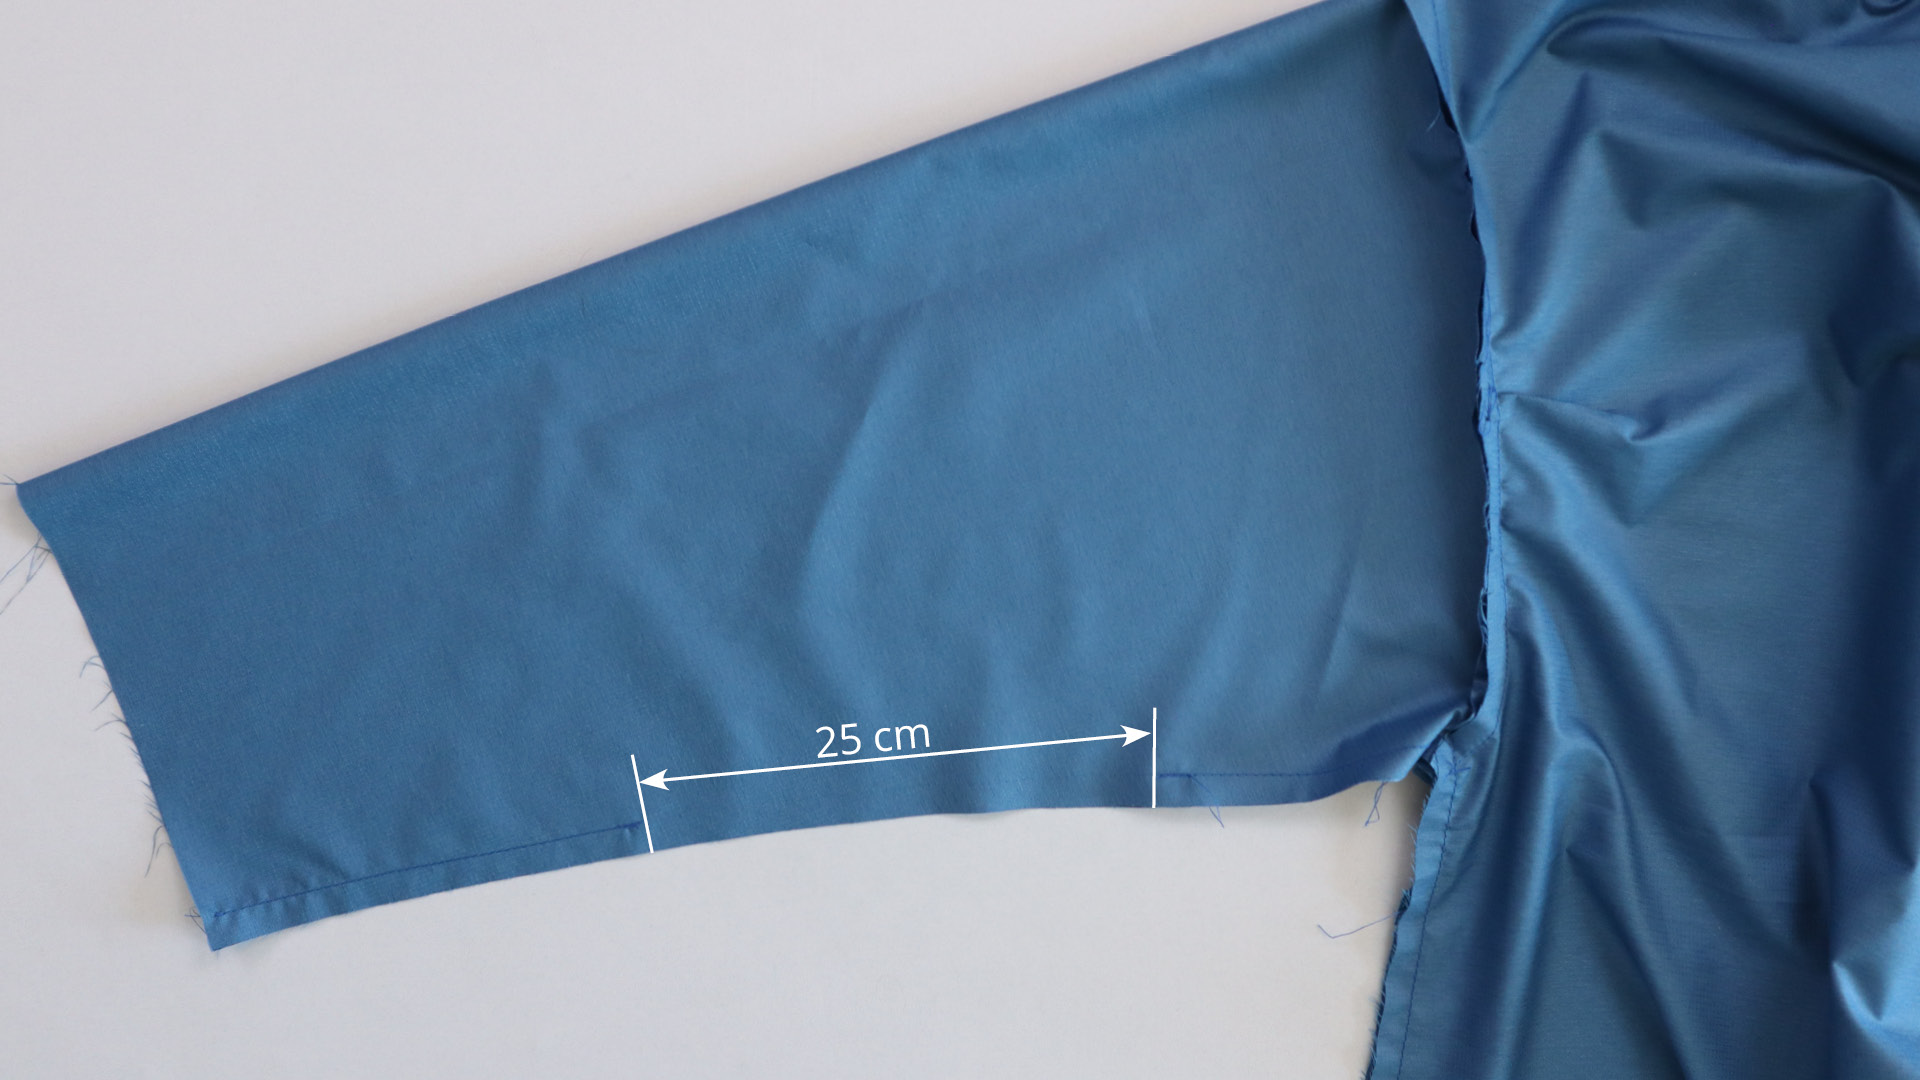
Please note: you will need a turning opening approx. 25 cm long in one sleeve, through which you can still turn the jacket when the outer and lining fabric are joined together. The best way to close the turning opening later is to sew this area with a long stitch length and secure the seam in front of and behind the turning opening. The seam allowances are pressed open in this area and the turning opening is opened up again.
Press the seam allowances to the back.
Joining outer fabric and lining
Sewing jackets together
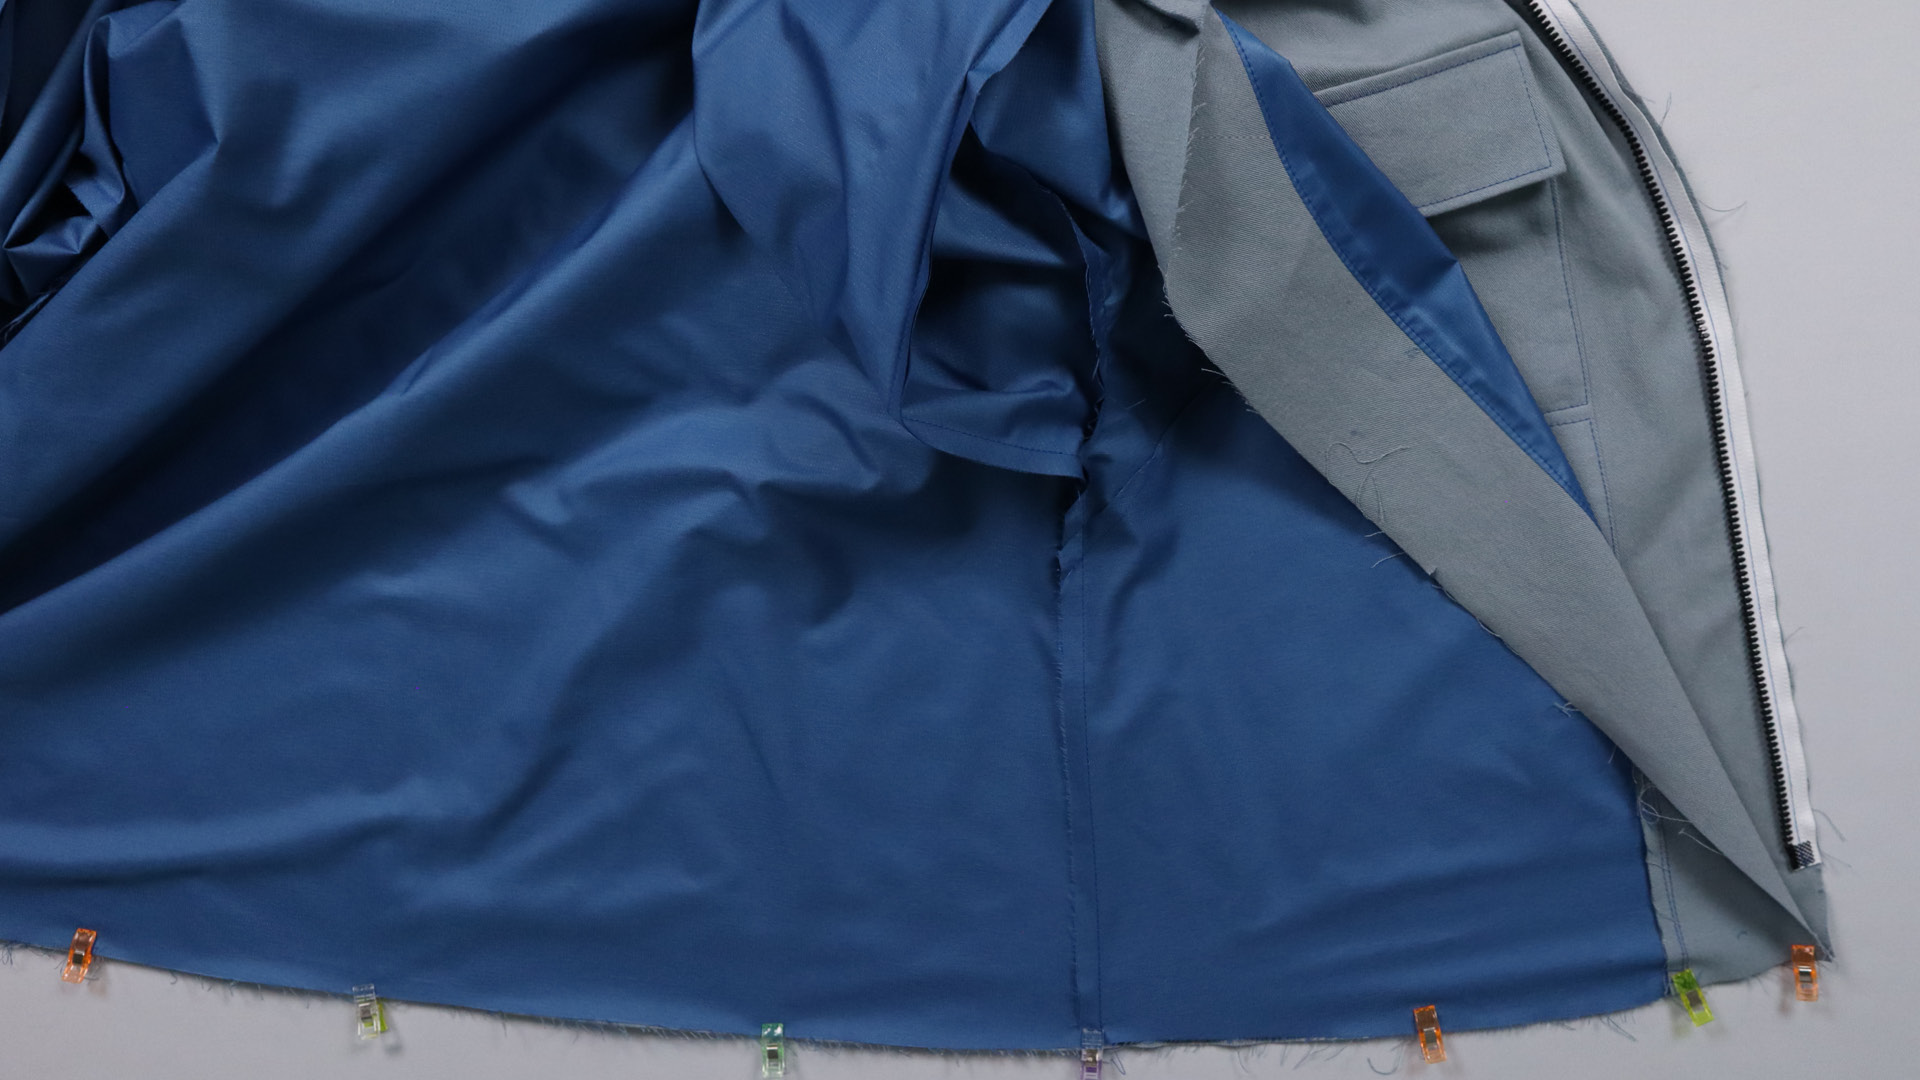
First, the outer jacket and lining jacket are placed right sides together at the hem, pinned flush and sewn together.
I mark the folded edge for the hem on the outer jacket again and transfer it to the inside of the jacket.

I fold the hem over at the marking and pin the front edges and the hood edges together, right sides facing.
I sew the entire length together in one piece with a 1 cm seam allowance.
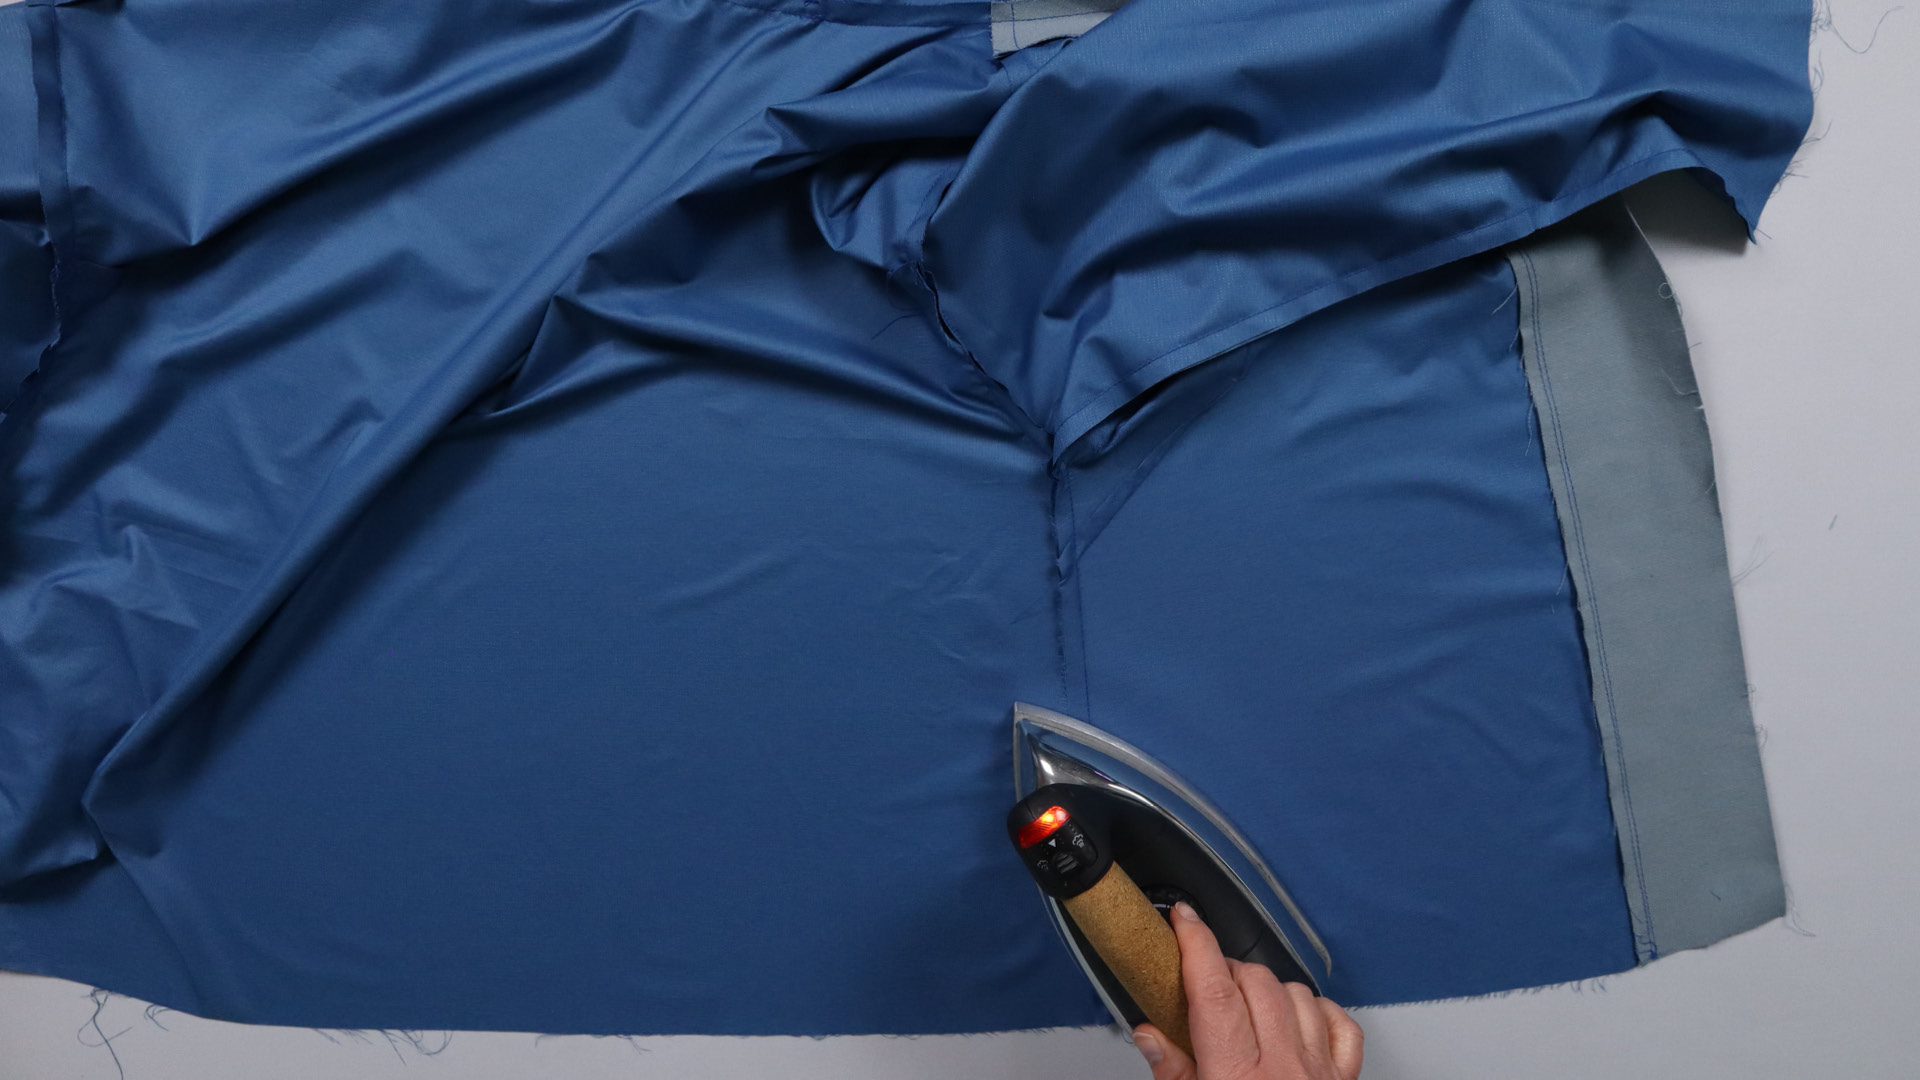
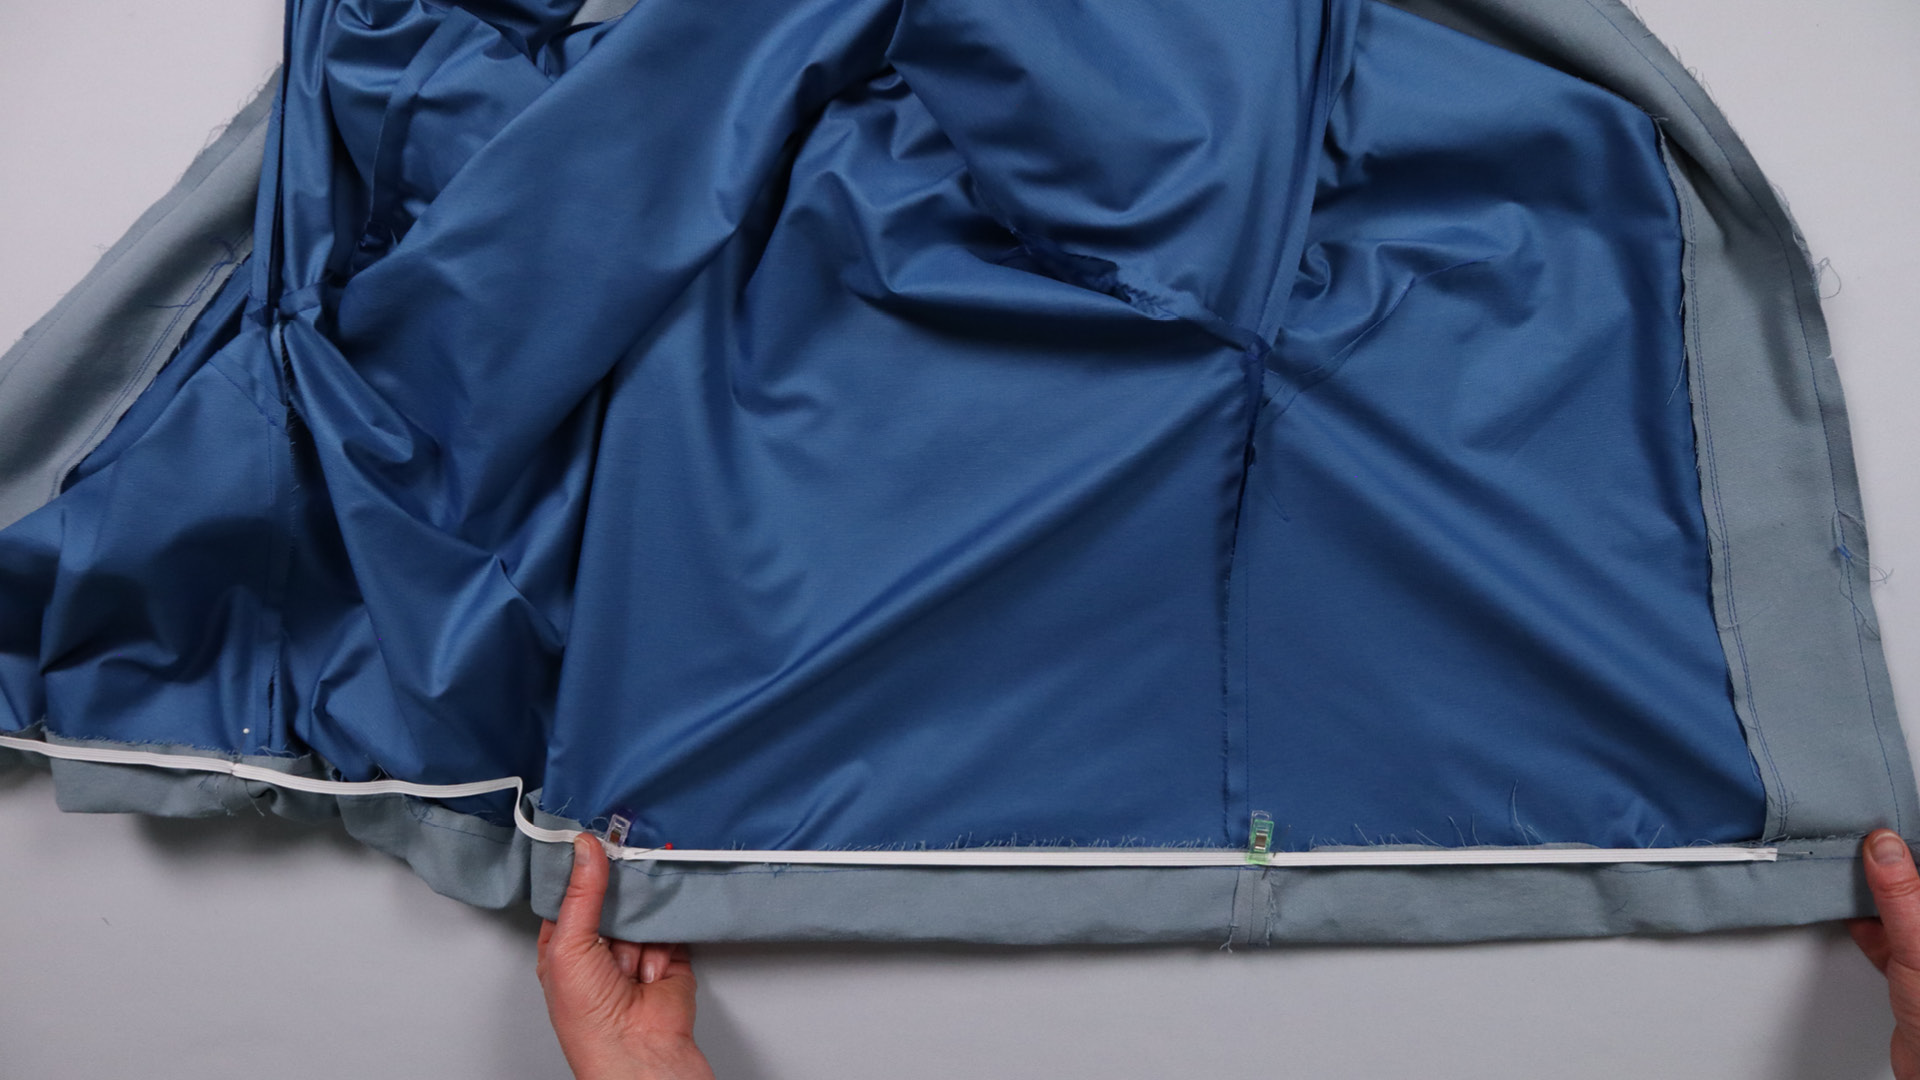
Sew the elastic tape to the hem
For the gathering, a 5 mm wide, flat elastic tape is now sewn onto the seam allowances of the hem. The length can be found in the consumption tables above.
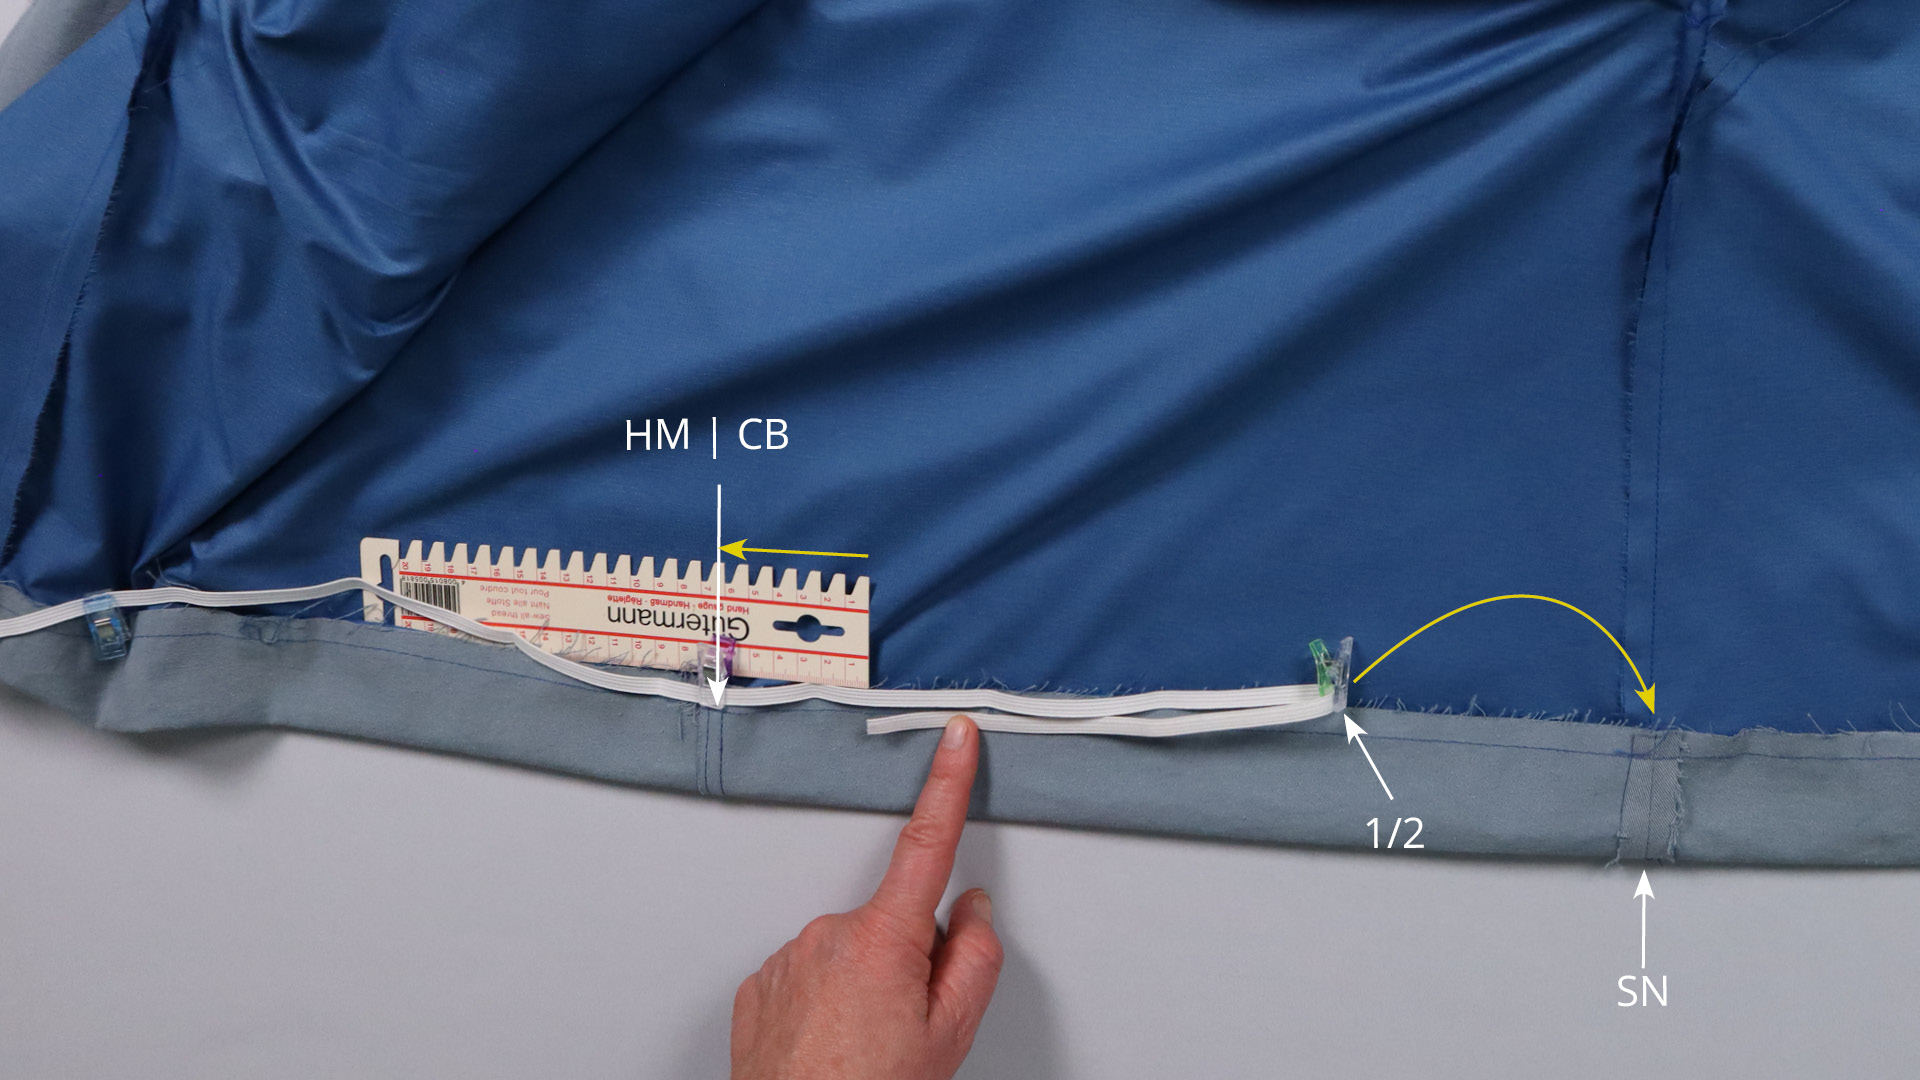
I pin the center back of the elastic to the center back of the hem. Then I mark 6 cm from the center back to both sides. I fold the elastic band in half up to this point and then mark the folded edge with a clip. This is where the elastic meets the side seam.

The end of the elastic meets the back seam allowance of the facing.
The elastic must be firmly secured at the beginning and end. In between, it can be sewn onto the seam allowance using a zigzag or straight stitch. The elastic must be stretched while sewing. If you have never done this before, I recommend you test it with a shorter piece of elastic on a scrap piece of fabric.
Make sure that you only sew within the seam allowance.
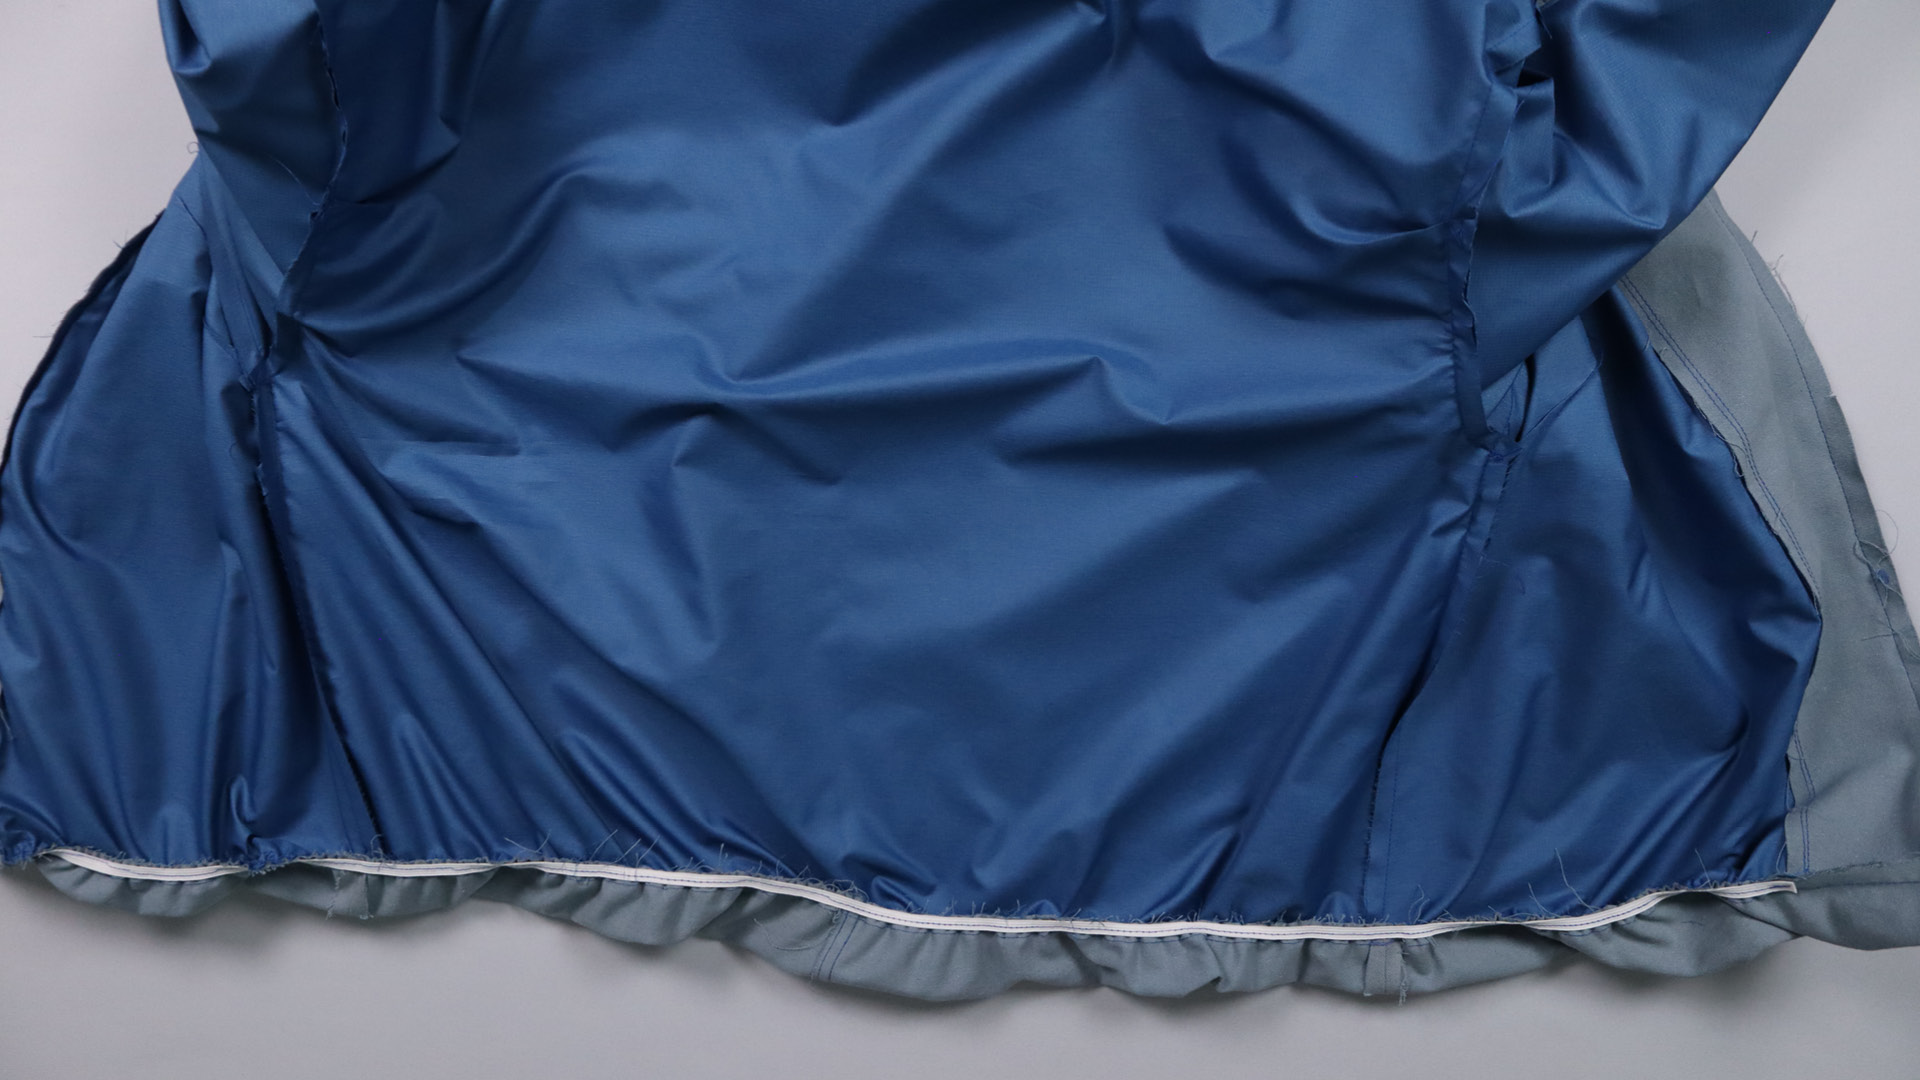
This is what the finished elastic looks like.
Finish the hood
 The rounding on the hood is cut in.
I cut the seam allowance on the front edge of the hood in the curves so that it does not stretch after turning.
Then I turn the jacket inside out and topstitch the hood facing close to the seam allowances.
The hood edge and both front edges are then ironed well. Be careful not to melt a plastic zipper in the process.
I pin the edges that have just been ironed.
Then I topstitch the front edges close to the edge and the tunnel for the hood cord at a distance of 25 mm from the front edge.
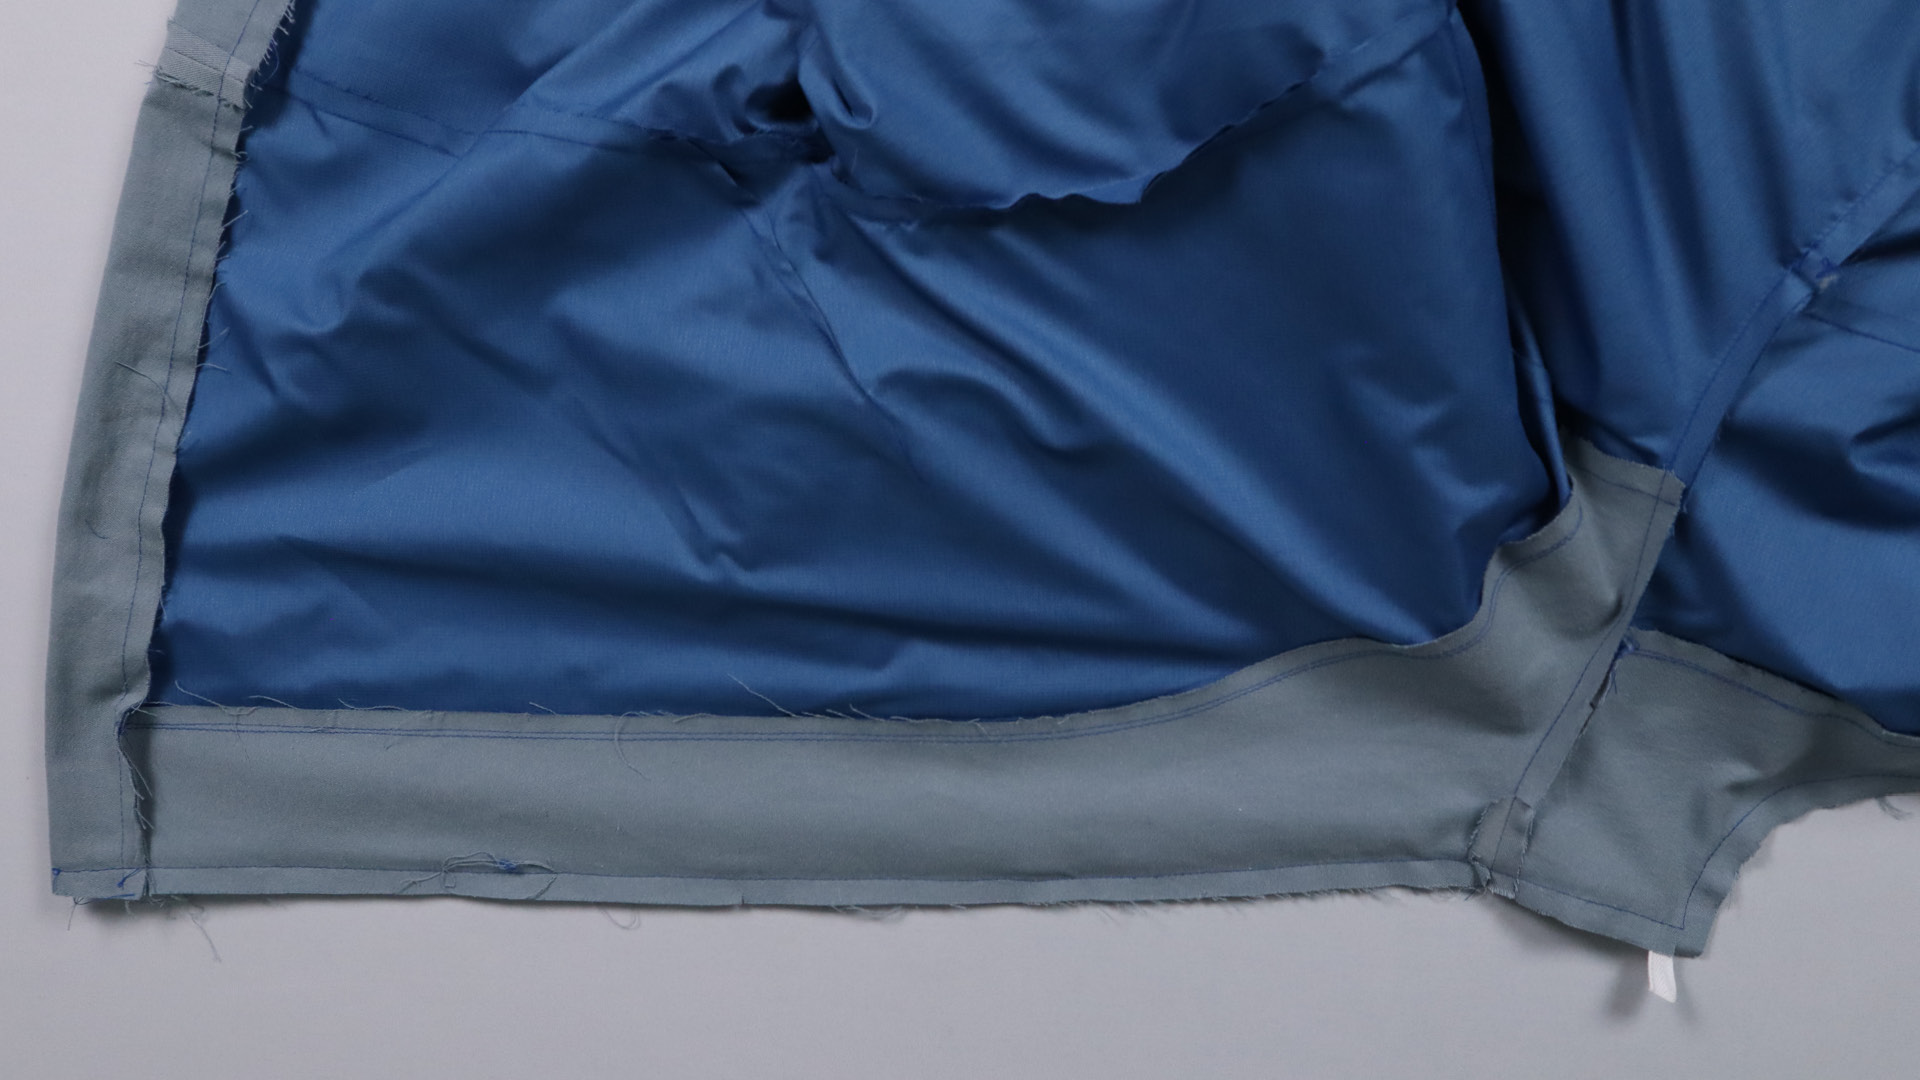
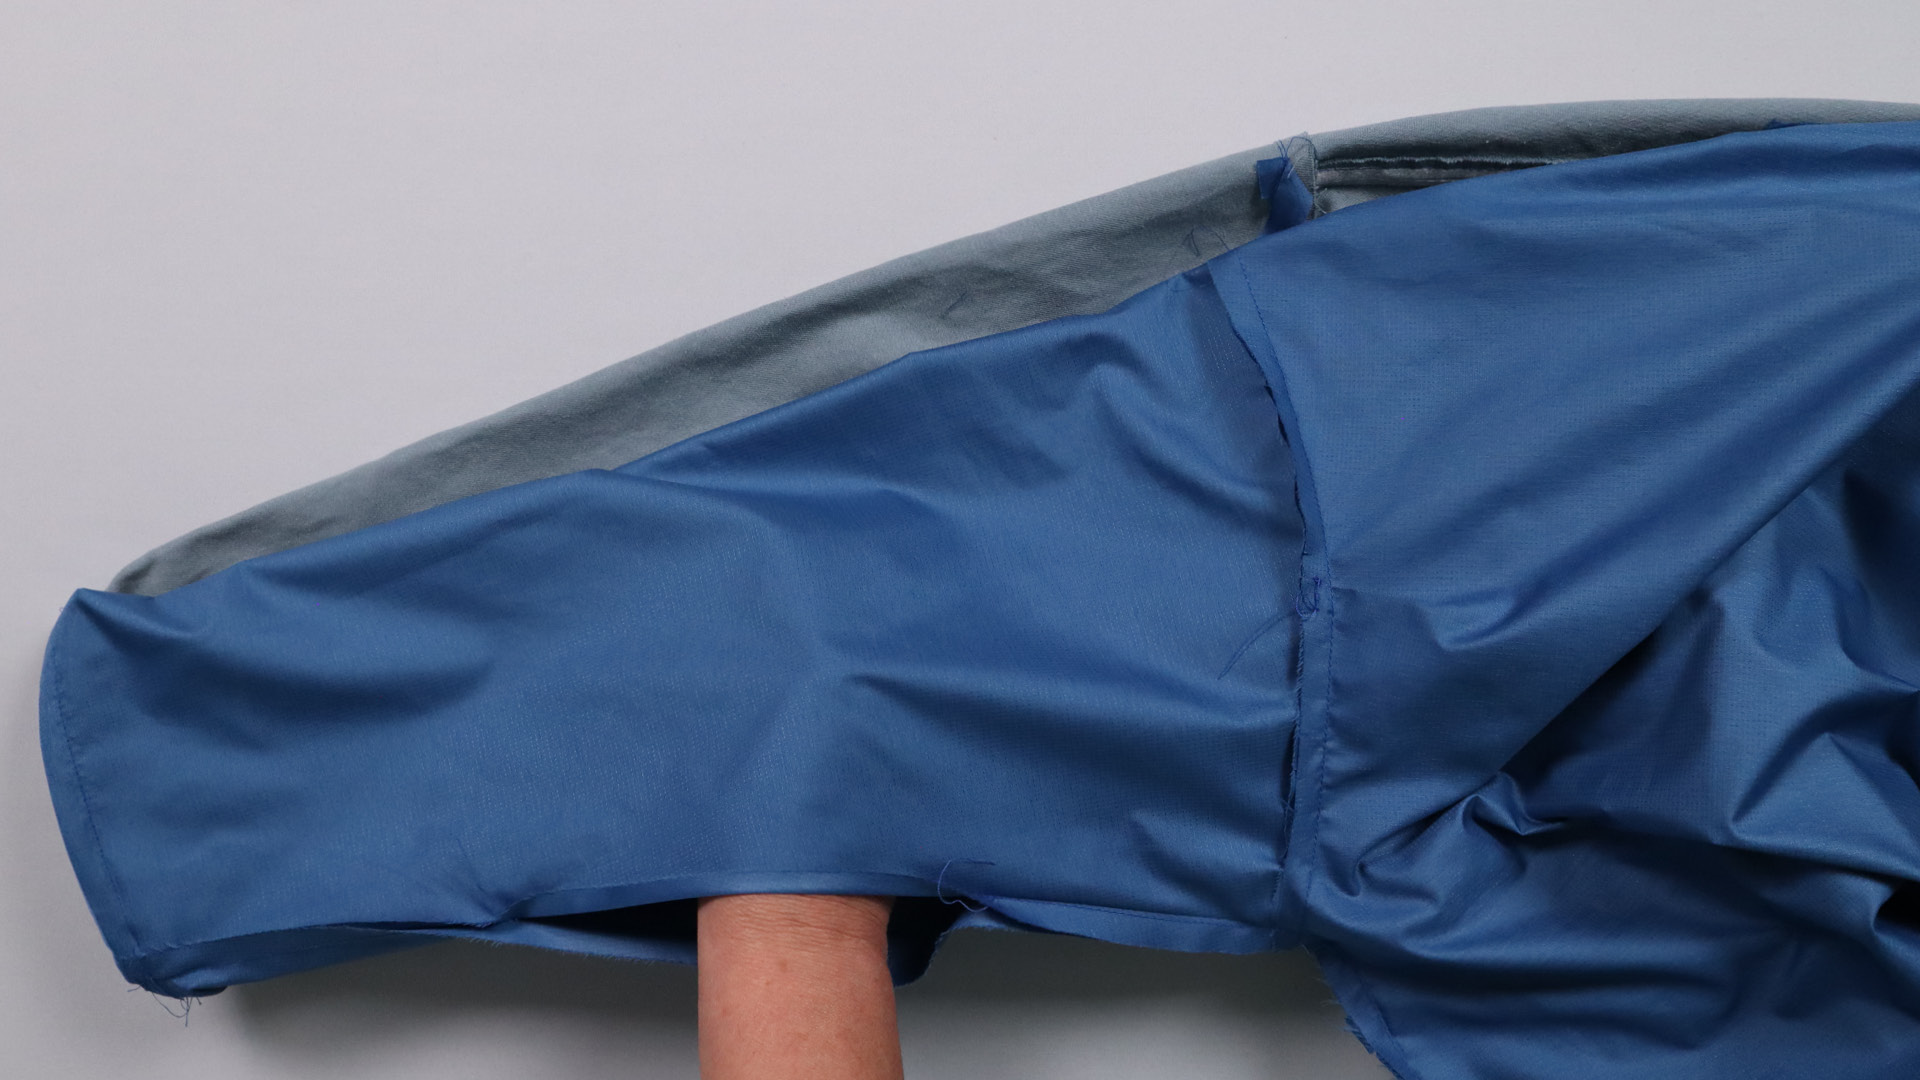
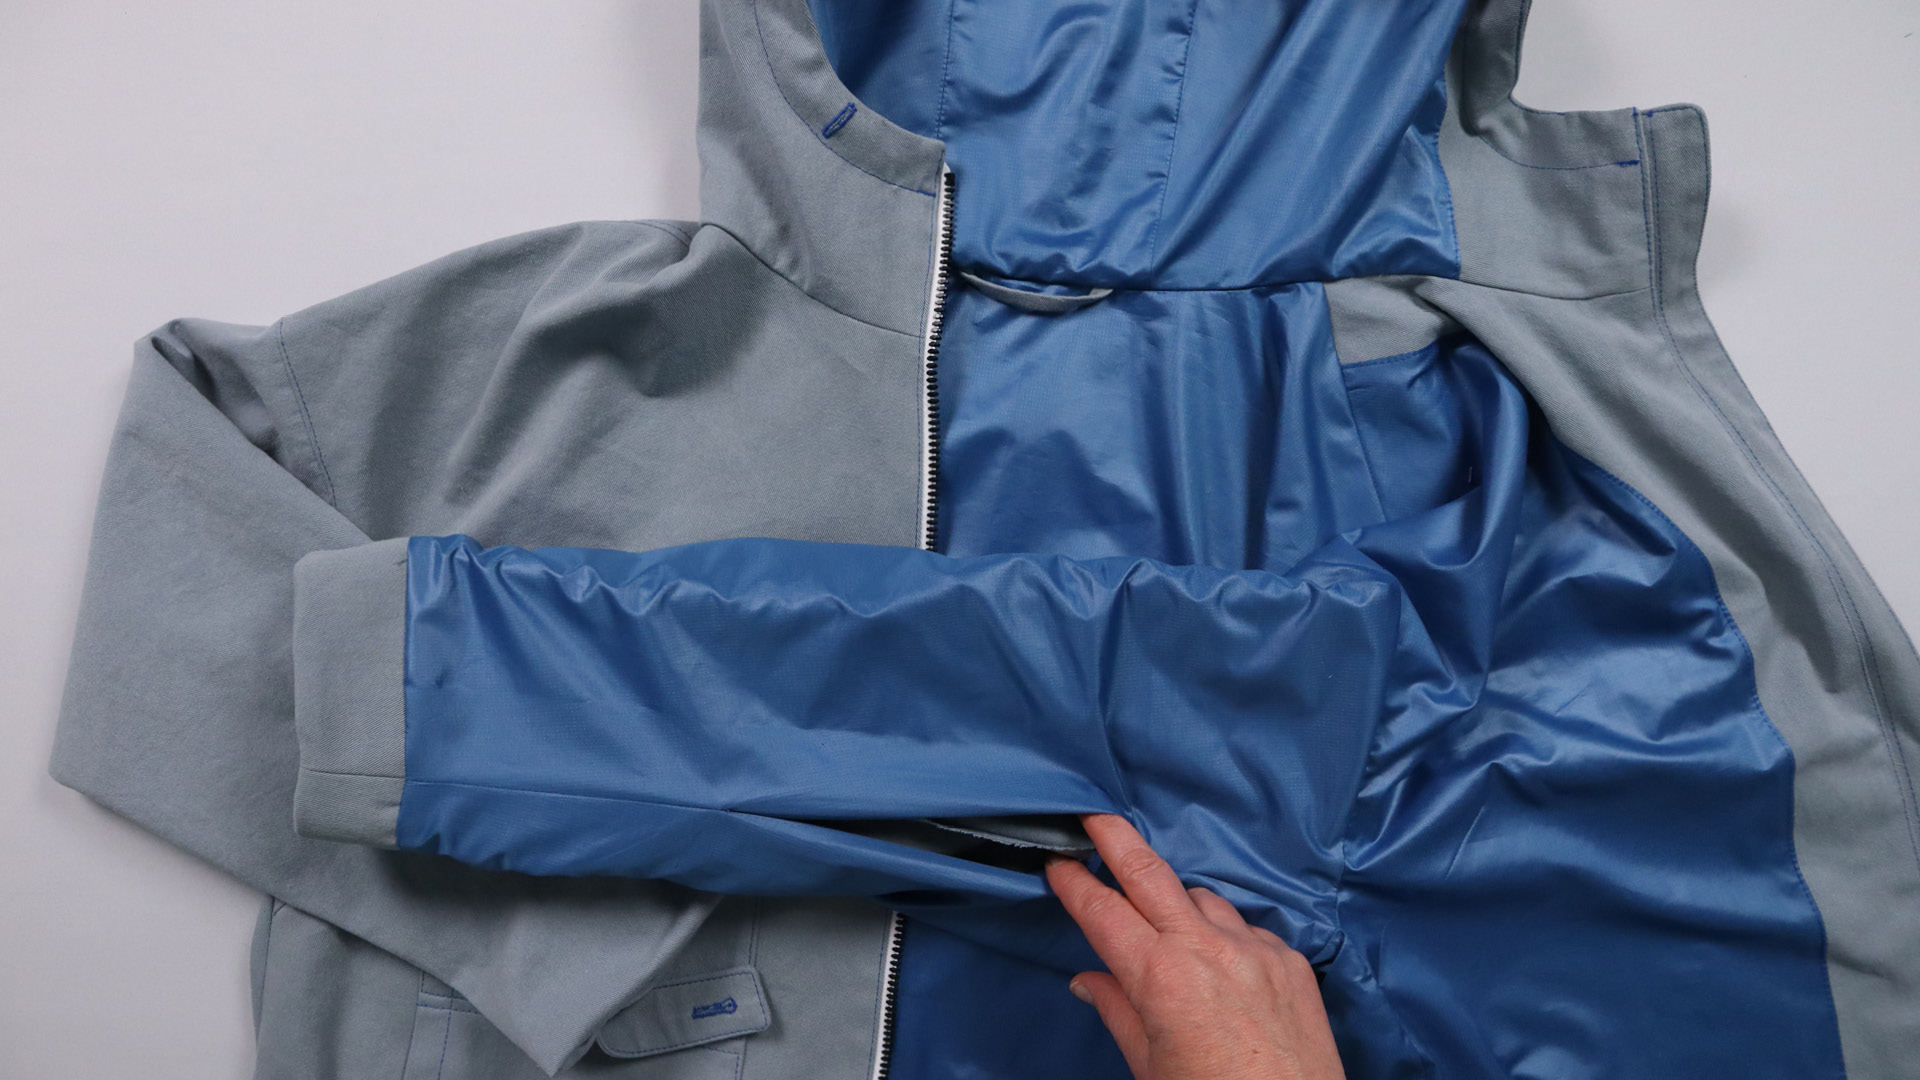
Joining the sleeve hems and finishing the sleeves
Now turn the jacket back over and lay it down as shown in the picture. Then fold over the lining hem by approx. 3 cm.

Then pin the sleeve hems together, right sides facing. If necessary, turn the jacket over again to check that nothing has twisted before sewing the hems together.
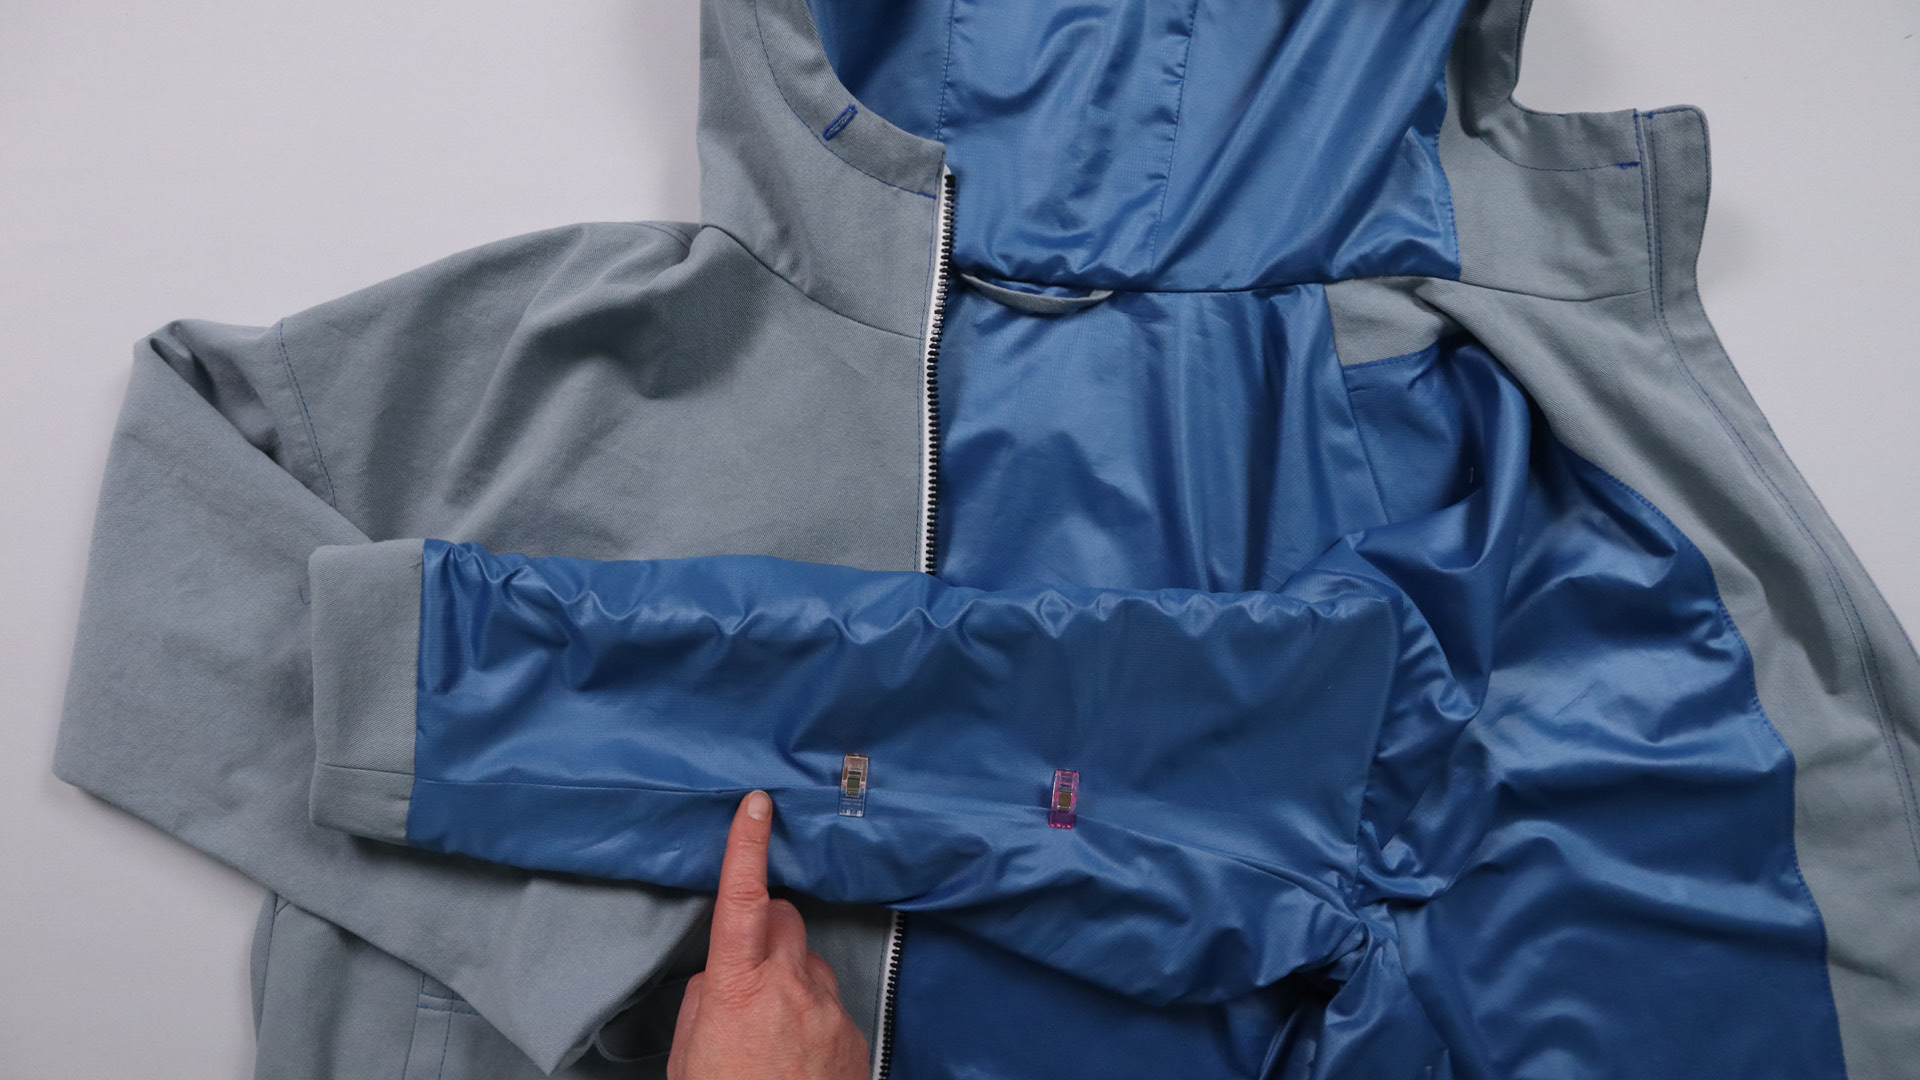
This is what the joined sleeve hems look like.
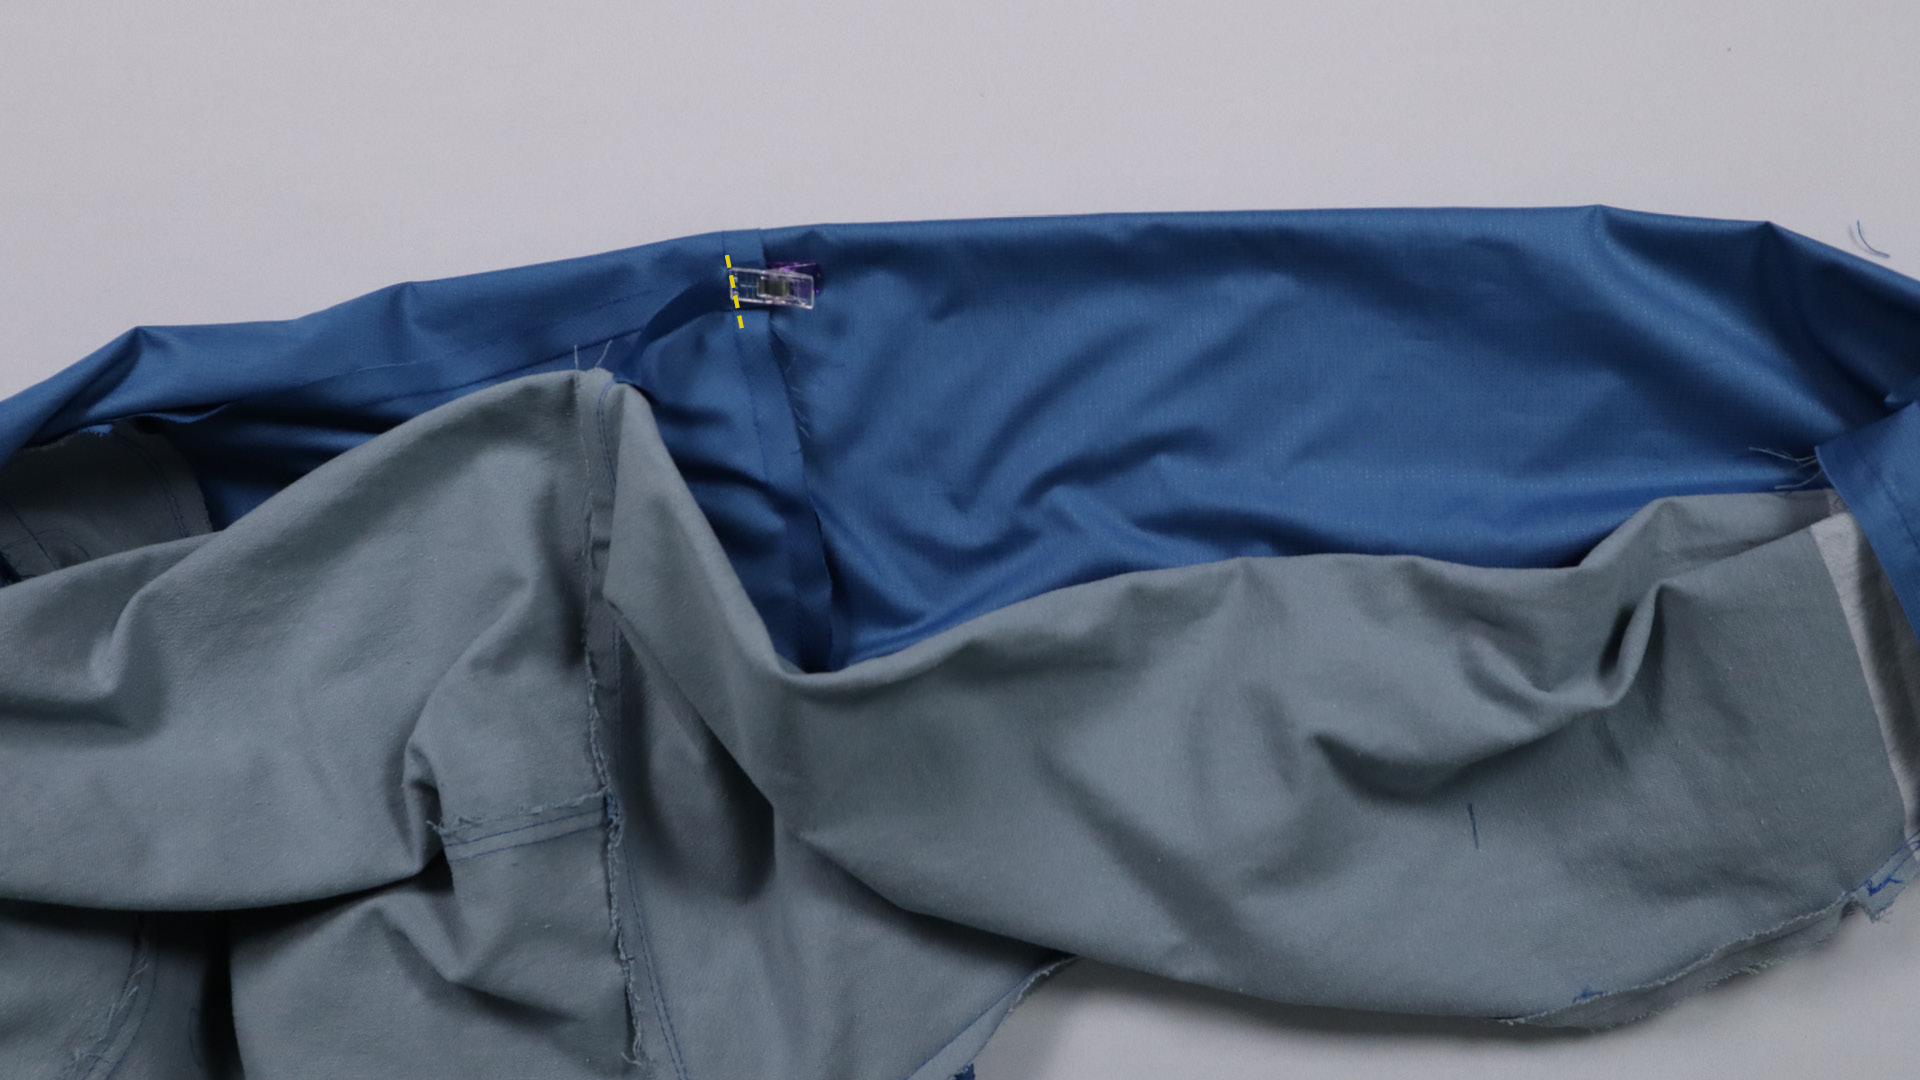
Sew connecting strips to the lining jacket
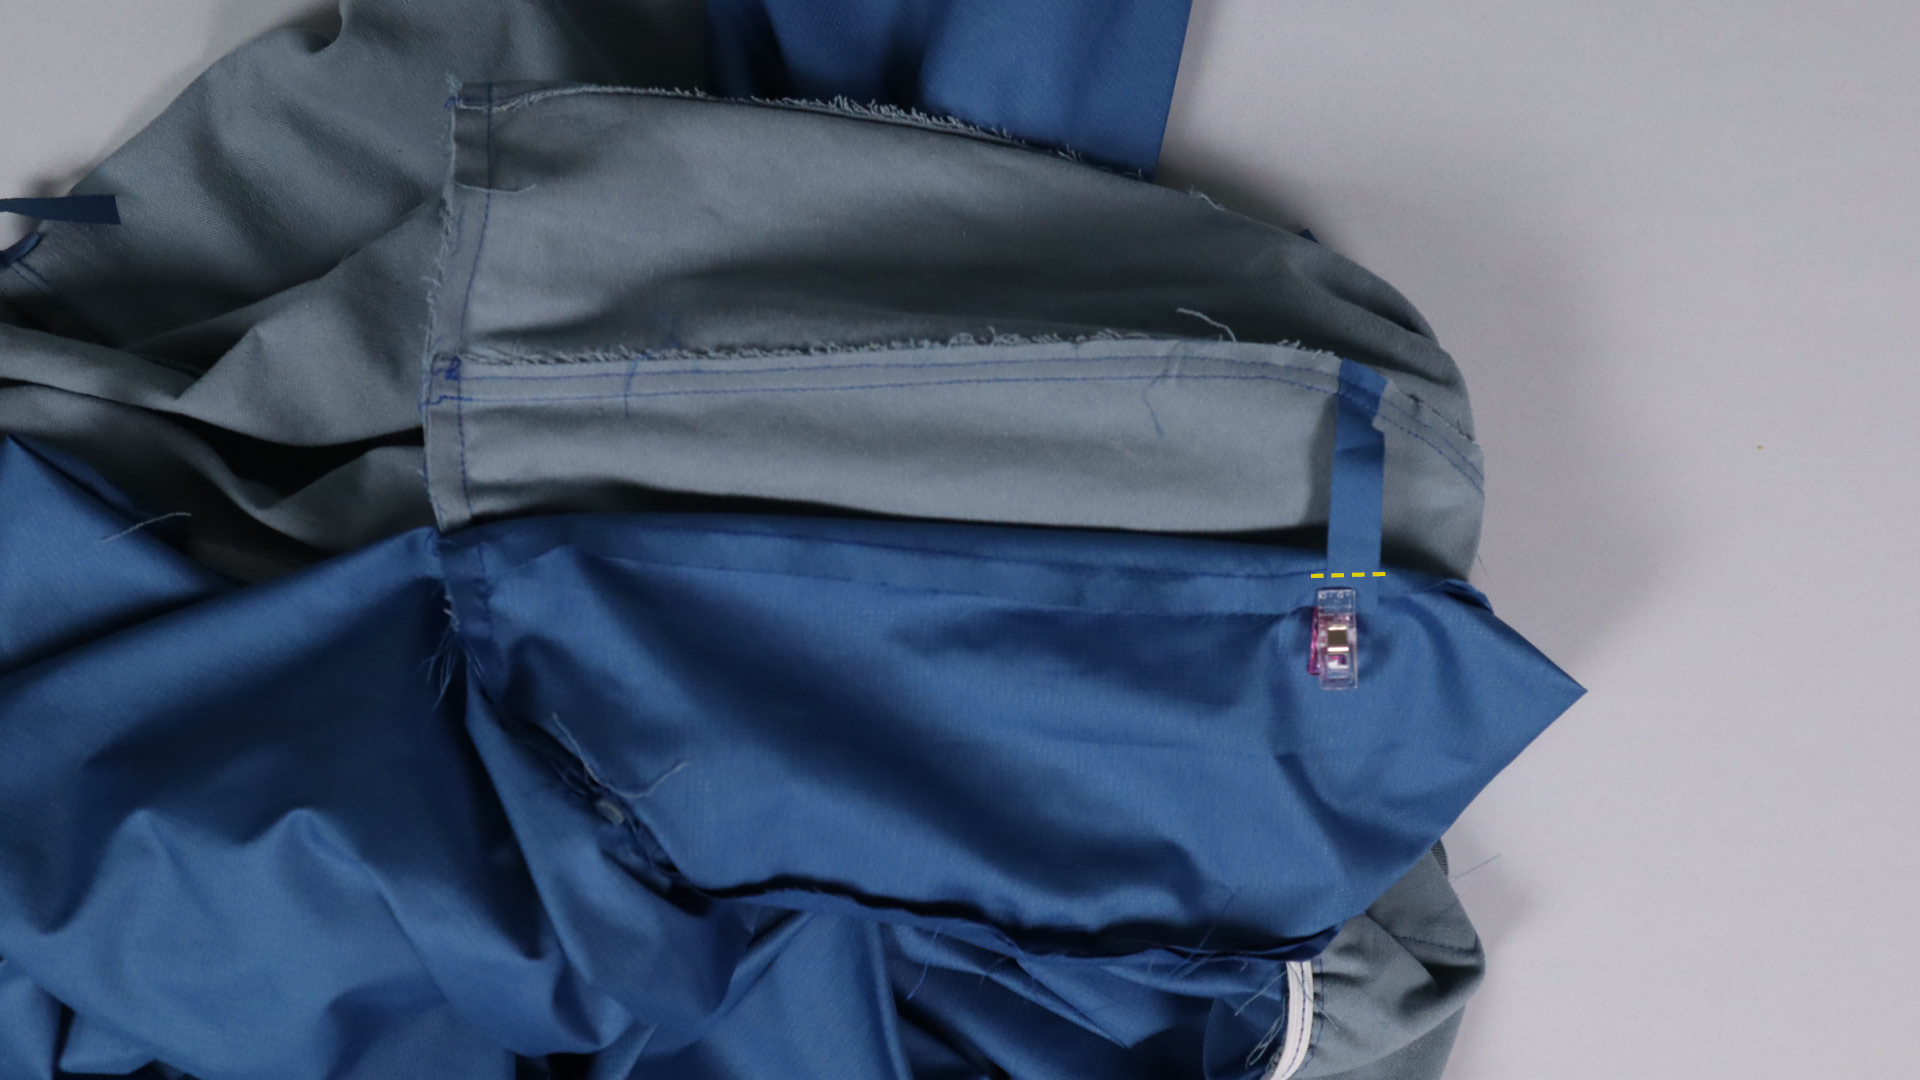 The connecting strips on the hood are sewn to the lining jacket.
Here you can see the connecting strips on the hood, which are pinned and sewn to the lining. Make sure that the strip on the lining hood is sewn in the same position as on the hood made from the outer fabric.
I sew the two hoods together at the center back of the neckline in the area of the seam allowances.
Make sure to do this so that the seam allowances continue to point towards the hood and sew back and forth several times in the area of the hanger to provide additional stability.
The connecting strip at the shoulder seam is sewn onto the lining jacket.
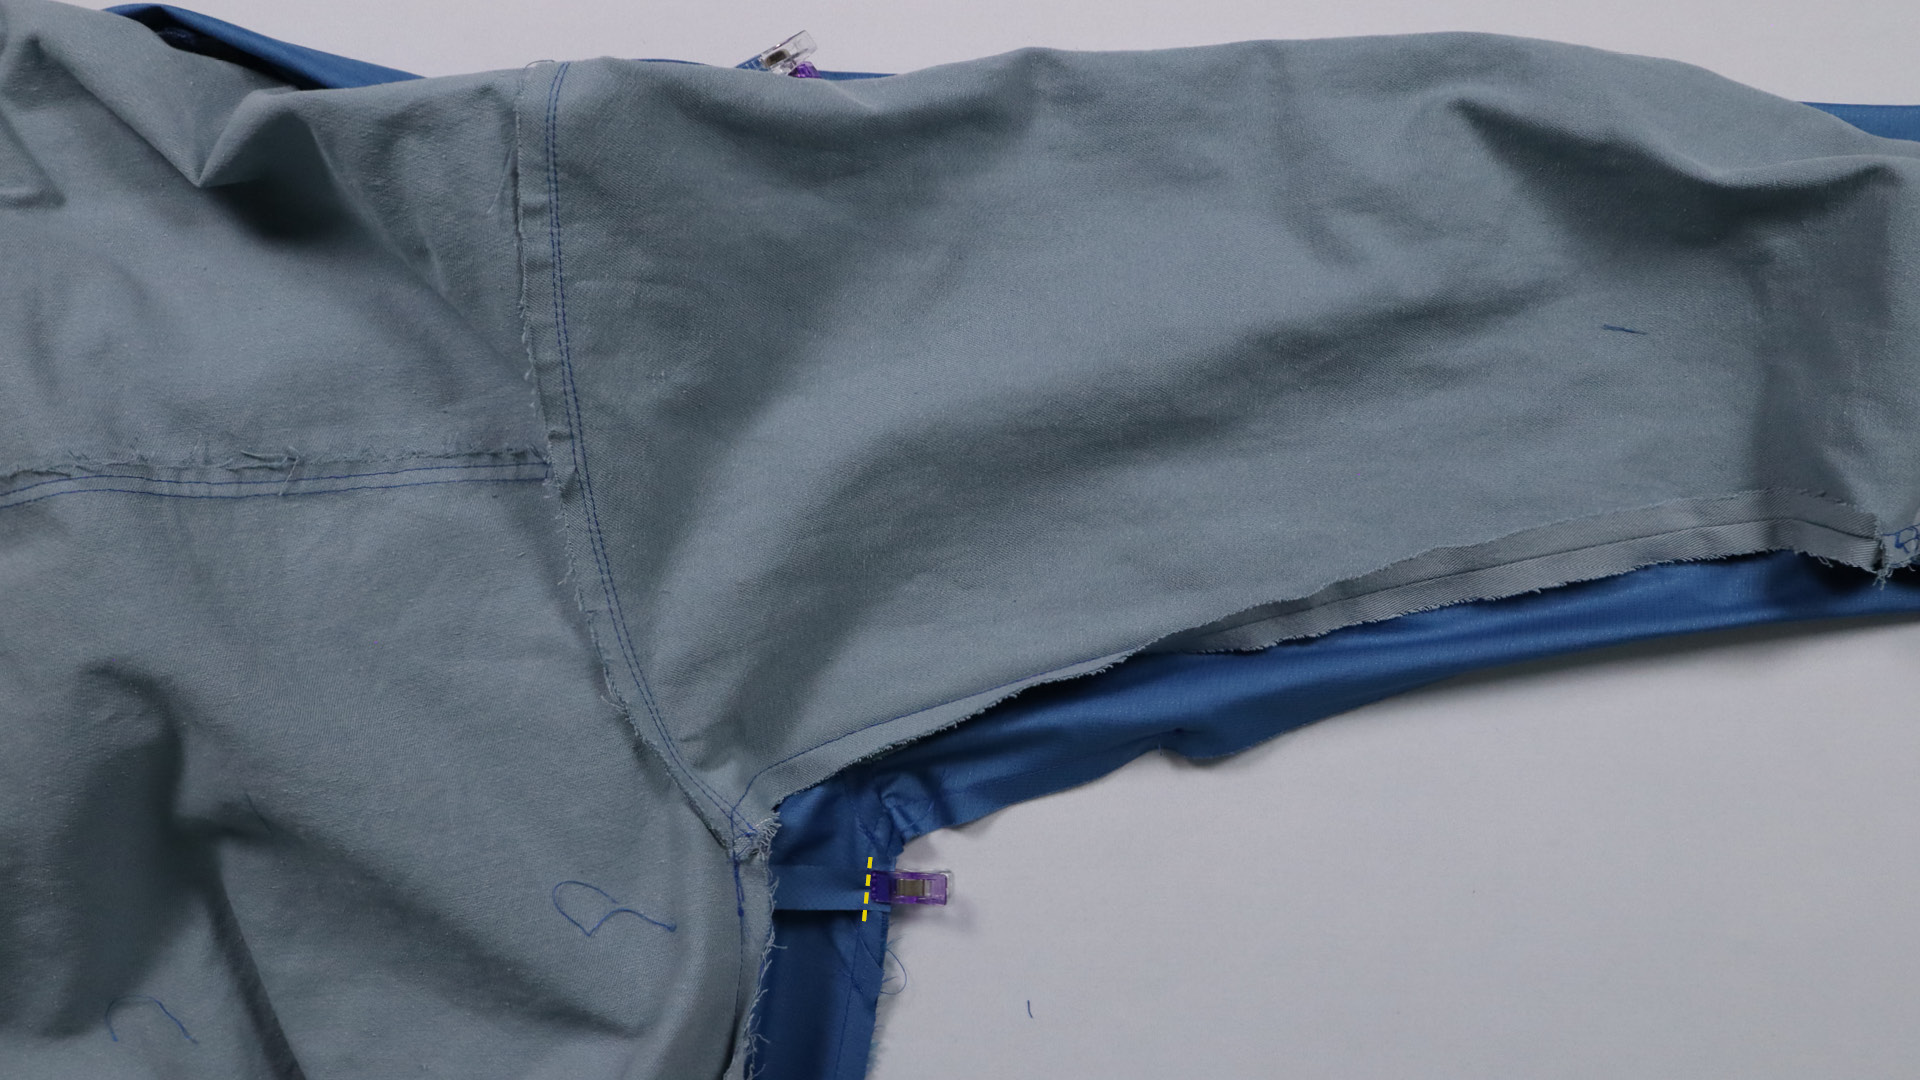
The connecting strips are also sewn to the lining jacket at the side seam.
Turn over jacket with hood
The jacket can now be turned inside out. To do this, reach into the turning opening and carefully pull the entire jacket through.
The turning opening can now be closed.
Pin the opening together…
… and sew it close to the edge.
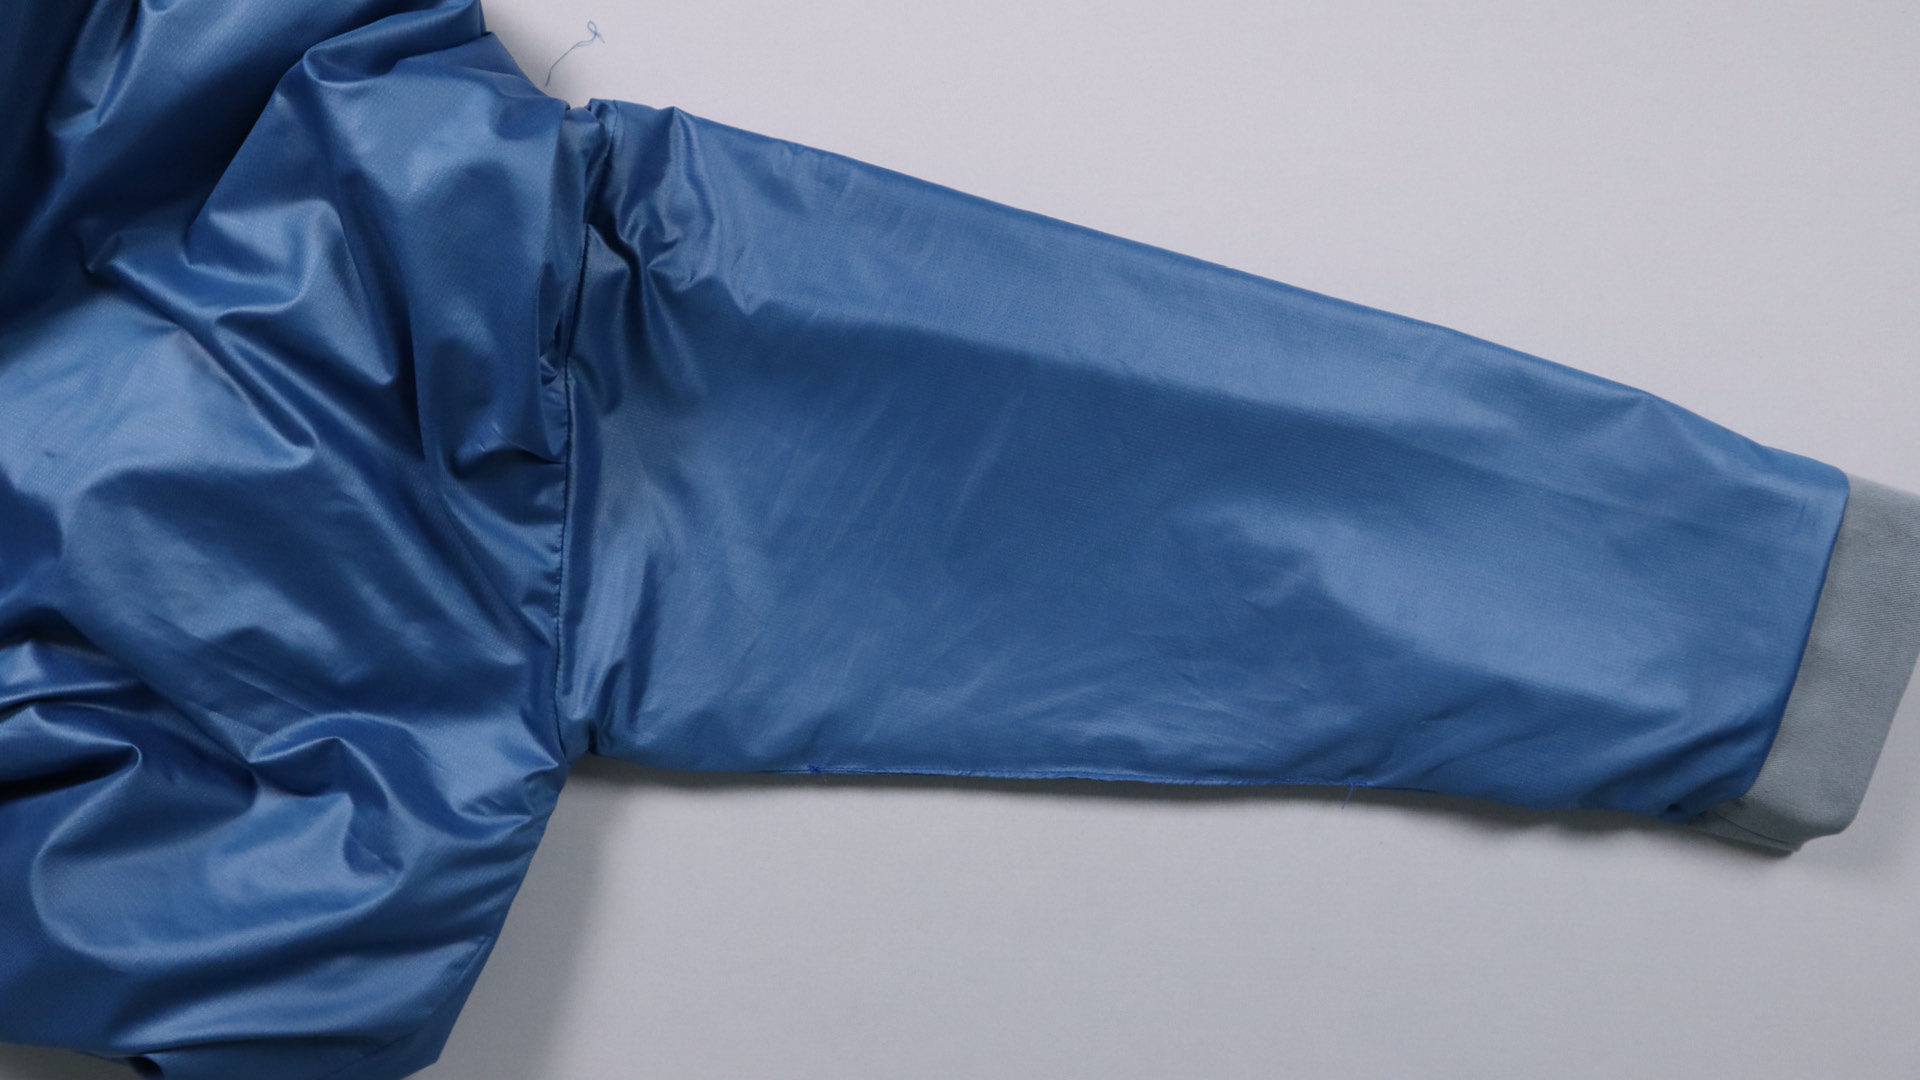
Stitch the sleeve hem and sew on the buttons
Topstitch the sleeve hem at a distance of 4 cm from the hem edge, taking care not to catch the lining.
Now the buttons can be attached. I mark the position of the first button through the eye of the buttonhole.
I attach the second button 3.5 cm next to the first button. It is best to place both buttons next to each other on the sleeve hem and decide how much space should be between the two buttons. This is a matter of taste and also depends on the button size.
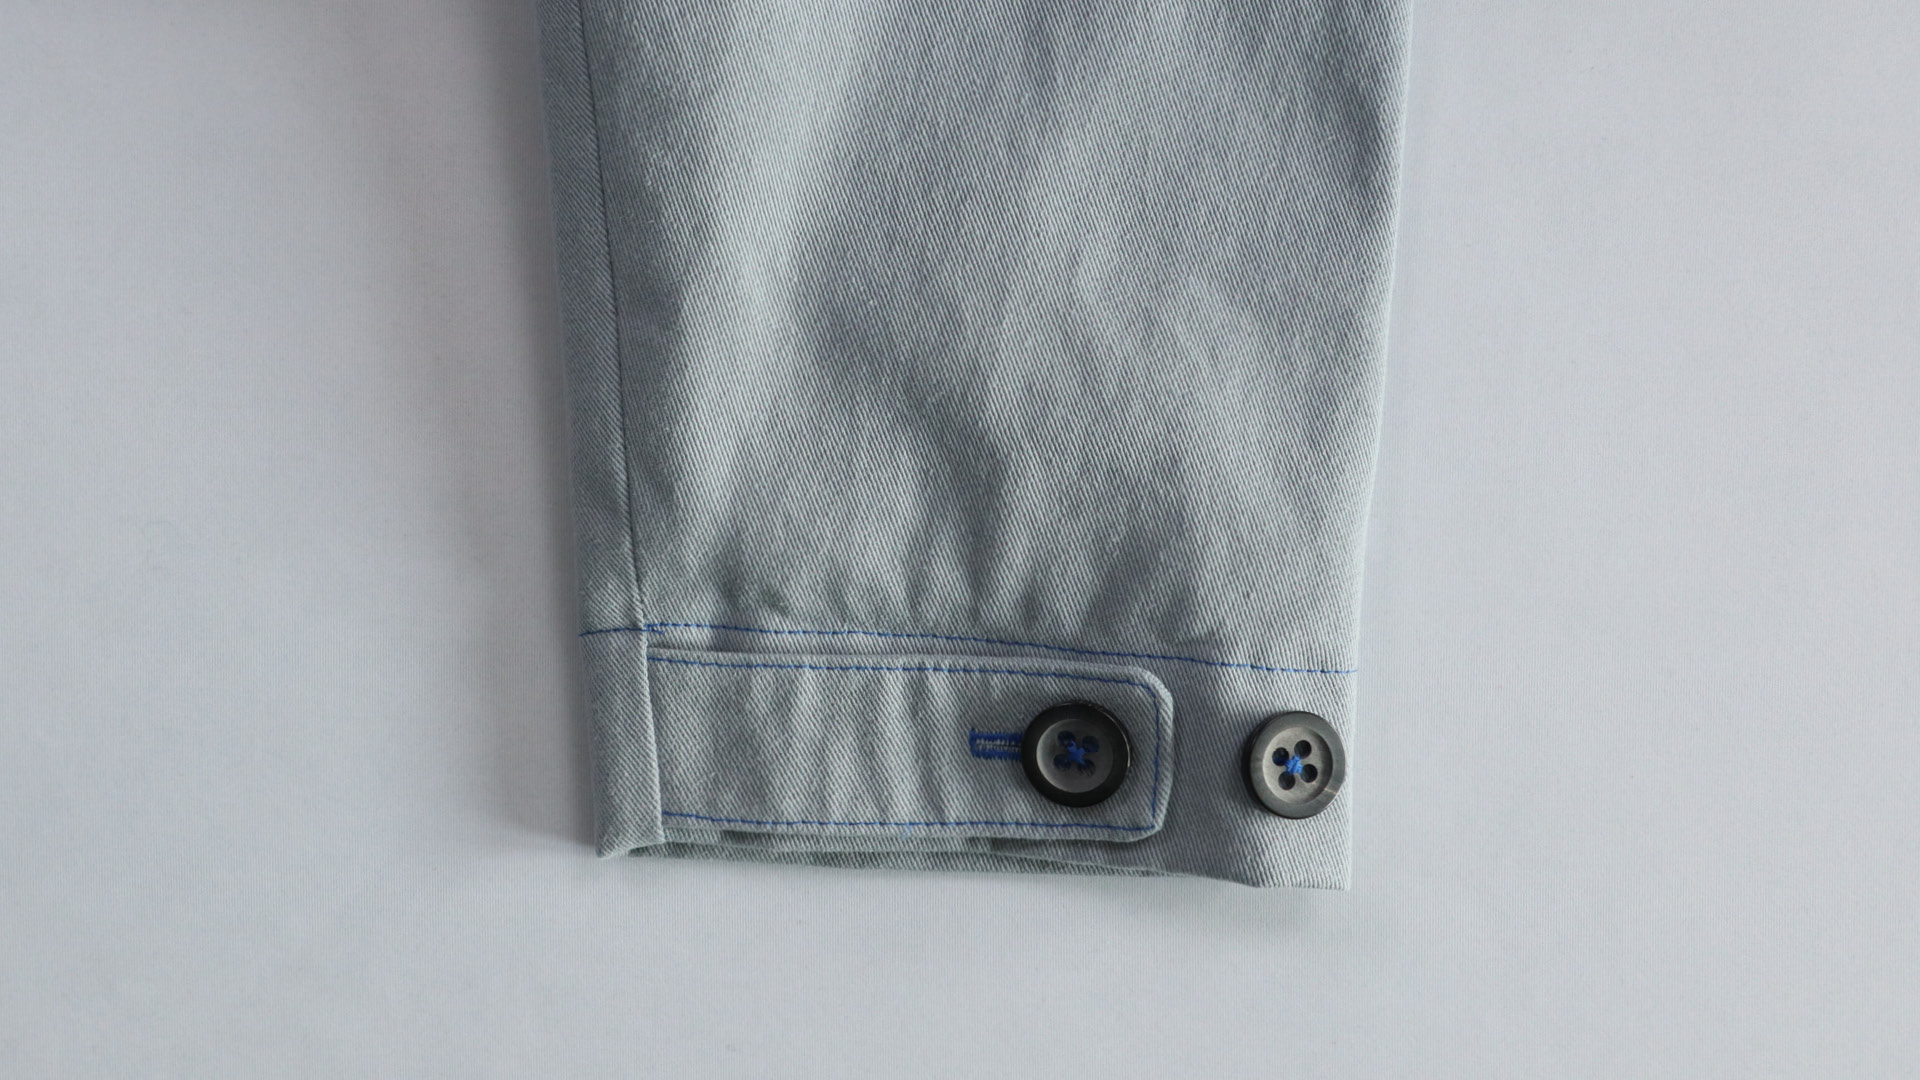
This is what the finished sleeve hems look like.
Sew hood band
The ribbons are ironed in the same way as you are probably familiar with bias tape. First, iron the two long edges to the center.
The ribbons are then folded twice and ironed well again.
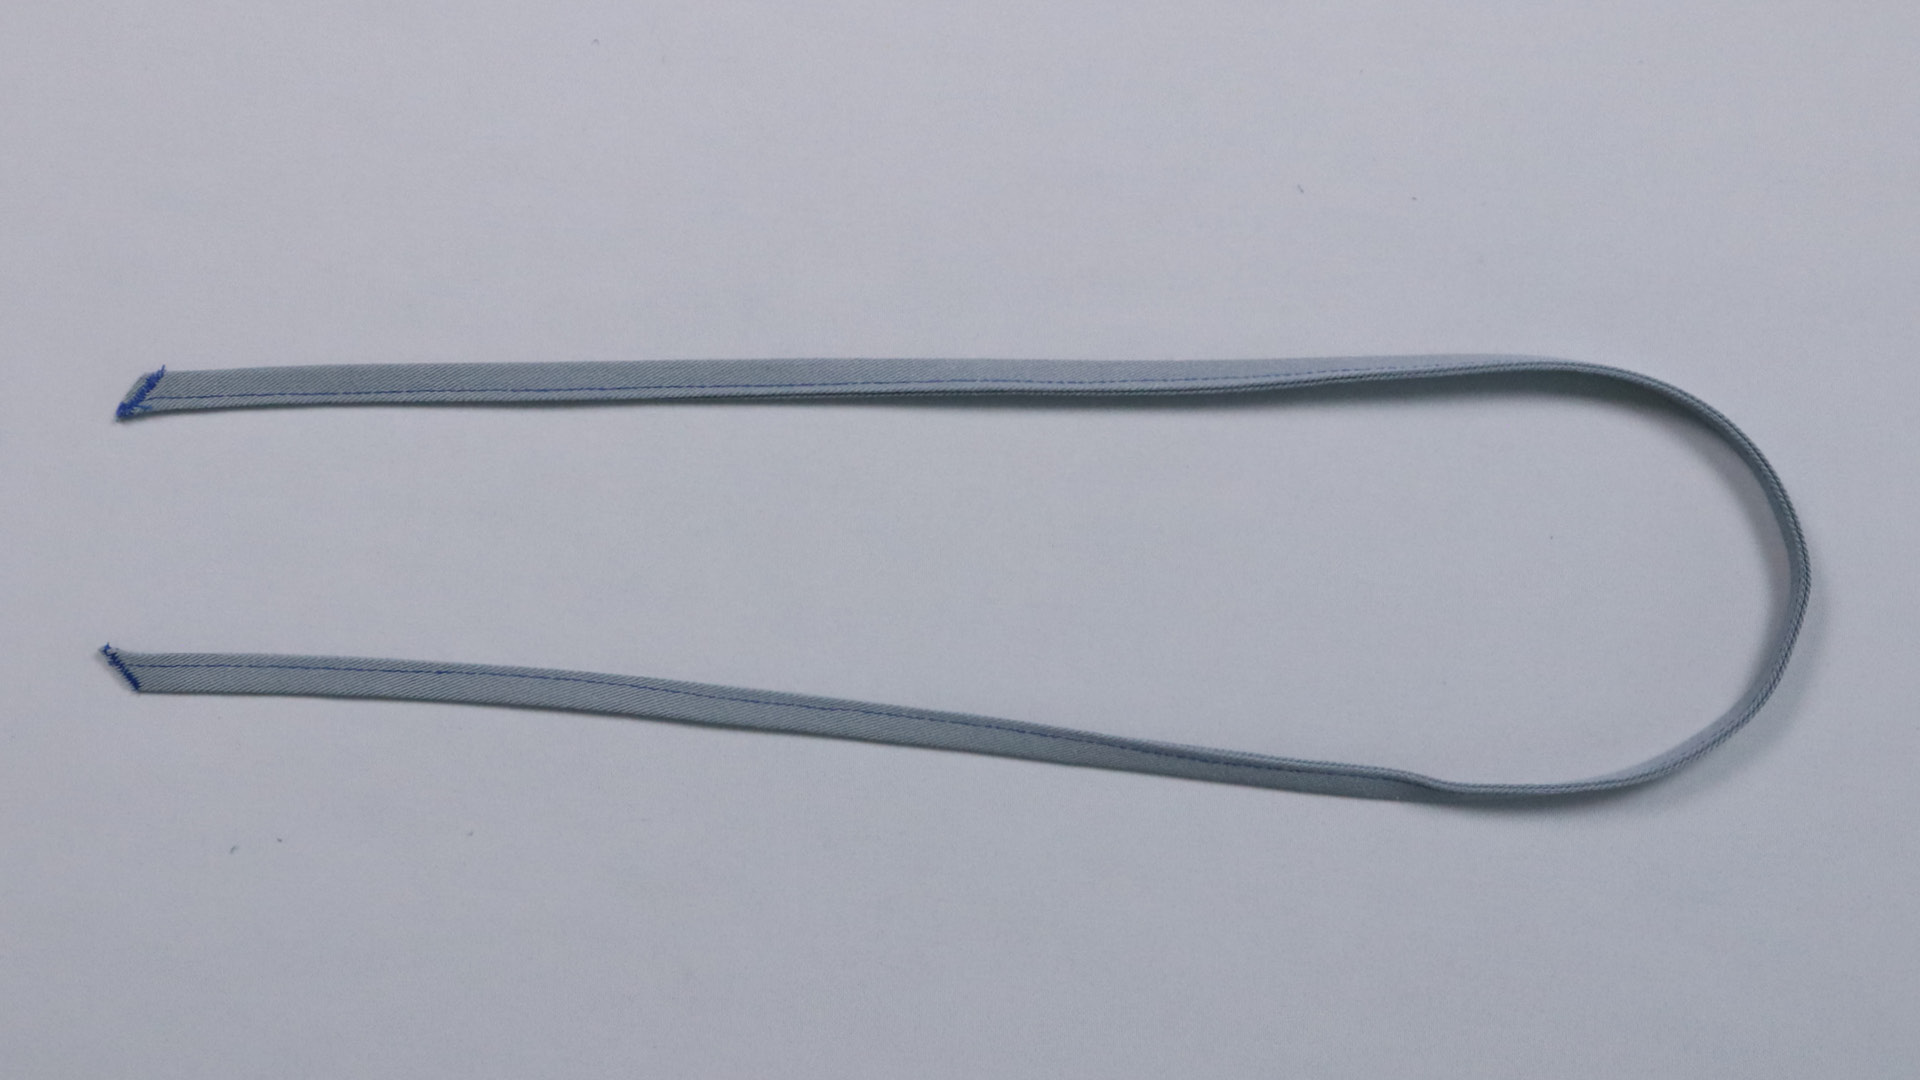
The ends of the band still need to be secured against fraying. I decided to use diagonal bartacks and cut off the excess fabric close to the edge.
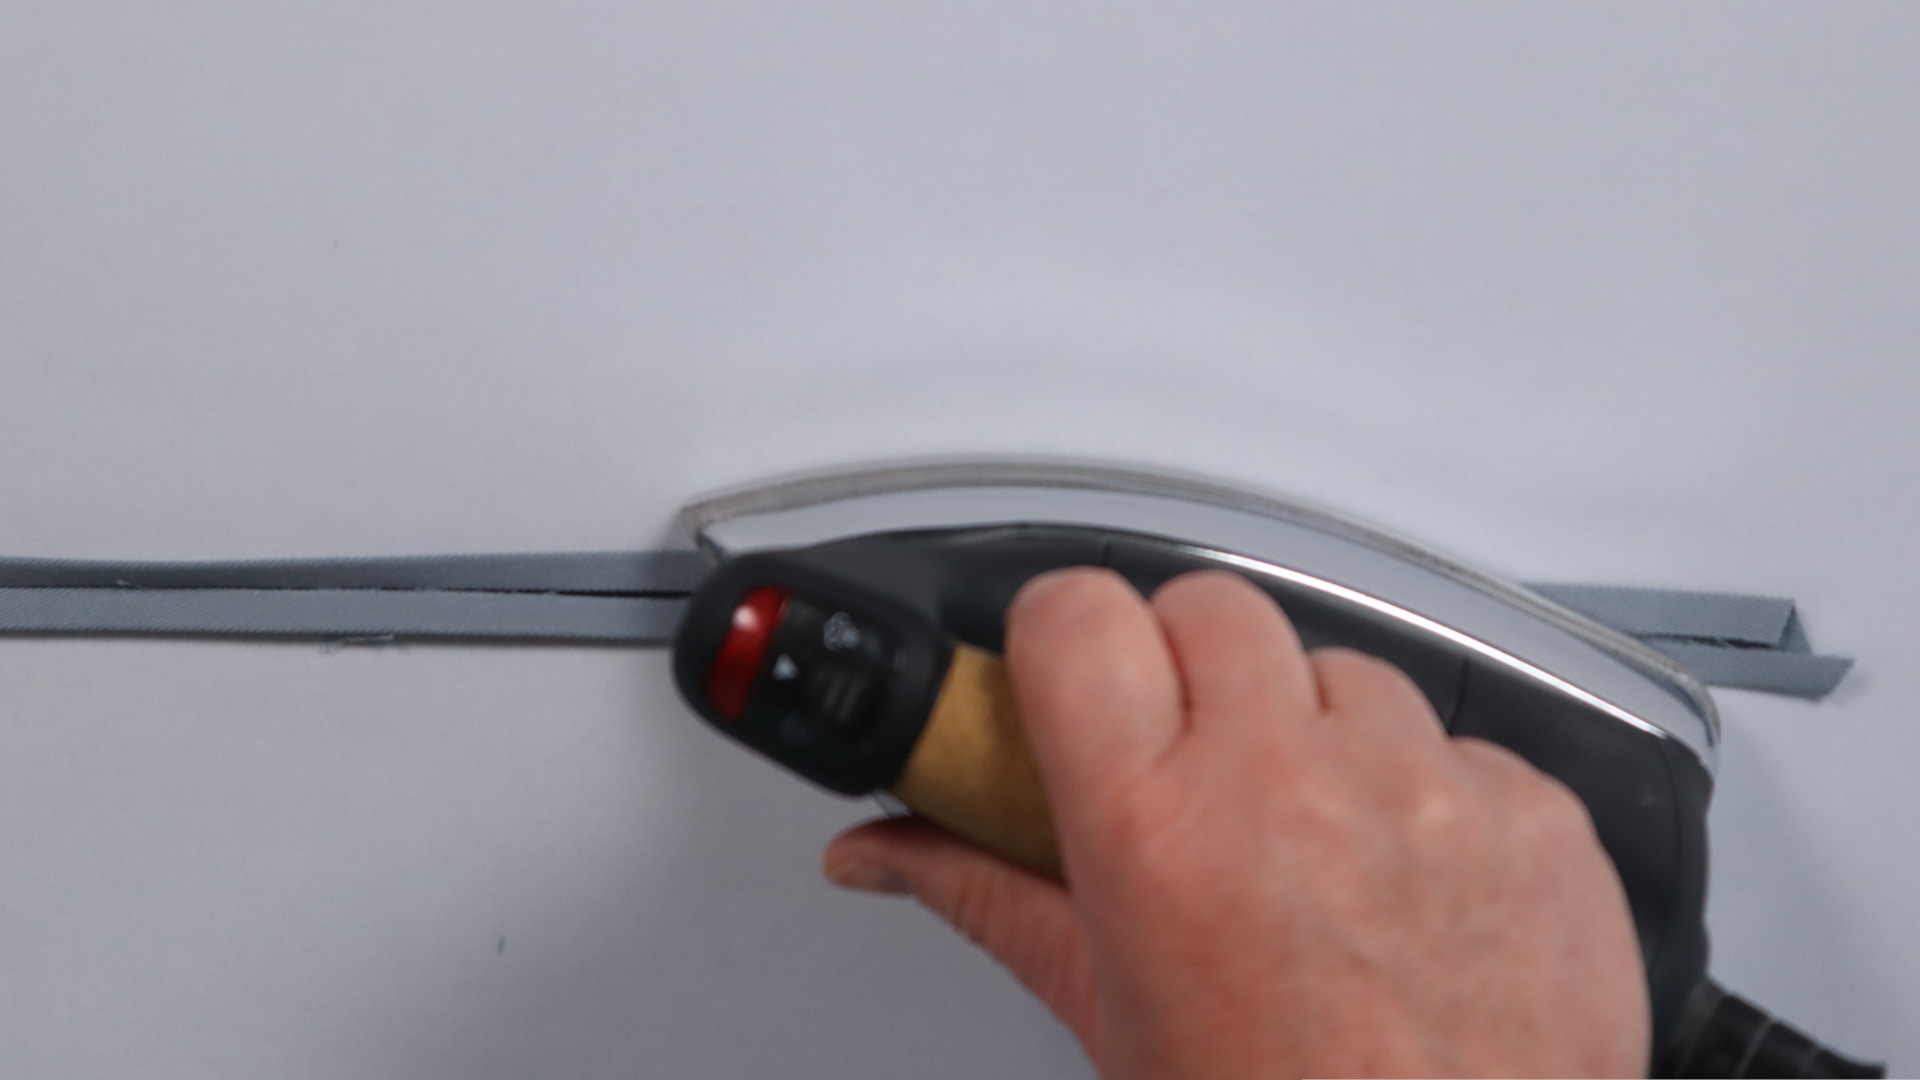
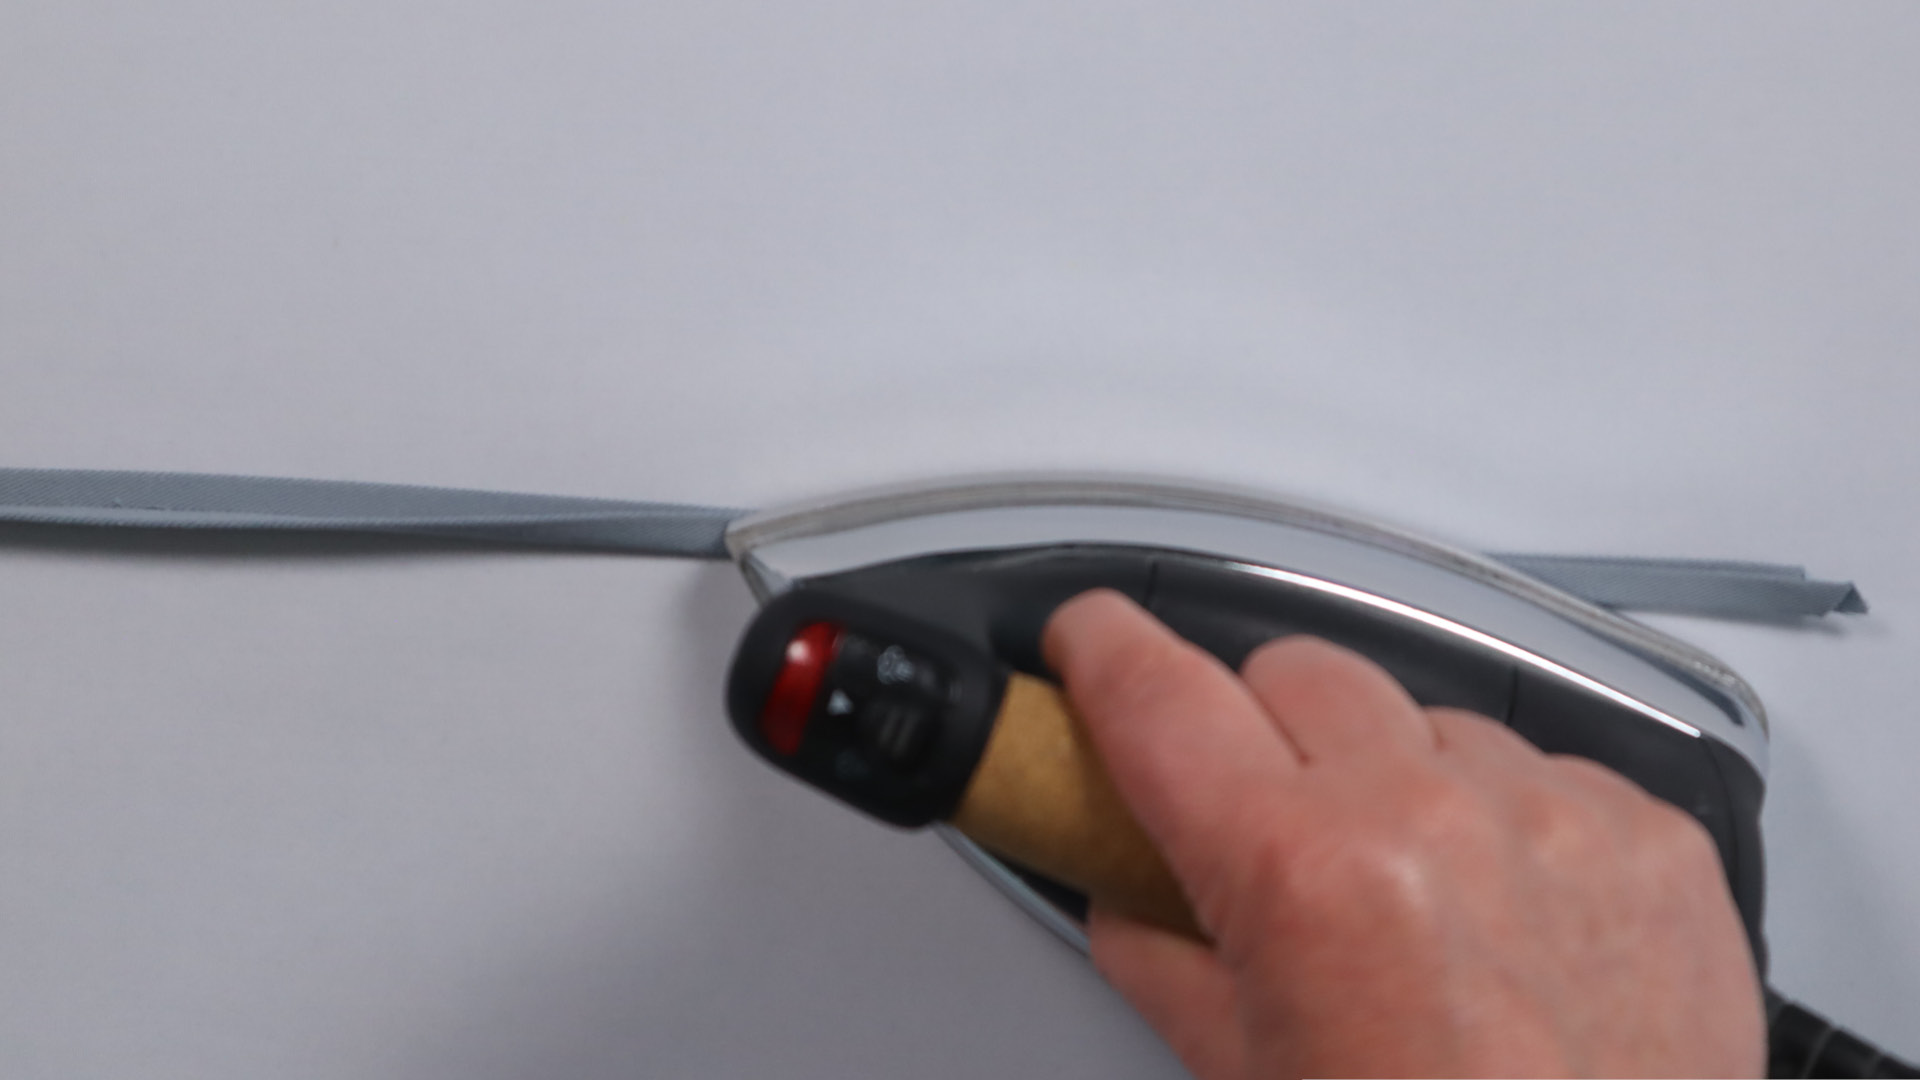
Now all you have to do is pull the ribbon or cord into the hood using a safety pin.
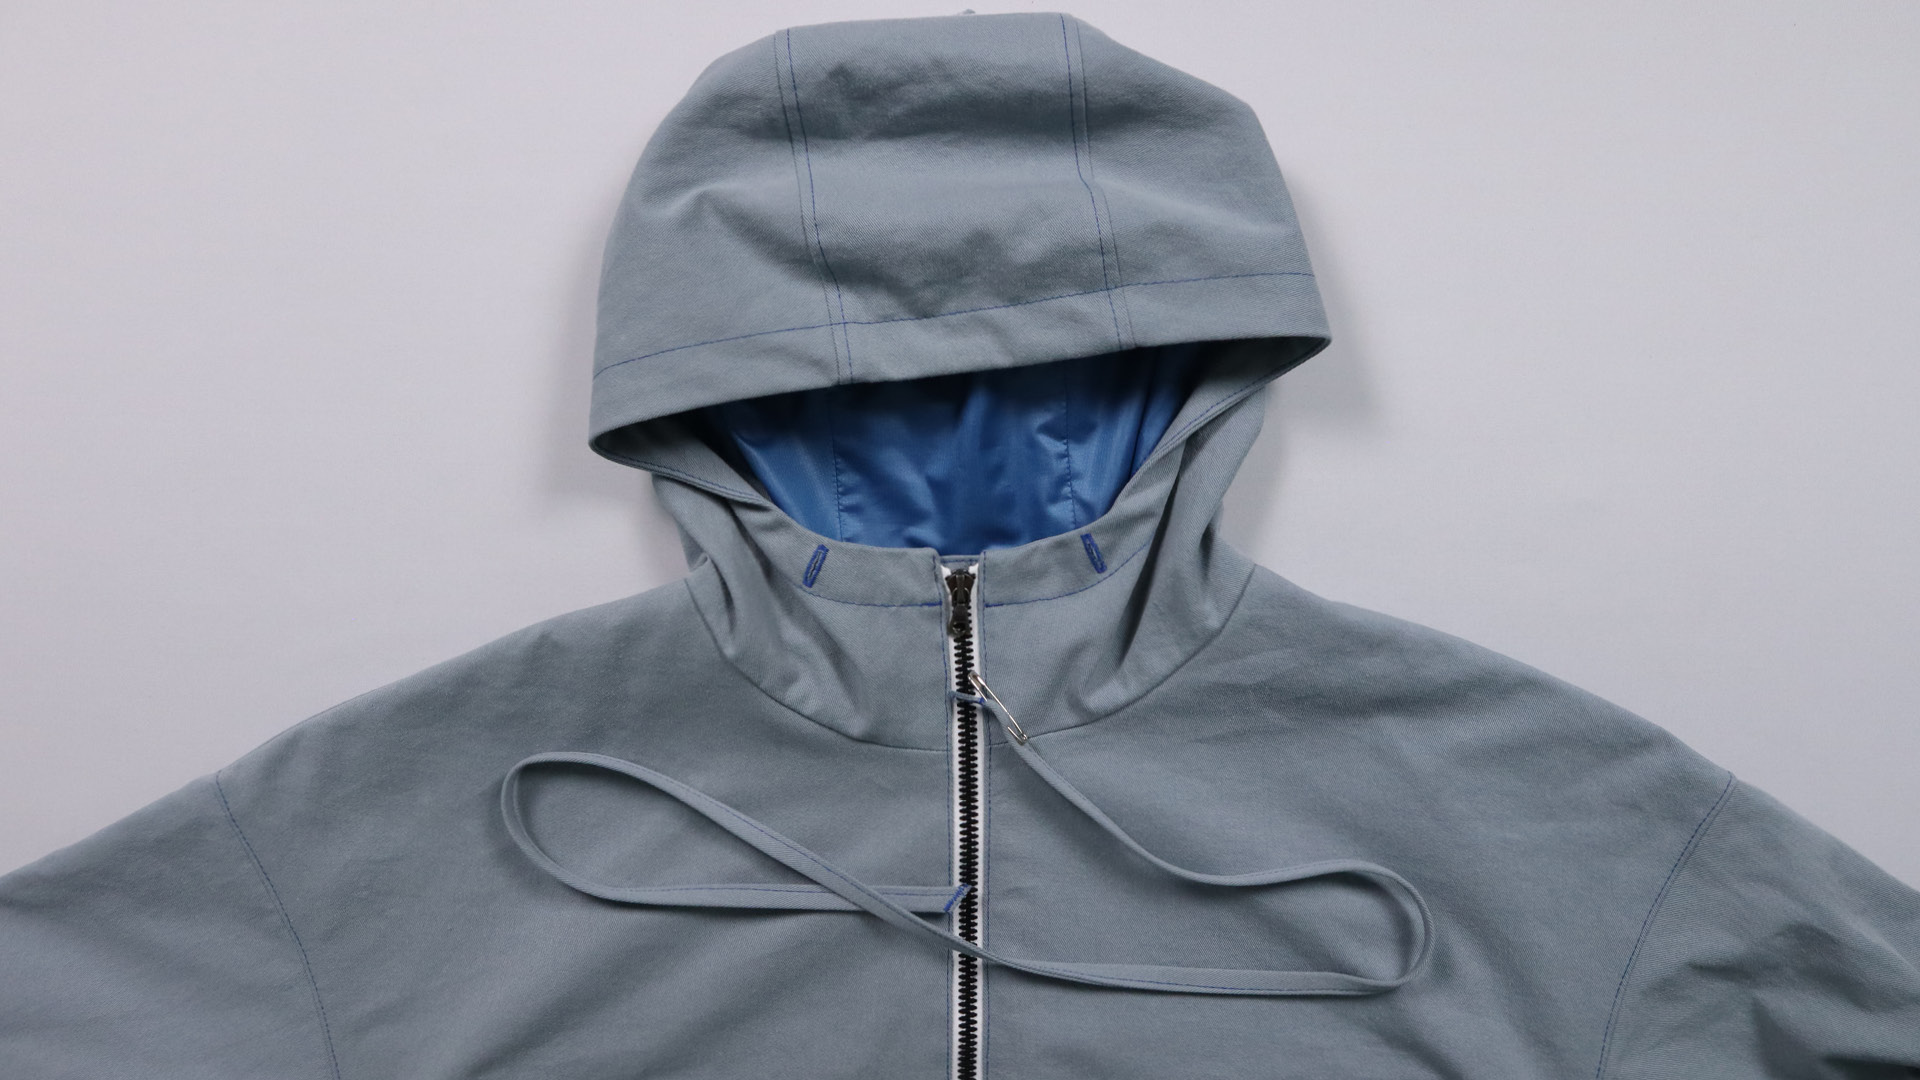
And your hooded jacket is finished. We hope you have lots of fun with it!
Show your work
We would be delighted if you showed your work in our Facebook group and/or on Instagram! Link us on Instagram with @smartpattern and use the hashtag #smartpatternkapuzenjacke so that we can find you.
Browse through our store and discover your next project!
-
![Title image for sewing pattern “Casual Chino HC03”]()
![Chino HC03 - Sketch]() 14,90 €Incl. tax
14,90 €Incl. tax -
![]()
![]() 14,90 €Incl. tax
14,90 €Incl. tax -
![]()
![Parka with hood JM02 Sketch details]() 14,90 €Incl. tax
14,90 €Incl. tax -
![]()
![]() 18,90 €Incl. tax
18,90 €Incl. tax


Legal matters
MISUSE and COMMERCIAL USE
These sewing instructions and the pattern (including all texts, illustrations, photos and graphics) are protected by copyright. Any distribution or reproduction is not permitted. If you would like to sell a product commercially, which is sewn according to this pattern, please contact us by e-mail: lizenzen@smartpattern.de