Loading cart contents...


We are delighted that you are interested in the pattern for our Cargo Barrelleg KEJA or that you have perhaps already purchased it as a paper or PDF pattern!
KEJA was created in collaboration with TAUKO magazine and appeared in issue 18, which has the theme “Pockets”. At the moment you can either buy the pattern as a PDF pattern directly from TAUKO or you can buy the magazine No. 18, which is available from 1000Stoff, for example, just like many matching fabrics for KEJA.
The PDF pattern is also expected to be available in German from TAUKO from mid-February and you can also buy it directly from us from around 20 th May.
In these instructions you will find all the information you need to sew KEJA according to your wishes.
Take a look at our FAQ – there you will find answers to many questions, tips on buying fabrics and accessories, etc.
If your questions are not answered there or you have feedback for us, please send us an e-mail to hallo@smartpattern.de.
Note for customers outside the EU, GB and CH
For tax reasons, we do not sell the patterns in our online store to all countries outside the EU, Great Britain and Switzerland. You can find a list of which countries are activated in the online store here. We are happy when customers from other countries visit our Etsy store.
Why the instructions are only available online
We have deliberately decided to make our instructions available online only. This saves a lot of paper, because not everyone wants to use printed instructions. You can also zoom in if you can’t see something straight away or the font is too small. Of course, you can also print out the individual instructions if you wish. To do this, use the corresponding print options in your internet browser. In many browsers, it is also possible to save the respective page so that it is available offline. This means you don’t always need an internet connection while you’re sewing and you can still save yourself the trouble of printing out on paper.
Sizes and measurements
Size selection
Choose your size based on your hip measurement. We recommend an extra width, i.e. a difference between body and finished measurements, of 8-10 cm.
Body and finished measurements table
You will find a body measurement table here that you can compare with your own measurements. All measurements are given in cm. If you want to convert to inches, divide the value by 2.54.
| Size | 1 | 2 | 3 | 4 | 5 | 6 | 7 | 8 | 9 |
|---|---|---|---|---|---|---|---|---|---|
| Waist | 62 | 70 | 78 | 86 | 96 | 109 | 118 | 124 | 130 |
| Lower hip | 86 | 94 | 102 | 110 | 121 | 133 | 142 | 148 | 154 |
Click on the button for instructions on how to take the right measurements.
You can also take the finished measurements of the Cargo Barrelleg from the table and decide how loose your KEJA should fit. Please note that the stretched waistband must be wide enough to fit over your strongest point, i.e. usually over your hips. Again all measurements are given in cm! If you want to convert to inches, divide the values by 2.54.
| Size | 1 | 2 | 3 | 4 | 5 | 6 | 7 | 8 | 9 |
|---|---|---|---|---|---|---|---|---|---|
| Waistband stretched | 86 | 94 | 102 | 110 | 121 | 133 | 142 | 148 | 154 |
| Lower hip | 94 | 102 | 110 | 118 | 130 | 142 | 151 | 157 | 164 |
| Thigh cirumference | 59 | 64 | 70 | 75 | 83 | 90 | 95 | 100 | 104 |
| Side length | 102 | 102 | 103 | 103 | 103 | 104 | 104 | 105 | 105 |
| Inseam | 74 | 74 | 74 | 74 | 74 | 73 | 73 | 73 | 73 |
| Side length short version | 58,5 | 59,5 | 60,5 | 62 | 63,5 | 6 | 66,5 | 68 | 69,5 |
| Inseam short version | 32 | 32 | 32 | 32 | 32 | 32 | 32 | 32 | 32 |
Product description
The Cargo Barrelleg has a comfortable, loose-fitting, barrel or balloon-shaped cut. You can sew the trousers in a long or short version. The long version offers different hem options: You can sew a simple hem or add tabs and buttons to secure the turned-up hem.
Create your own design by choosing from different pocket variants. For example, you can sew an additional pocket in the side section to carry your cell phone. Some pocket variants have a lot of volume, others are sewn on flat. You can also sew smaller pockets onto larger ones and add pocket flaps. It is possible to attach Velcro, buttons and buttonholes or press studs to close the flaps. Press interfacing onto the areas of the waistband, hem and pockets/pocket flaps where you want to add Velcro, buttons, buttonholes, eyelets or press studs. All pockets can be finished with decorative topstitching. You can use a matching thread or choose a contrasting color, depending on how eye-catching you want the seams to be.
KEJA has no zipper, which makes sewing much easier and ensures a high level of comfort. The waistband can be made from the main fabric with an elastic band inserted. You can also insert a drawstring to adjust the width.
The pattern and instructions are designed for many different fabrics, e.g. denim, twill, corduroy, …
General information
Seam allowances
All seam allowances are included in the pattern. The standard seam width is 10 mm. If a different seam allowance is required, we will indicate this in the instructions.
Fabrics and materials
You will need the following materials to sew the Cargo Barrelleg. You can see approximately how much fabric you need for your size in the table below. Bear in mind that you may need less fabric if you are sewing fewer pockets. If you want to make sure you don’t buy too much fabric, it’s best to lay out the pattern with all the pieces you need on a table or the floor, mark the width of the fabric you want and measure how much fabric you need.
| Size | 1 | 2 | 3 | 4 | 5 | 6 | 7 | 8 | 9 |
|---|---|---|---|---|---|---|---|---|---|
| Short version, 140 cm fabric width | 167 | 169 | 171 | 192 | 212 | 232 | 247 | 277 | 285 |
| Long version, 140 cm fabric width | 212 | 213 | 218 | 227 | 260 | 270 | 274 | 312 | 318 |
| Interfacing, 90 cm width | 35 | 35 | 35 | 35 | 35 | 35 | 35 | 35 | 35 |
- Outer fabric: light to medium-weight woven fabric, e.g. cotton, linen, corduroy, denim, twill. If you want to sew cargo pockets with volume, choose a fabric that can be easily folded and ironed!
- Fusible interfacing, e.g. Vlieseline G 405
- Edge tape 2 cm wide, e.g. Vlieseline T20
- Elastic band for the waistband, 3 cm wide, approx. 3-5 cm shorter than your waist circumference
- possibly 2 buttons if you are sewing bartacks for the folded hem
- cord for the waistband if necessary
- if necessary, eyelets to match the cord if you don’t want to sew buttonholes
- elastic cord, eyelets and cord stoppers for the hem if required
- Yarn matching your materials
![]() We generally recommend that you wash the fabric before sewing to prevent your finished Cargo Barrelleg from shrinking later on. Therefore, wash the fabric in exactly the same way (temperature, spin cycle, etc.) as you will wash the finished garment later and follow the manufacturer’s instructions.
We generally recommend that you wash the fabric before sewing to prevent your finished Cargo Barrelleg from shrinking later on. Therefore, wash the fabric in exactly the same way (temperature, spin cycle, etc.) as you will wash the finished garment later and follow the manufacturer’s instructions.
Take any shrinkage into account when purchasing the fabric! Unless otherwise stated for the respective fabric, assume an addition of 10 %, which should normally be sufficient.
If you are using a patterned fabric, you will probably need more fabric so that the pattern can be used evenly!
To prevent or reduce bleeding on colored fabrics, you can add a dash of vinegar to the washing machine or water.
Cutting
The patterns are available as separate PDF files in A4 and A0 format. By default, all sizes are printed together, but you can also print only the required layer(s). We explain how this works in these instructions.
All pattern pieces include a seam allowance of 1 cm, unless otherwise stated. The long trousers have a hem allowance of 4 cm, the short trousers 3 cm.
Here you can see an overview of all the pattern pieces:

You can see an overview of all pocket variants in the following image.
TIP: we have also used the add-on pockets for the cargo pockets in the example, but only recommend this – if at all – for very thin fabrics.

The cargo pocket pieces are also used to sew the flat pockets. To create the flat version, trace the original pocket edges on the sides and bottom and draw a new line 3 cm inwards. Cut along this line to remove the extra width.

Which pattern pieces you need depends on whether you want to sew the Cargo Barrelleg in short or long, with or without side pocket(s) and which pockets you want to sew on the front and back.
In these instructions, we have sewn KEJA once in long from a light denim. We have sewn all pocket variations as flat pockets and also inserted pockets into the side panels.
For the short version in black, we opted for the cargo pockets and also sewed both side panels with pockets.


front trousers – 2x
upper side – 2x
lower long side – 2x
back – 2x
yoke – 2x
waistband- 1x, see table
front pocket flat – 2x
upper front add-on pocket – 1x
lower front add-on pocket – 1x
back pocket flat – 1x
flap – 1x
back pocket & flap – 1x
lower back pocket flatt – 1x
side loop – 4x


front – 2x
upper side – 2x
lower side short with pocket – 2x
back – 2x
yoke- 2x
waistband – 1x, see table
front pocket cargo – 2x
upper front add-on pocket – 1x
lower front add-on pocket – 1x
back pocket cargo – 1x
flap – 1x
back pocket & flap – 1x
lower back pocket cargo – 1x
| Size | 1 | 2 | 3 | 4 | 5 | 6 | 7 | 8 | 9 |
|---|---|---|---|---|---|---|---|---|---|
| Waistband length | 88 | 96 | 104 | 112 | 123 | 135 | 144 | 150 | 156 |
| Waistband width | 9 | 9 | 9 | 9 | 9 | 9 | 9 | 9 | 9 |
Ironing insert
You should cut iron-on interfacing for the following pattern pieces to reinforce the fabric.

The interfacing is indicated in the image by the dotted areas.
pocket openings of all pockets
back pocket & flap: on the part of the flap
side loop: on two of the four tabs
(lower) side: the area where the tab is sewn on
Sewing instructions
Notes
Here I explain how I sewed the long and the short Cargo Barrelleg KEJA. Basically, the explanation is based on the long version; different steps for the short version are mentioned at the appropriate points. If you are sewing one or both side panels without pockets, the process for sewing on the front and back trousers is identical – only the corresponding steps for preparing the pocket are then omitted.
I took the photos for these instructions while sewing the first examples. In retrospect, there have been minor adjustments to the front add-on pockets – so don’t be confused by the fact that they are slightly different sizes in this example.
If you look very closely, you will also notice that the lettering on the pattern pieces is different from that on your pattern. This is simply because TAUKO magazine has adapted this to its usual labeling.
I also used a finished waistband instead of the waistband strip for the short version. If you want to do the same, I recommend that you test the width of the waistband before sewing it to the pants. As the stretch of different waistbands can vary greatly, it is not possible to give specific information on the required waistband length.
In addition to the description in the TAUKO magazine, I added an elastic cord to the hem of the long version so that I could adjust the leg width if necessary. I explain how I did this further down in these instructions.
And last but not least: as always, I recommend that you read the instructions in full before you start sewing to get an overview of what to do and in what order.
Preparations
First I iron on the interfacing. Here you can see the reinforced edges of the front add-on pockets.
I reinforce the bottom edge of the upper side. This will later become the small flap that goes over the pocket opening.
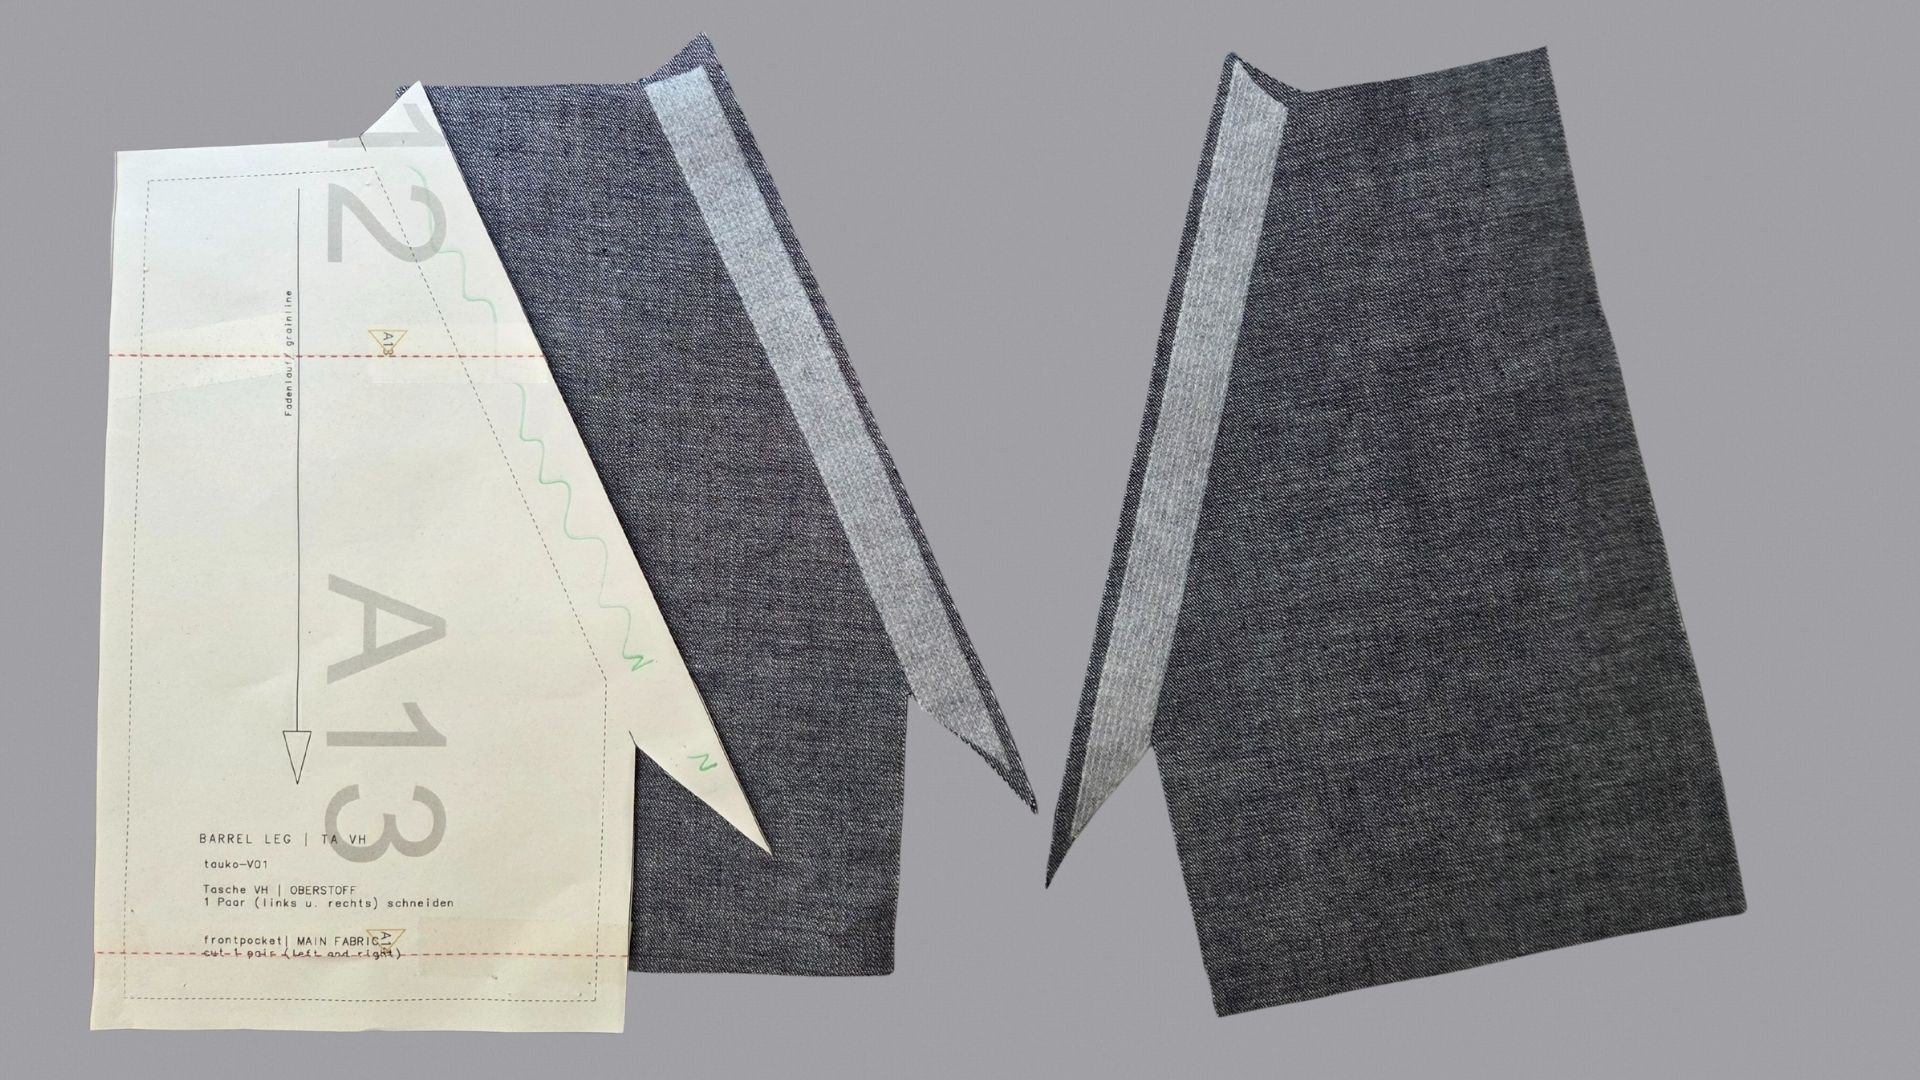
The slanted edges of the front pockets are reinforced.
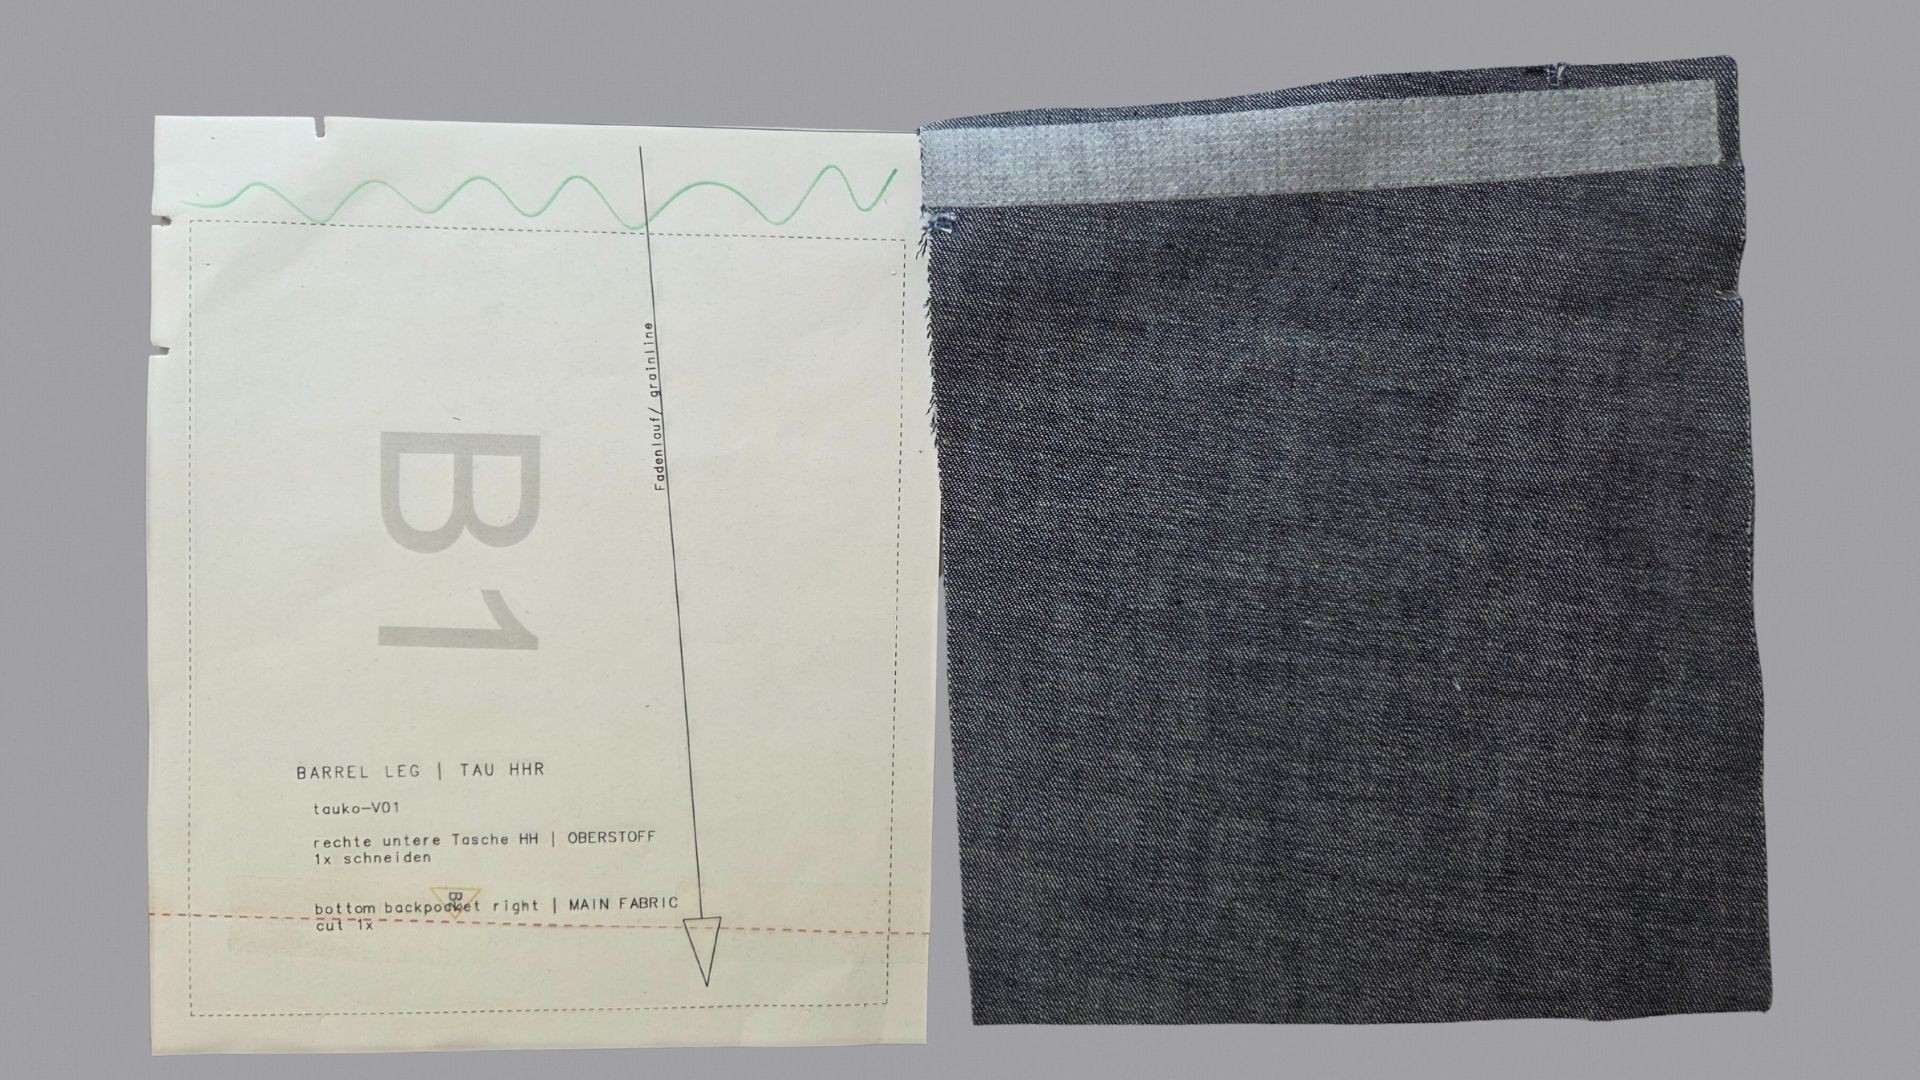
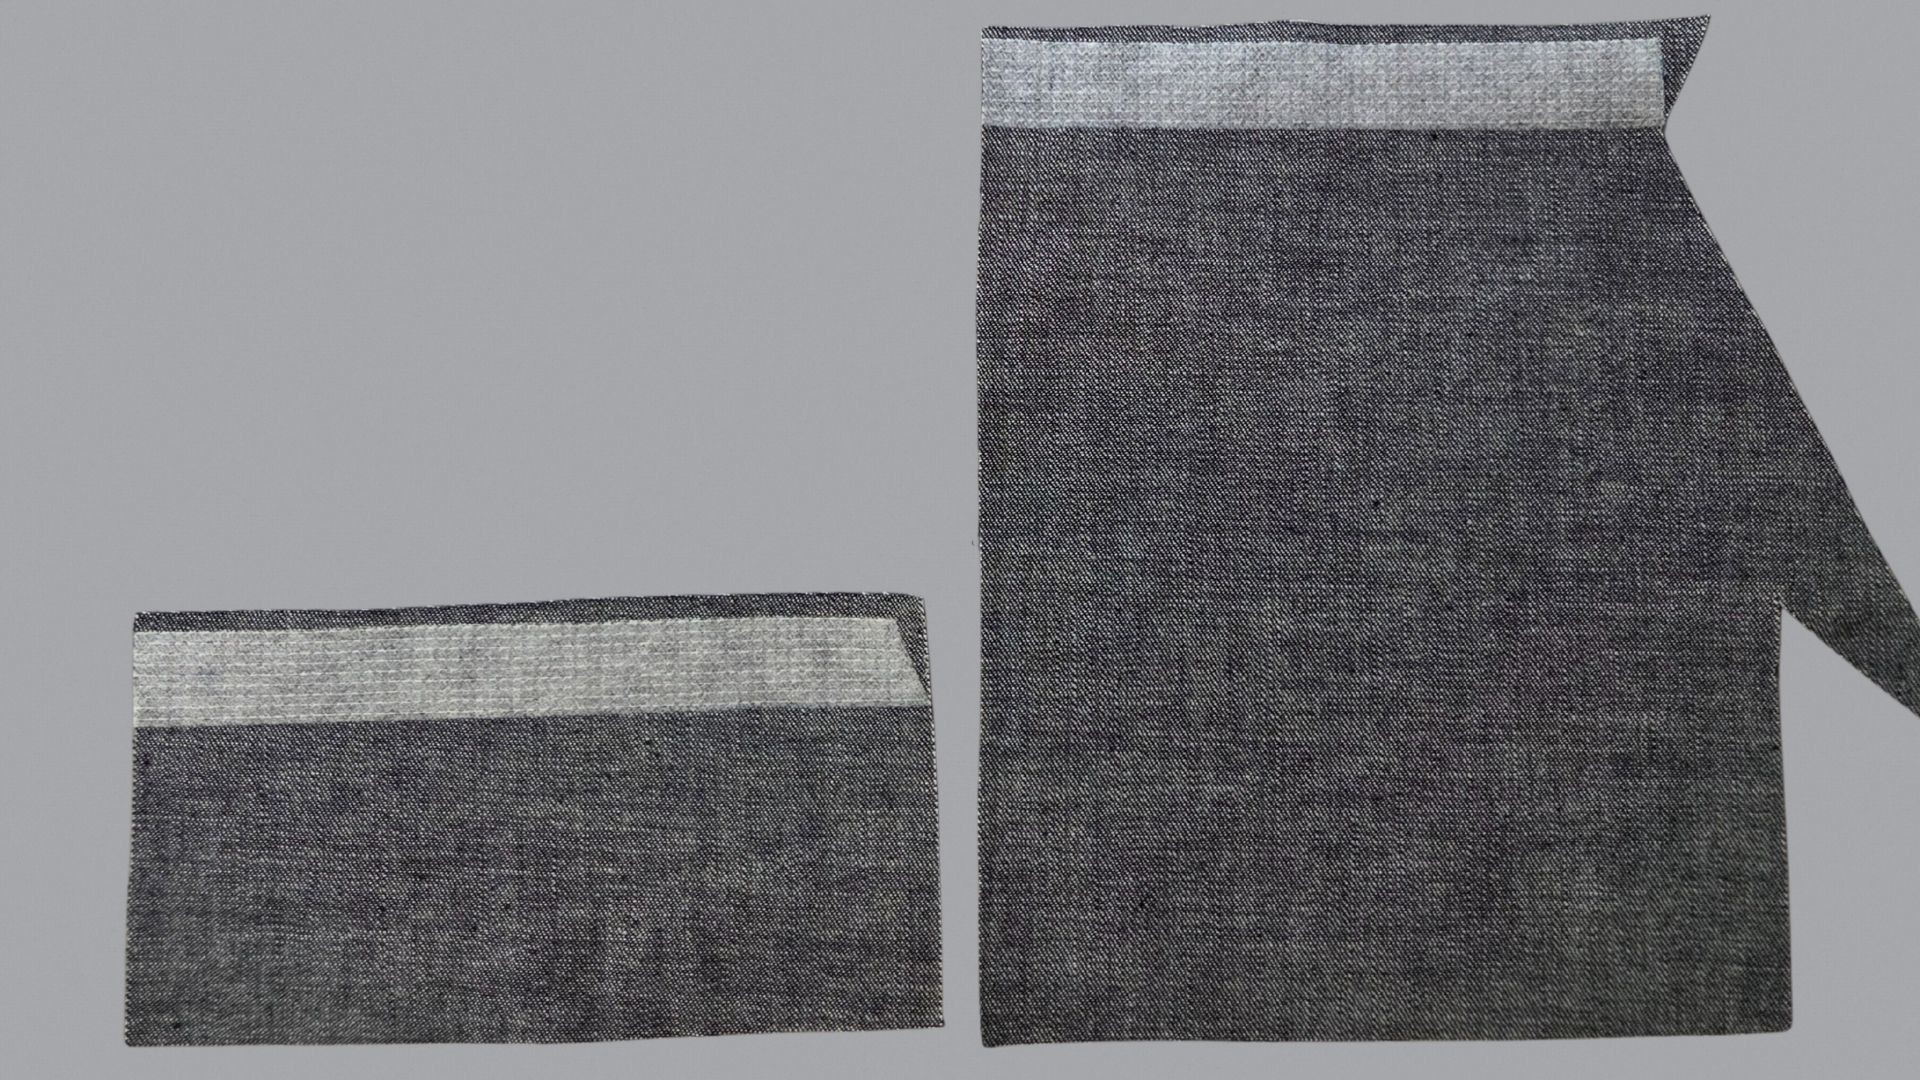
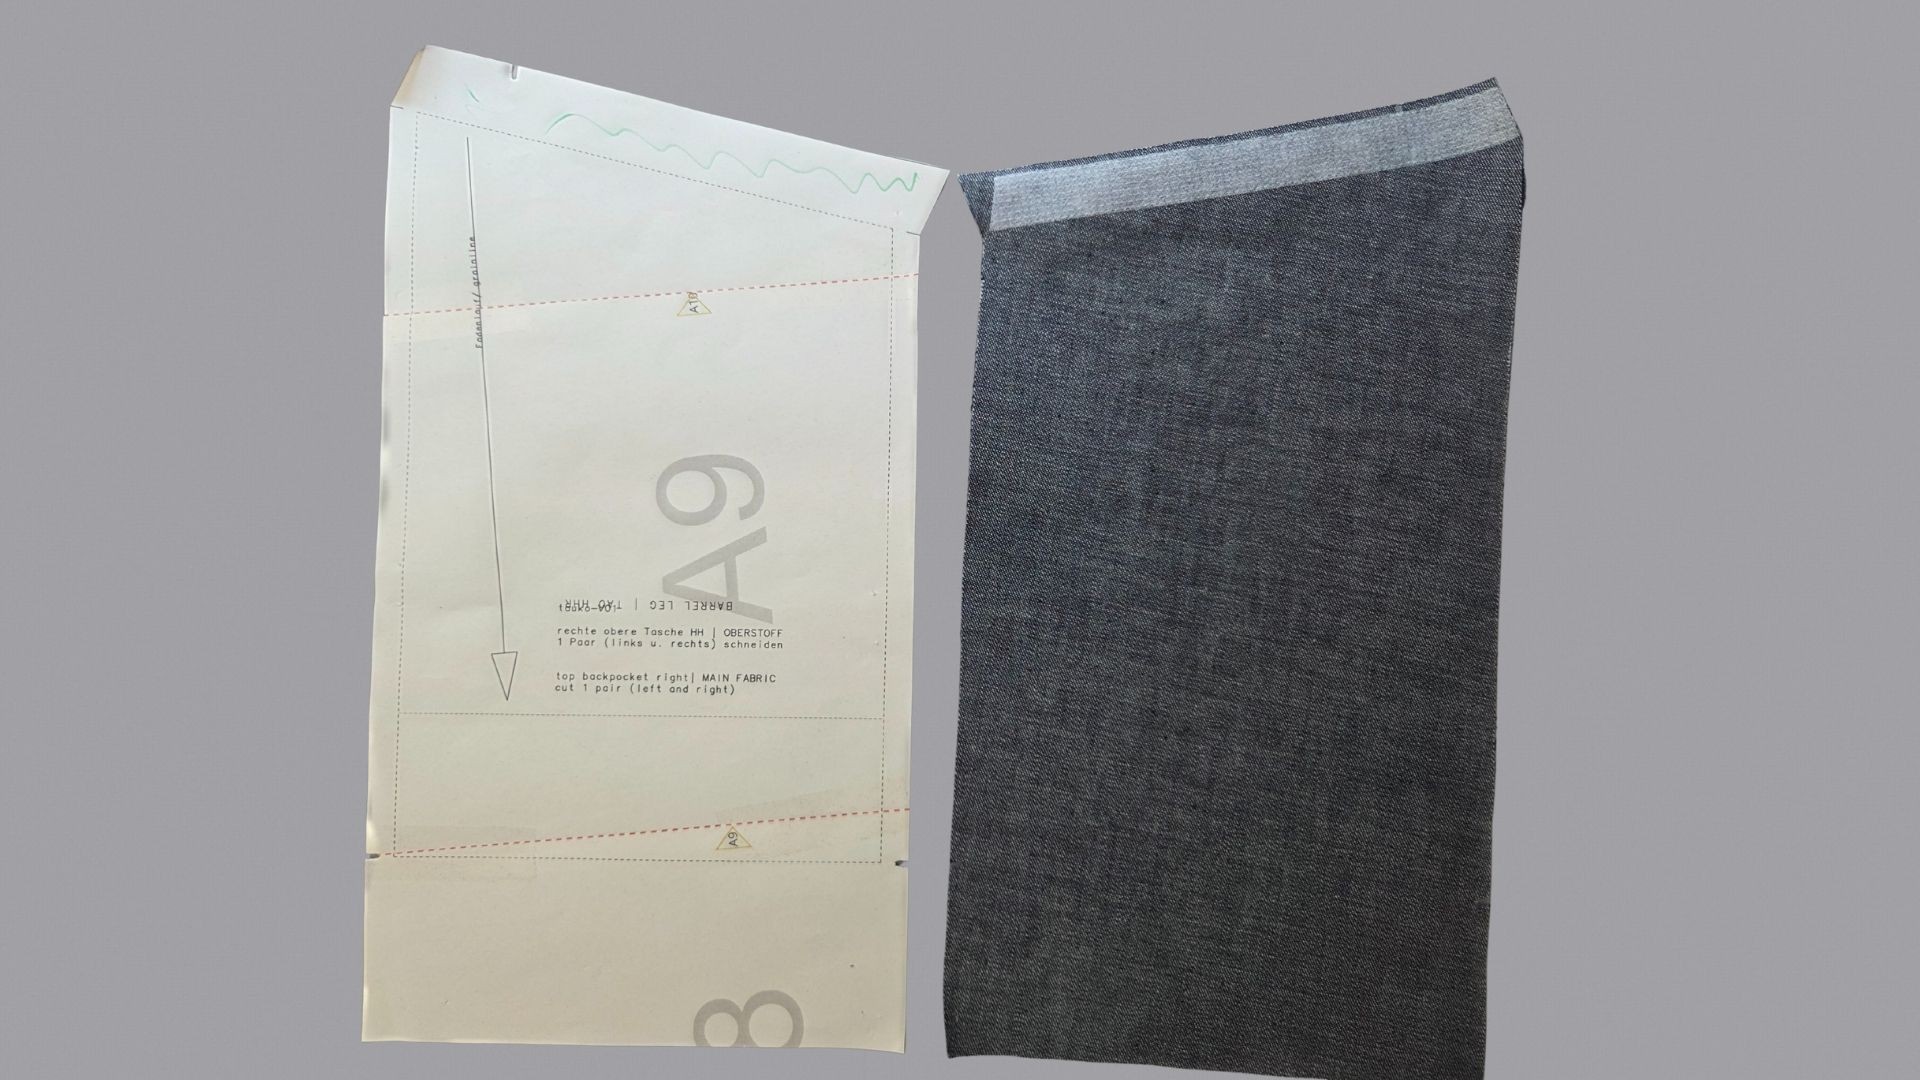
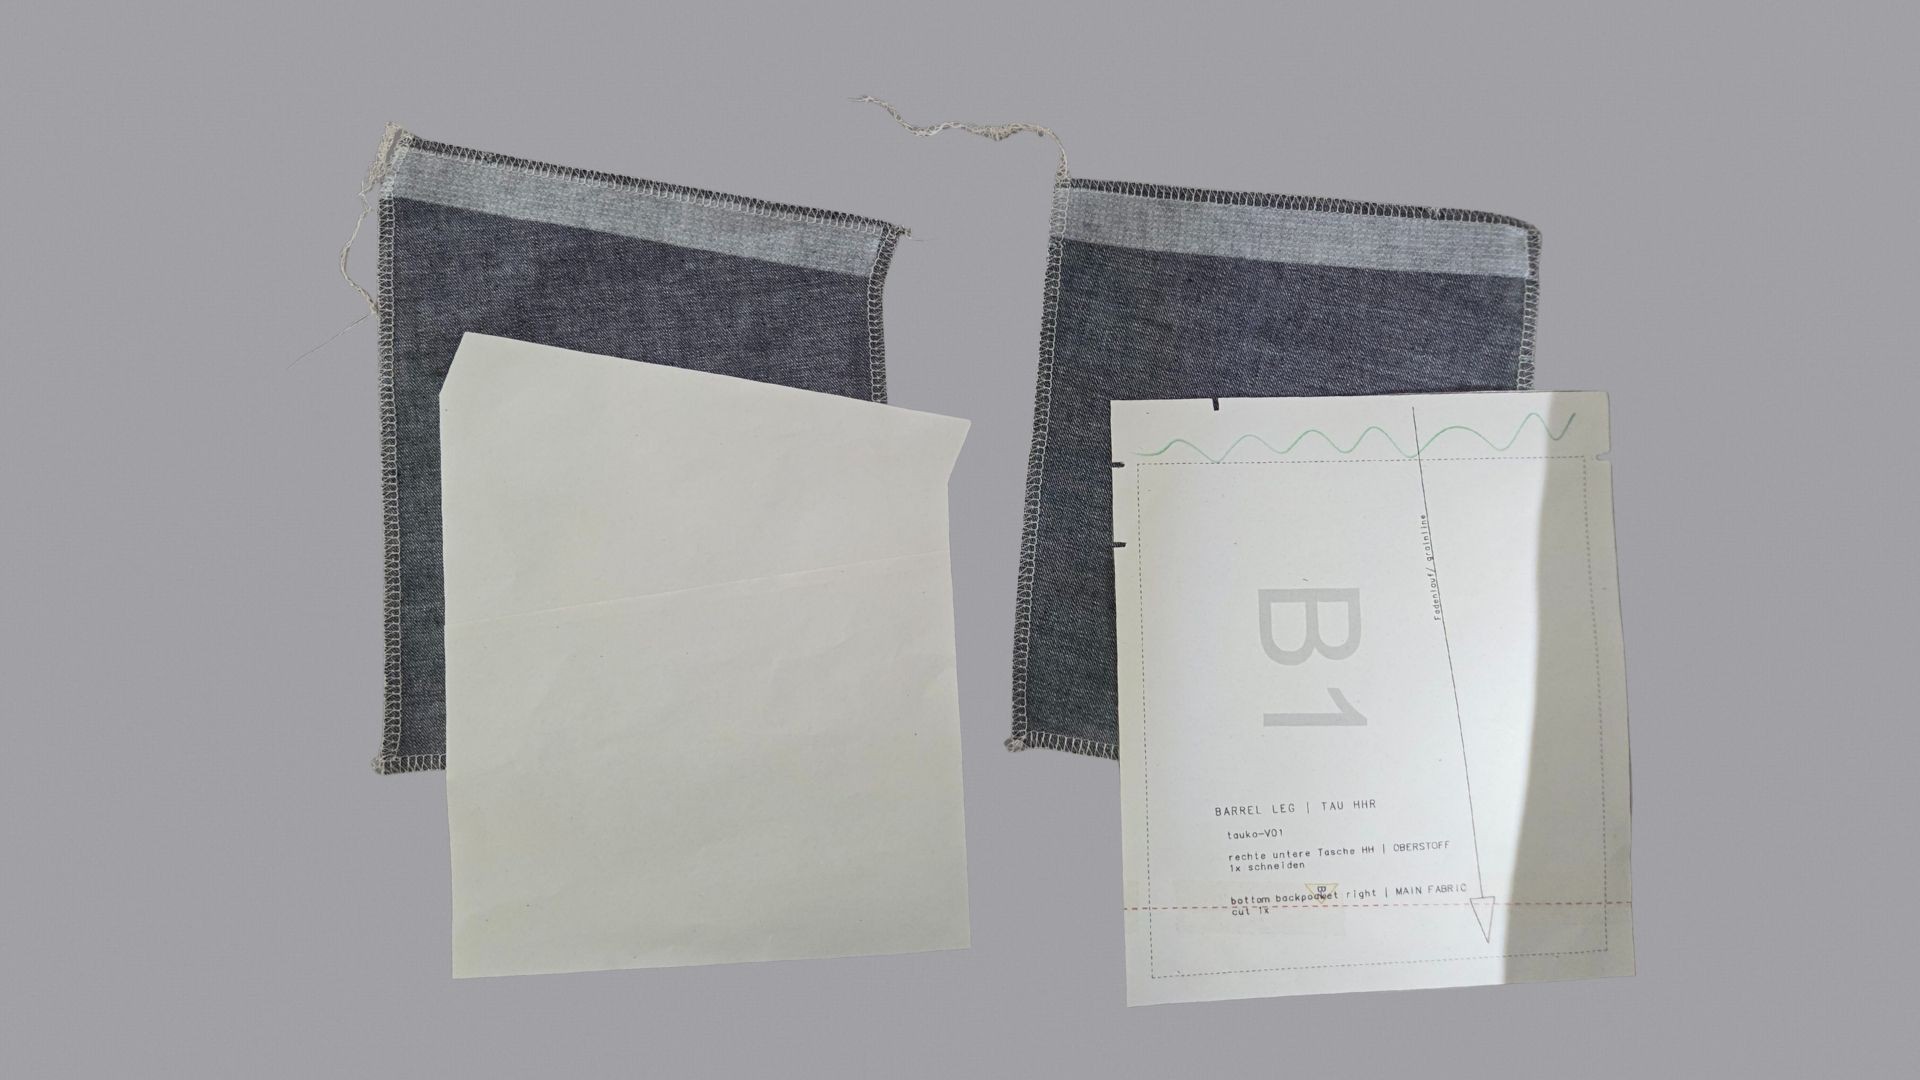
I also iron an interfacing strip onto the upper edges of the back pockets – here on the lower pocket that goes on the right trouser leg…
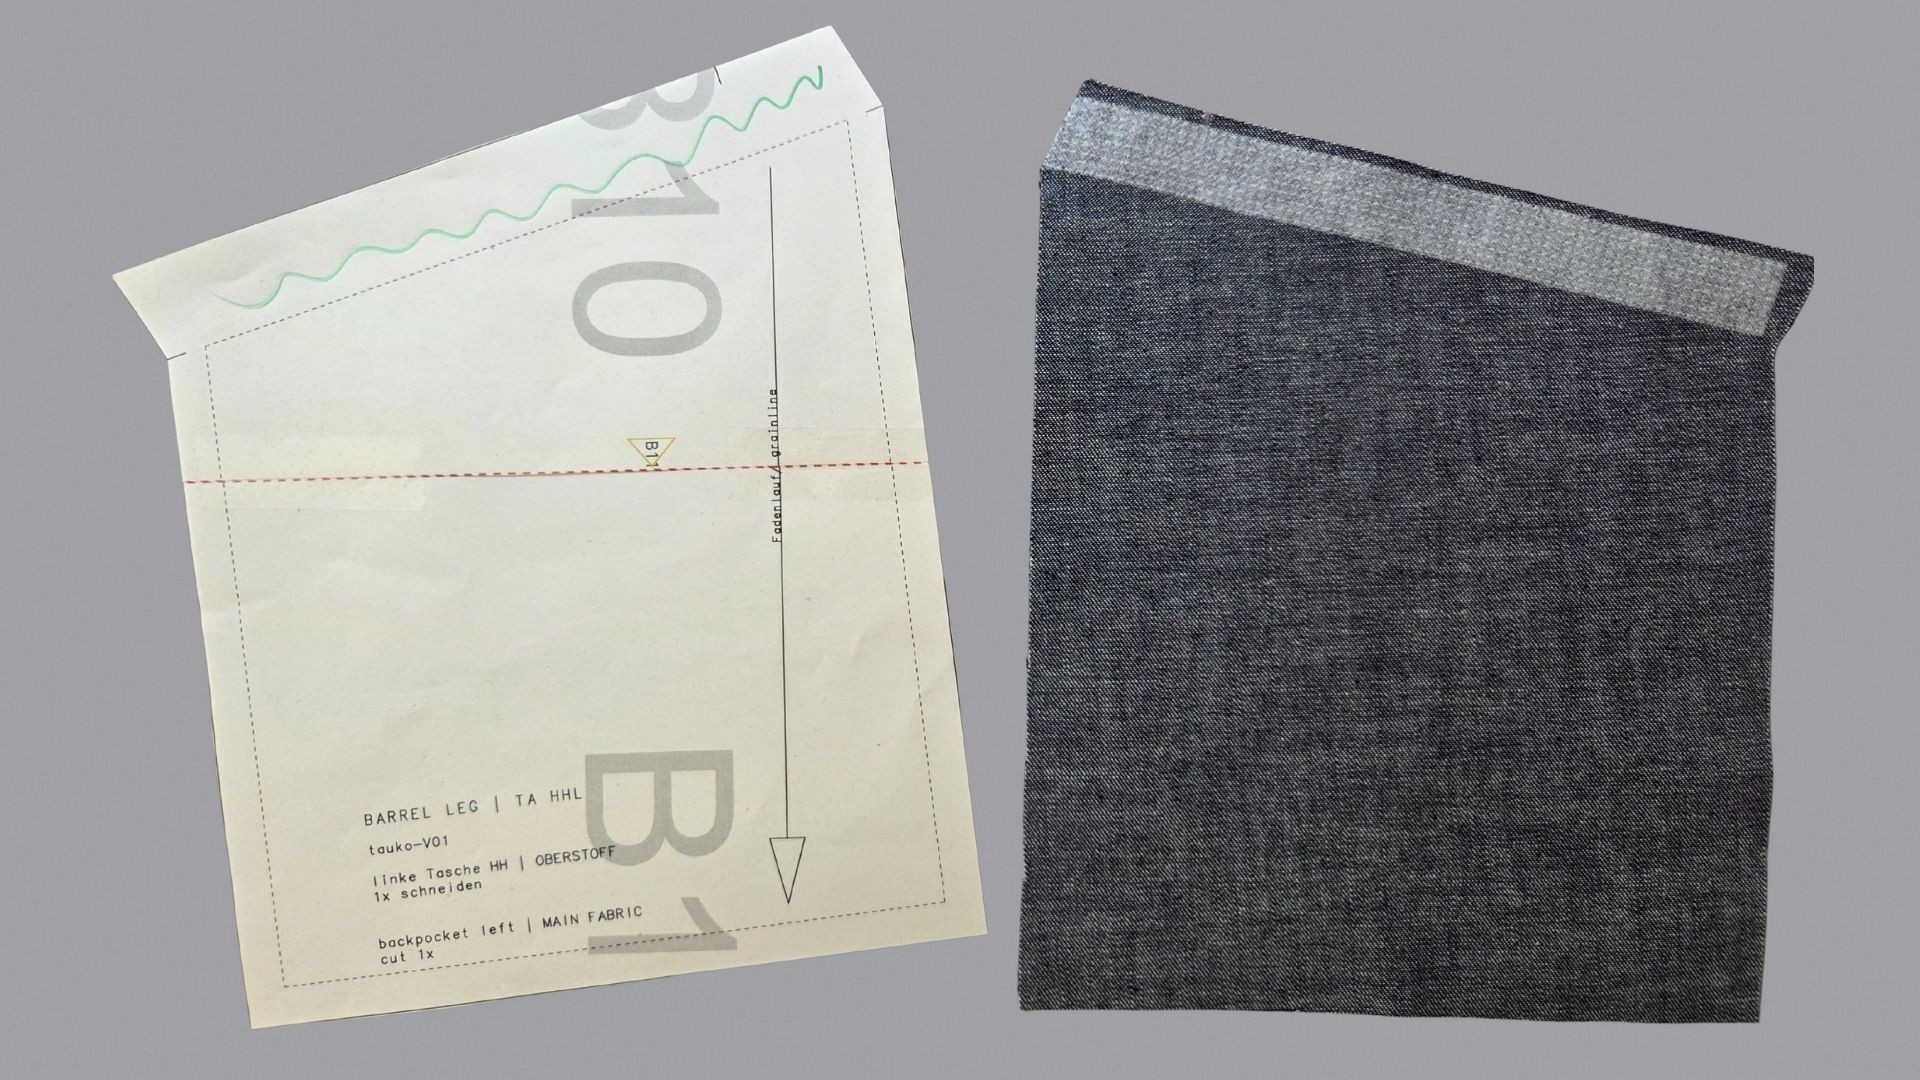
… and here with the pocket for the left trouser leg.
For the back pocket with flap, the upper part of the flap can be reinforced in addition to the upper opening edge. You can see this in more detail a little further down.
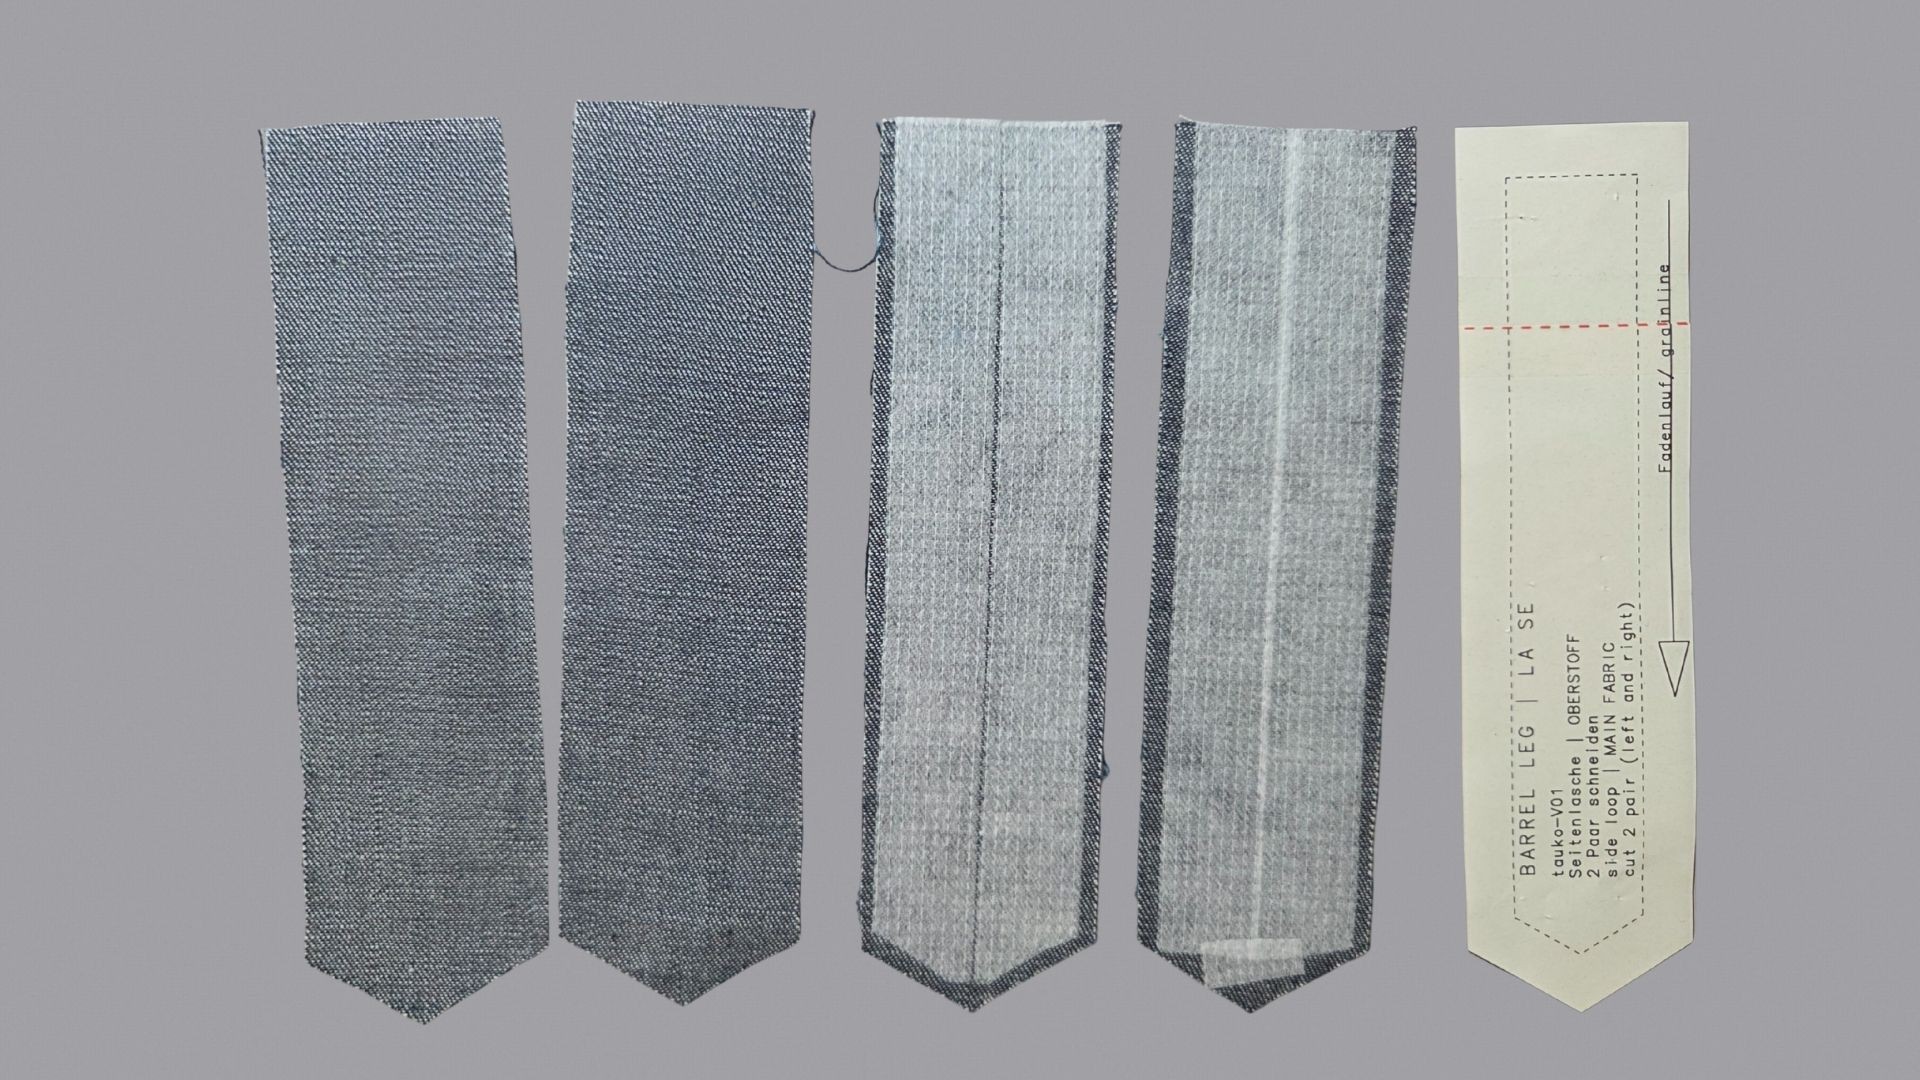
Two of the four tabs are reinforced with interfacing.
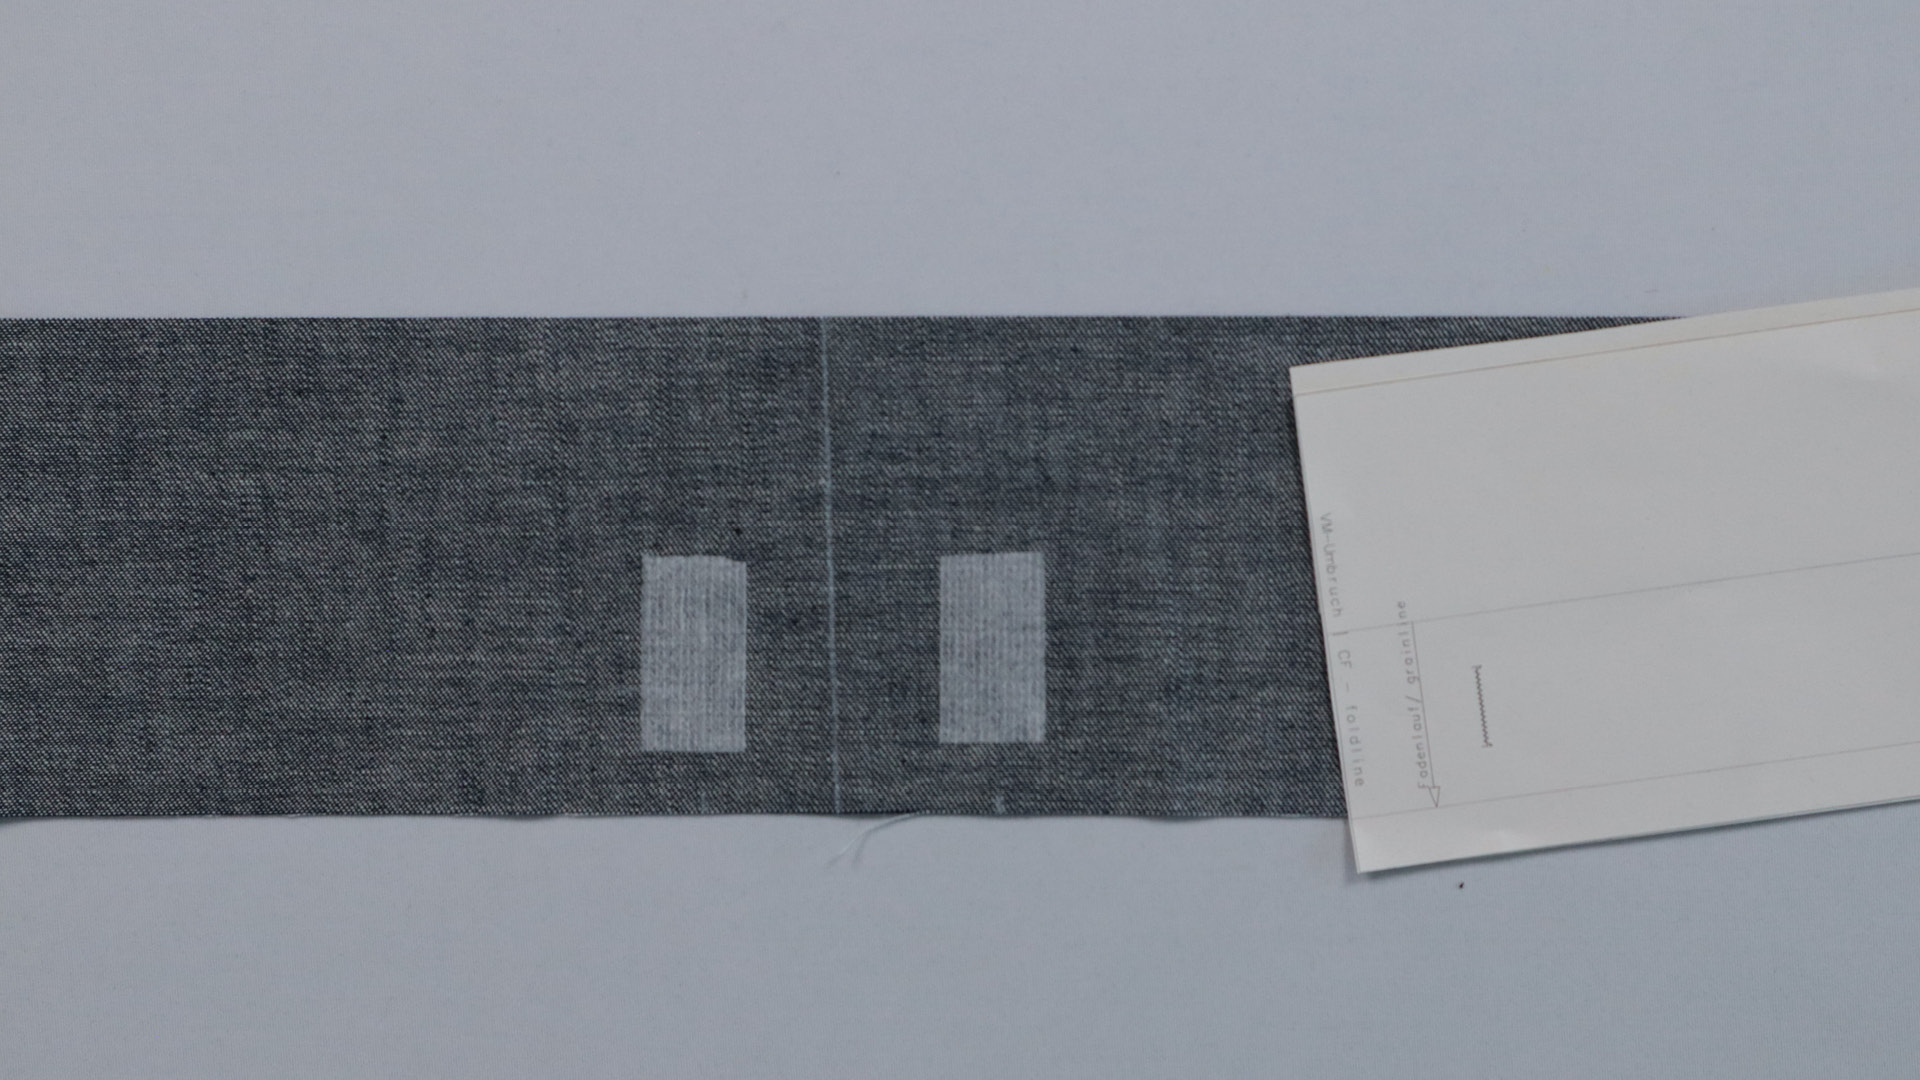
The areas on the waistband where I will later sew buttonholes for the cord are reinforced.
It is best to mark the center front on your waistband strip and then iron the interfacing on both sides with a little distance to the center front (approx. 2 – 3 cm).
The upper edges of the add-on pockets can then be serged.

I finished the top back pocket with flap all the way around. Here you can also see the ironed interfacing in the place that will later be the outer side of the flap.
The other two back pockets can also be finished all the way around.
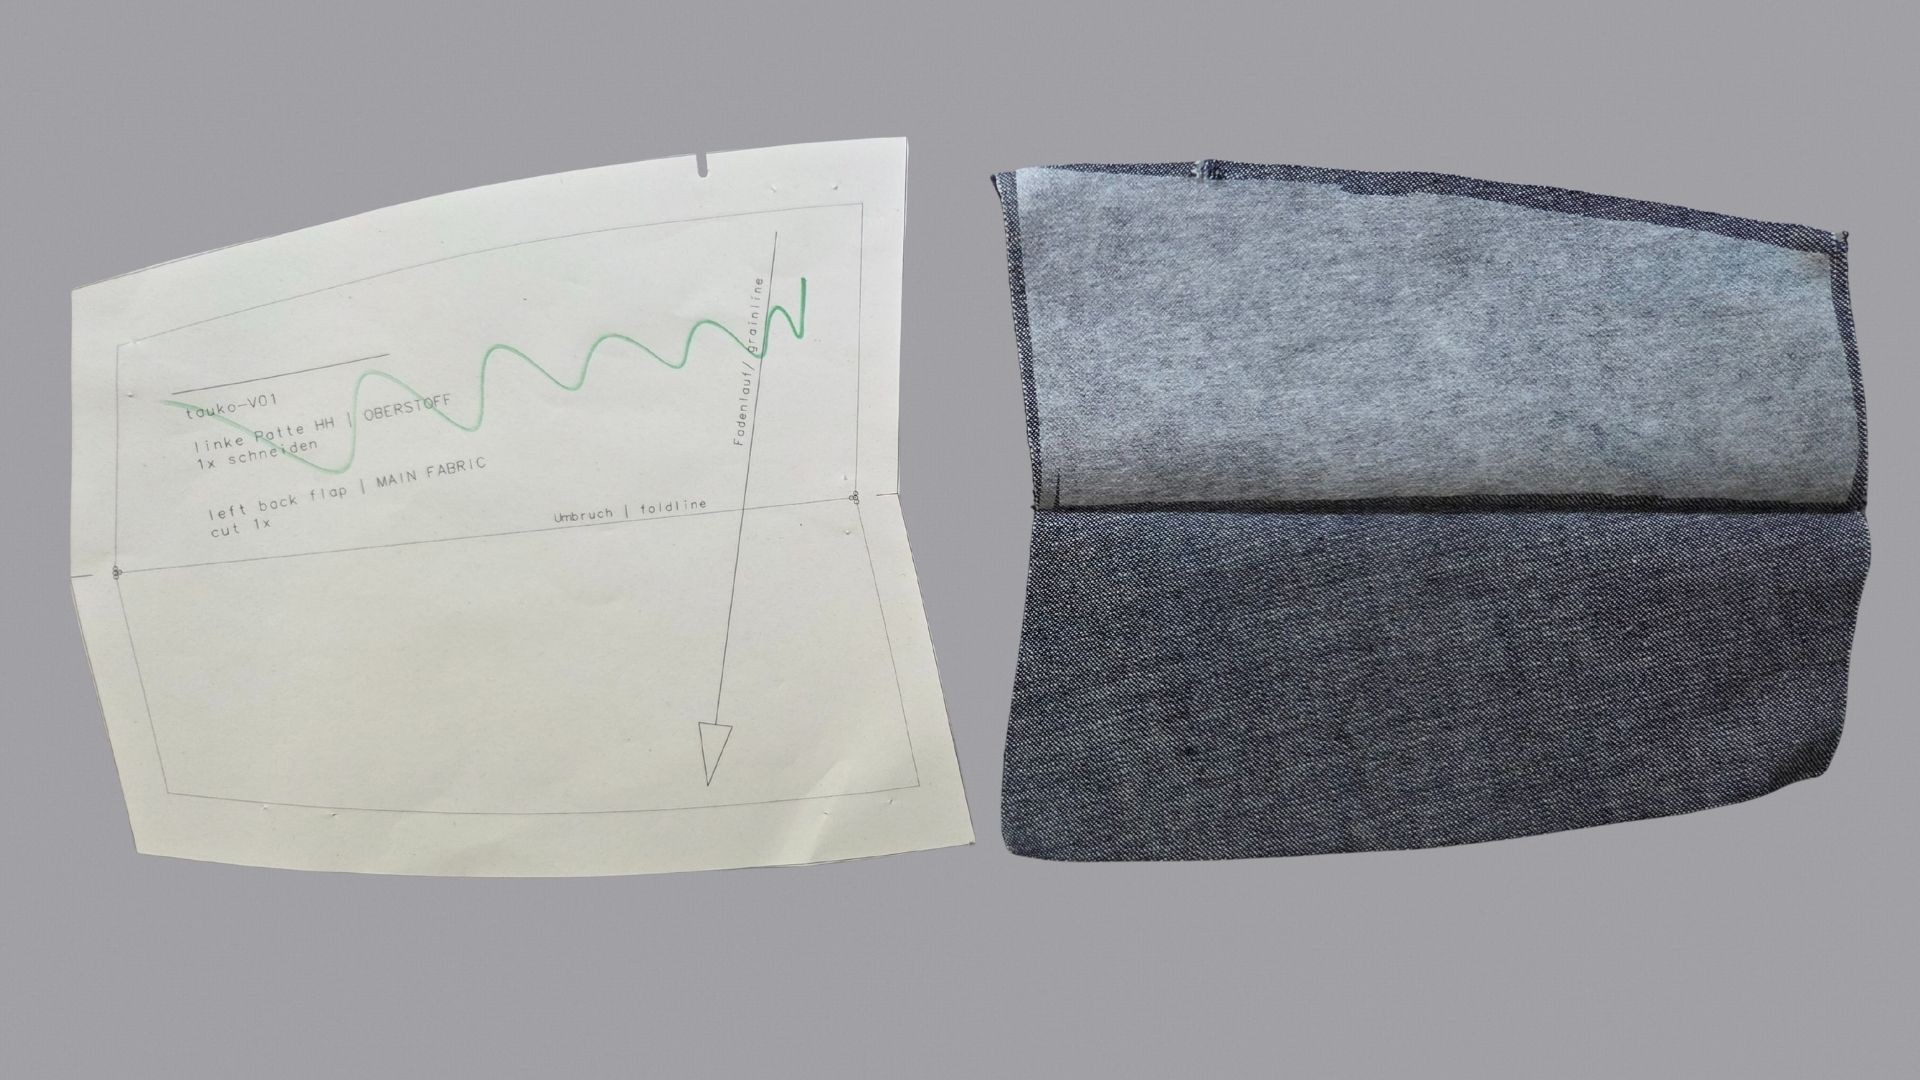
For the flap for the back pocket, I only reinforce the half that will later be on the outside. Depending on the fabric, you can also reinforce the entire flap.
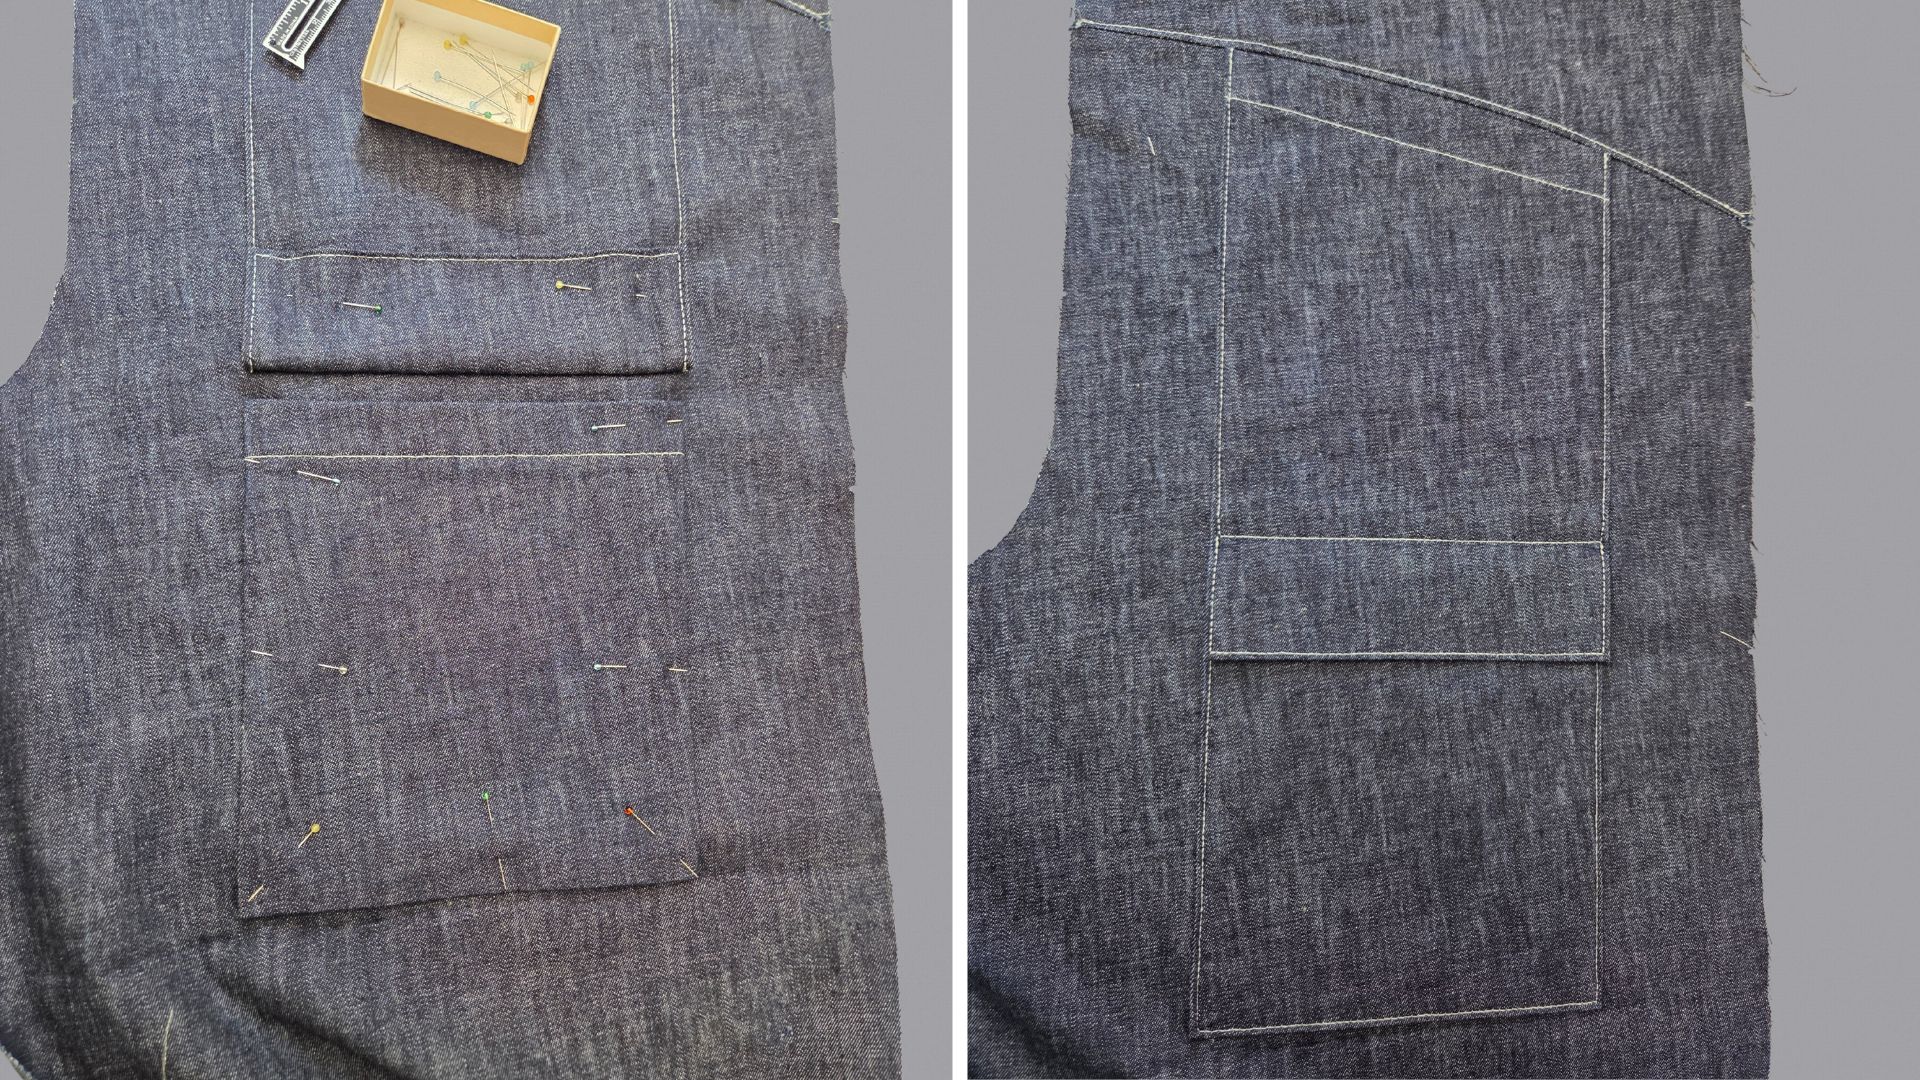
Sew front pockets
The add-on pockets are first turned inwards at the top edge according to the notches, ironed and topstitched 2 cm from the edge. Then I pin them to the front pockets and sew them in place all around within the seam allowances.
I had inadvertently serged the pocket opening beforehand – but this is better done in the next step for both layers of fabric at the same time.
Here, both add-on pockets are sewn on and the pocket openings are serged.
The pocket openings are now also pressed inwards at the notches and topstitched 2 cm from the edge.
Then the inner and lower sides of the pocket bags are serged. The outer edge is finished together with the front trousers.
If you like, you can divide the smaller add-on pocket again with a seam. Then press the side and bottom seam allowances inwards, pin the pockets to the front pants and sew them in place. Pay attention to the markings in the pattern.
This is what the sewn-on front pockets look like.
Now you can finish the inner and outer leg seams.
Cargo pockets at the front
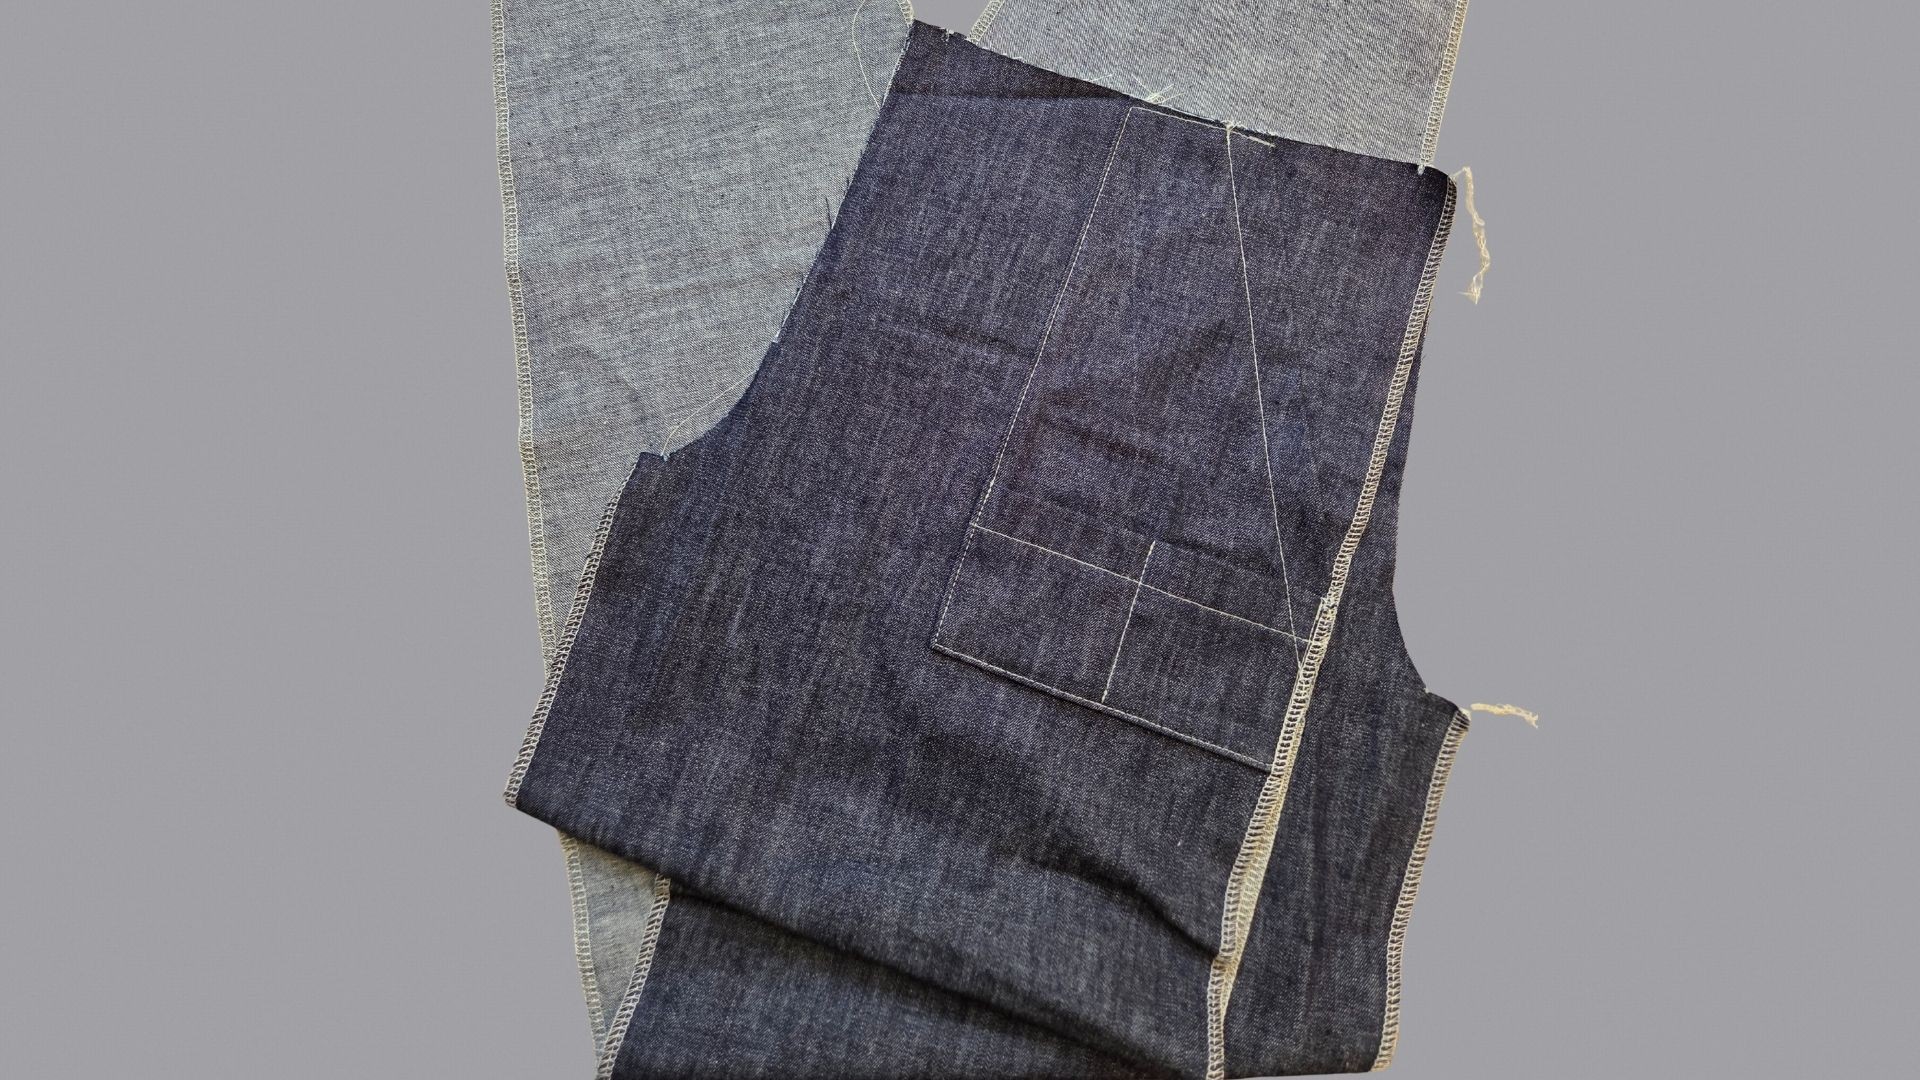
I also sewed the cargo pockets with add-on pockets, but I can only really recommend this for very thin fabrics. Otherwise it will be difficult to finish them neatly, especially at the bottom corners, and as you can see in the next picture, they don’t lie properly flat.
At the top left of the picture you can see the front cargo pockets with sewn-on add-on pockets; the pocket openings are turned in and topstitched and the raw edges are finished.
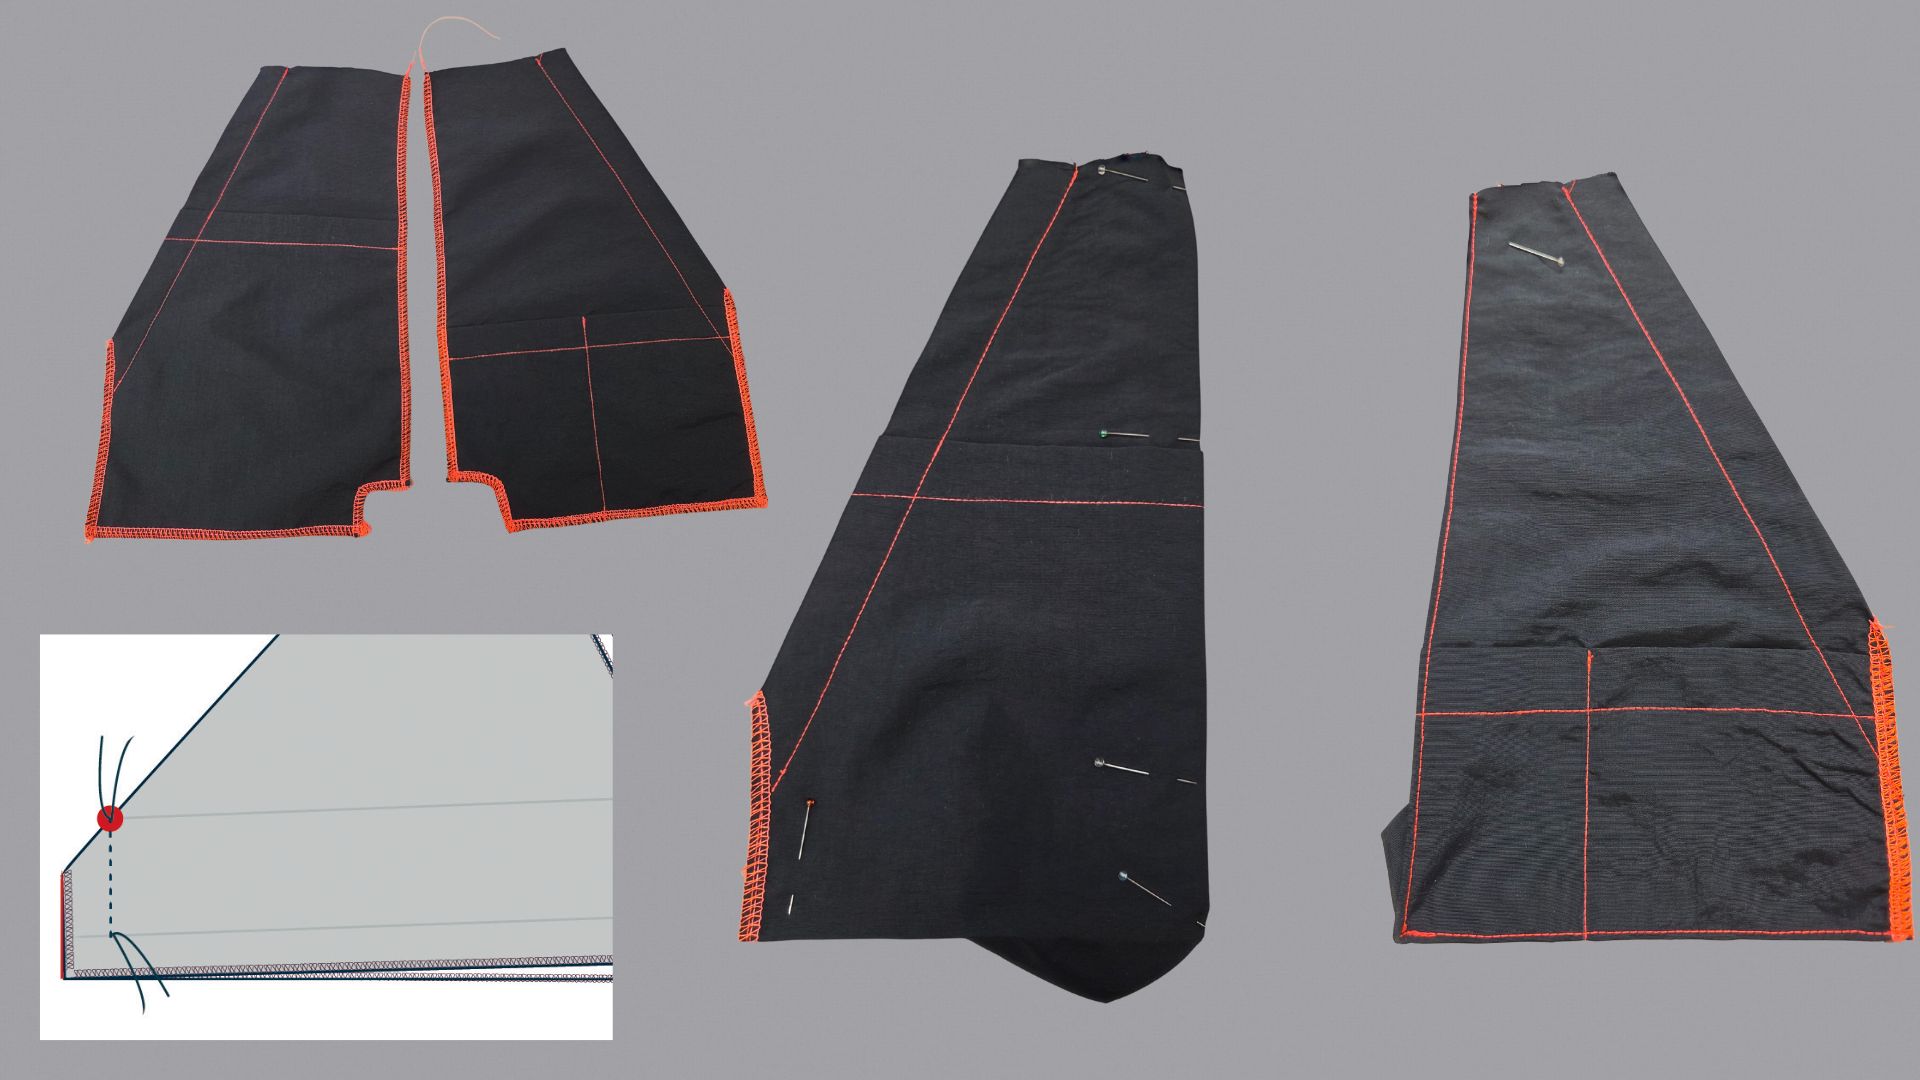
First, I press the 1 cm seam allowances on the long and bottom side inwards. I also fold the other 3 cm, which will later create the volume of the pocket, inwards and press this edge inwards too.
To form the bottom corner, fold the pocket bag diagonally as shown in the sketch at the bottom left of the picture. The long side and the bottom side of the pocket bag are on top of each other. Sew with a 1 cm seam allowance, starting at the top and ending 1 cm before the edges – this will make it easier to sew the pocket on later. Press open the seam allowance of the short seam that has just been sewn.
Then I turn the seam allowance and the 3 cm turn-ins to the inside, pin them and topstitch the long and bottom edges close to the edge. You can leave the needle in the fabric at the corner and then pivot the pocket bag. Before continuing to sew, make sure that the fabric is smooth under the presser foot.
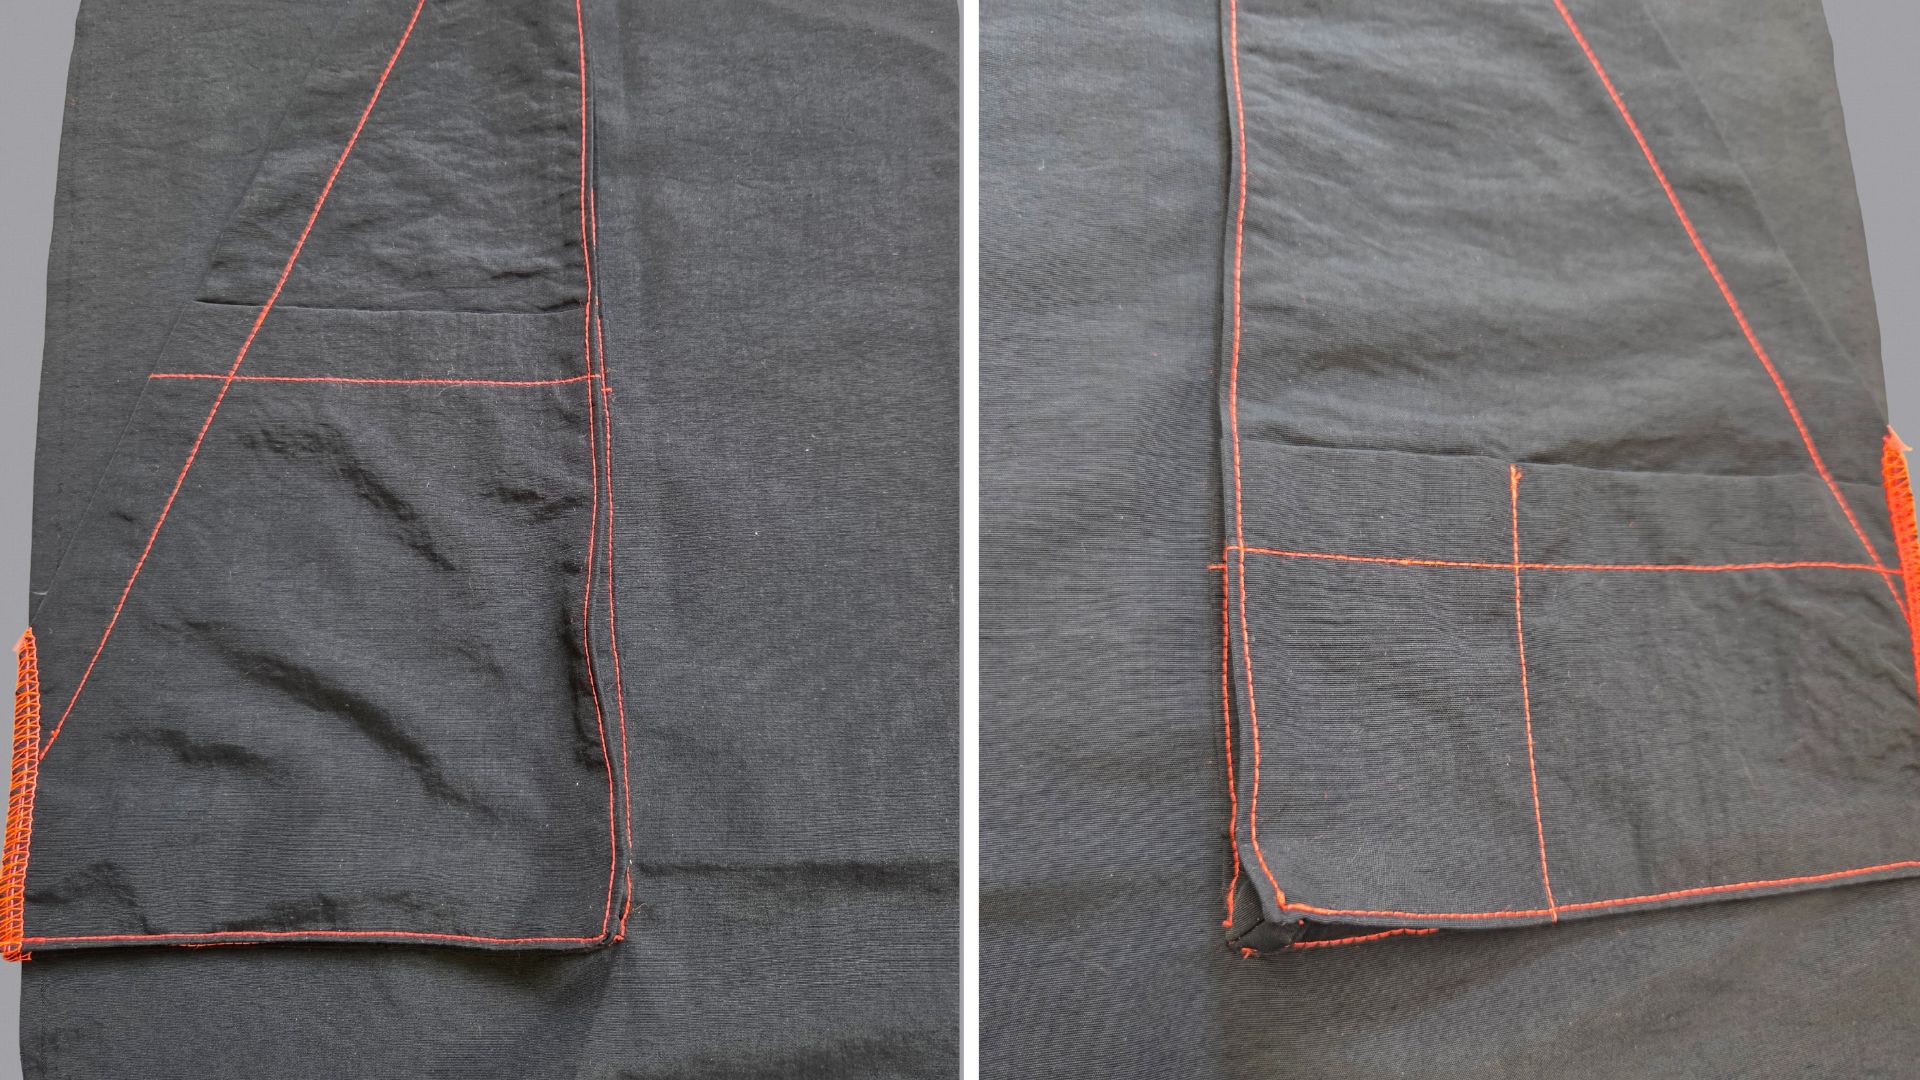
Take a little time to sew the pocket bags onto the front trousers so that you get a nice result.
The pre-pressed edges of the 1 cm wide seam allowance should be as close as possible to the previously sewn, topstitched edge. To make this a little easier, you can first pin the resulting fold, press it briefly and then pin the pockets to the front trousers. Pay attention to the markings in the pattern and then sew the pocket bags onto the trouser parts close to the edge. You can also leave the needle in the fabric at the corner, turn your fabric and then continue sewing.
The pocket bag should be secured with a few stitches inside the seam allowance at the top edge of the trousers, where the waistband will later be sewn, and at the side. This will prevent it from slipping later, especially in the area of the sewn-in pleat.
Sew side panel with pockets and flaps
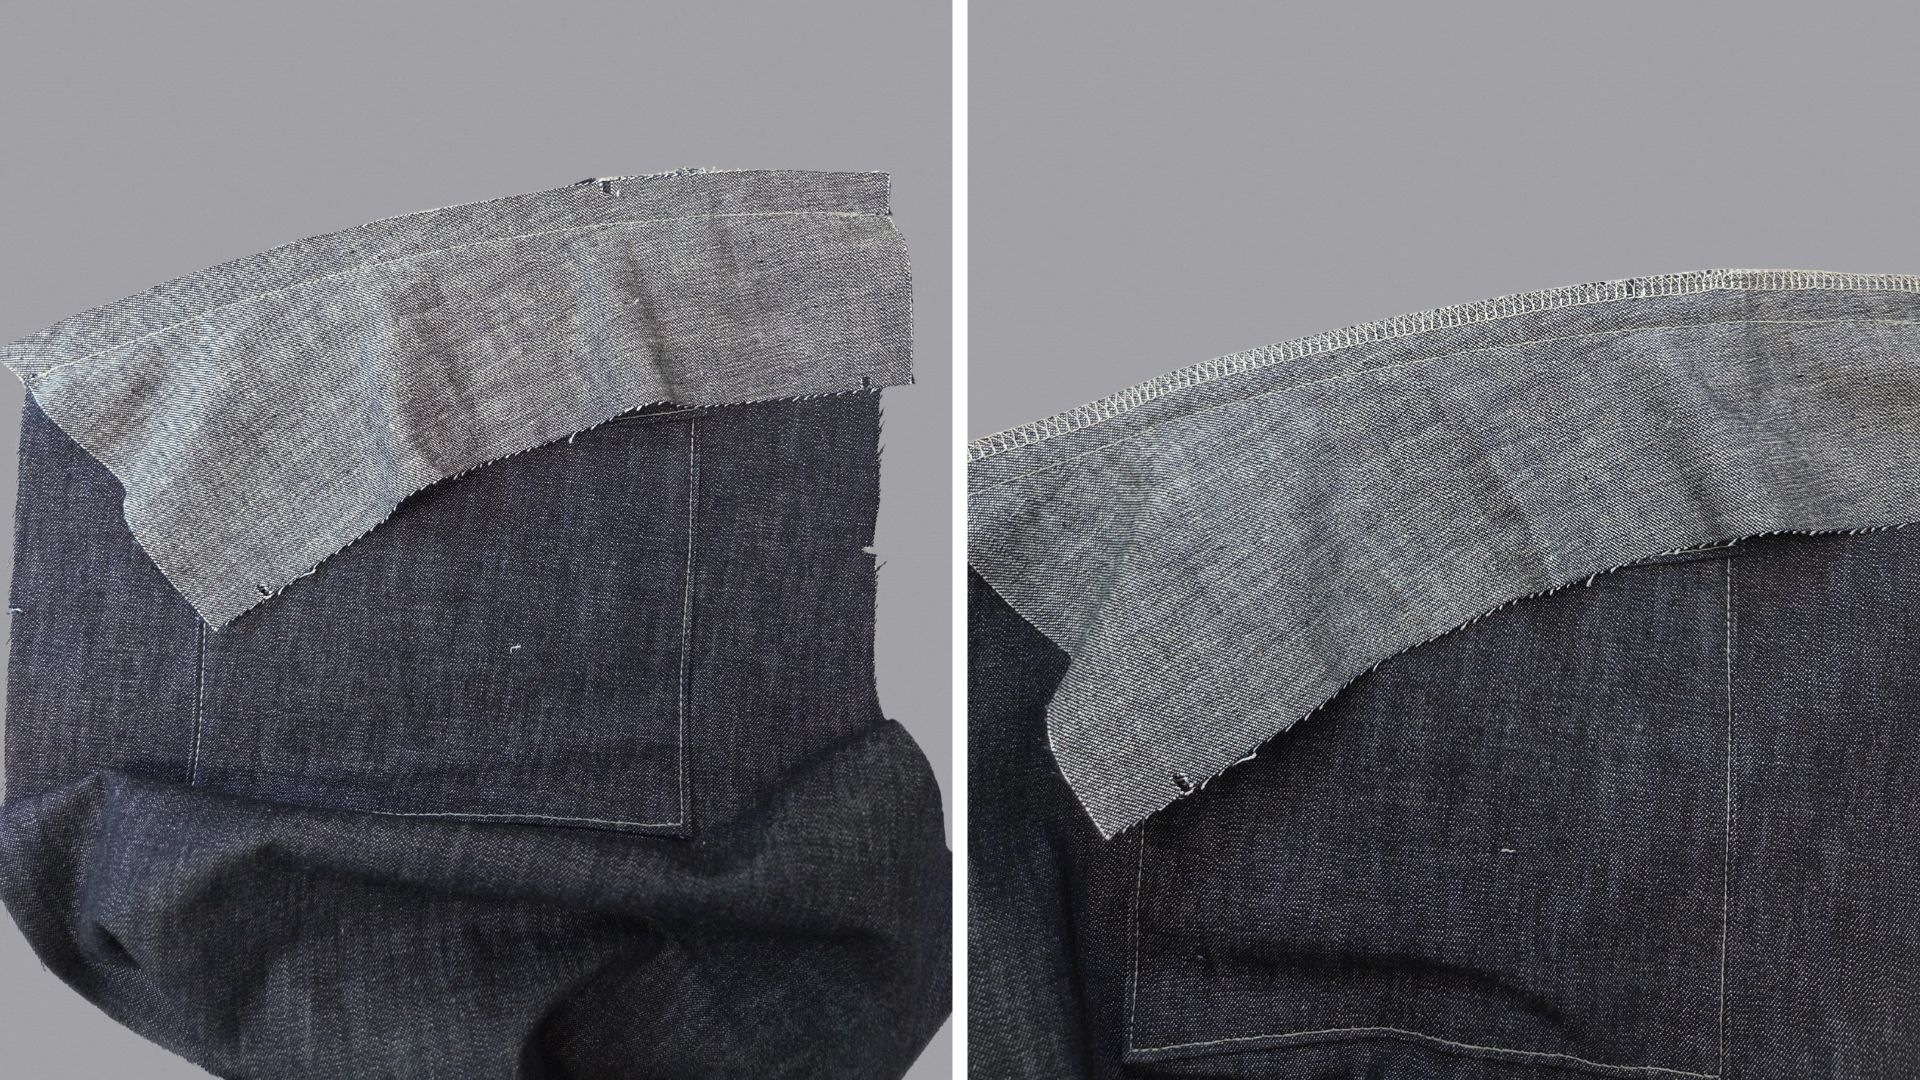
Now I sew the pocket into the side panel. To do this, I first fold the lower side section at the notches to create the pocket. I secure it within the seam allowance so that nothing slips. The fabric protrudes slightly at the upper edge; the upper side section is sewn on there, right sides facing, and the raw edges are finished together.
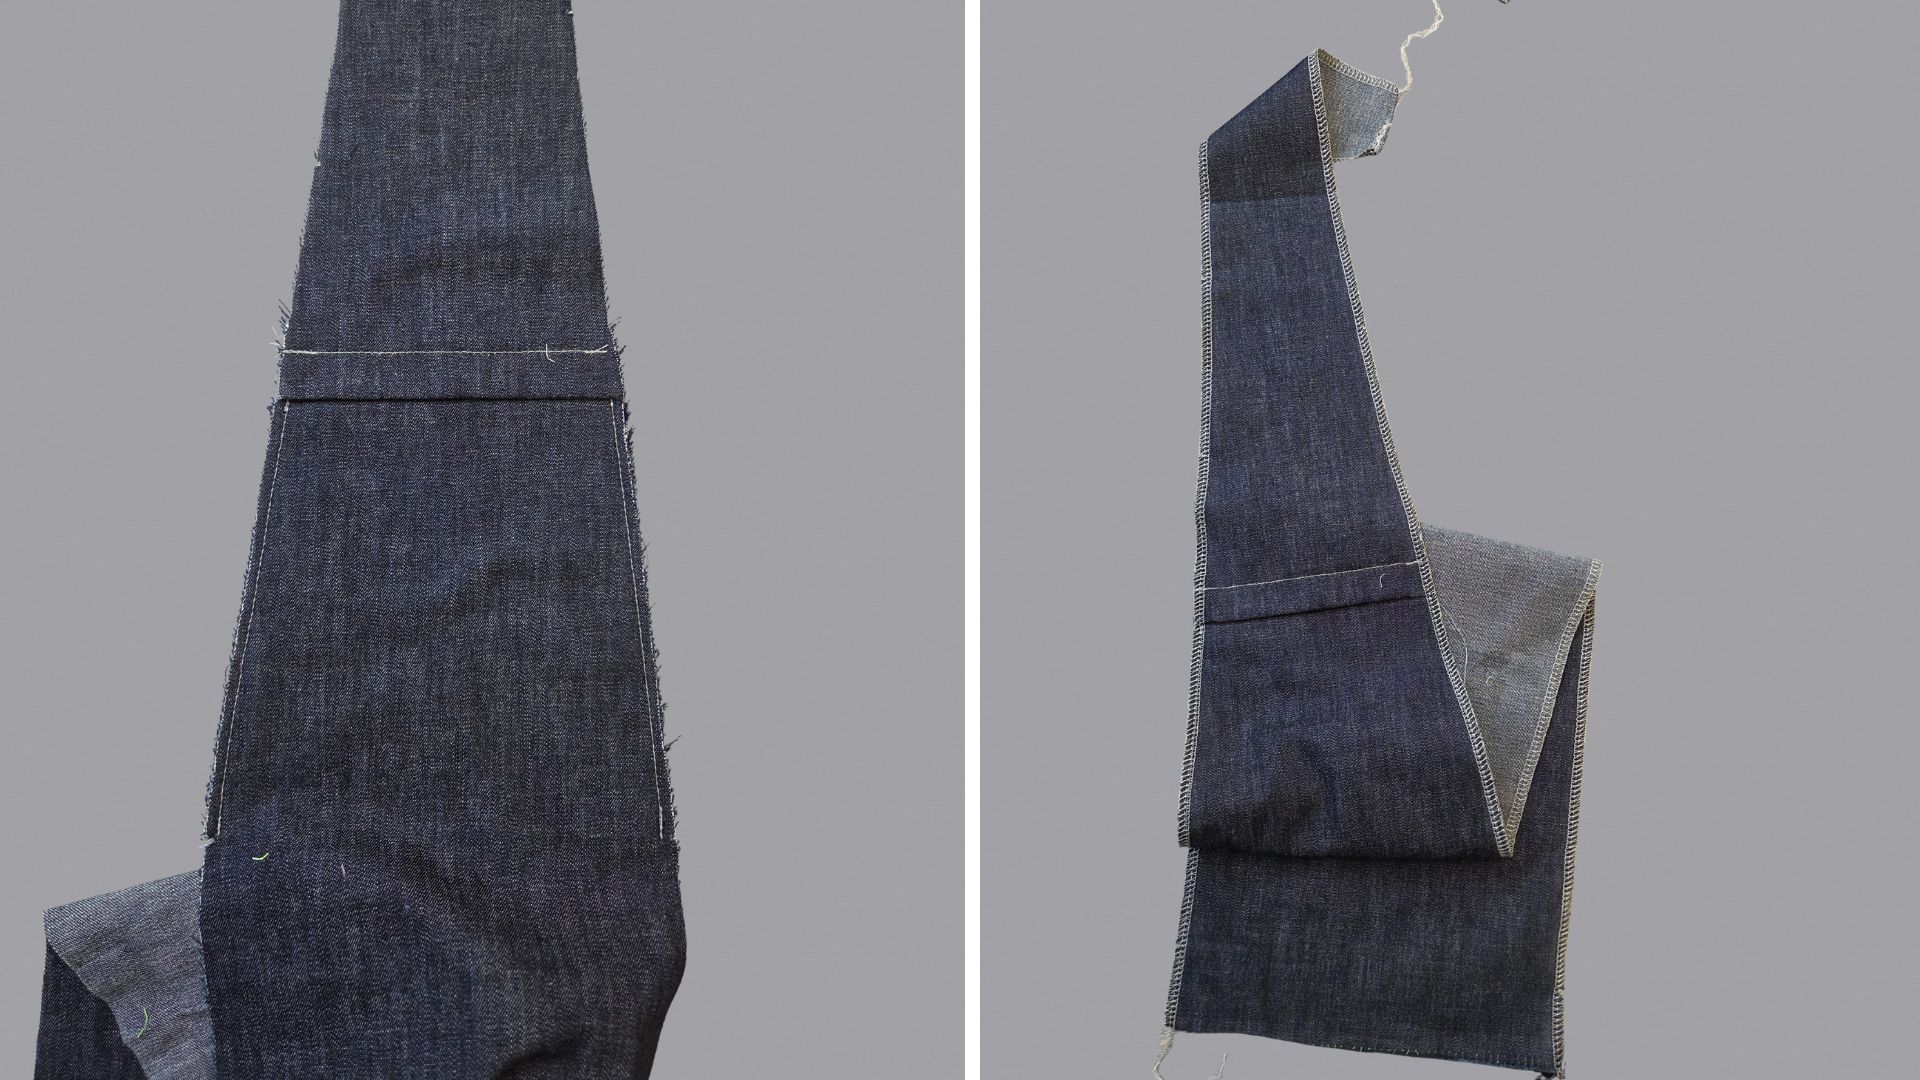
At the snaps on the upper side section, I then fold the side section up again, creating the small flap that covers the pocket opening. I stitch this in place 2 cm from the edge, as shown in the picture above, and then finish the long sides.
Sew the side part of the shorts
For the short version, first fold the lower side section at the notches with wrong sides together. You can sew it within the seam allowance or, as I have done here, pin it in place. Pin the top side piece to the top edge of the pocket with the bottom edge right sides together, sew in place and finish both pieces together.
The upper side piece is folded upwards at the notches and the small flap is topstitched 2 cm from the edge. Then the long sides are finished. I also finish the sides and hem of the front pants. If you are sewing the side part without a pocket, only the long sides are finished.
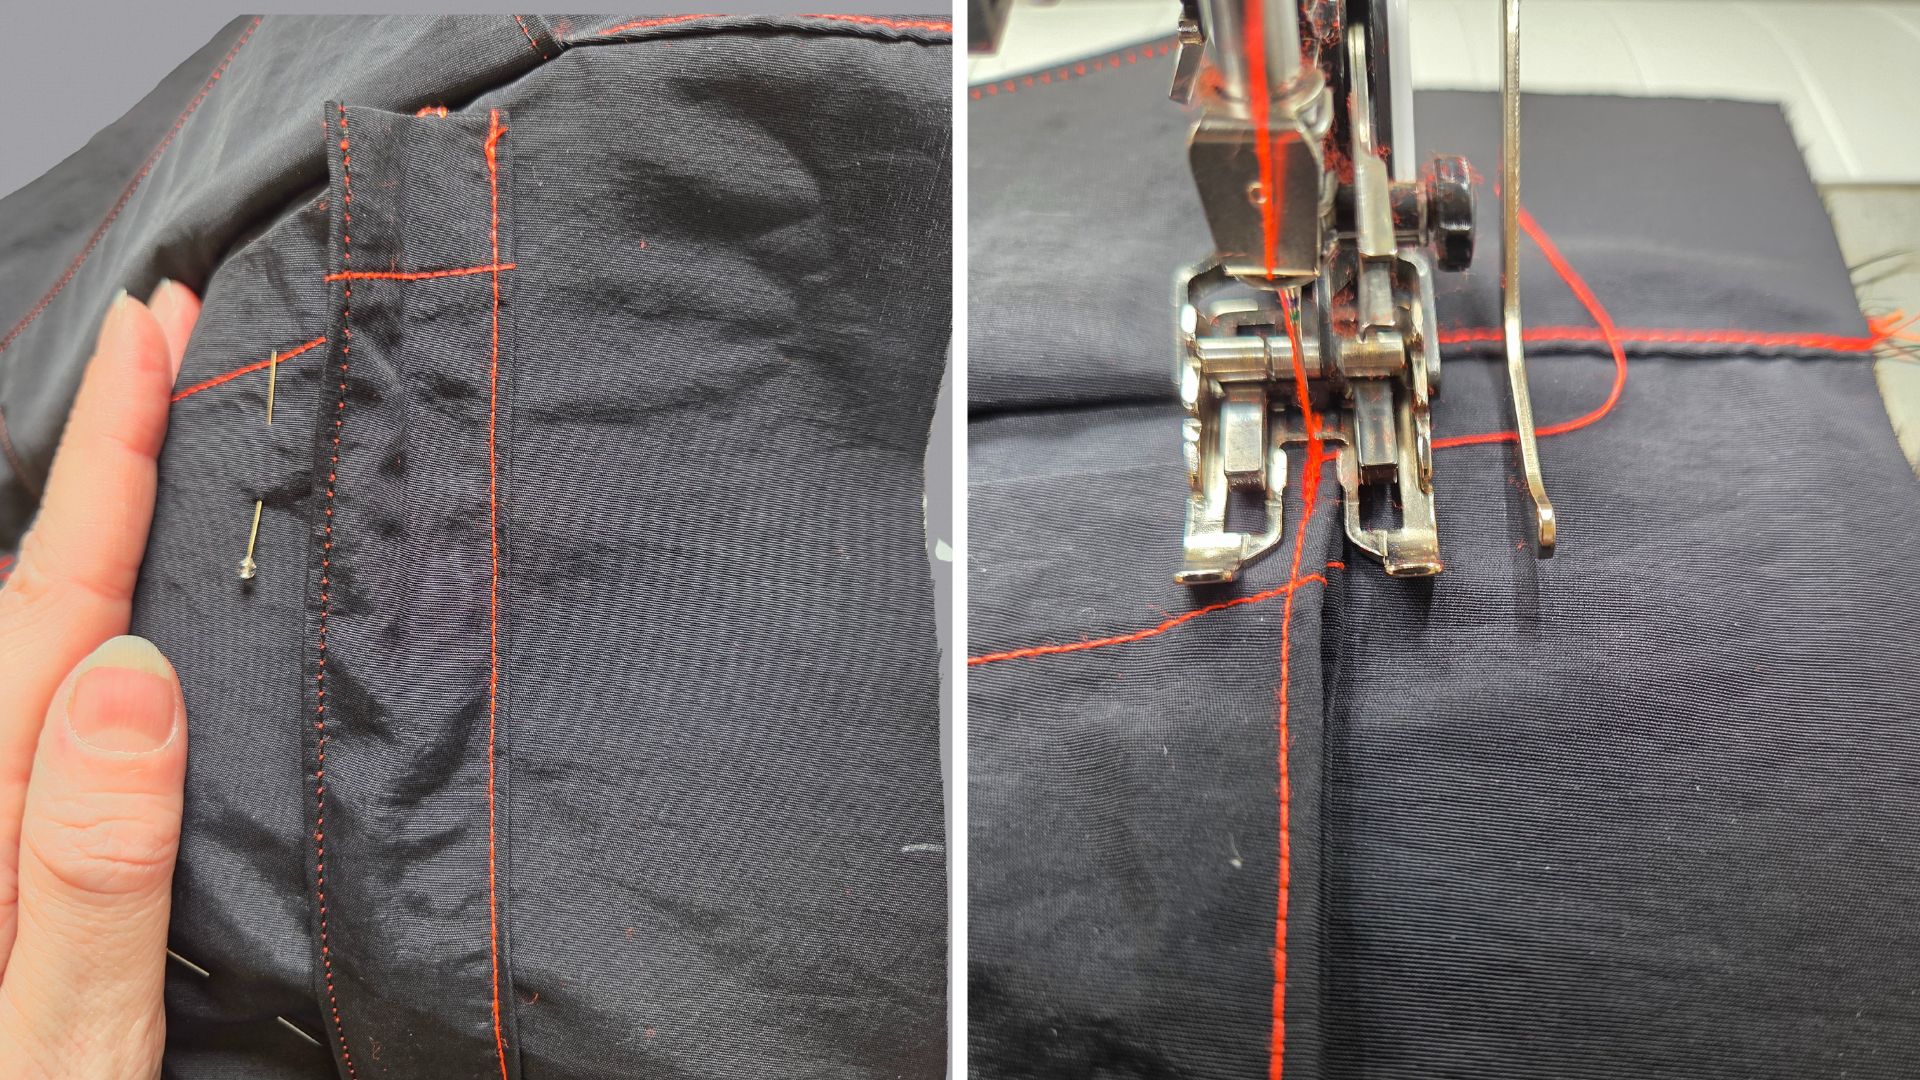
Sew tabs
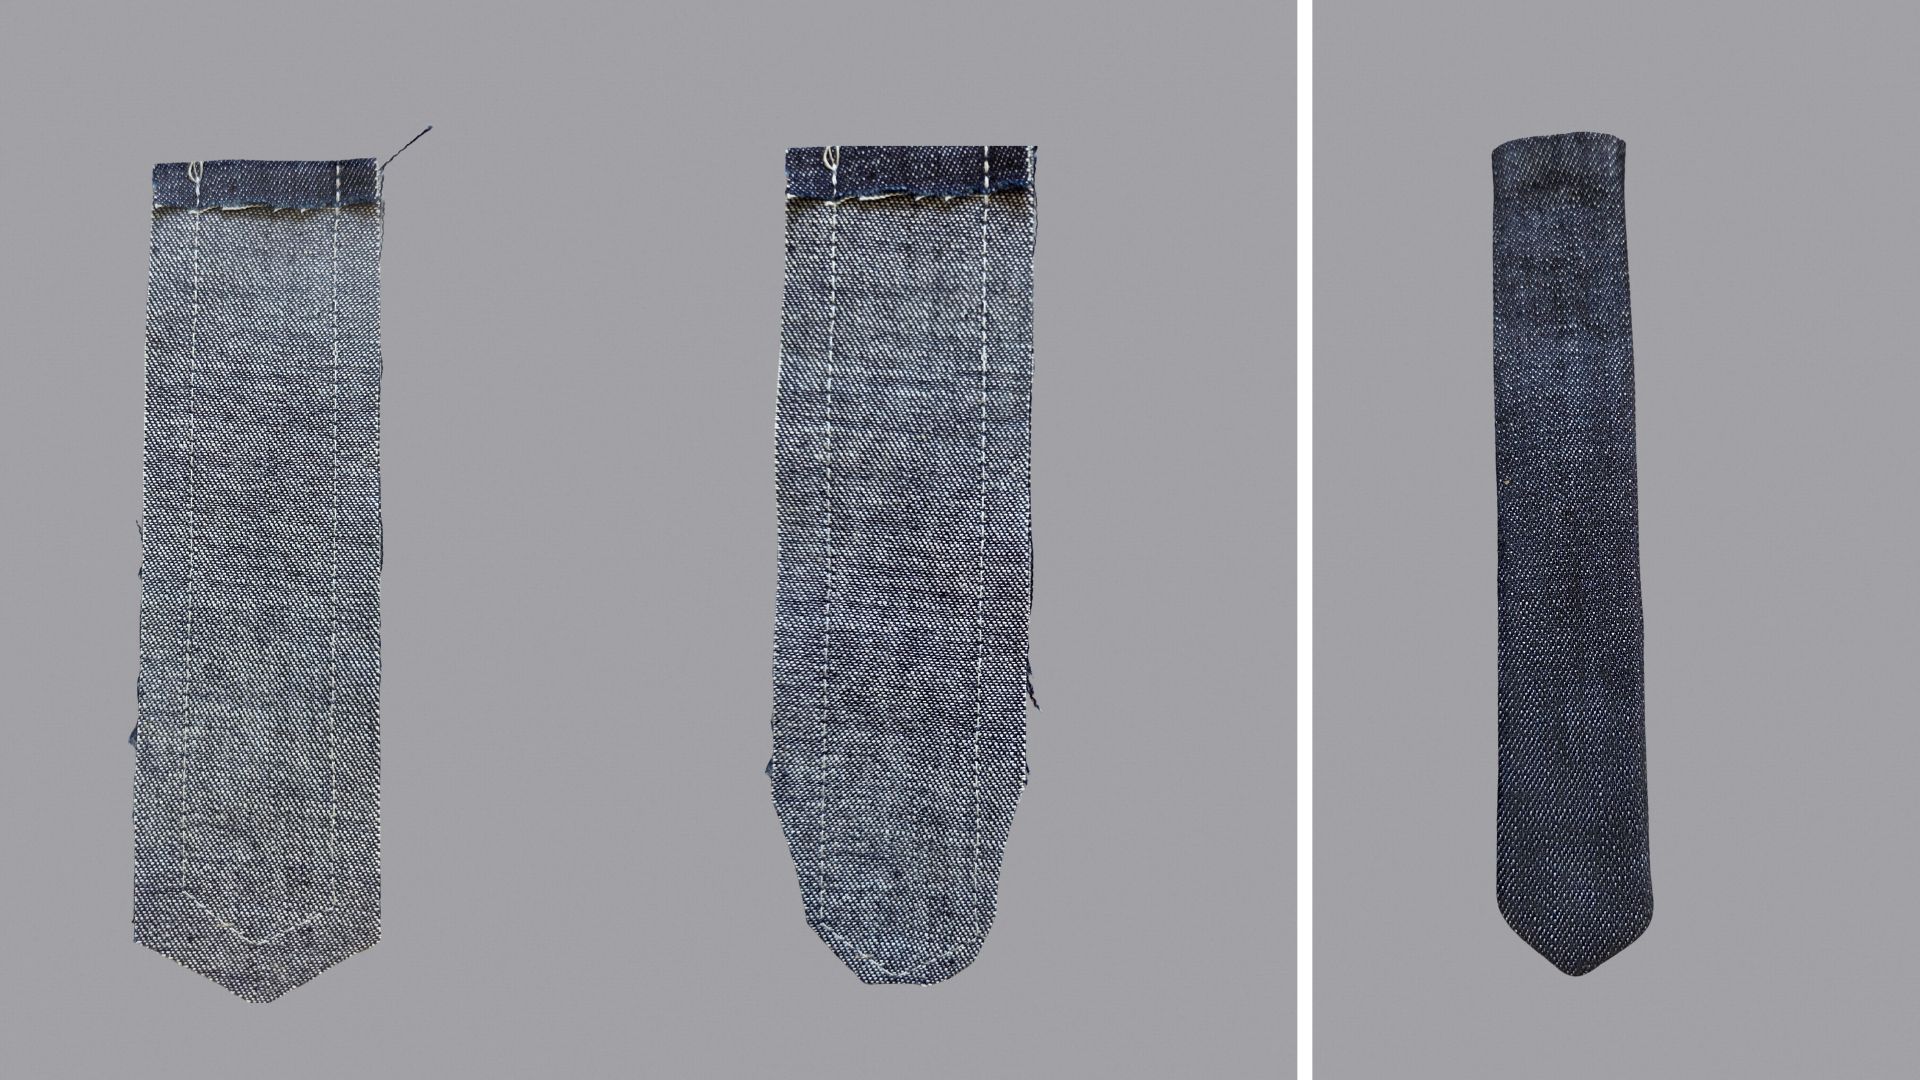
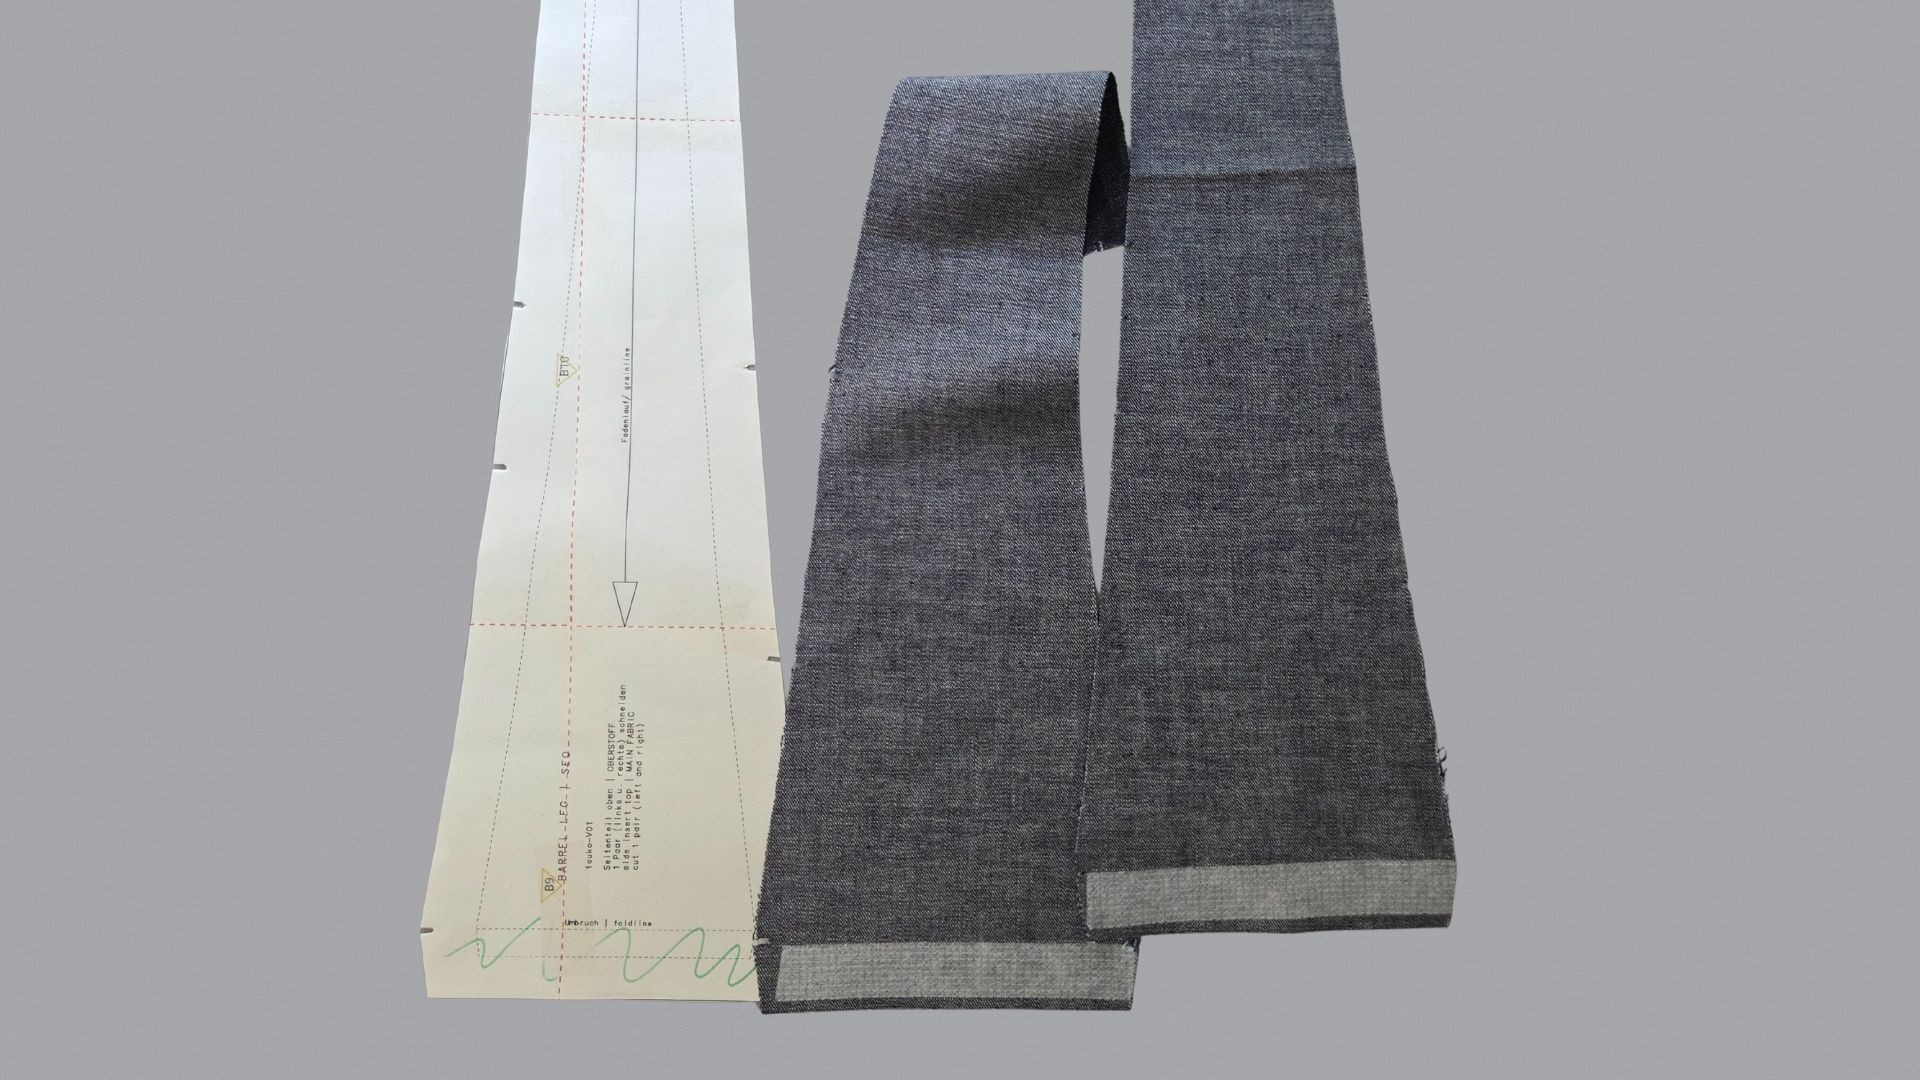
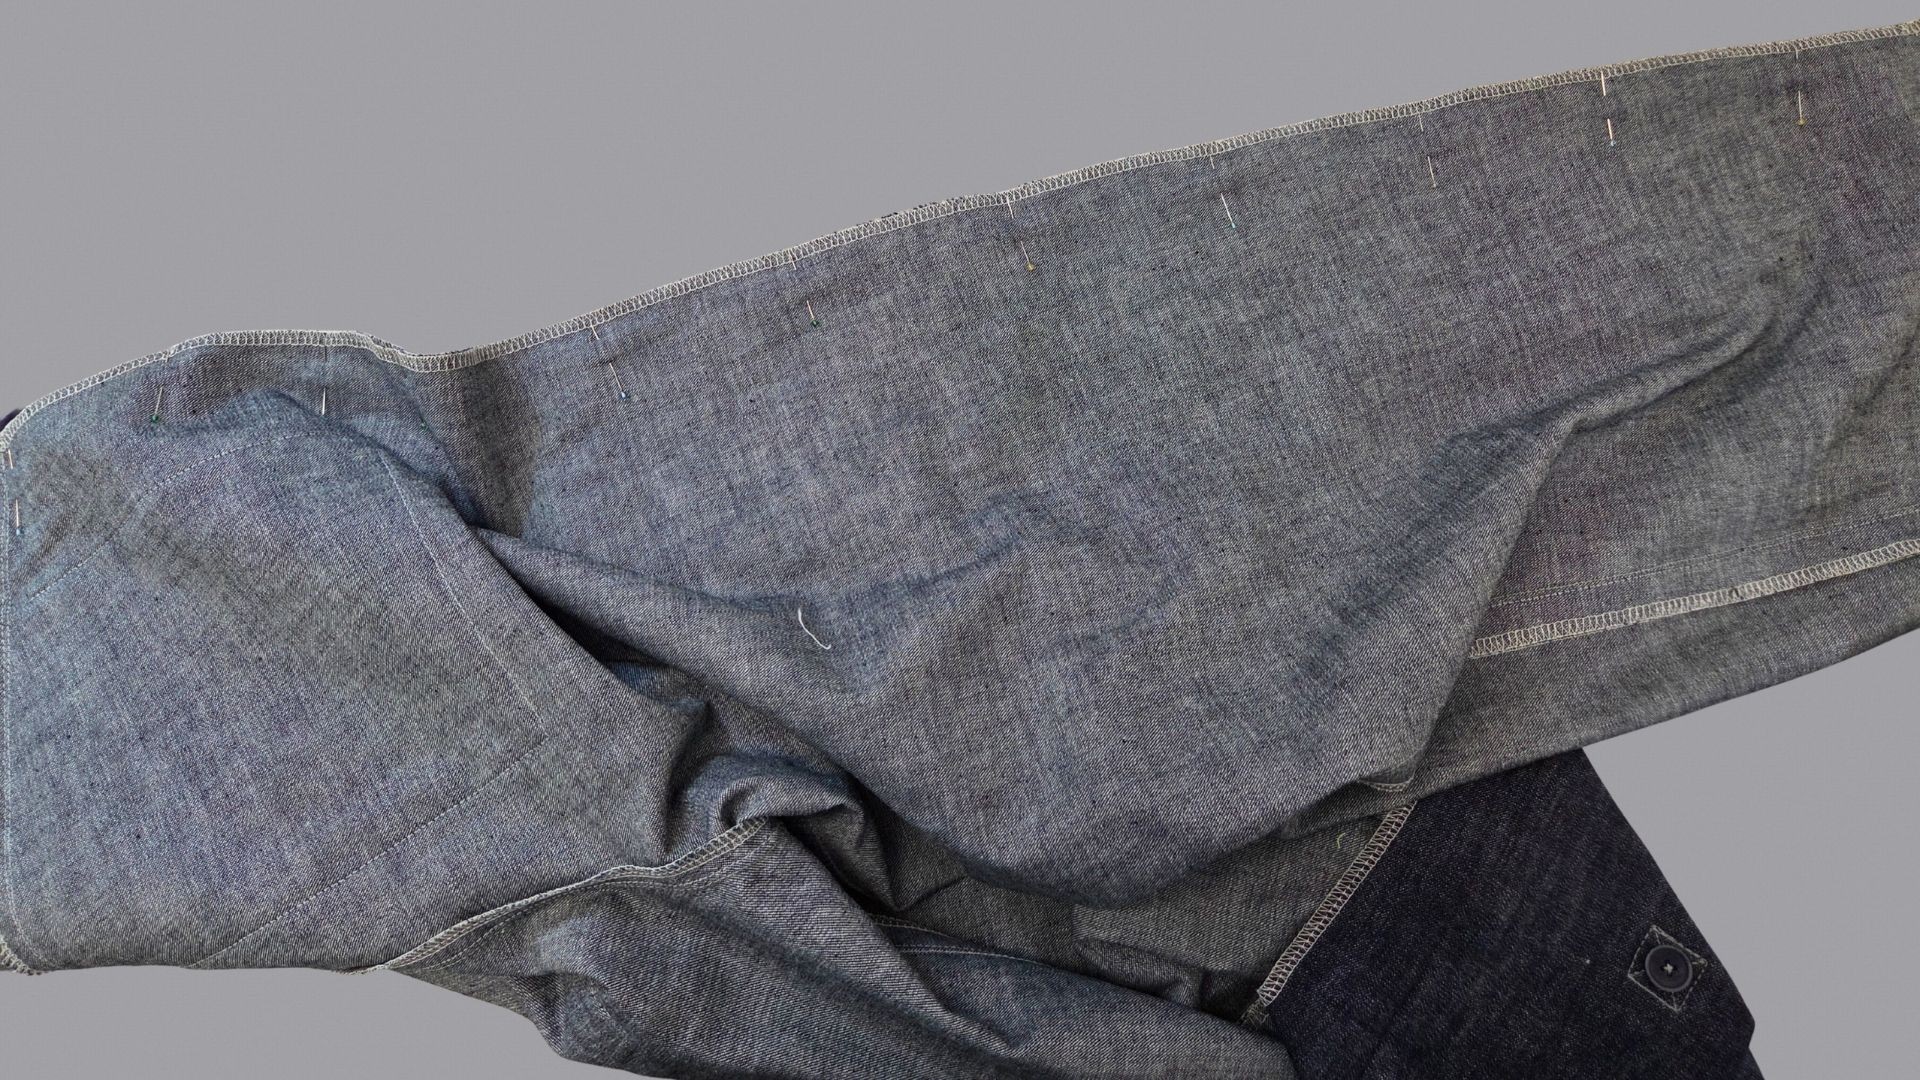
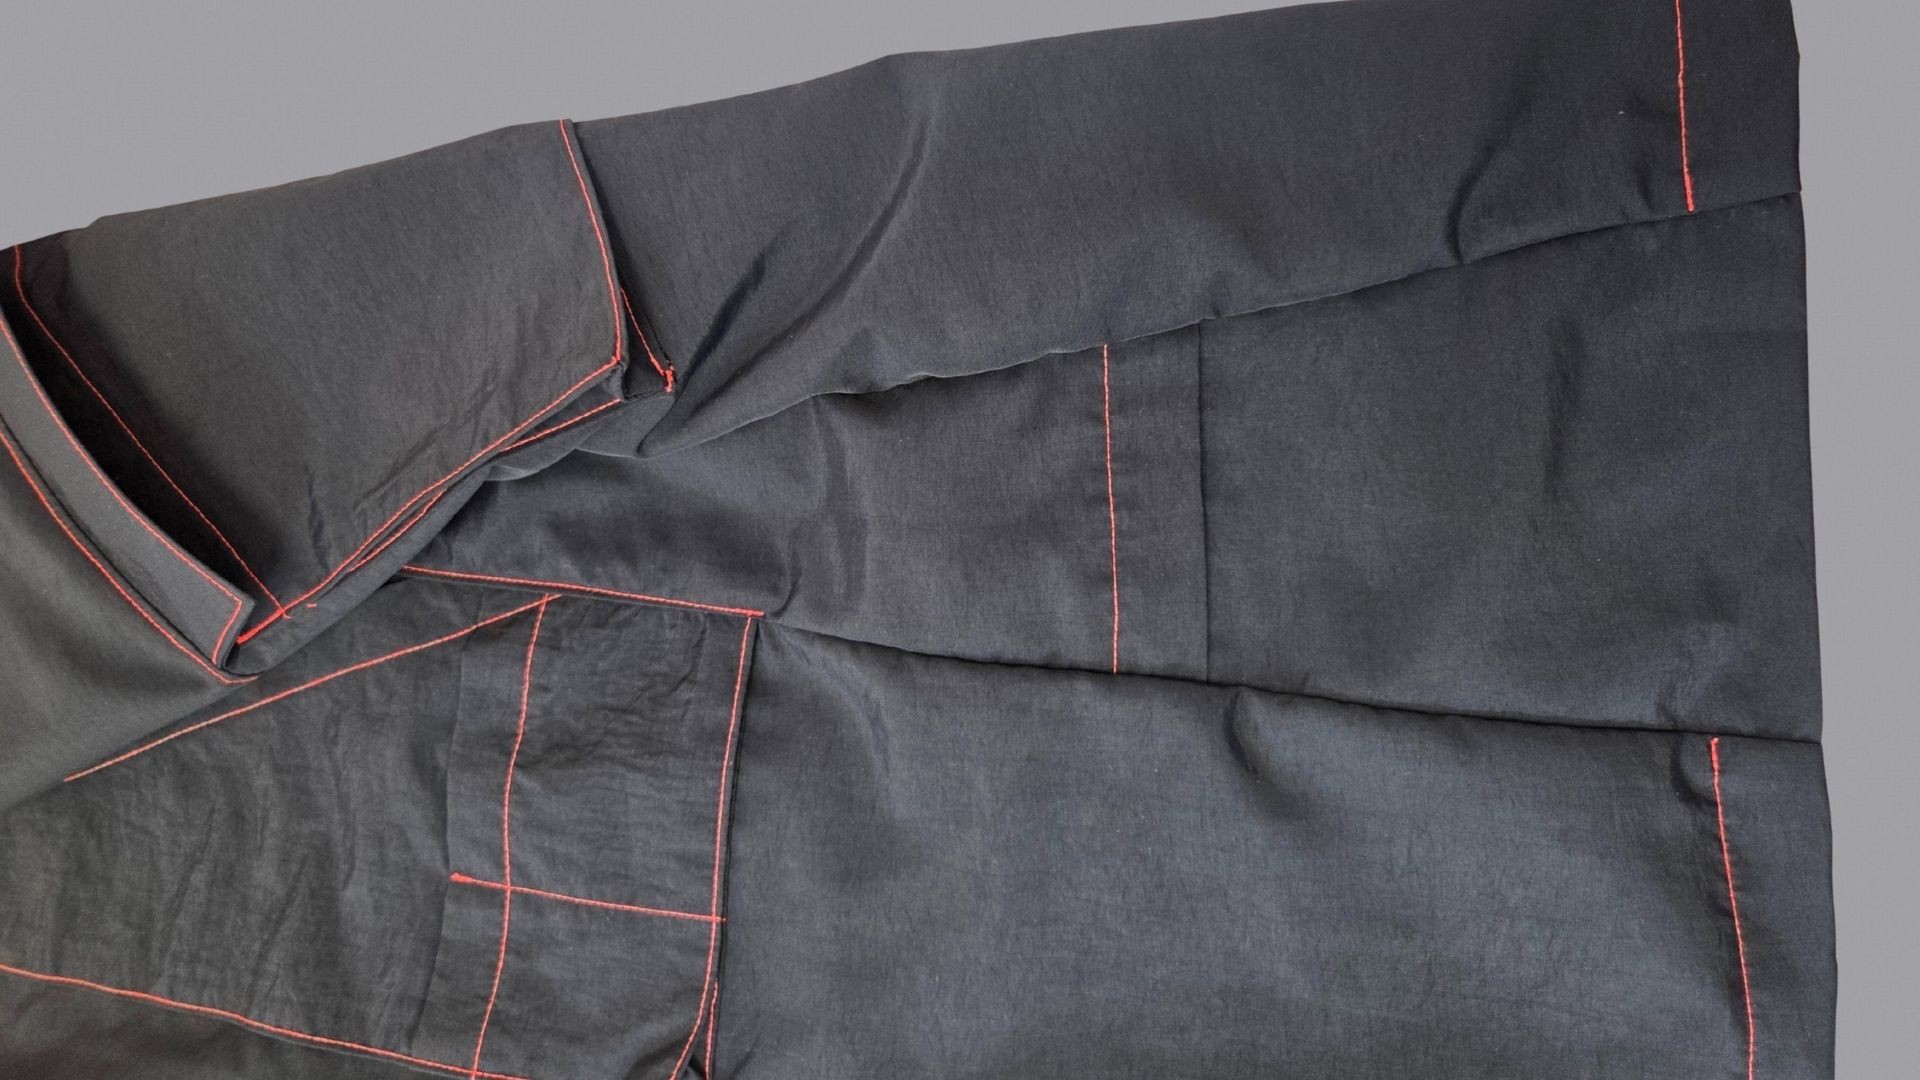
Next, I sewed the tabs so that I can roll up my cargo barrel leg and attach the turn-up. To do this, I lay one tab with and one tab without interfacing right sides together. I fold the seam allowances on the short sides inside out and then sew the two long sides and the lace. I cut back the seam allowances in the lace area, as shown in the middle. Then I press the seam allowances open, turn the tab over and press it out properly.
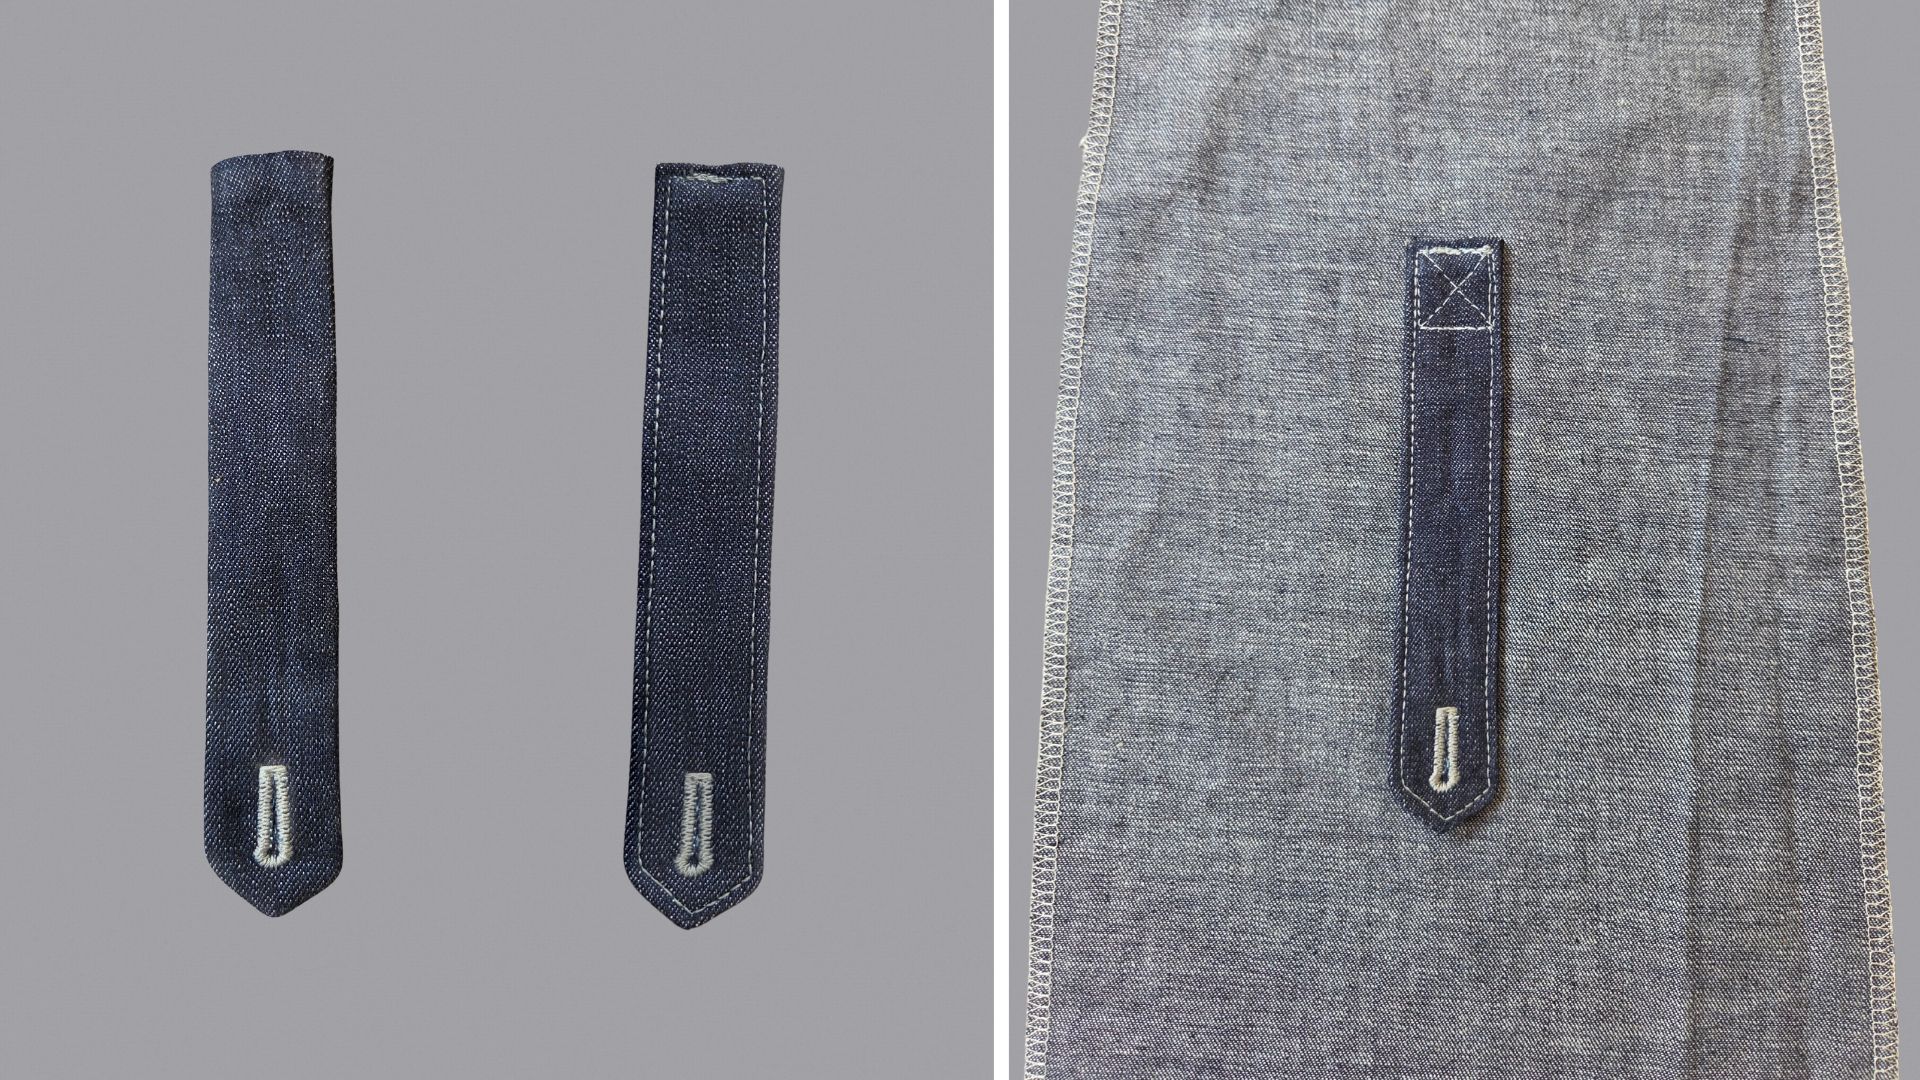
You can then sew the buttonhole according to the marking in the pattern. The size depends on how big your button is. The side of the tab on which you have ironed the interfacing should be on top.
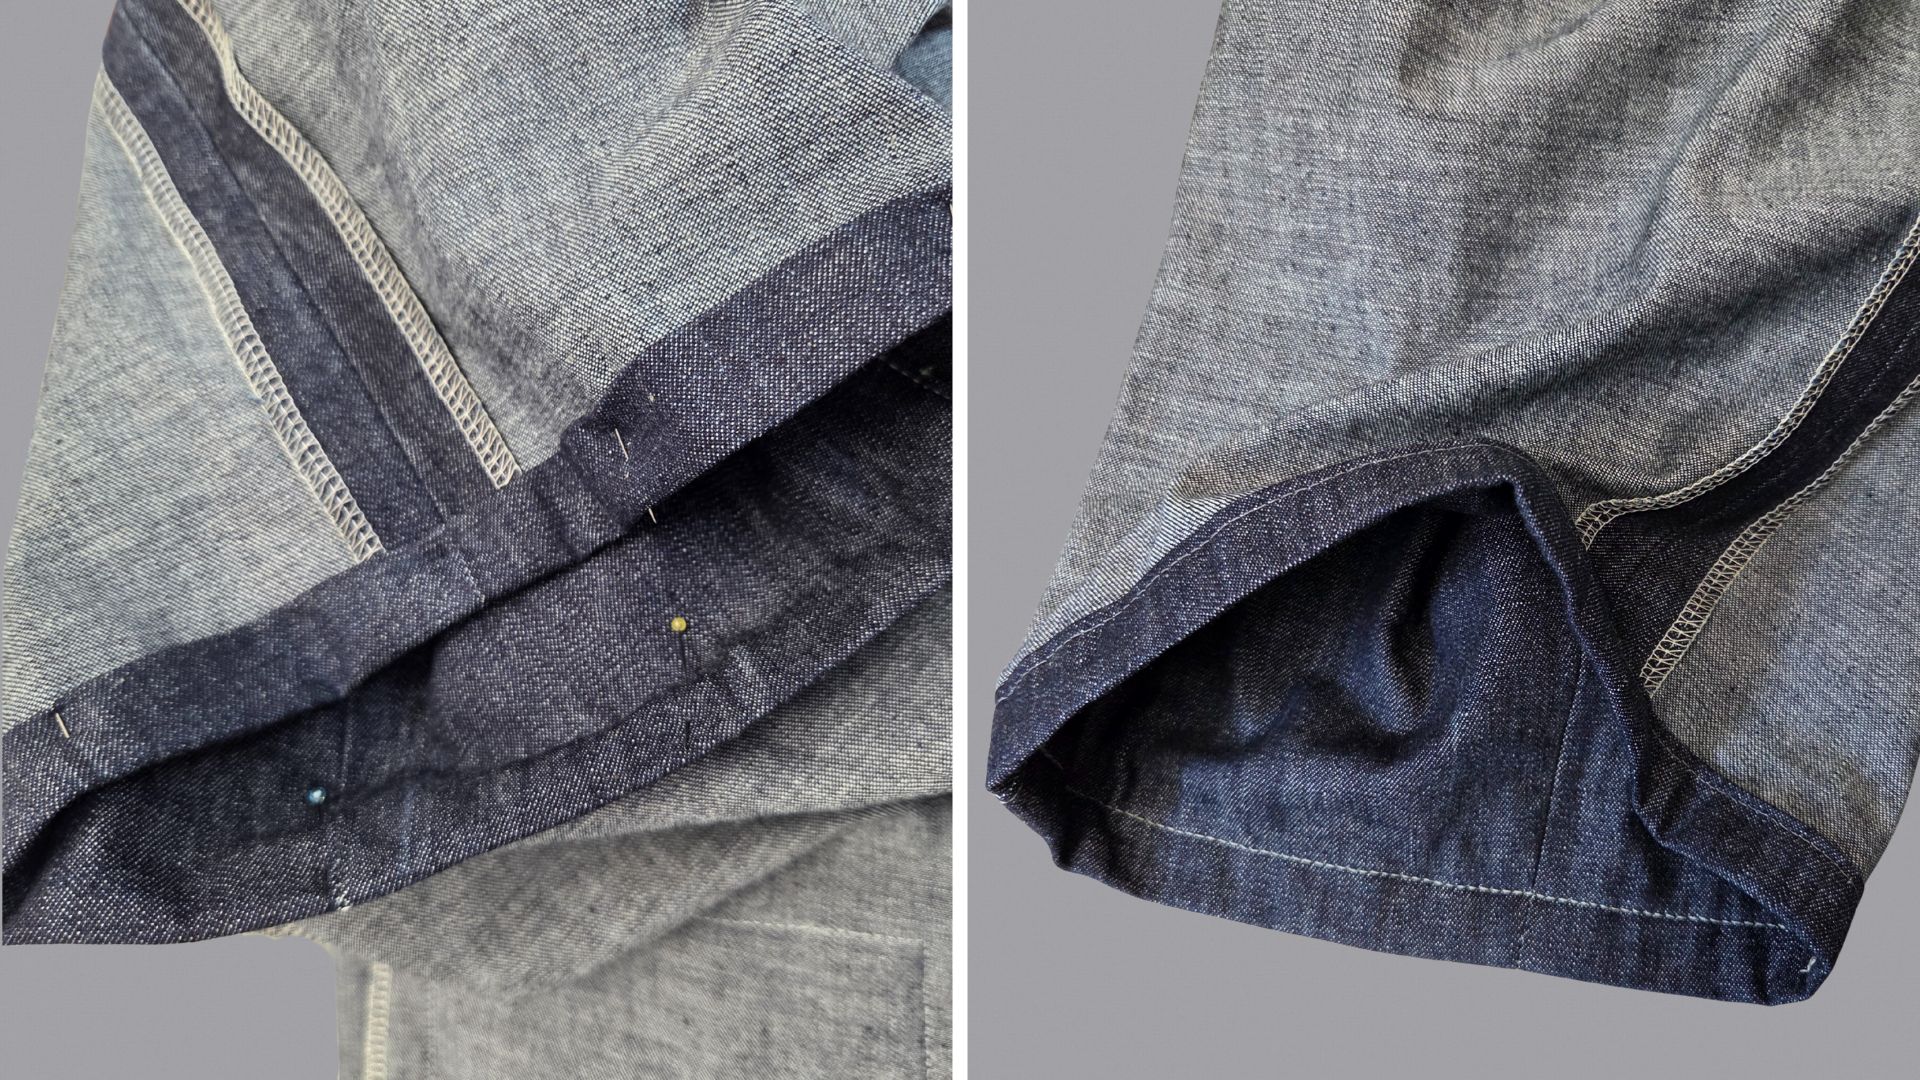
Then topstitch the tab close to the edge and sew it to the left side of the side panel, as shown in the picture on the right. The exact position can be found in the pattern. Sew the button onto the right side of the fabric, as shown in the next picture.
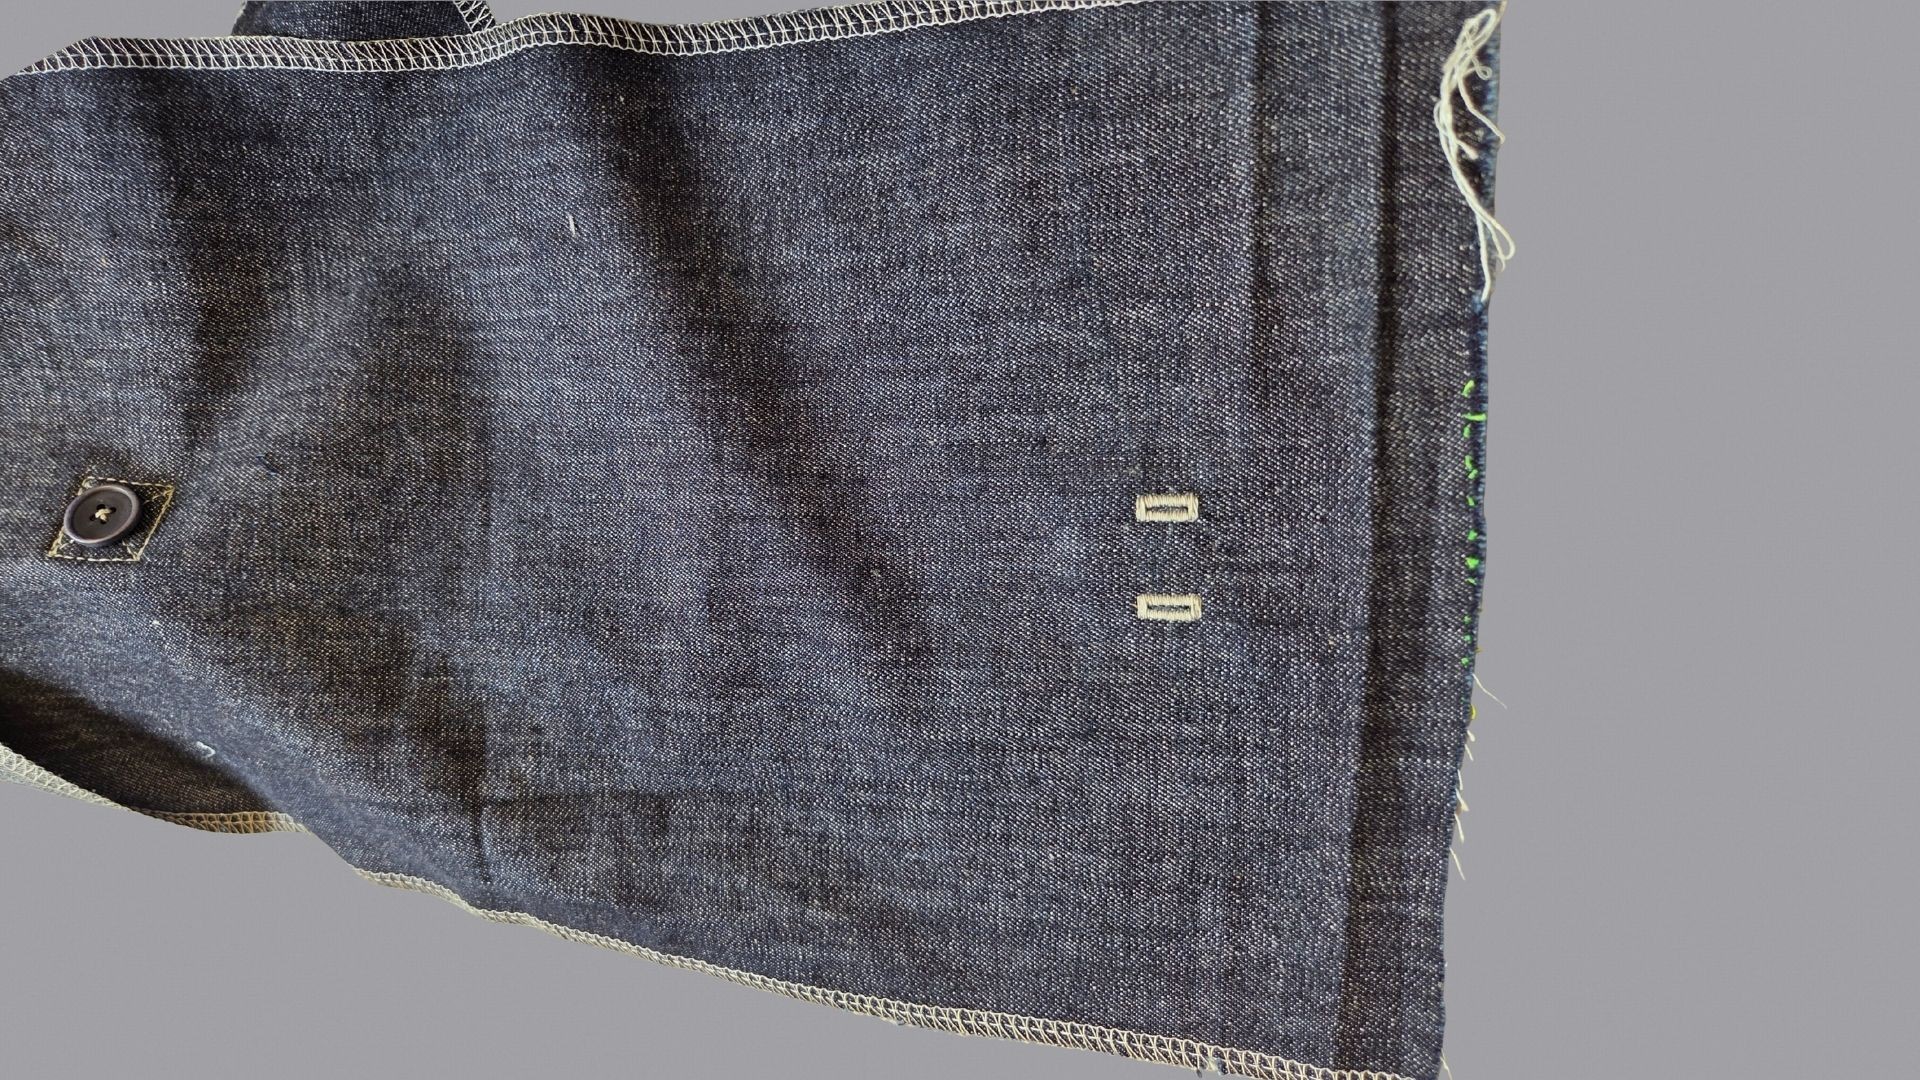
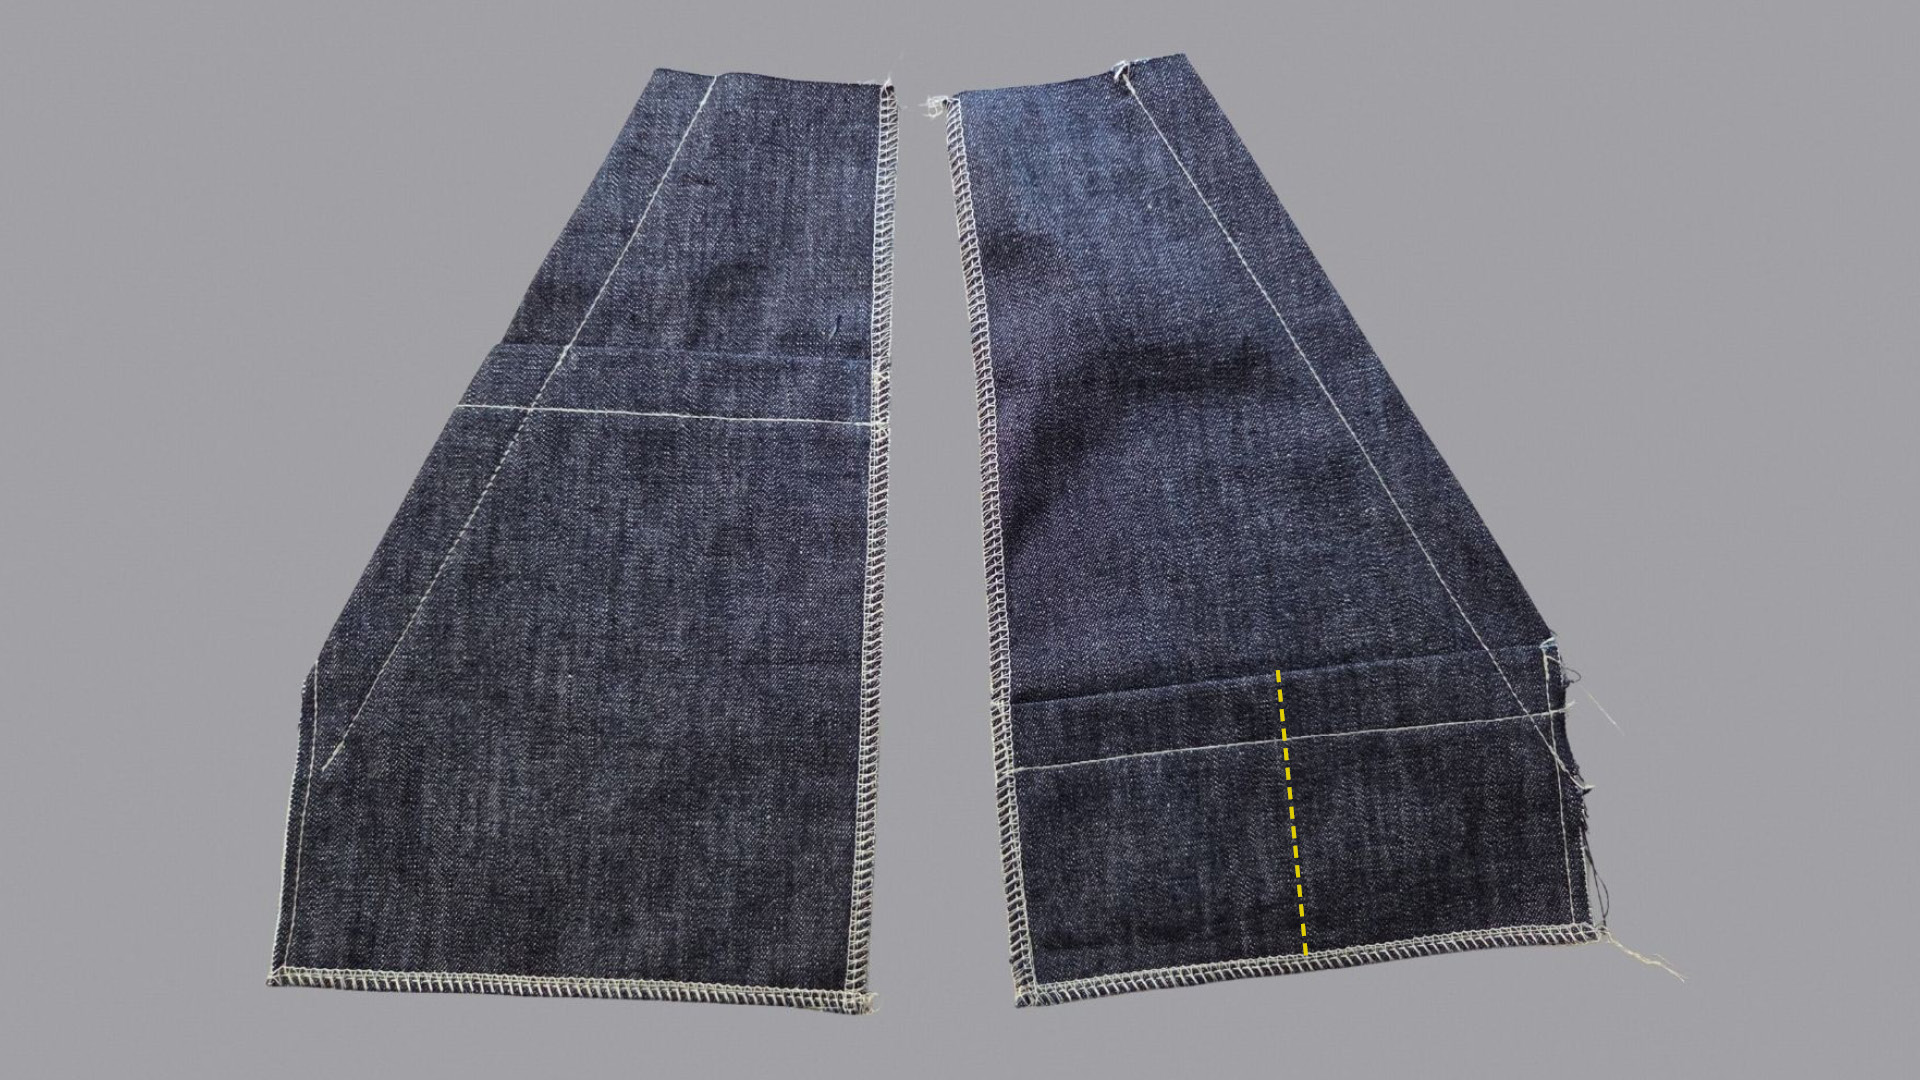
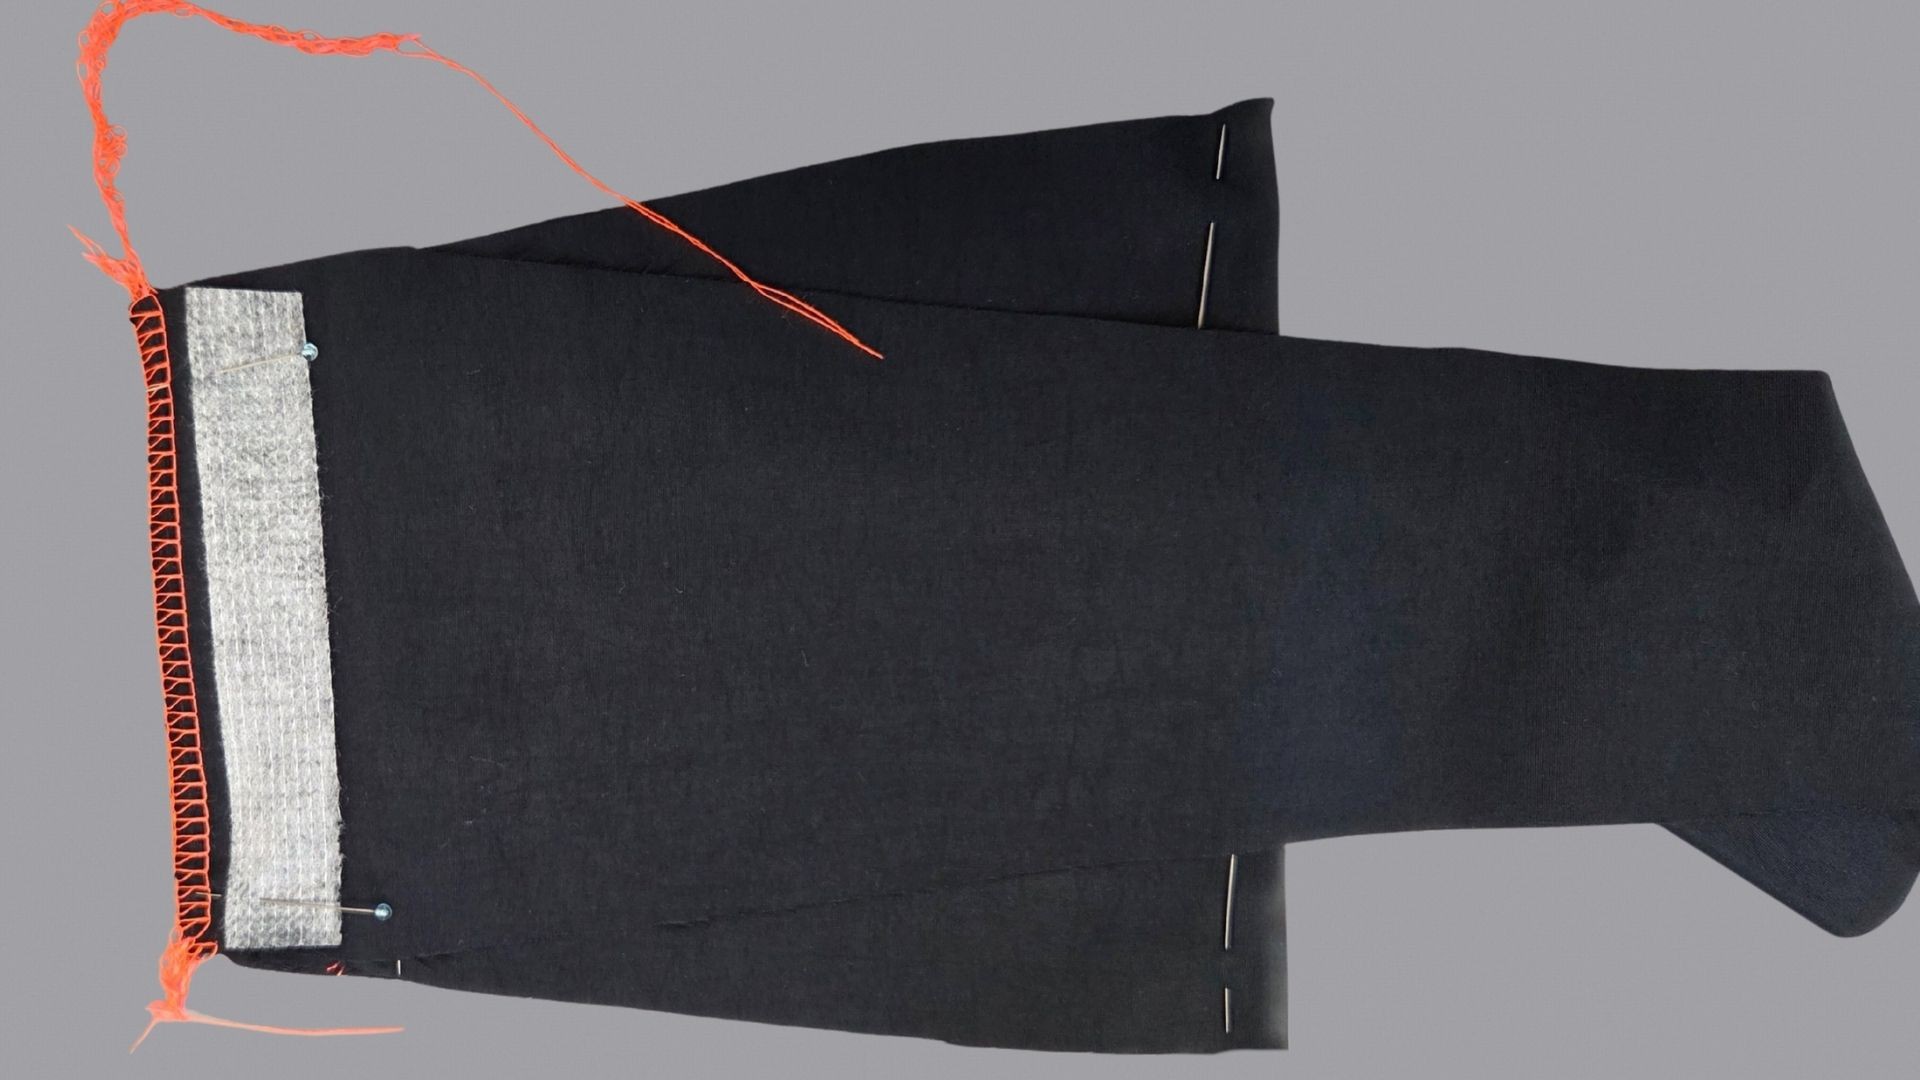
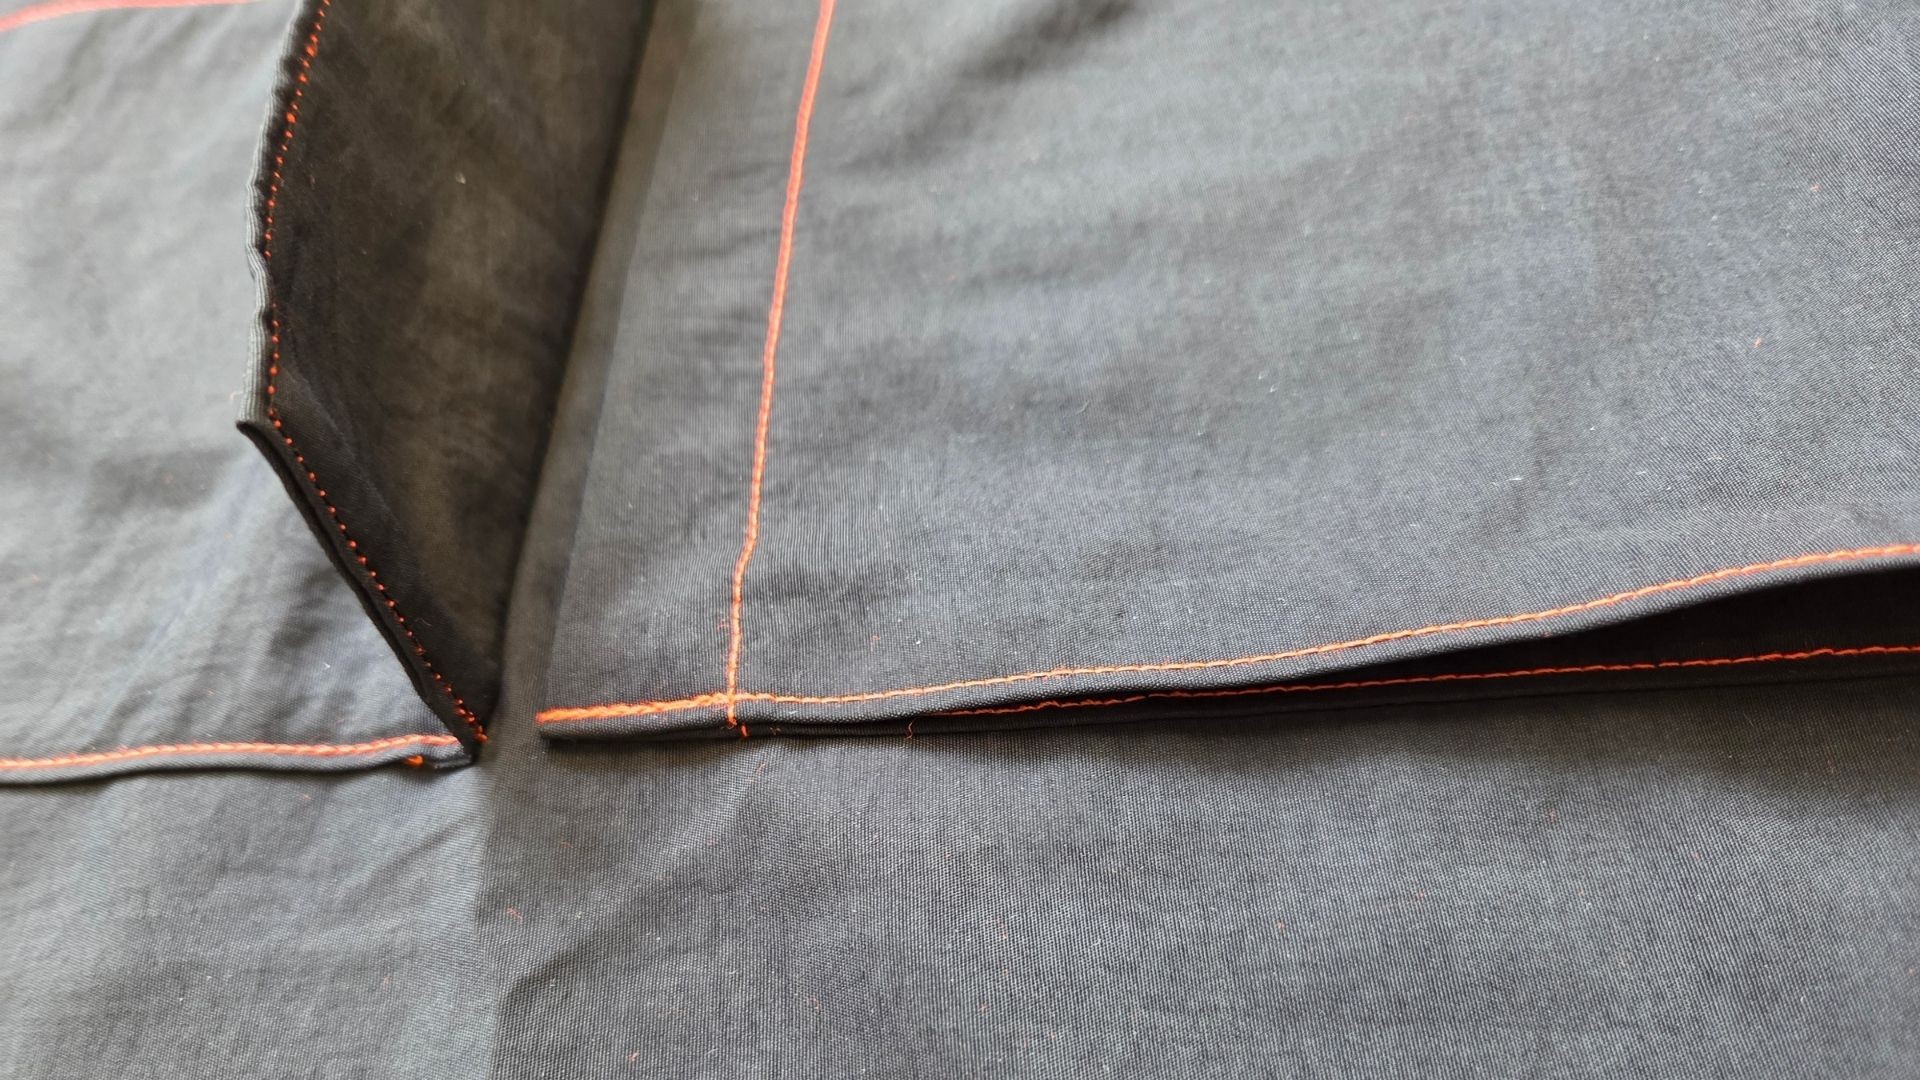
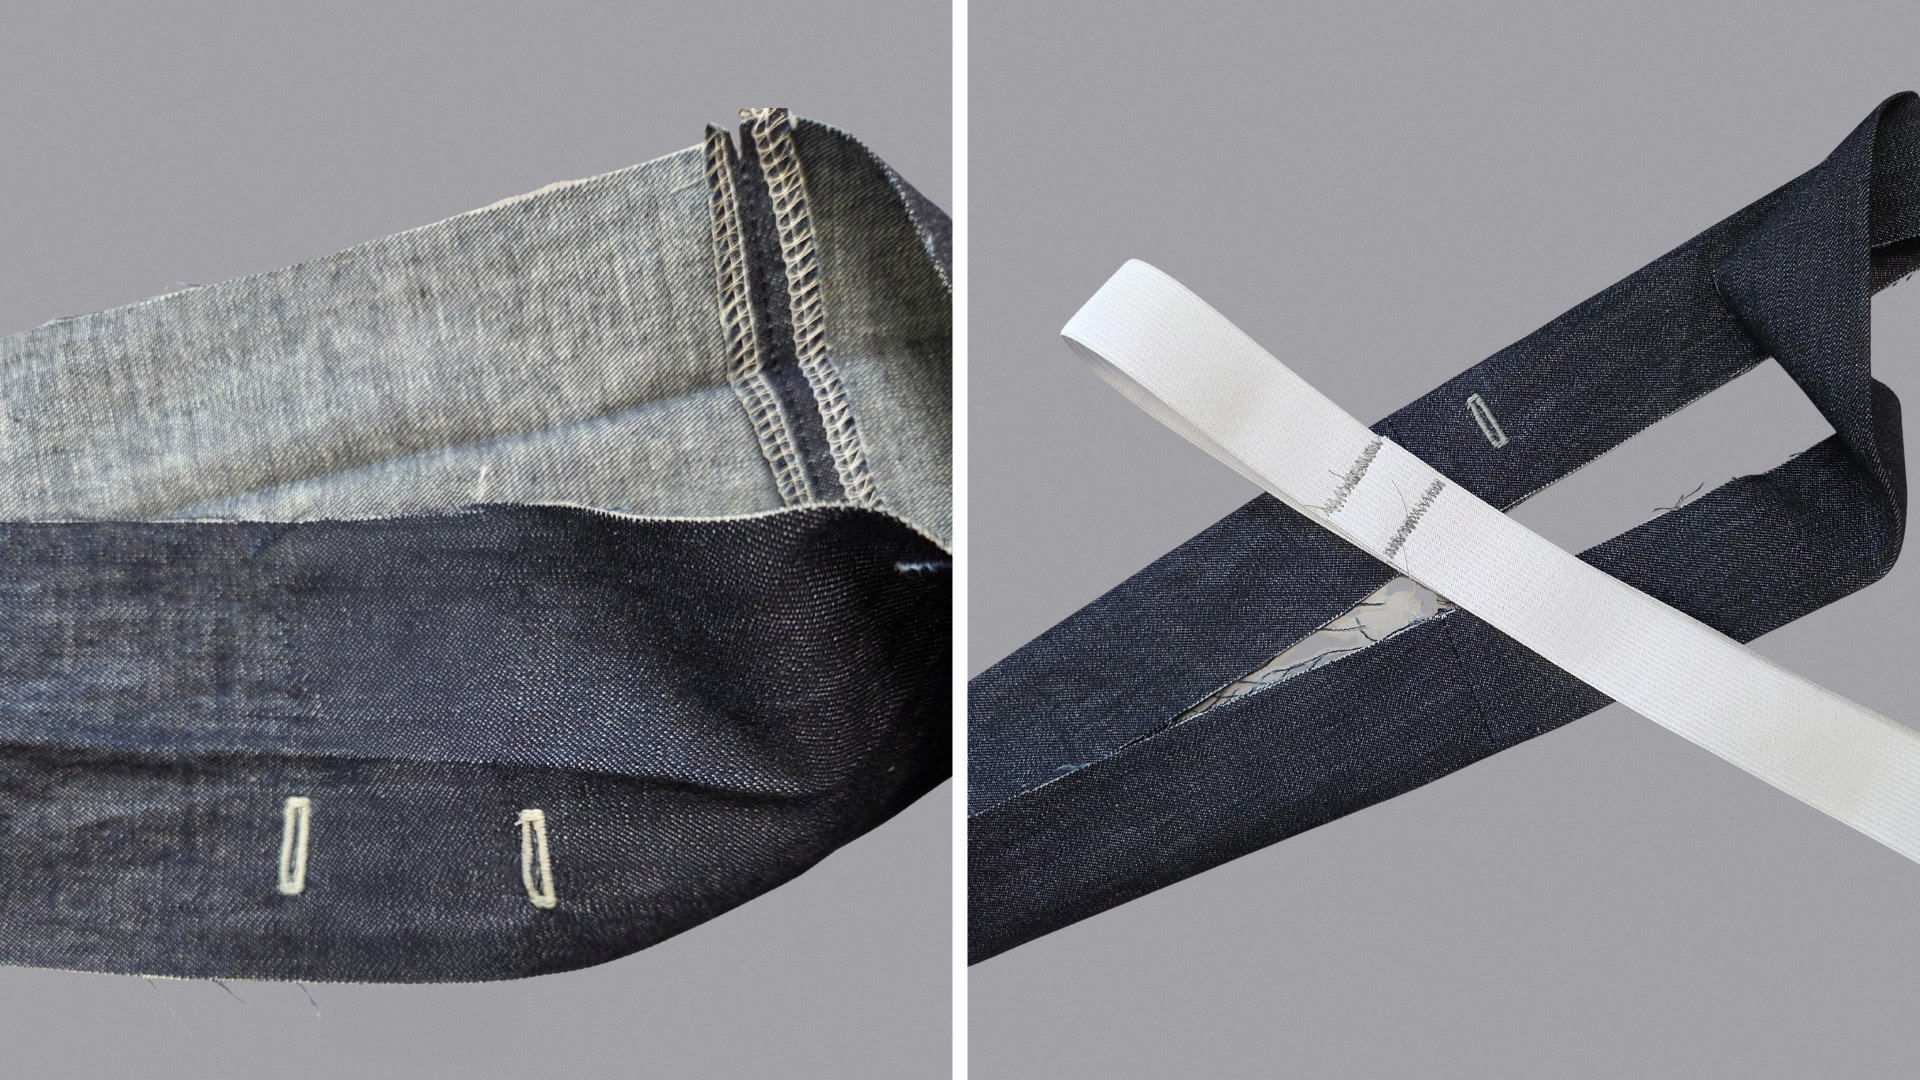
So that I can tighten my hem later with an elastic cord, I also sewed two small buttonholes in the side section, through which I will pull the elastic cord later. I ironed interfacing onto the wrong side of the fabric at the position of the buttonholes. As you can see, I ironed the hem beforehand to determine the correct distance to the hem edge. I later fold the hem inwards twice, each time 2 cm wide. The bottom edge of the buttonholes is approx. 4.5 cm from the hem edge.
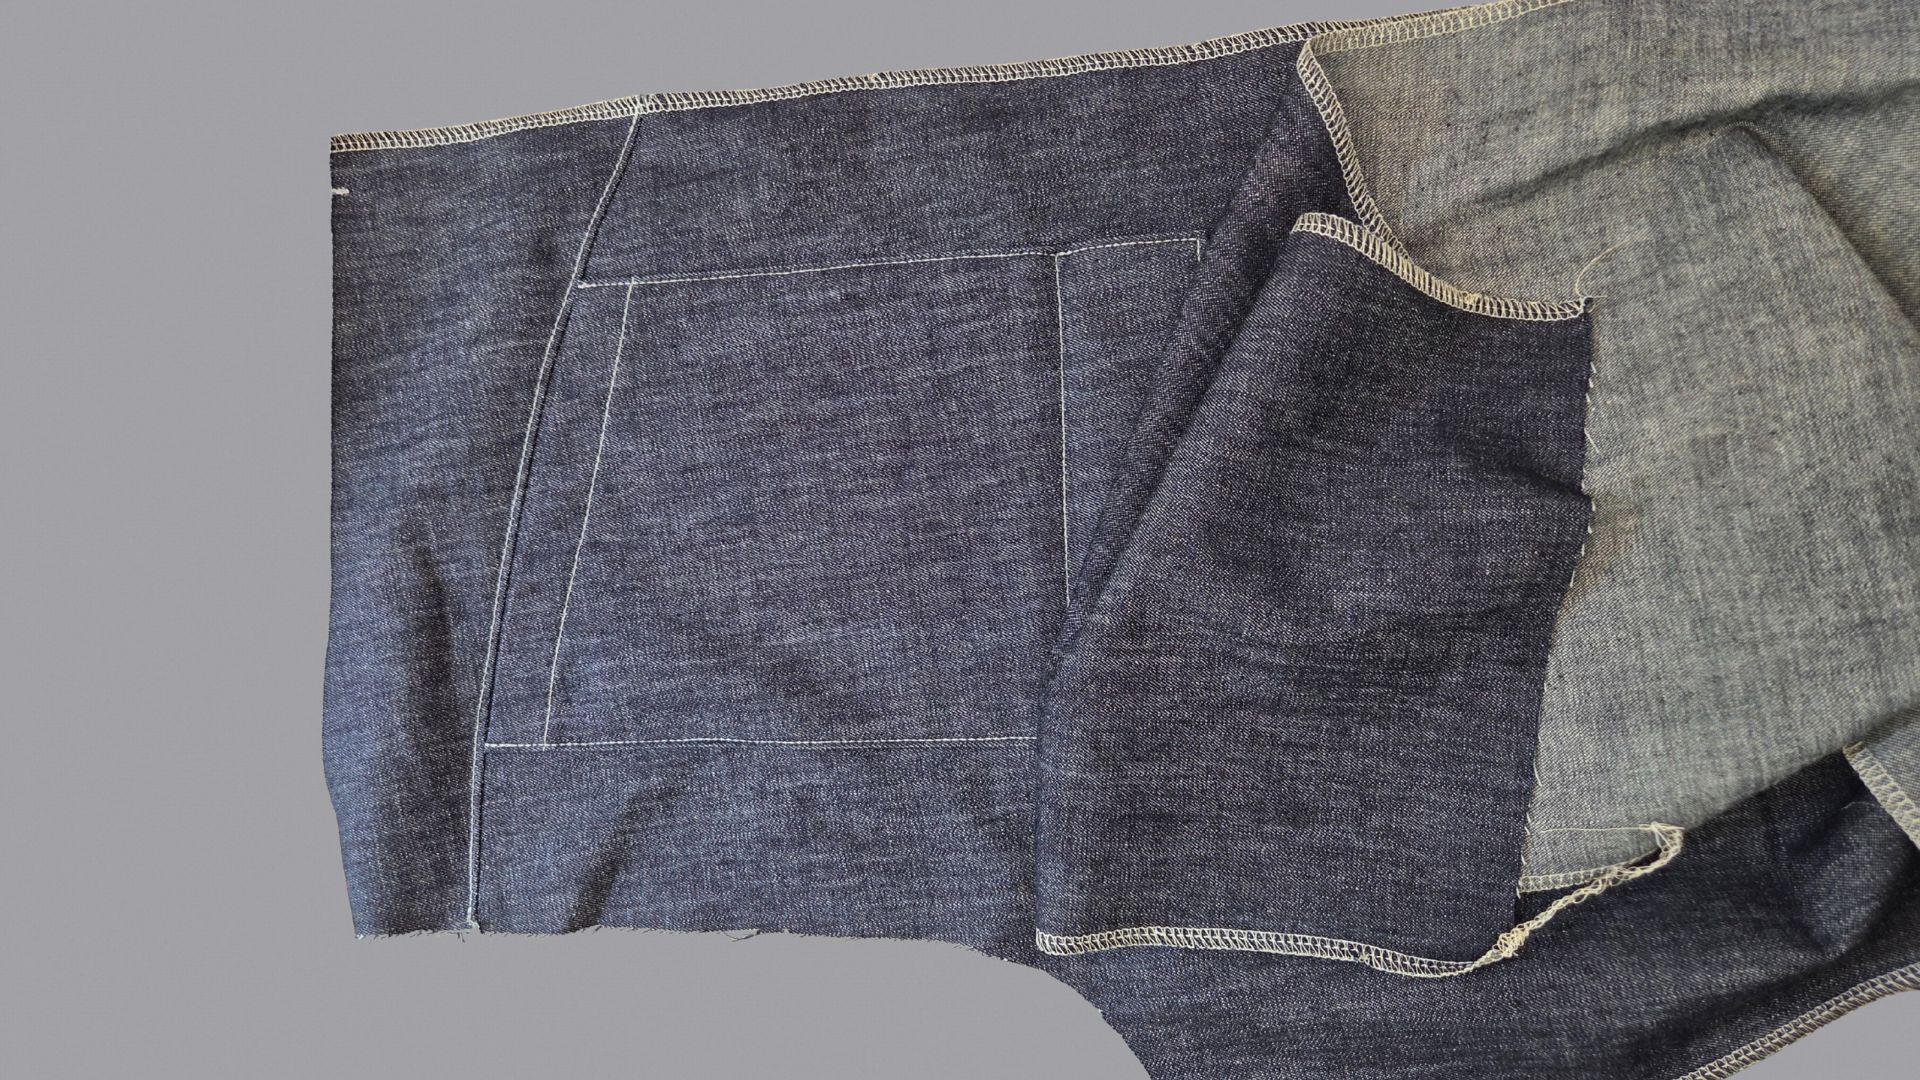
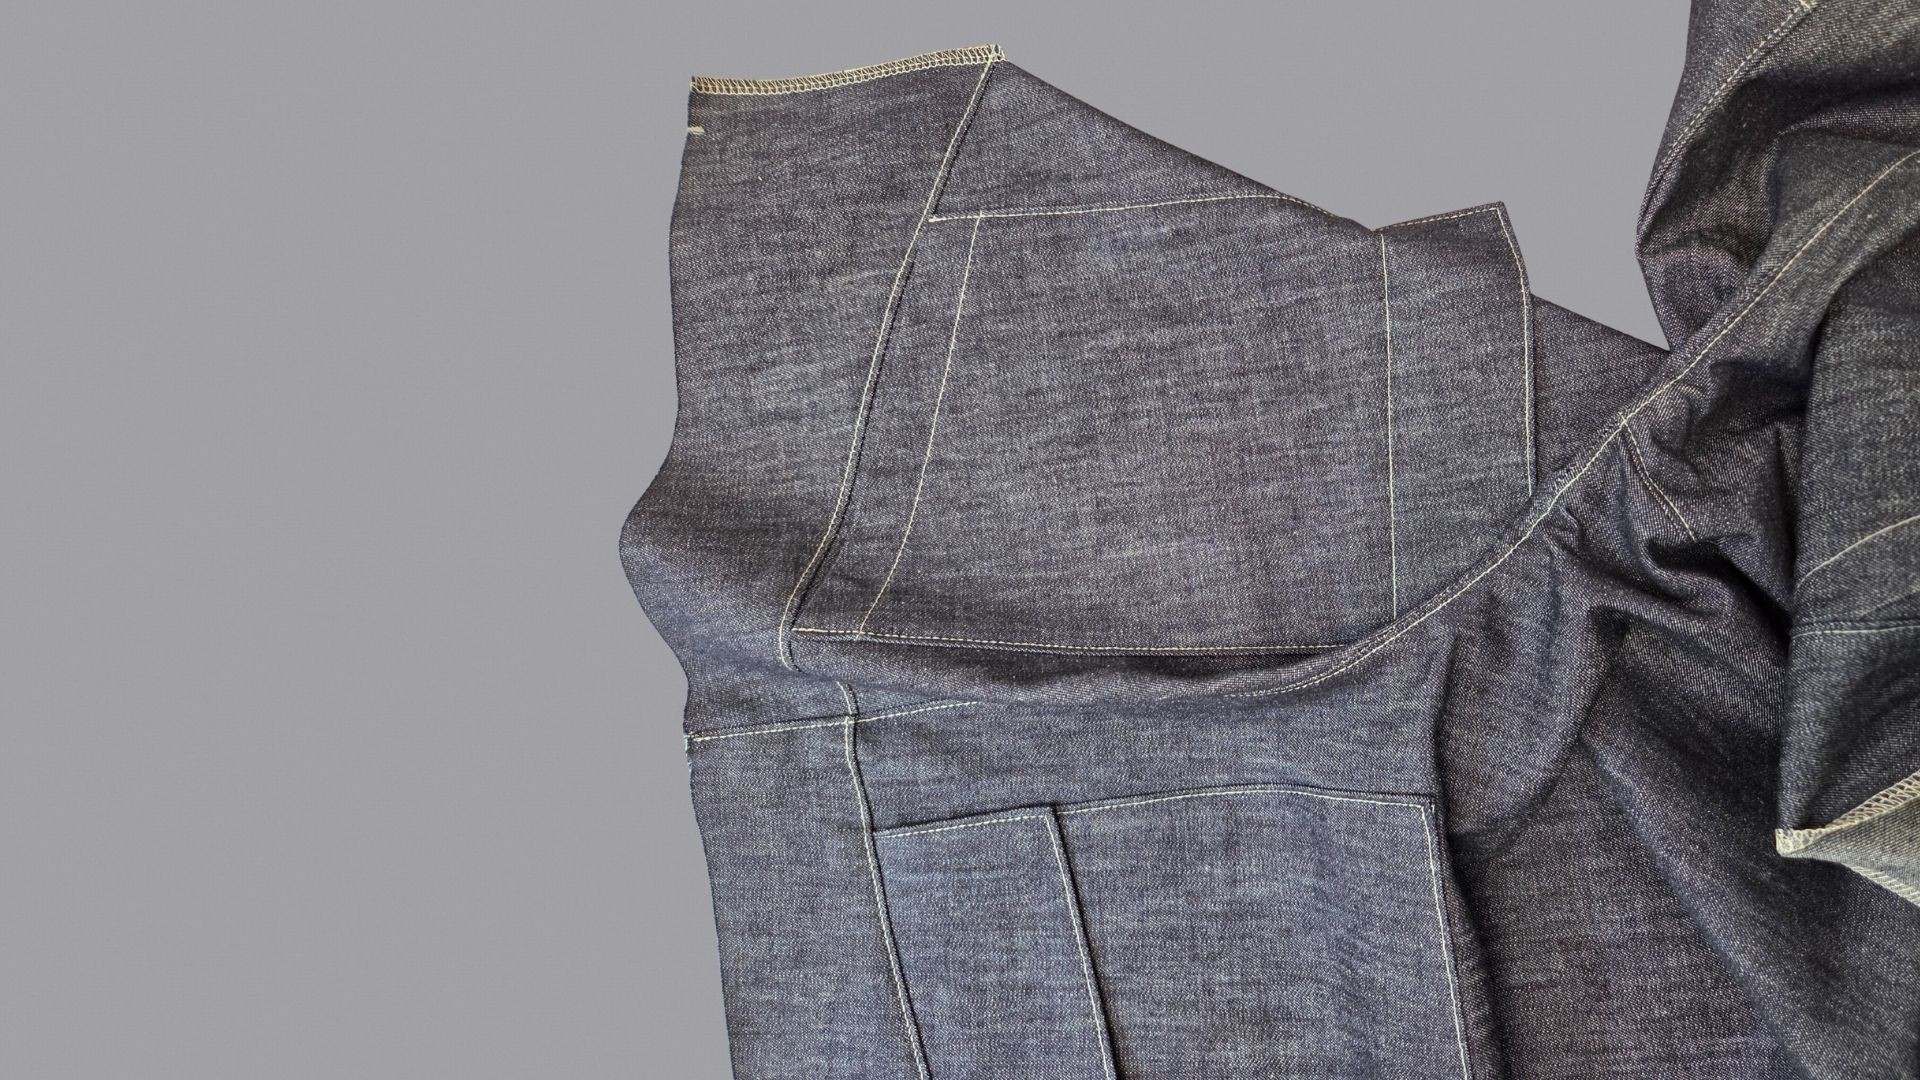
Sew the side section to the front section of the Cargo Barrelleg
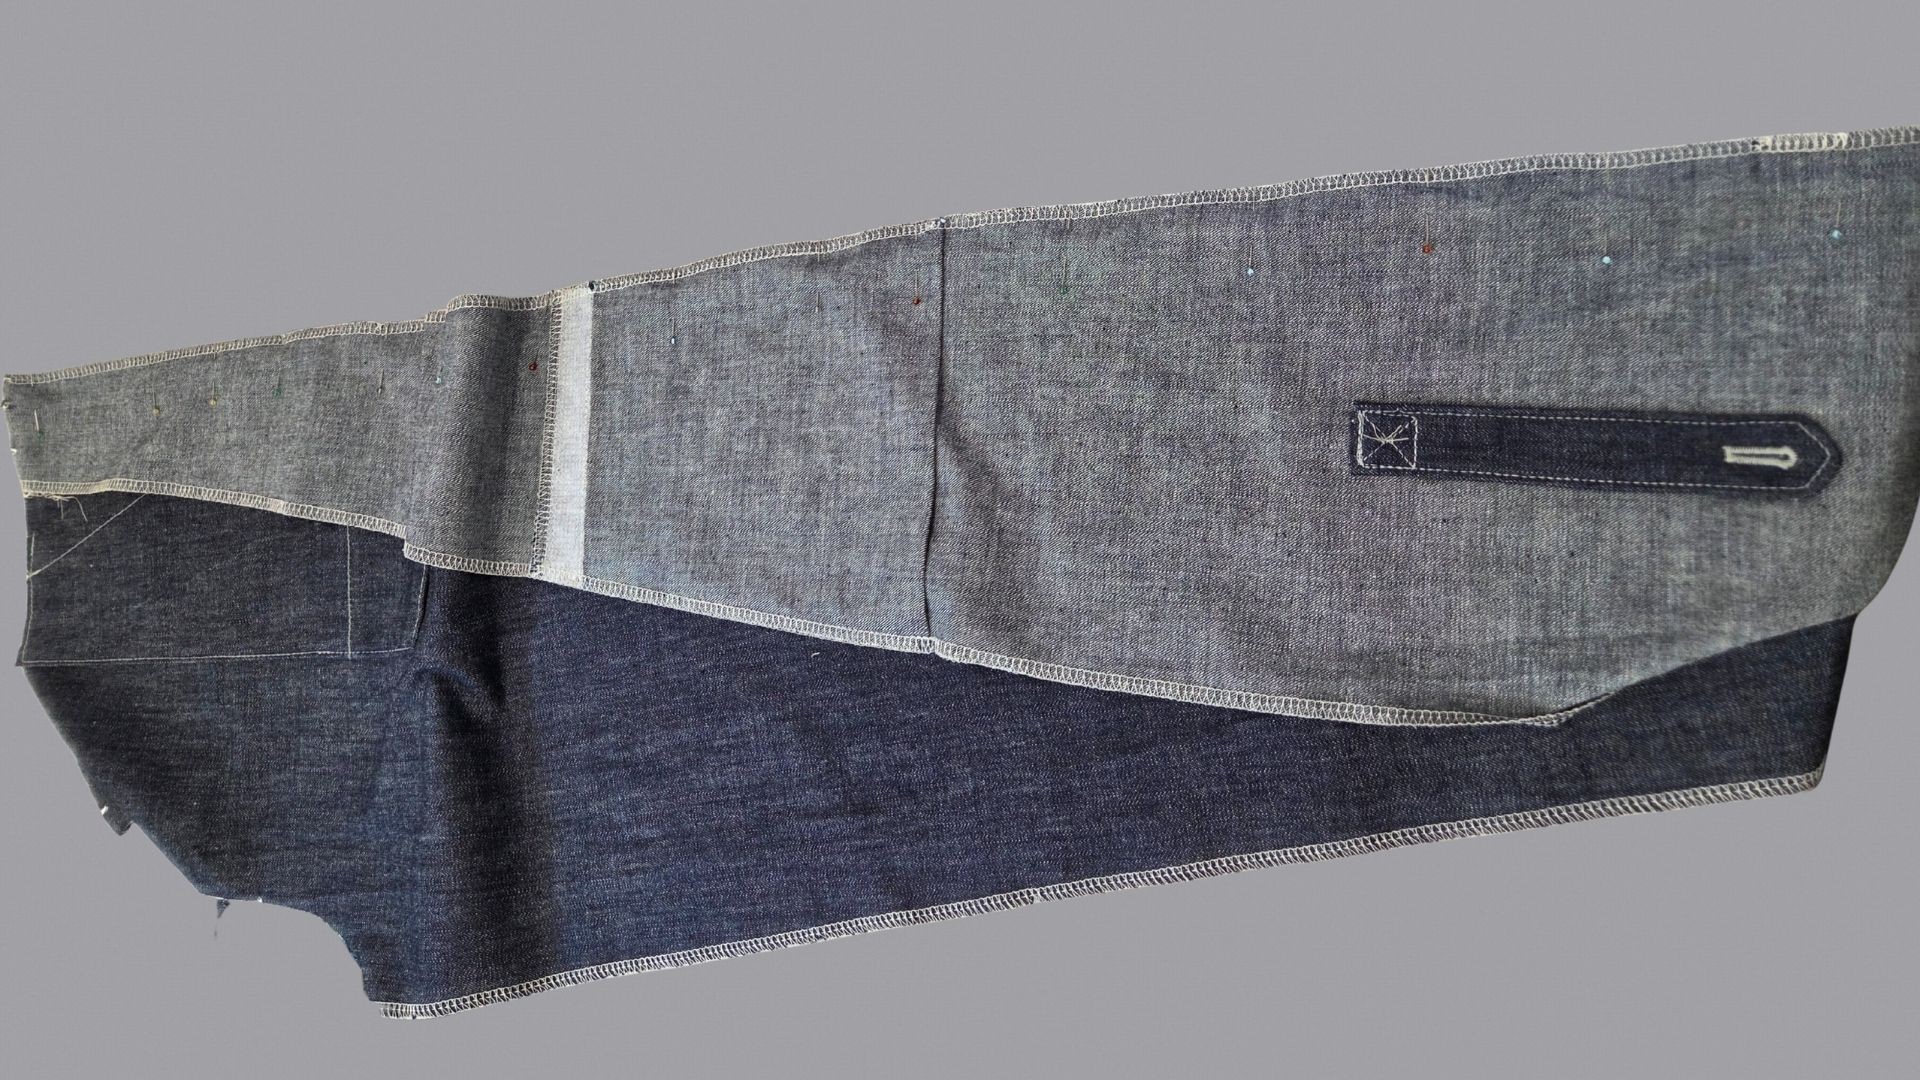
Now the side section can be pinned to the front trousers, right sides together, and sewn in place.
In the area of the front pocket, I press the seam allowances in the direction of the side panel, underneath I press them apart.
If you like, you can topstitch the seam allowances in the area of the front pocket with a topstitching.
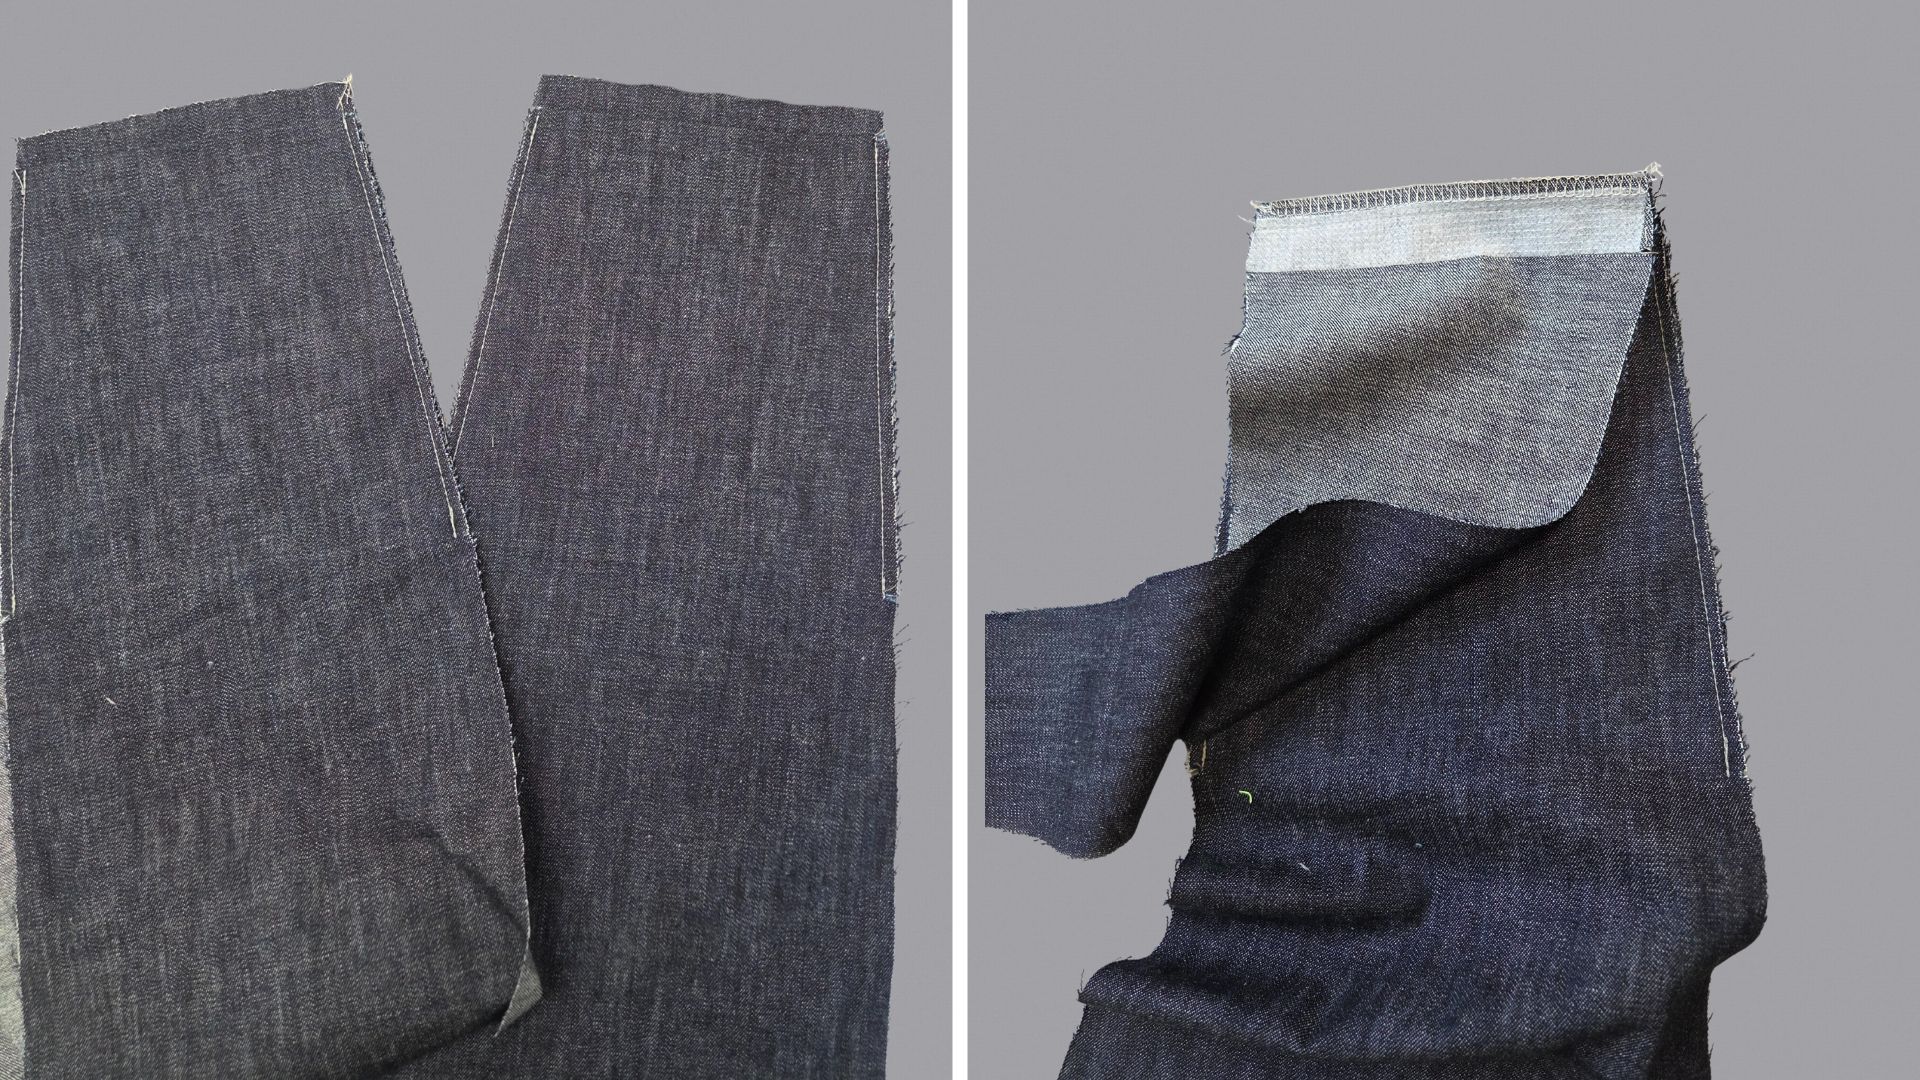
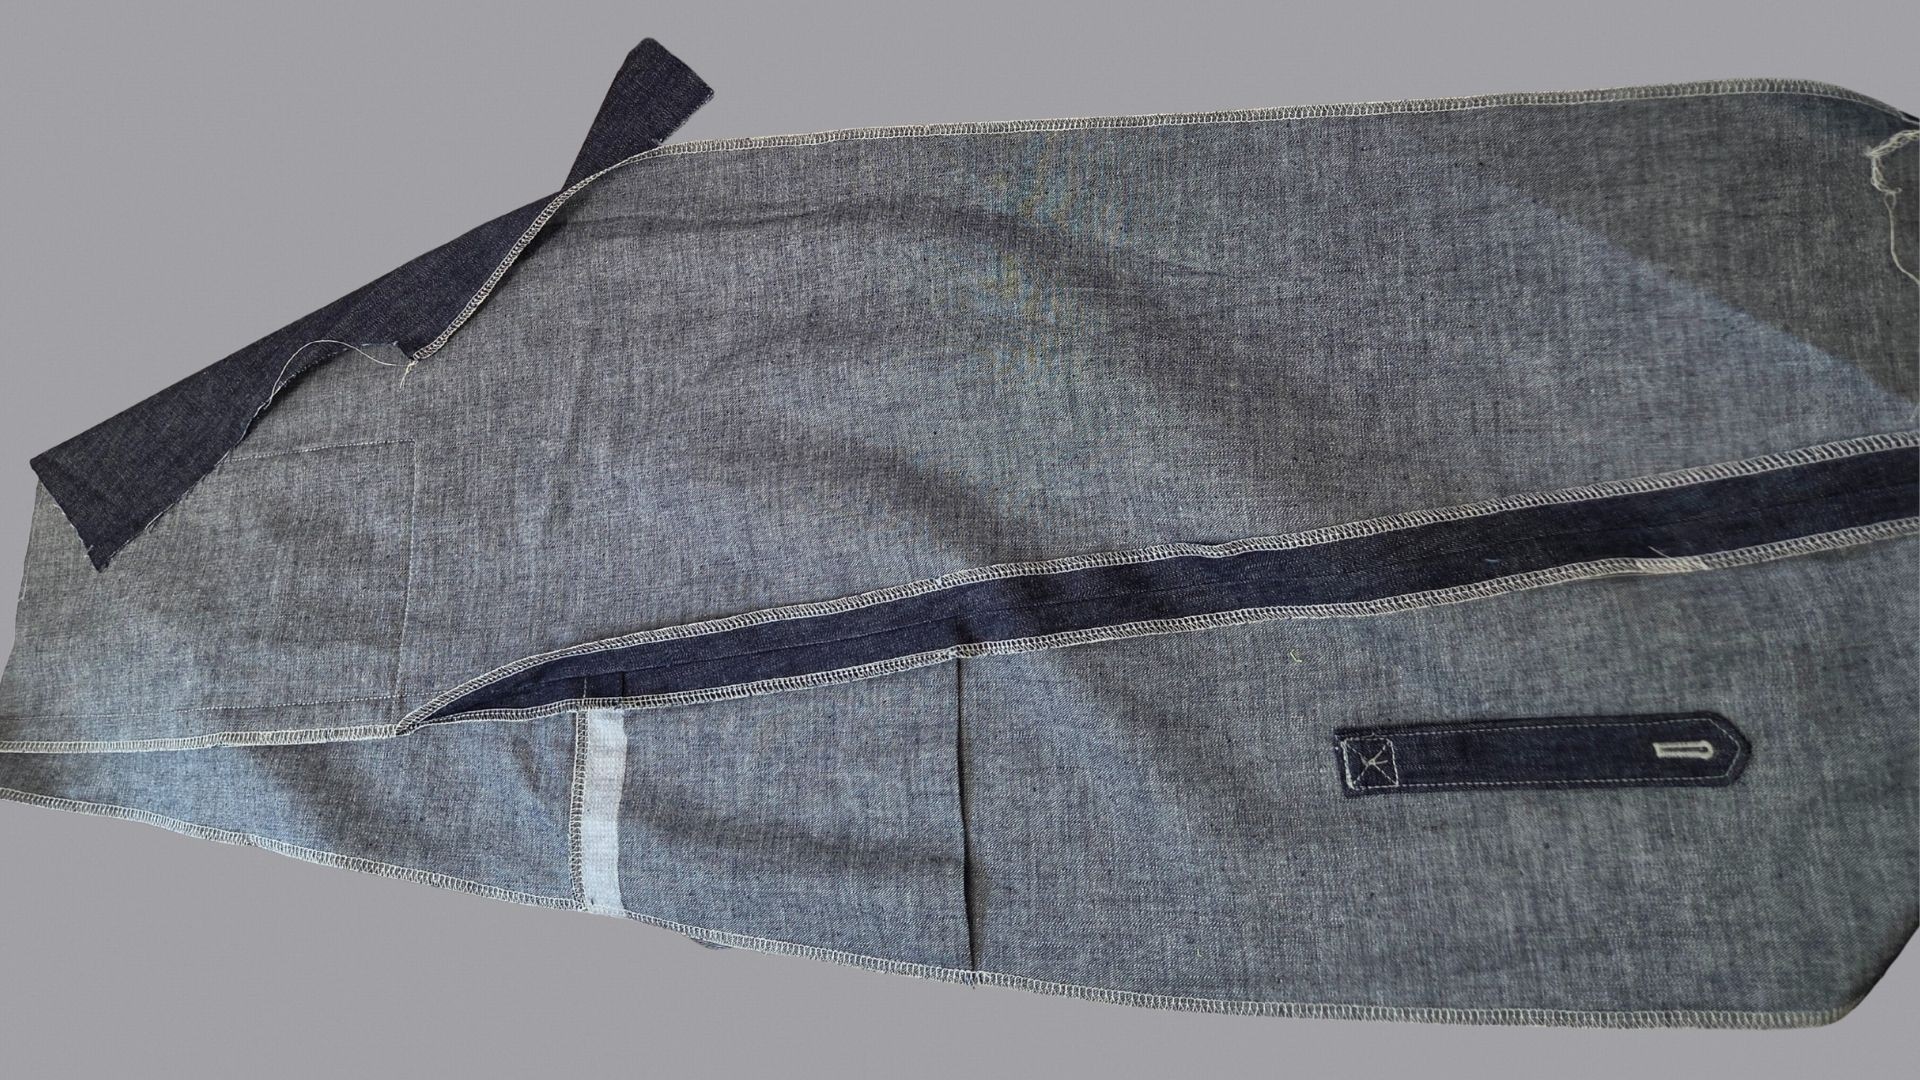
Sewing the side part to the front part of shorts with side pocket
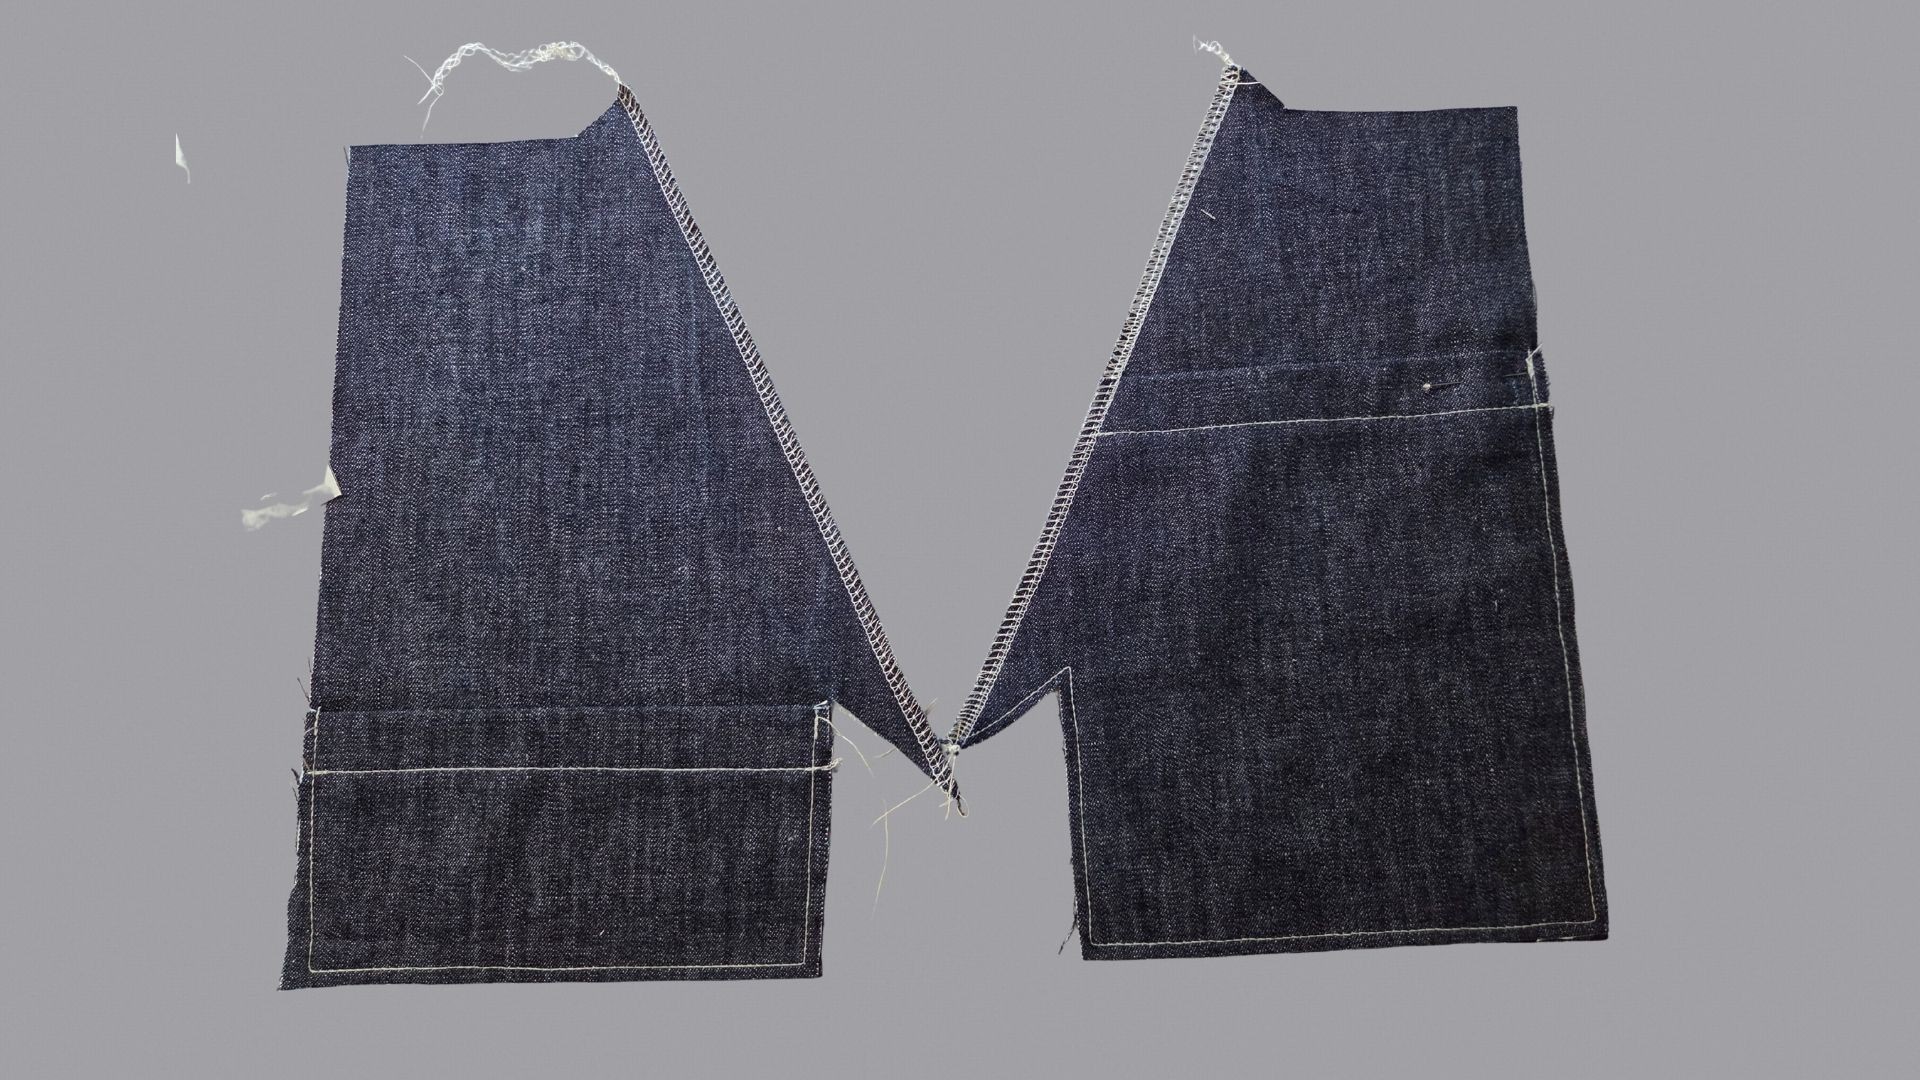
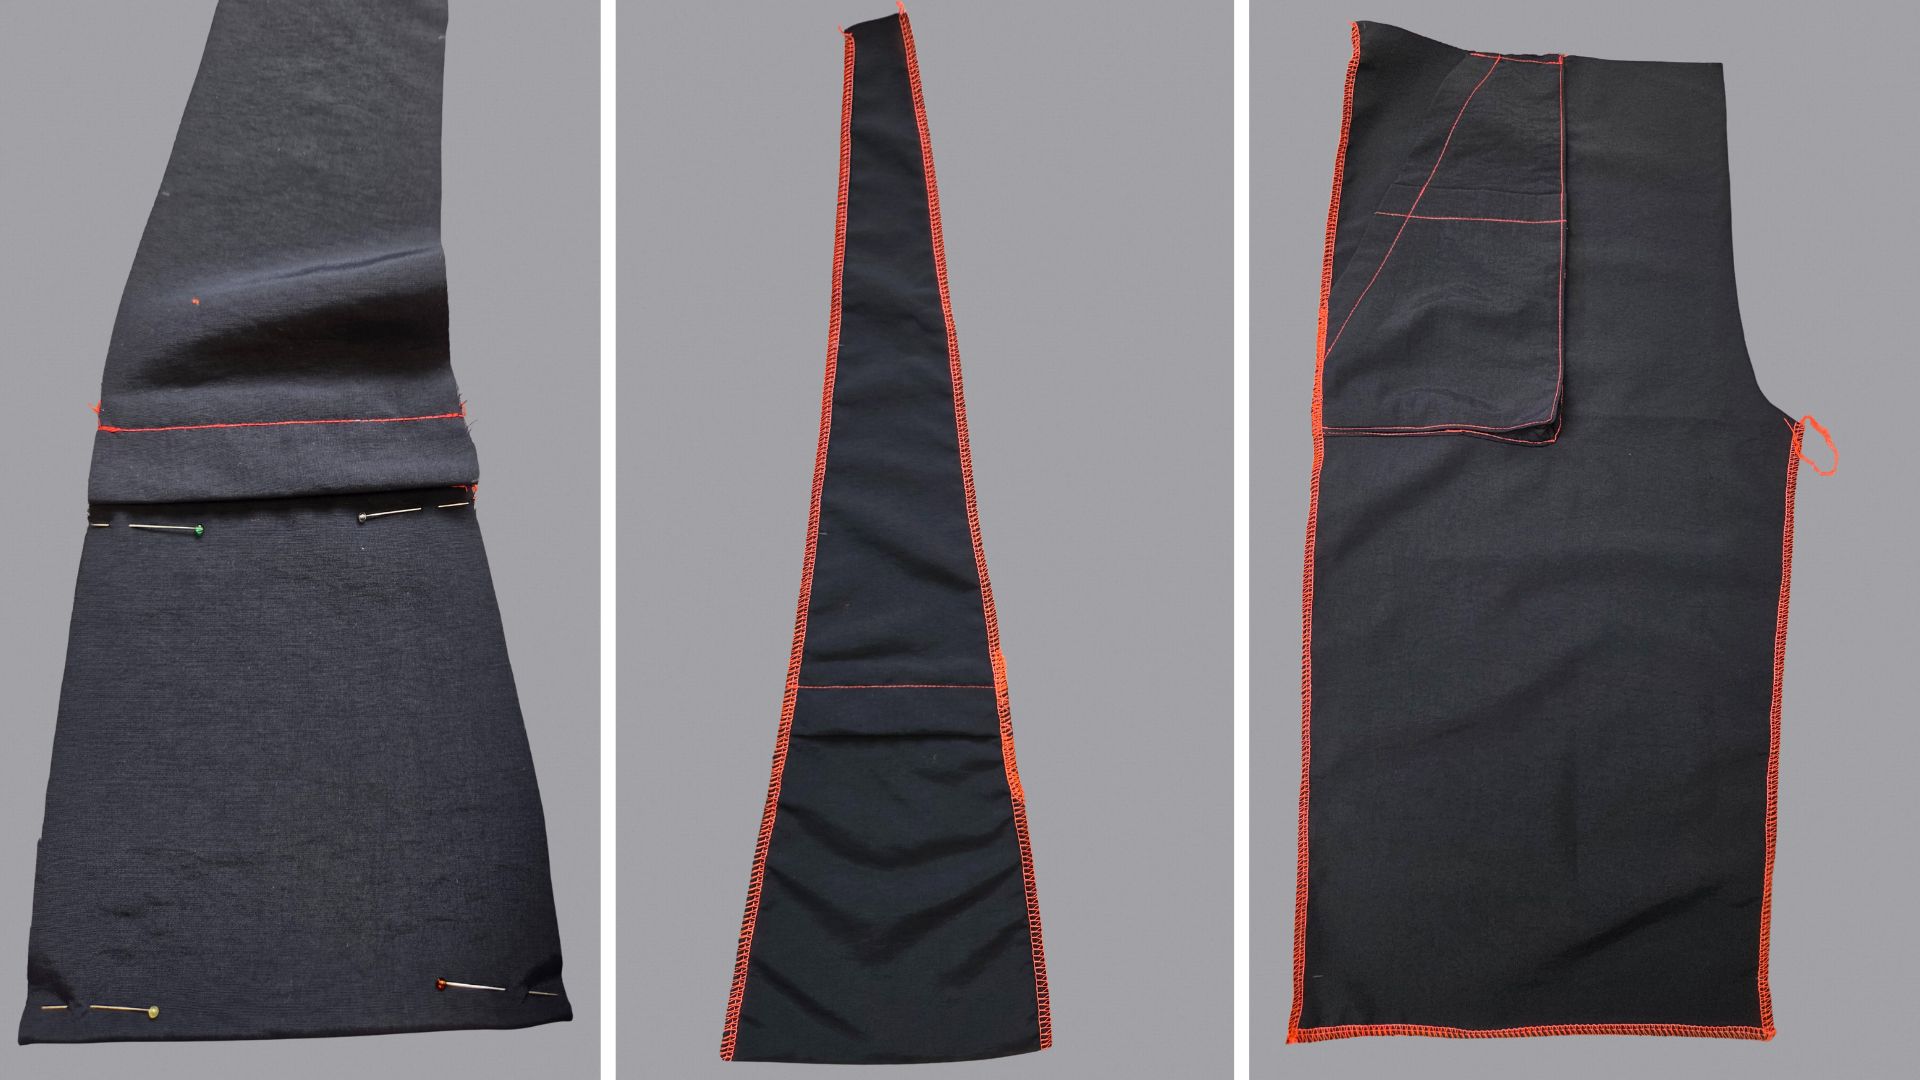
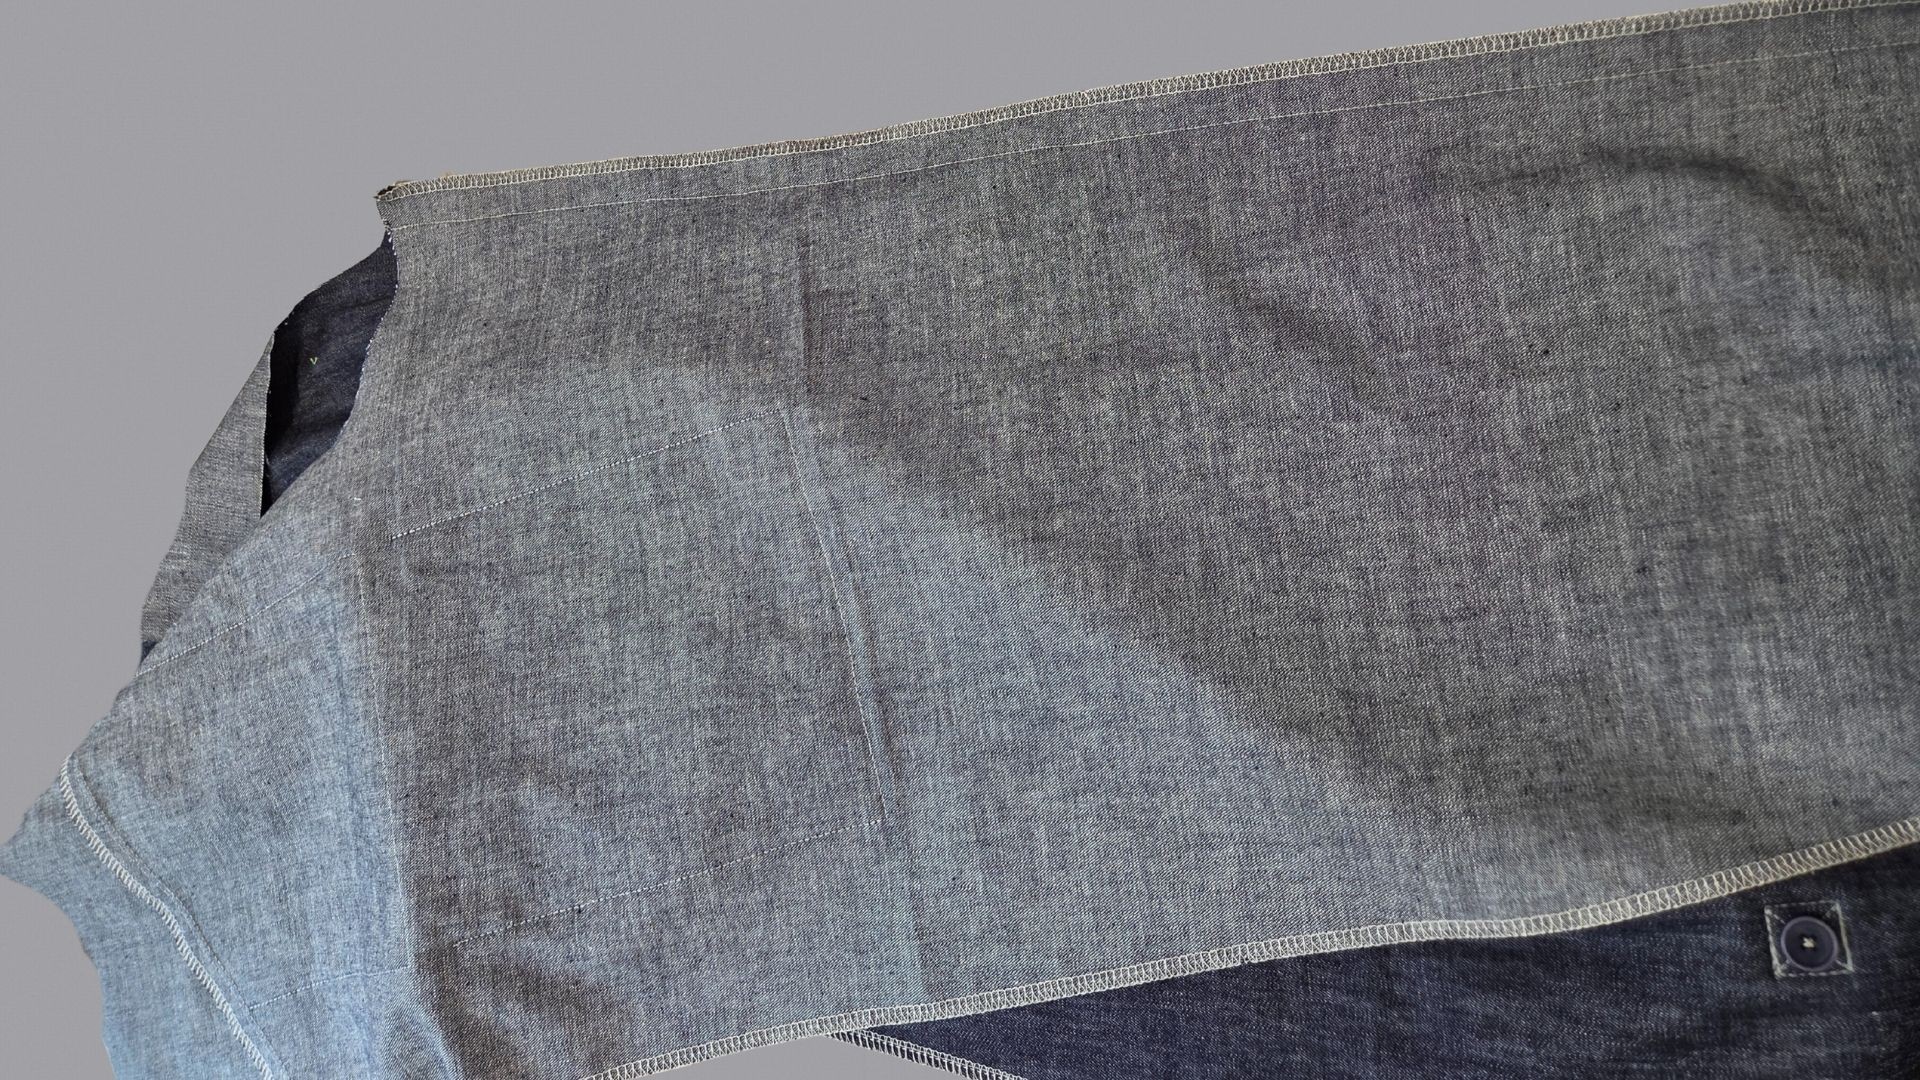
If you are sewing the shorts with a pocket in the side panel, the bottom edge of the pocket is also the hem. To join the side and front sections, pin the side section to the front trousers with the right sides together and then fold the 3 cm wide hem over the side section at the bottom edge, as shown in the picture on the left. On the right in the picture you can see what the right front trousers look like with the side part sewn on.

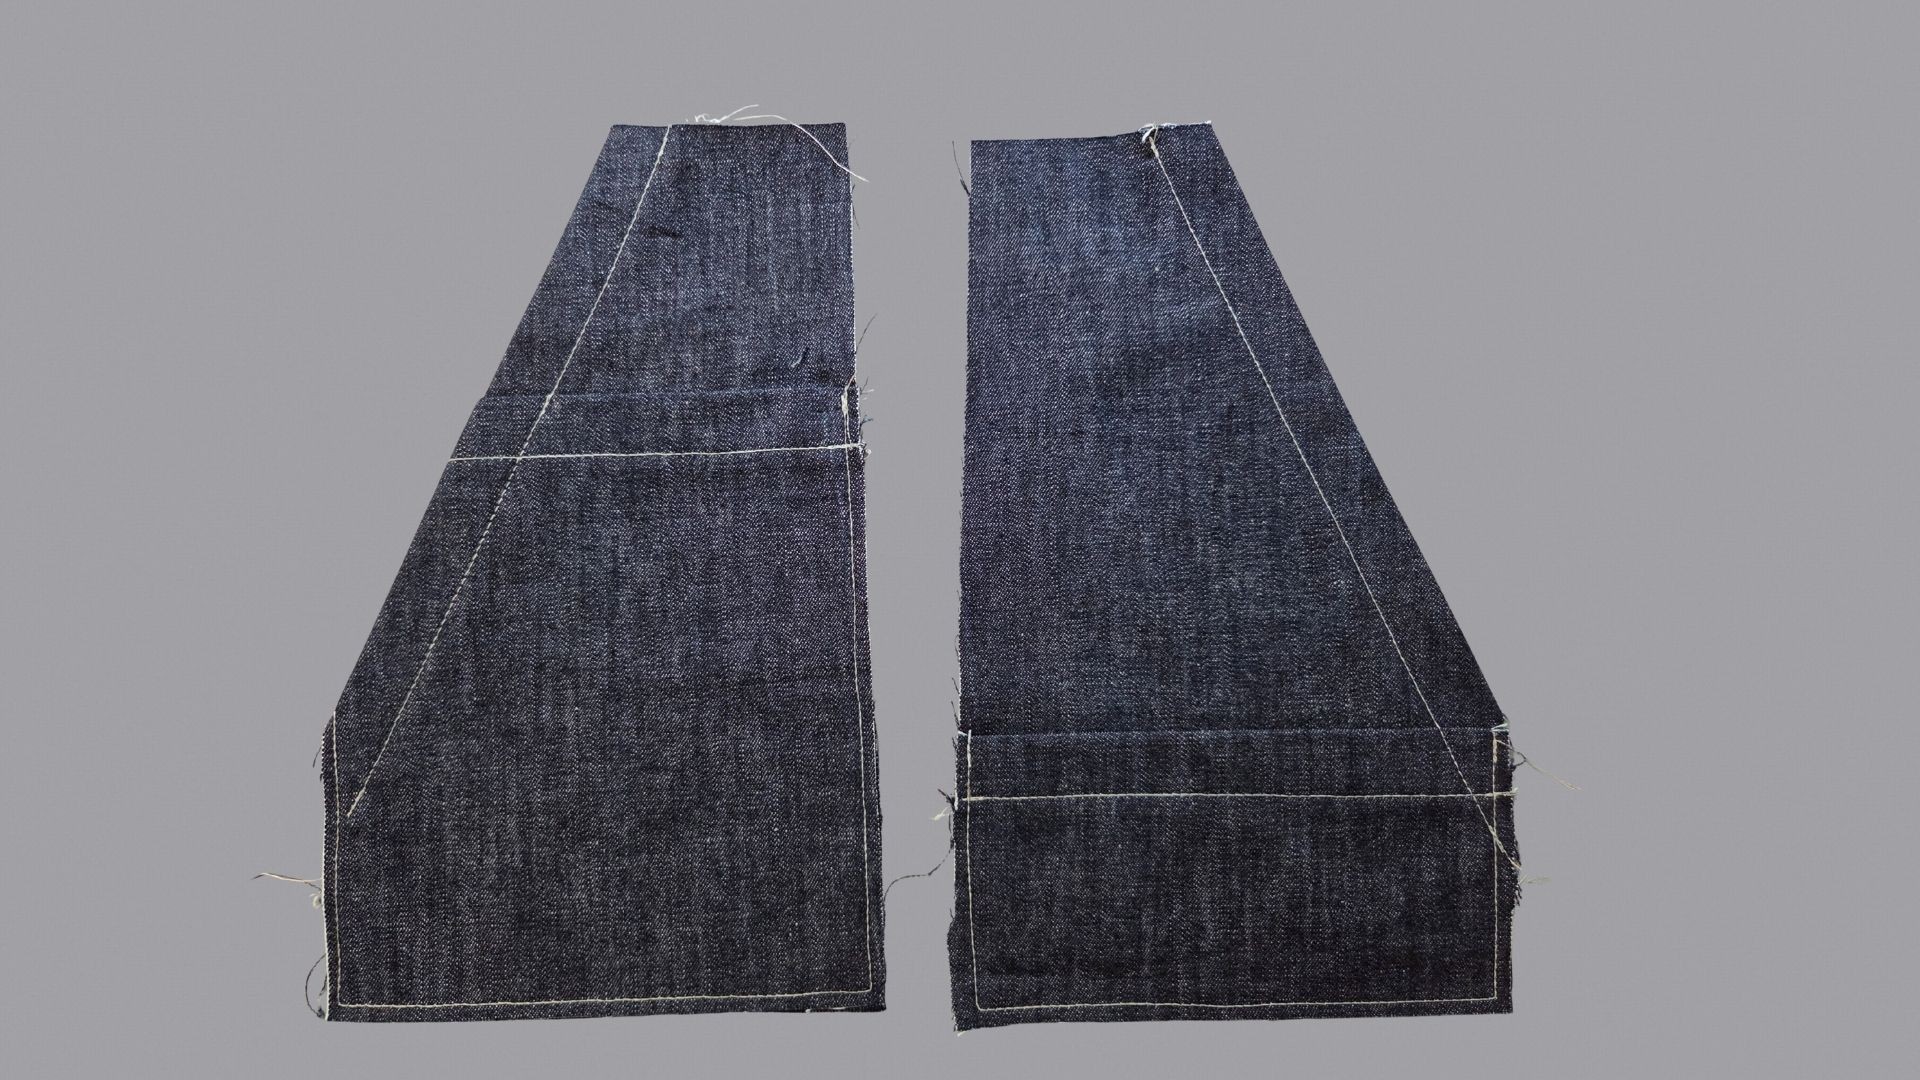
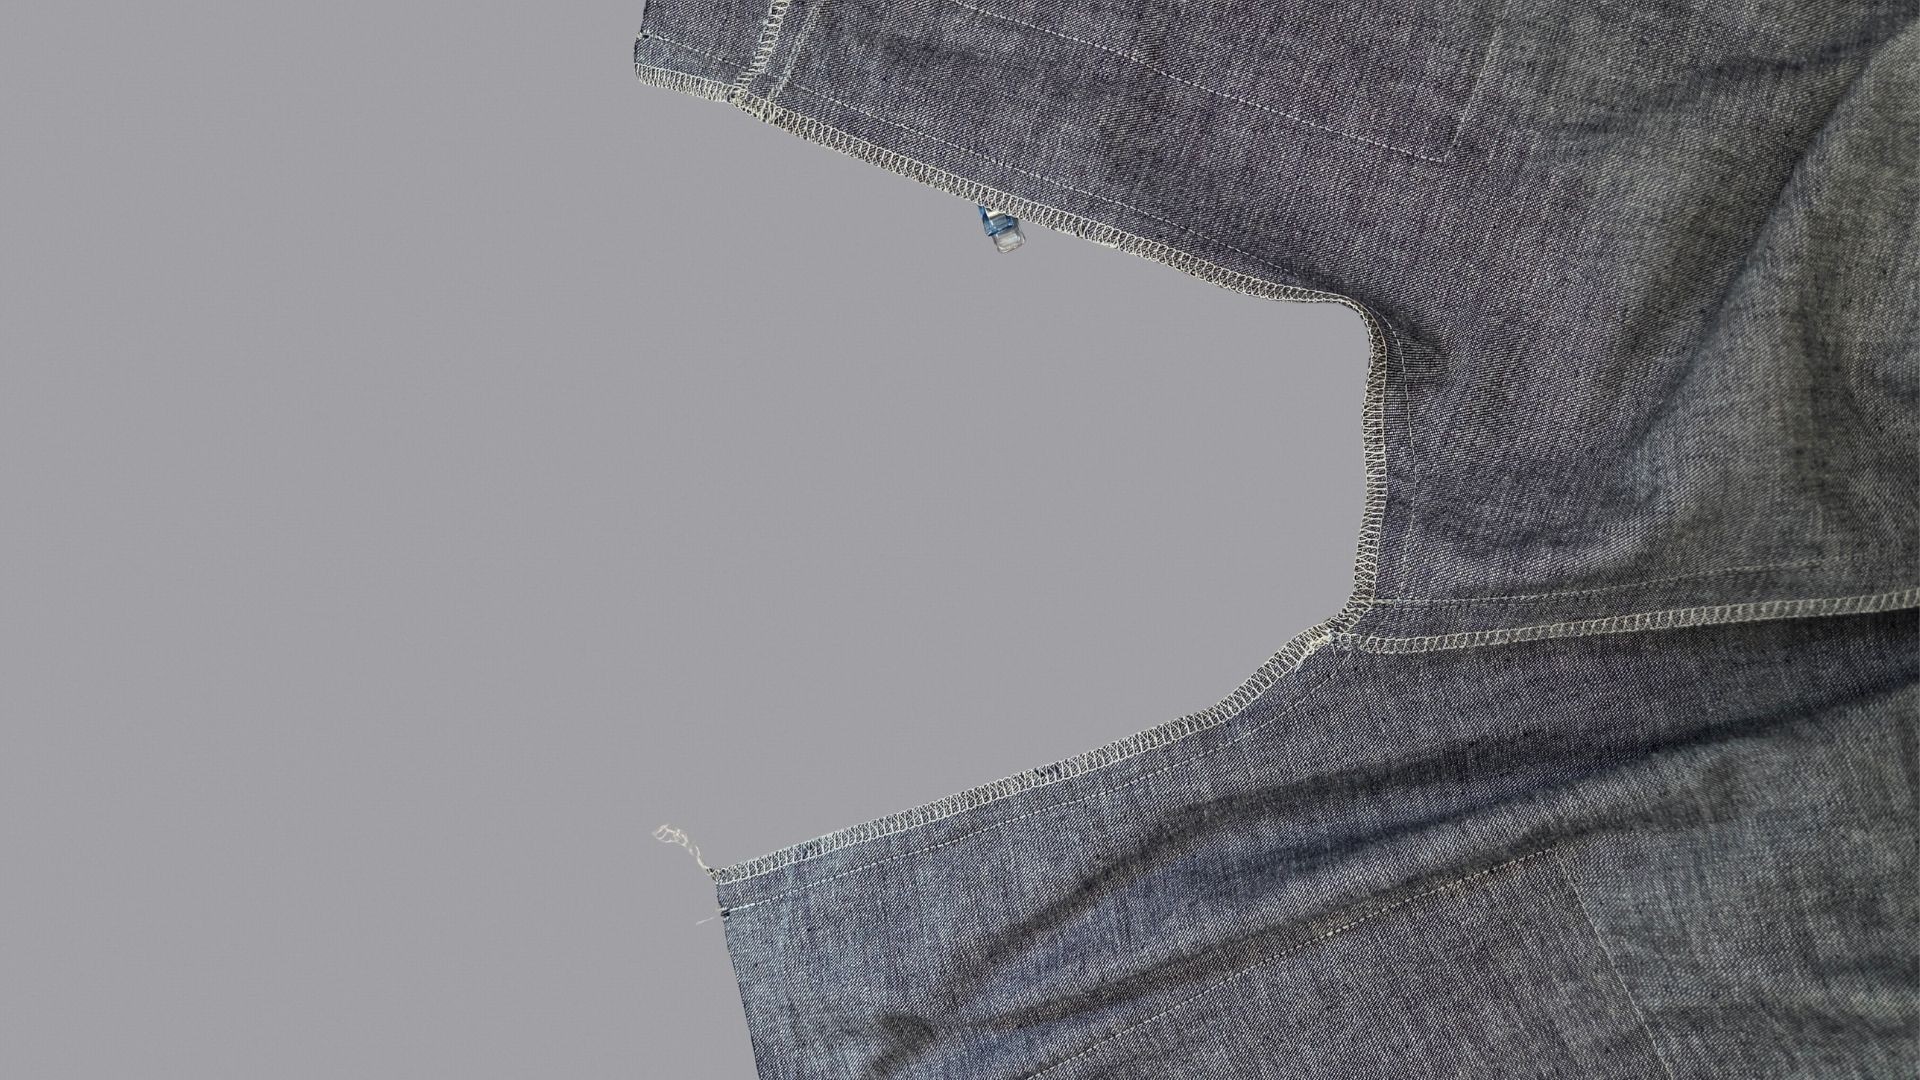
Here you can see how the left front trousers look from the left and right with the side part sewn on. You can now put these pieces aside.
Sew back pockets and yoke
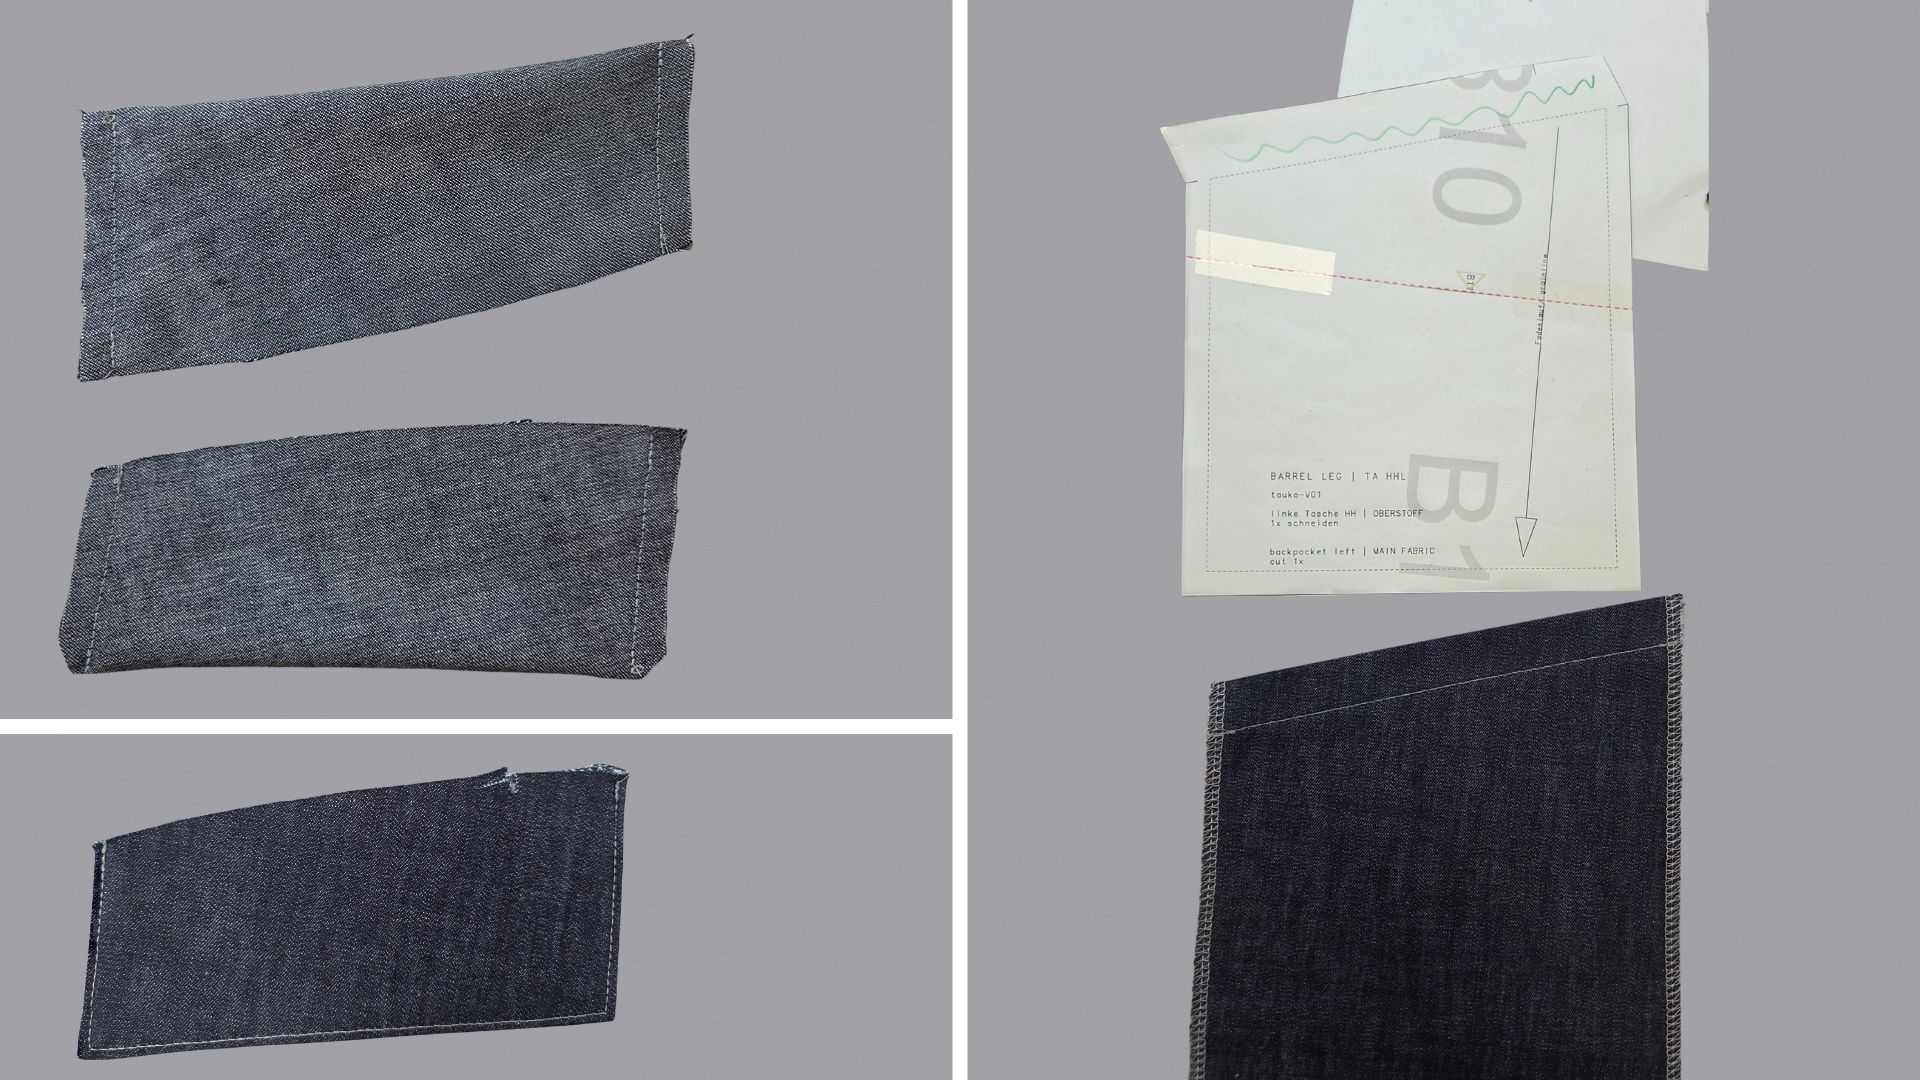
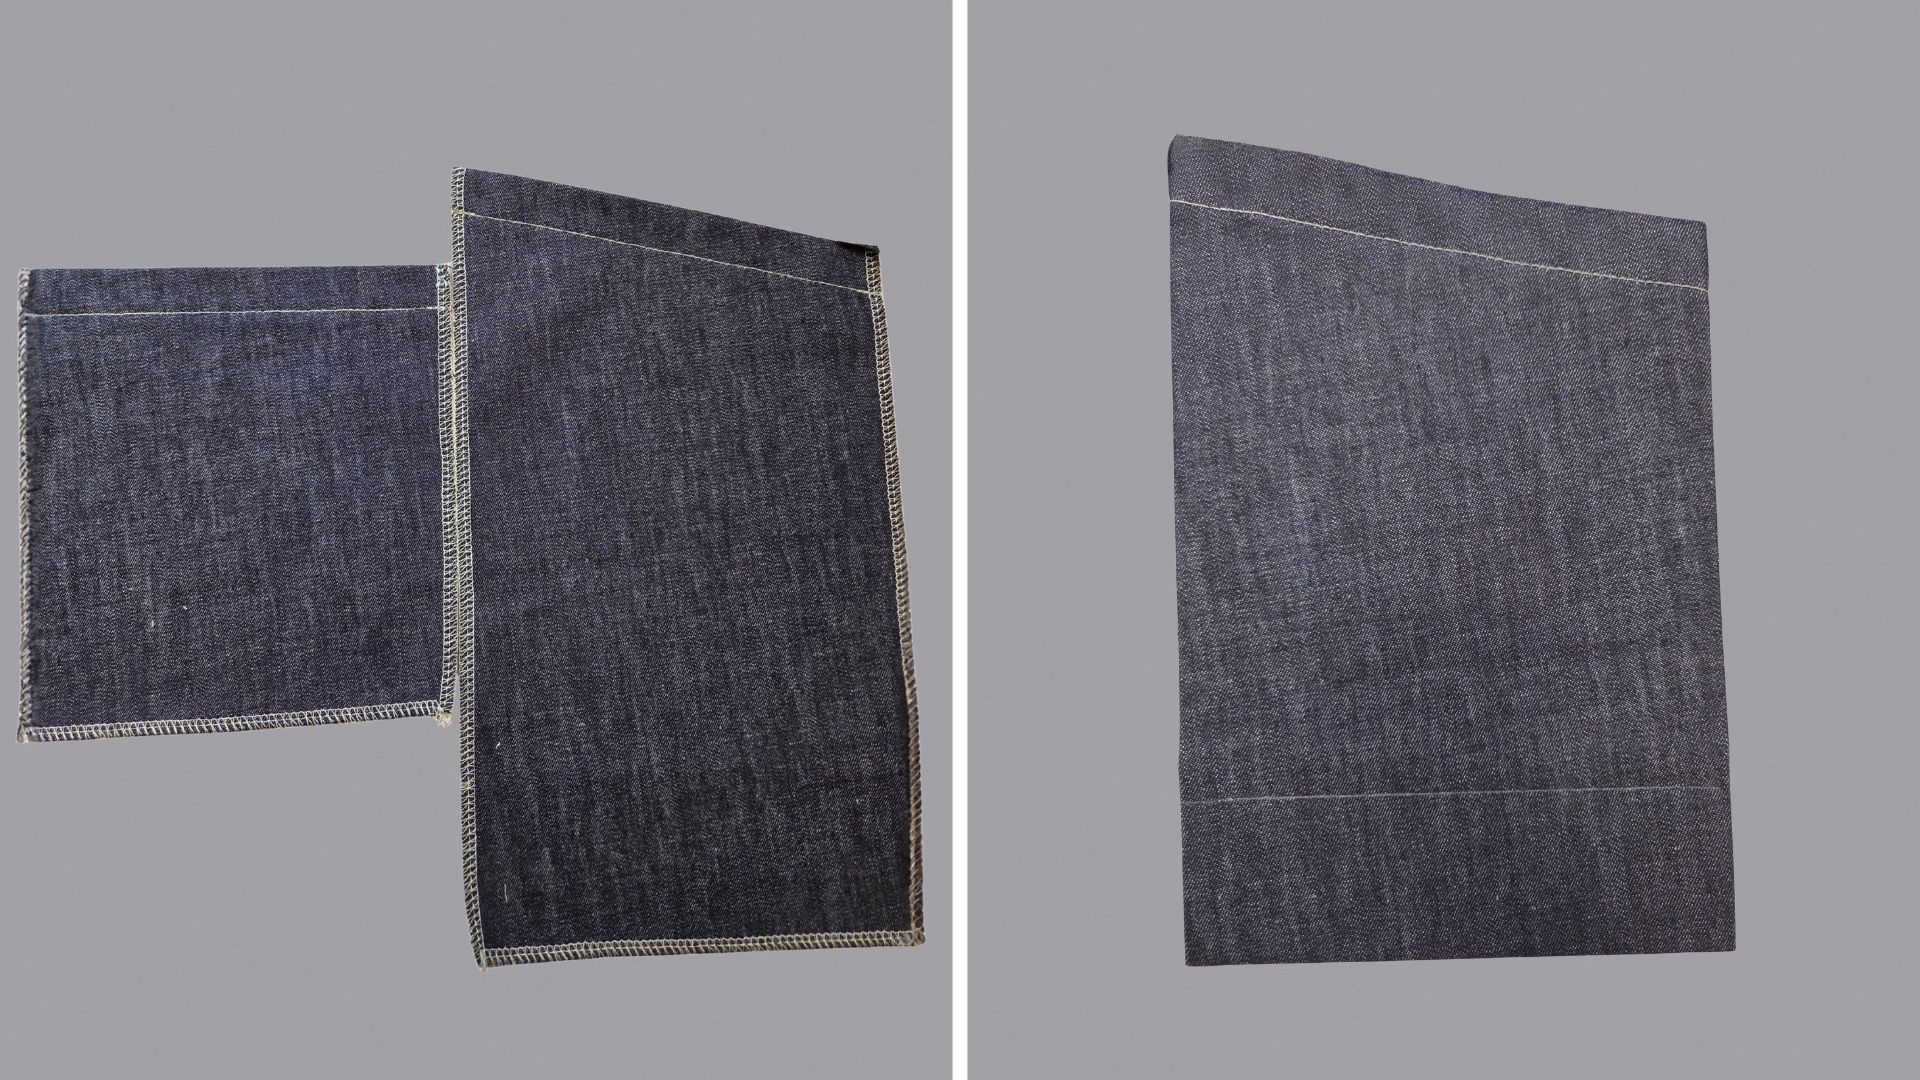
Let’s continue with the left back trousers. I opted for the flat pocket with flap. First, I fold the flap wrong sides together at the folded edge and sew the short sides. I cut back the seam allowances at the folded edge, as shown on the left in the middle. I press the seam allowances open, turn the flap and topstitch it close to the edge, as shown at the bottom left.
On the pocket, I fold the pocket opening inwards and topstitch it 2 cm from the edge as well. Then I press the seam allowances on the long sides and bottom inwards.

I pin the pocket onto the back trousers according to the marking in the pattern and sew it on close to the edge. Of course, you can also sew a double seam, stitch a pattern on the pocket or something similar – let your creativity run wild!
I then place the pocket flap on the trousers and secure it inside the seam allowance.
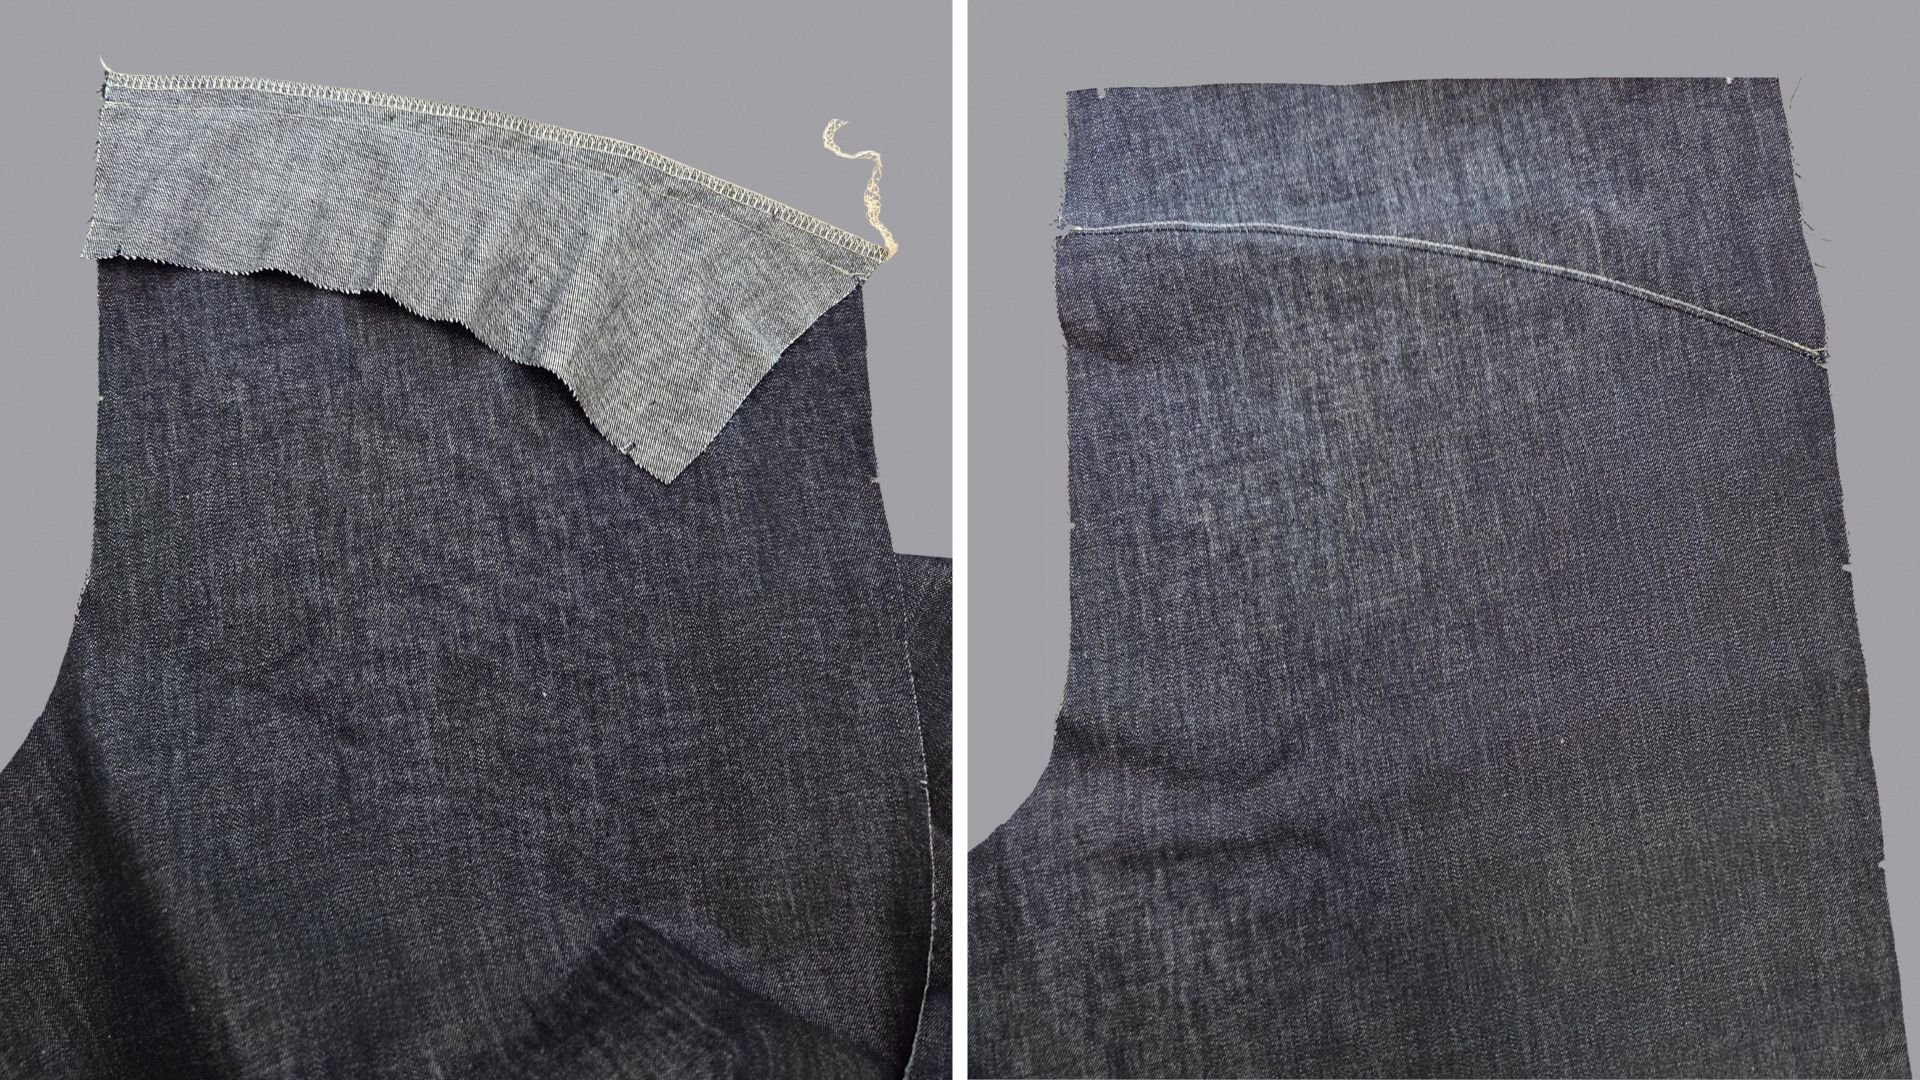
Next, the yoke is sewn onto the back trousers, right sides together. Again, be sure to note the notches in the pattern. I neaten the seam allowances together.
Then I fold the saddle upwards, press out the seam and topstitch it. Of course, you can also topstitch several decorative seams next to each other here. I then neaten the long raw edges.
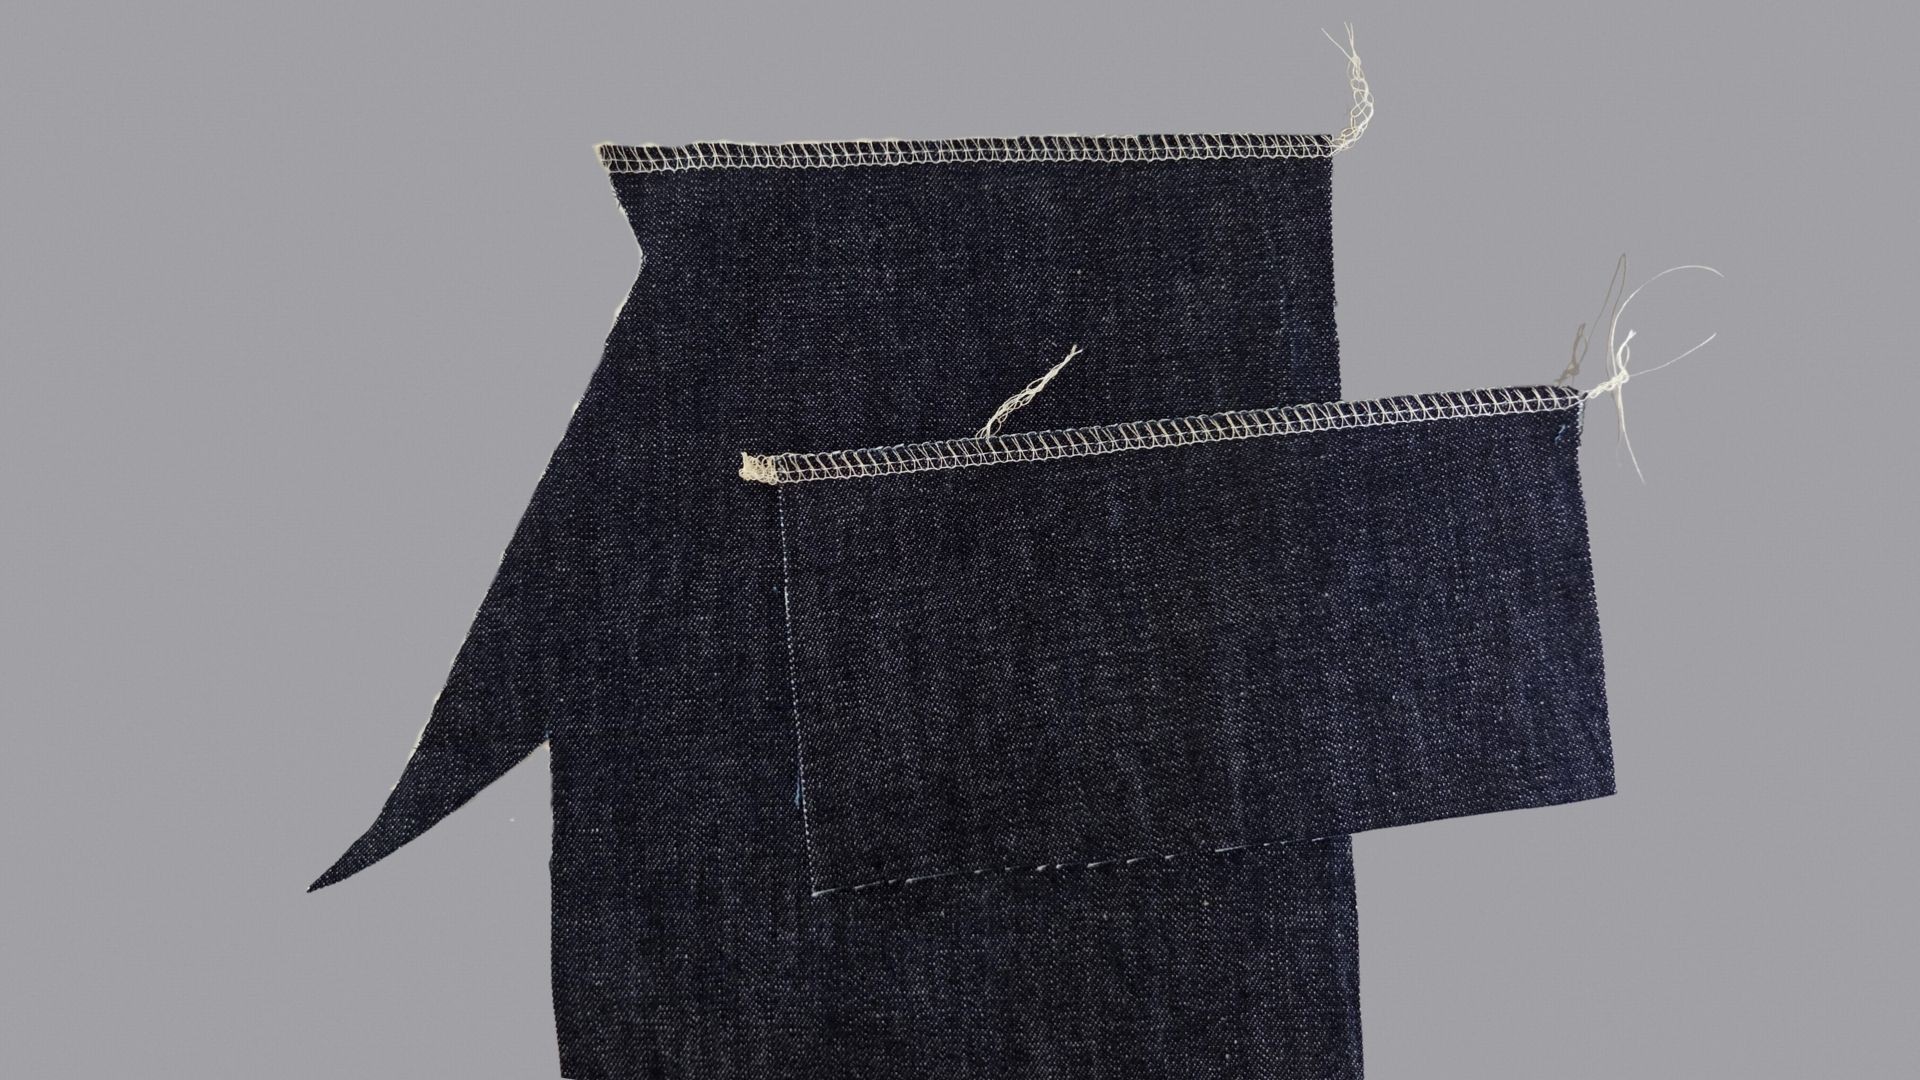
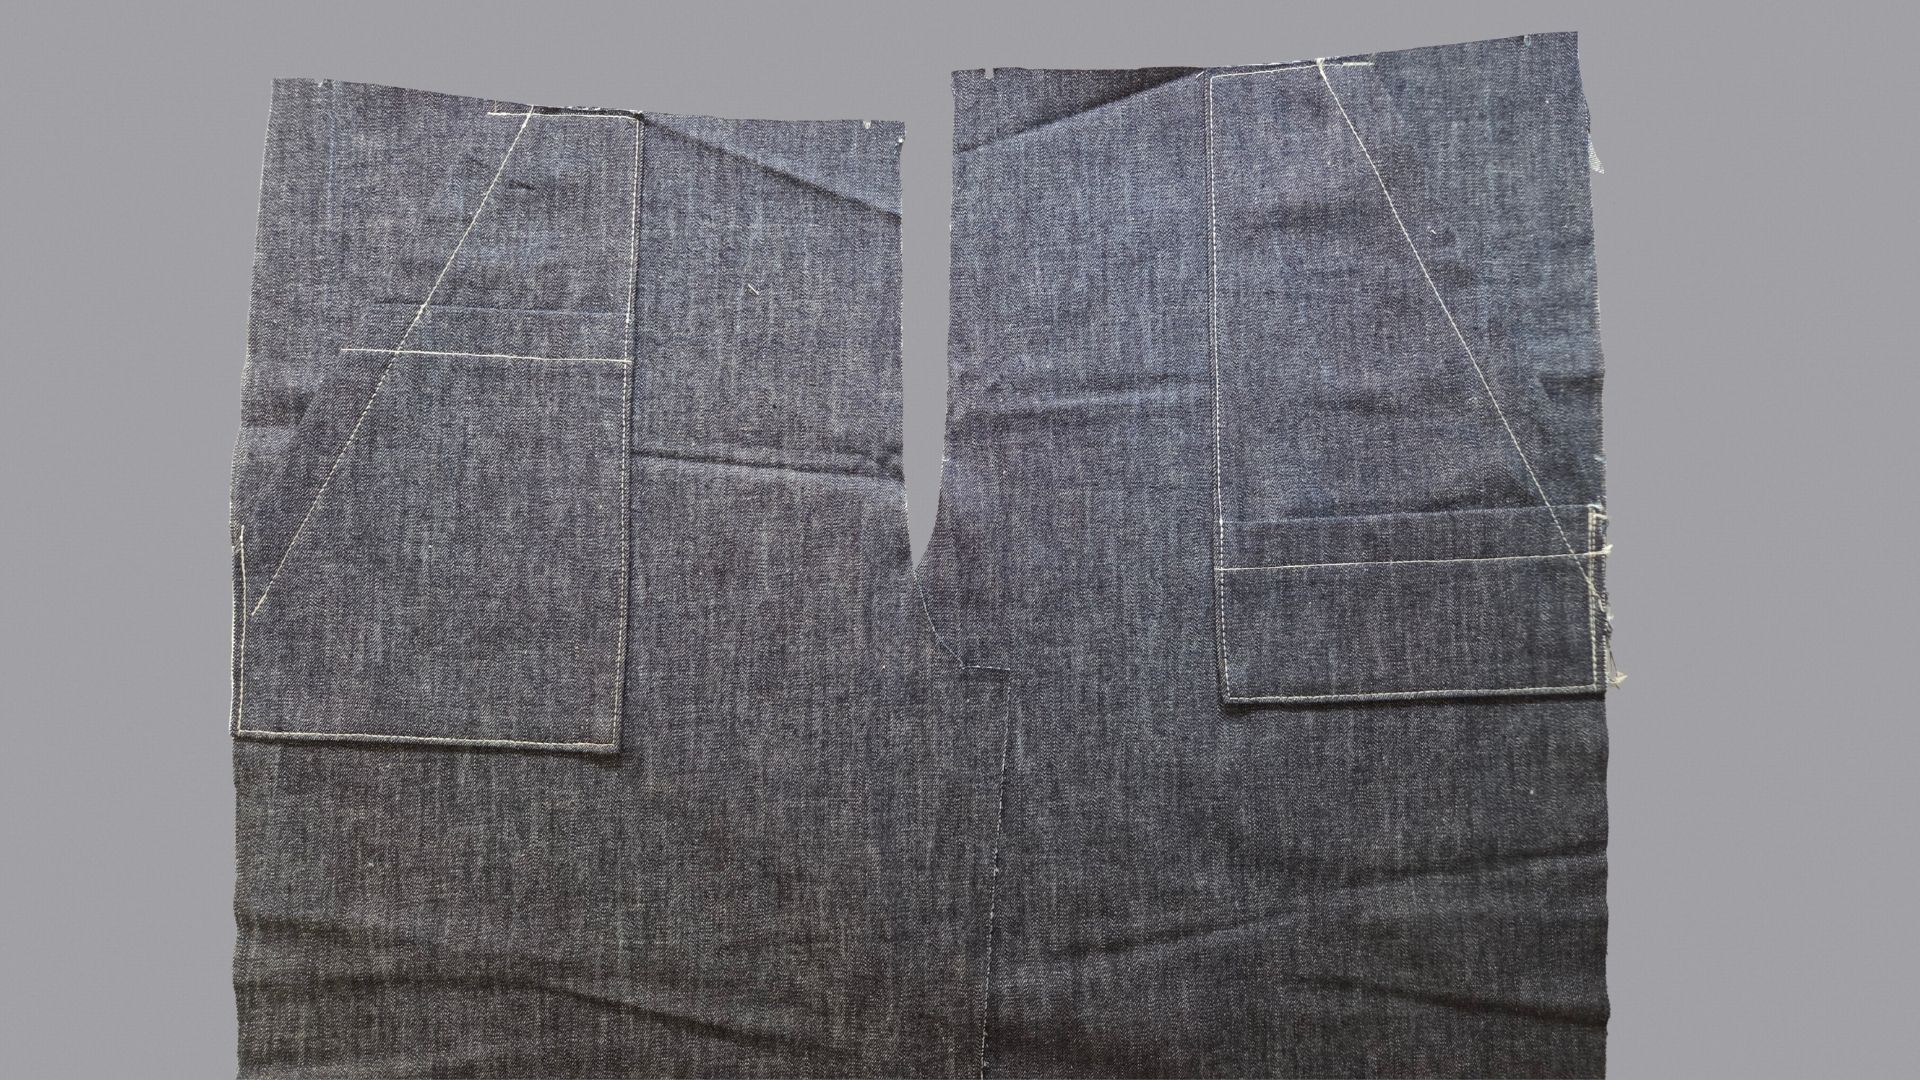
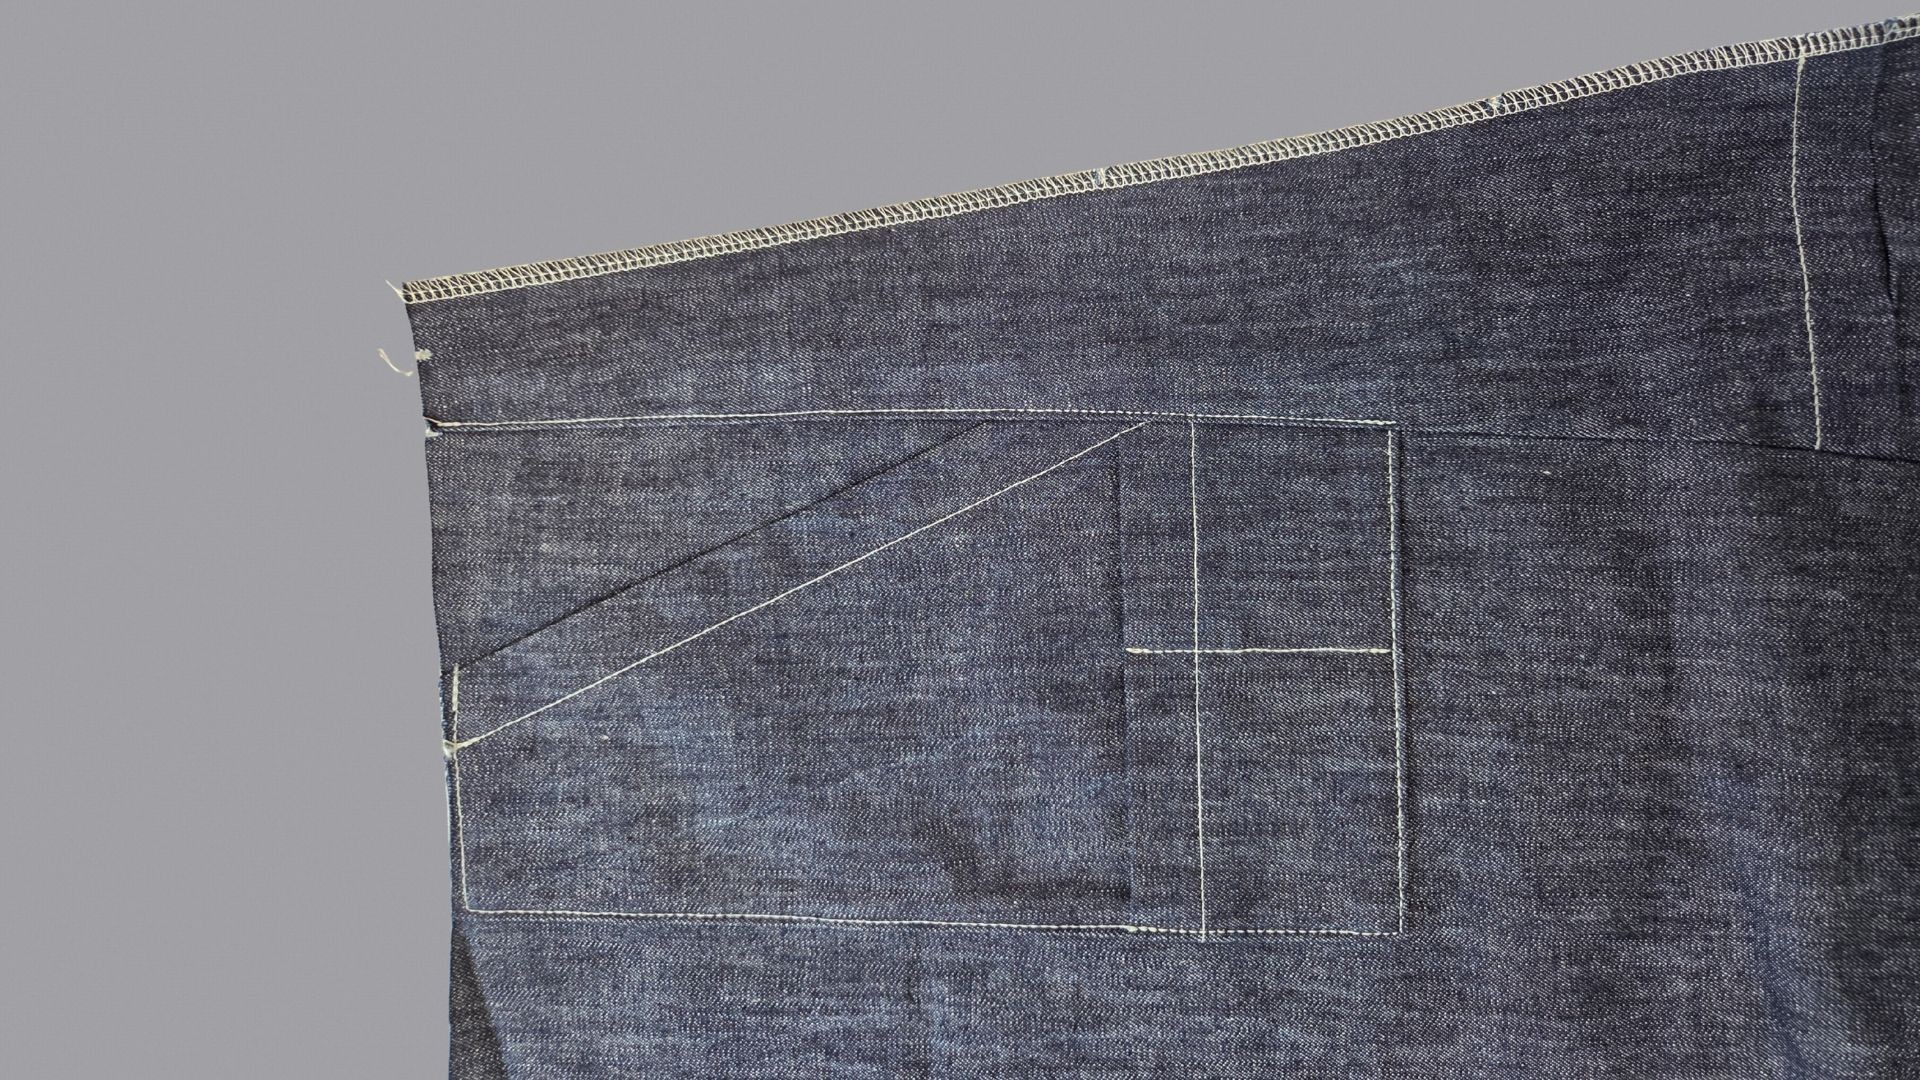
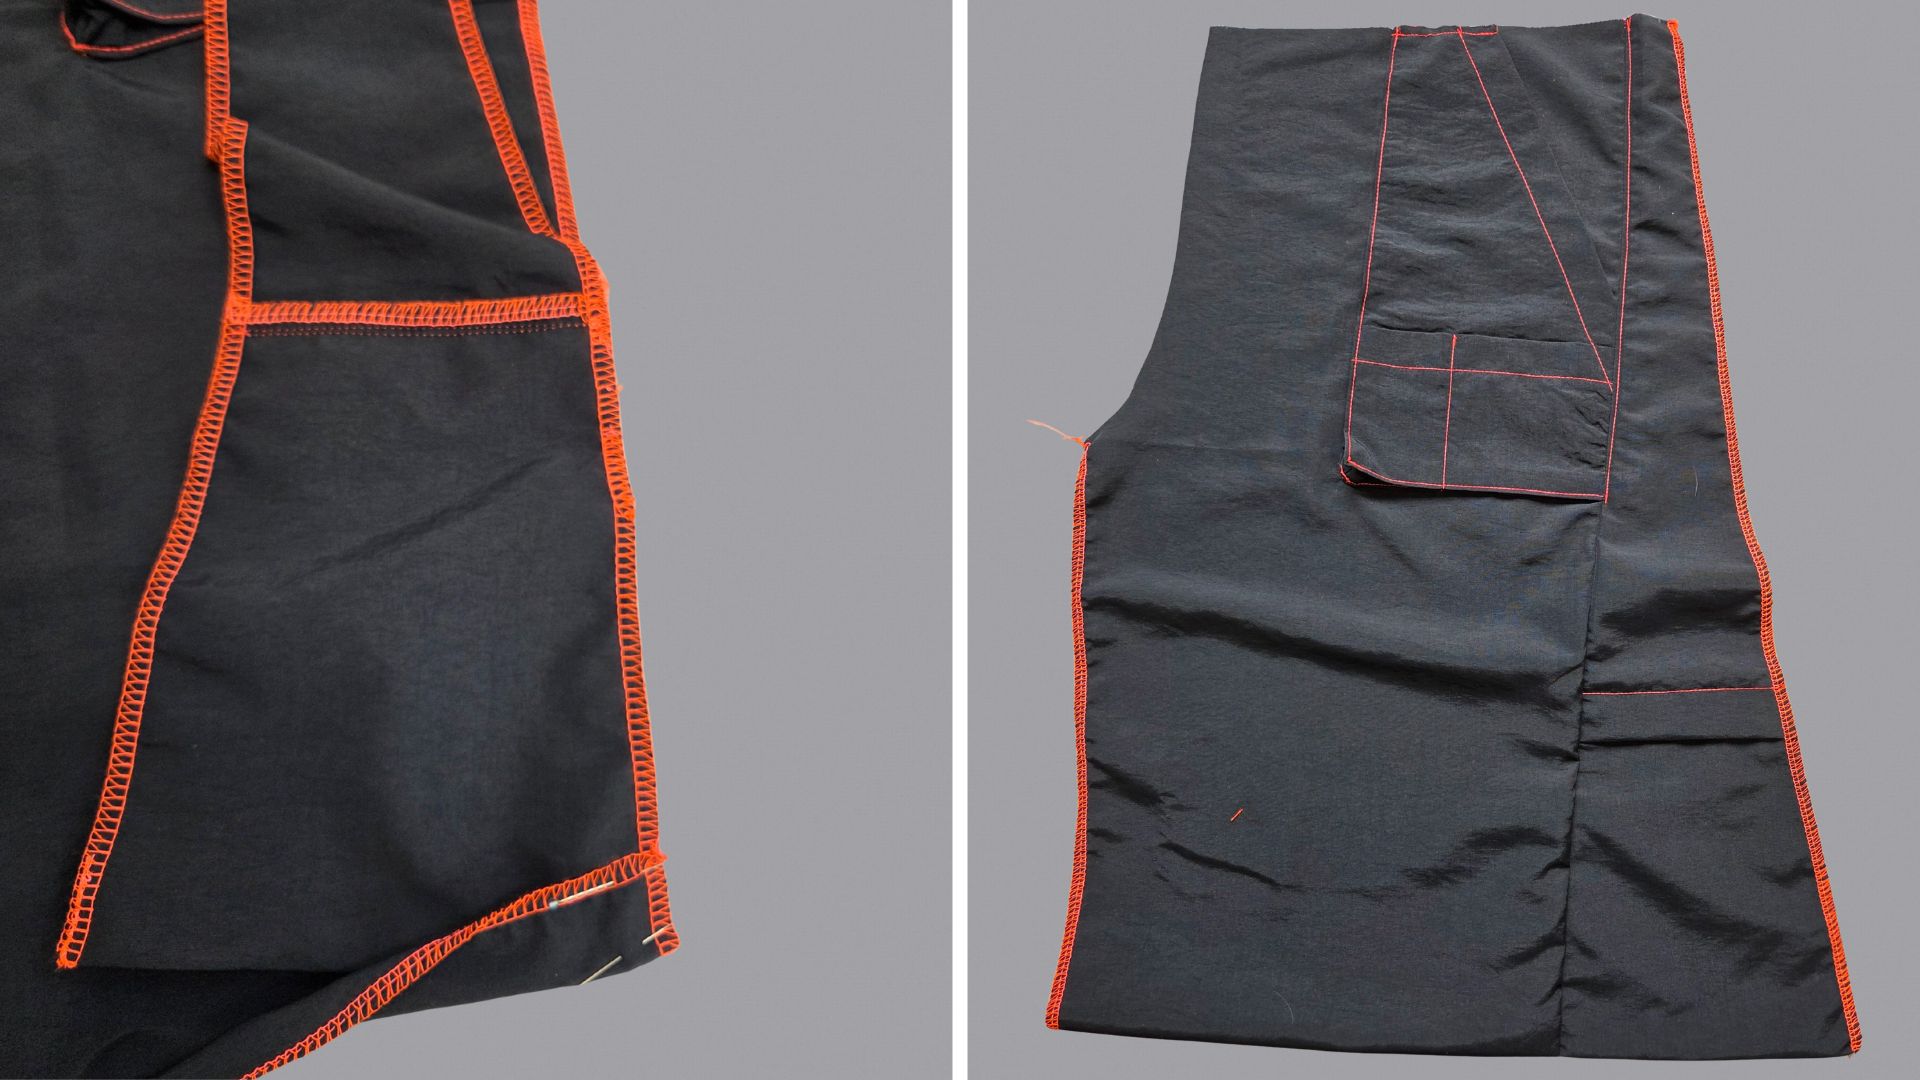
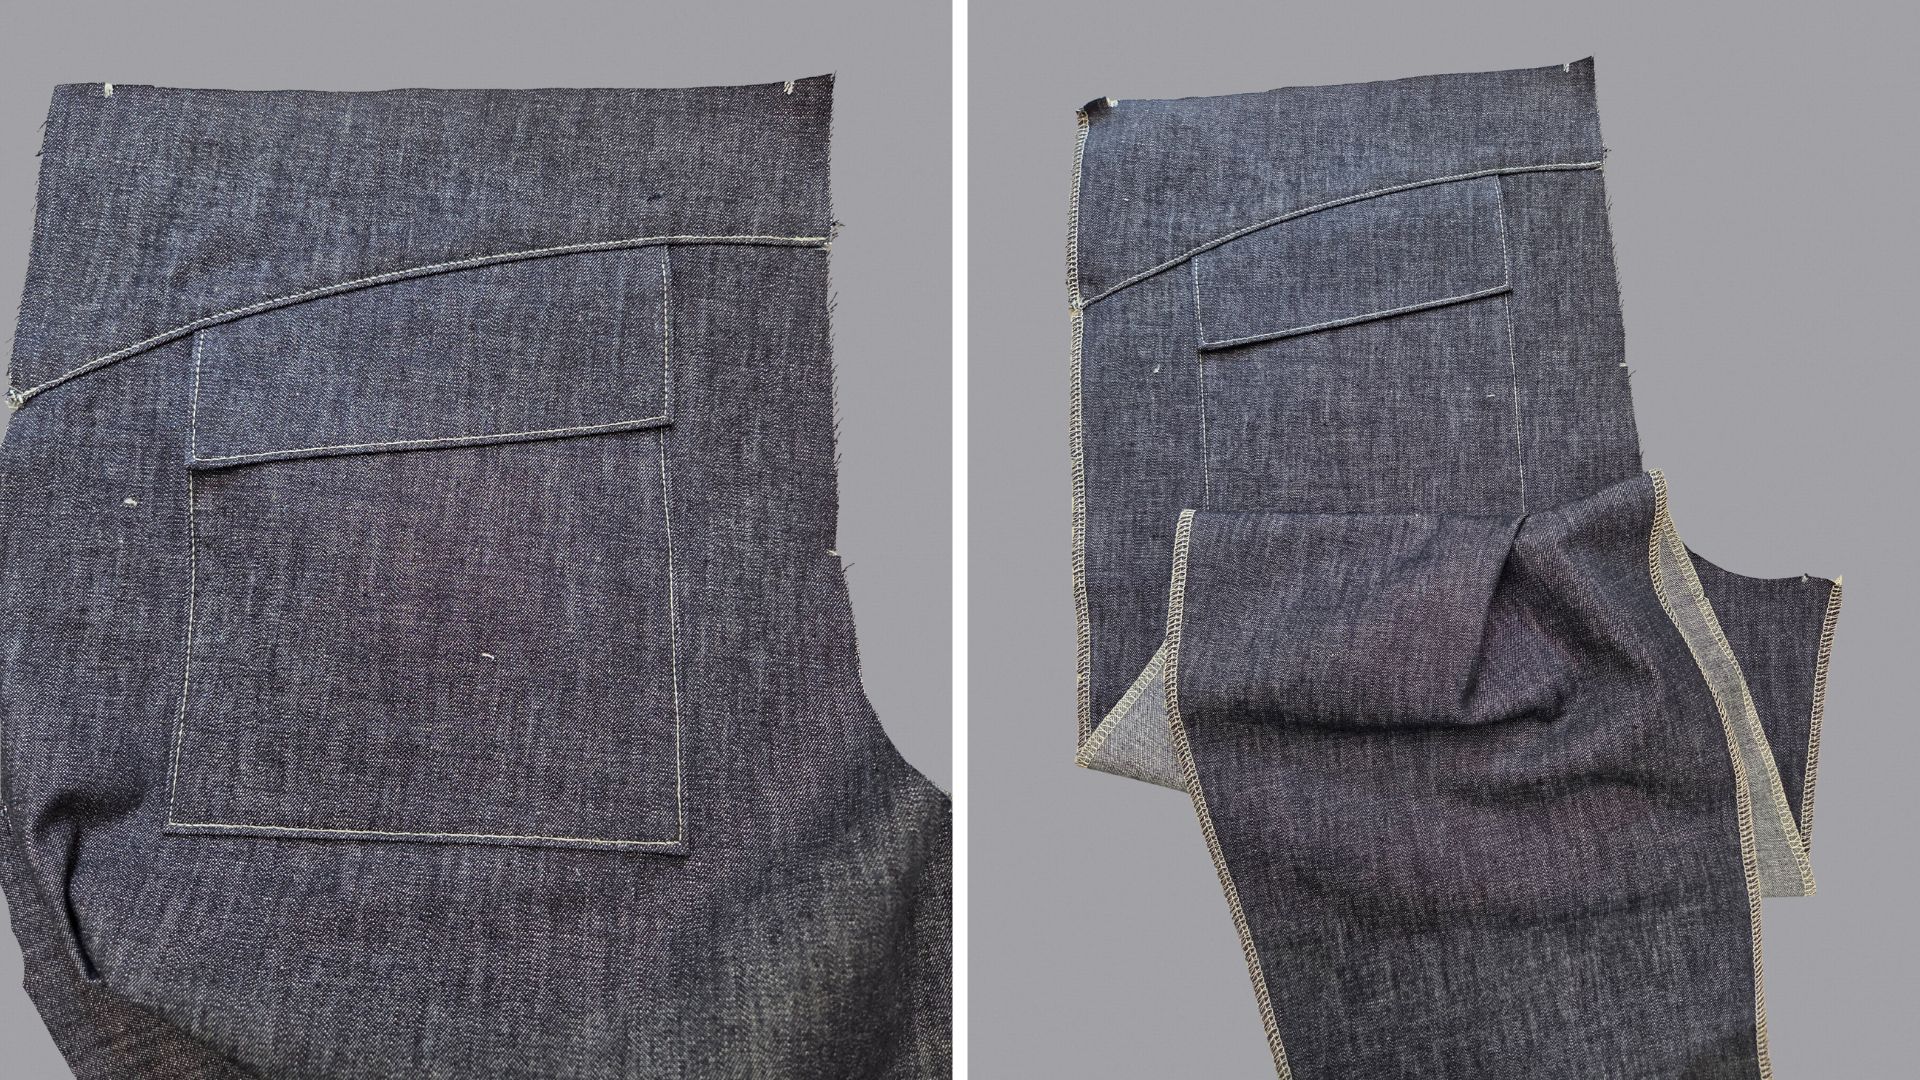
The right back trousers have the upper pocket with flap (center of the picture) and the lower pocket (right in the picture). On both, I turn the opening edges inwards and topstitch them 2 cm from the edge.
To sew the flap to the top pocket, first fold it right sides up at the notches and sew the short sides as for the flap of the left back trousers, cutting back the seam allowances. After pressing the seam allowances open, turn the flap inside out and press.
The seam allowances of both pockets are then ironed to the inside. On the top pocket, I transfer the marking for the stitching line for sewing on the pocket from the pattern. The pocket and the flap are sewn on later in one step.
Below this line, I topstitch the flap on the short sides and the bottom edge (see picture after next).
Now I sew the yoke on. I pay attention to the notches again, neaten the seam allowances together, press the yoke upwards and topstitch it.
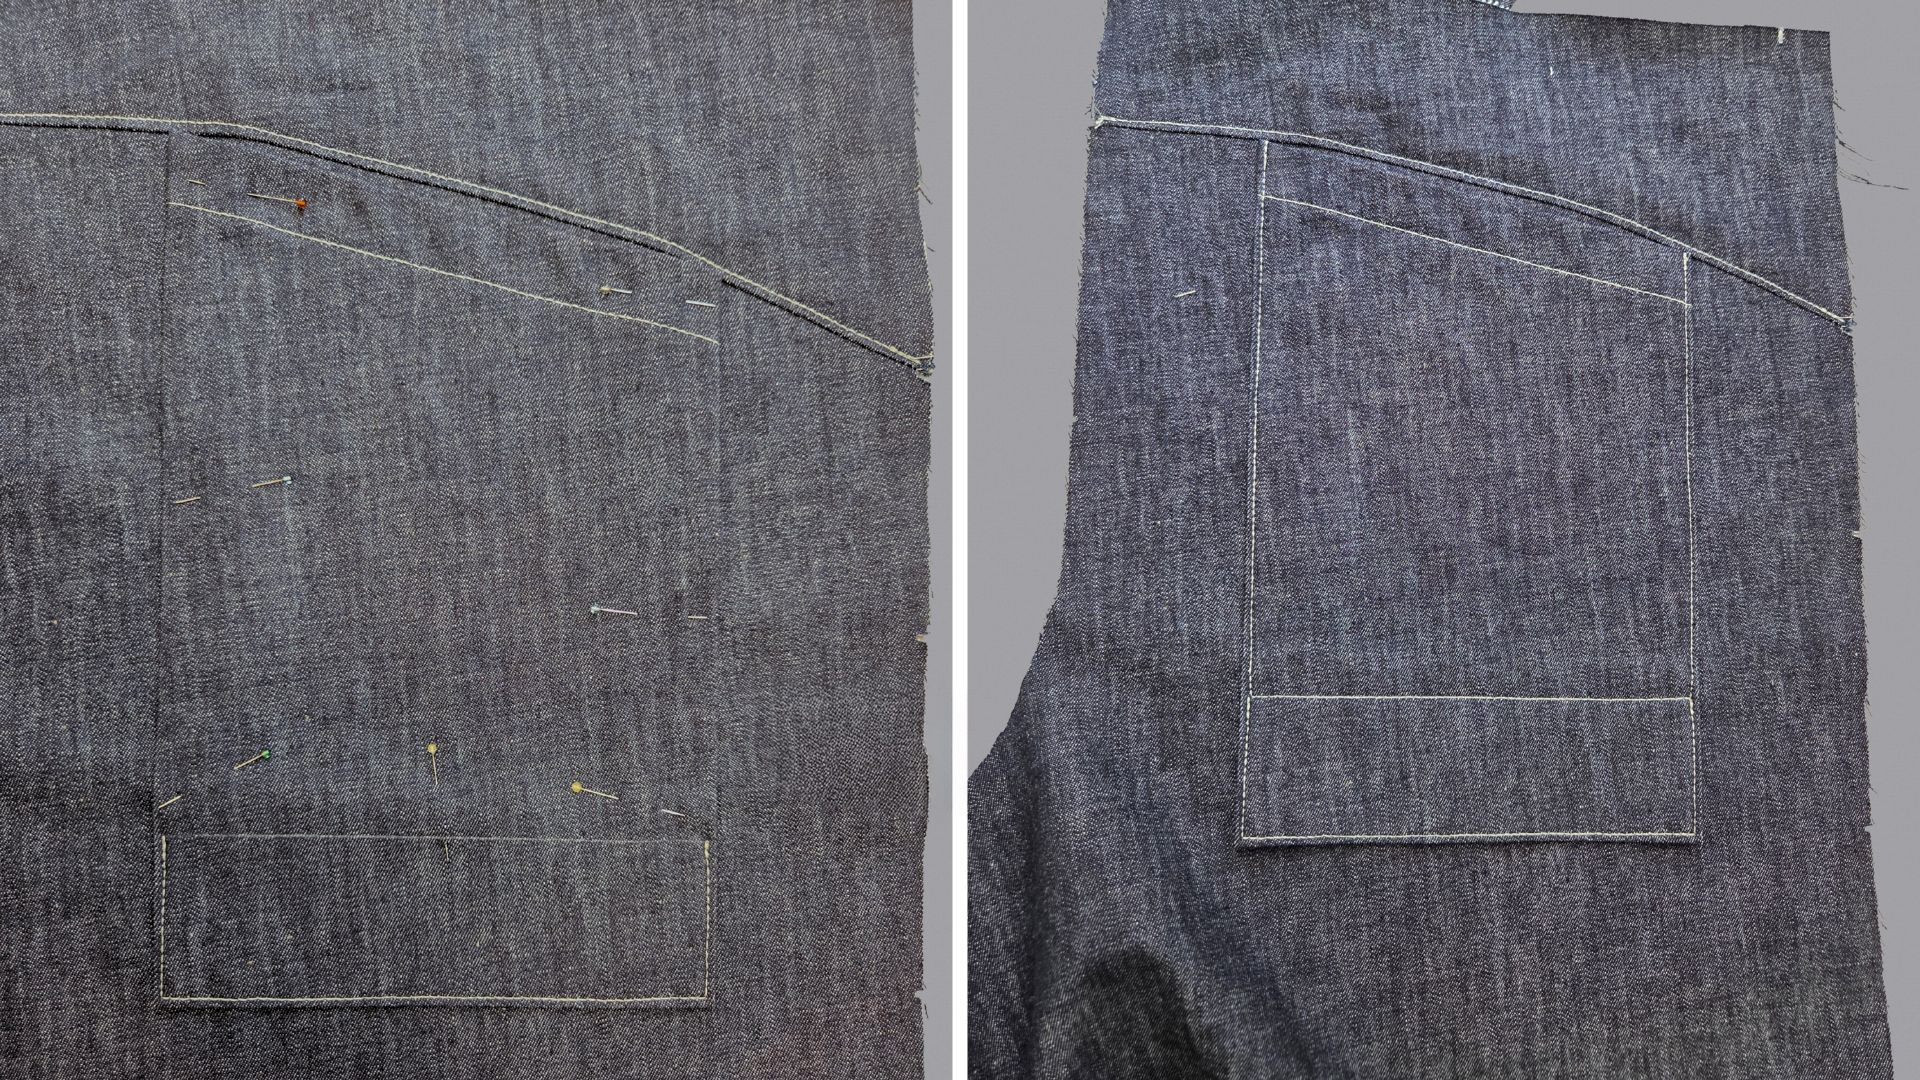
Then I pin the pocket to the back trousers according to the markings in the pattern and topstitch it in place. My seam meets the topstitching of the flap at the sides and I sew the flap in place with the bottom seam.
To sew on the lower pocket, I fold the flap upwards and pin it in place. Then I pin the pocket bag onto the trousers and stitch it in place.
I then finish the long raw edges of the back trousers with the overlocker.
Back cargo pockets
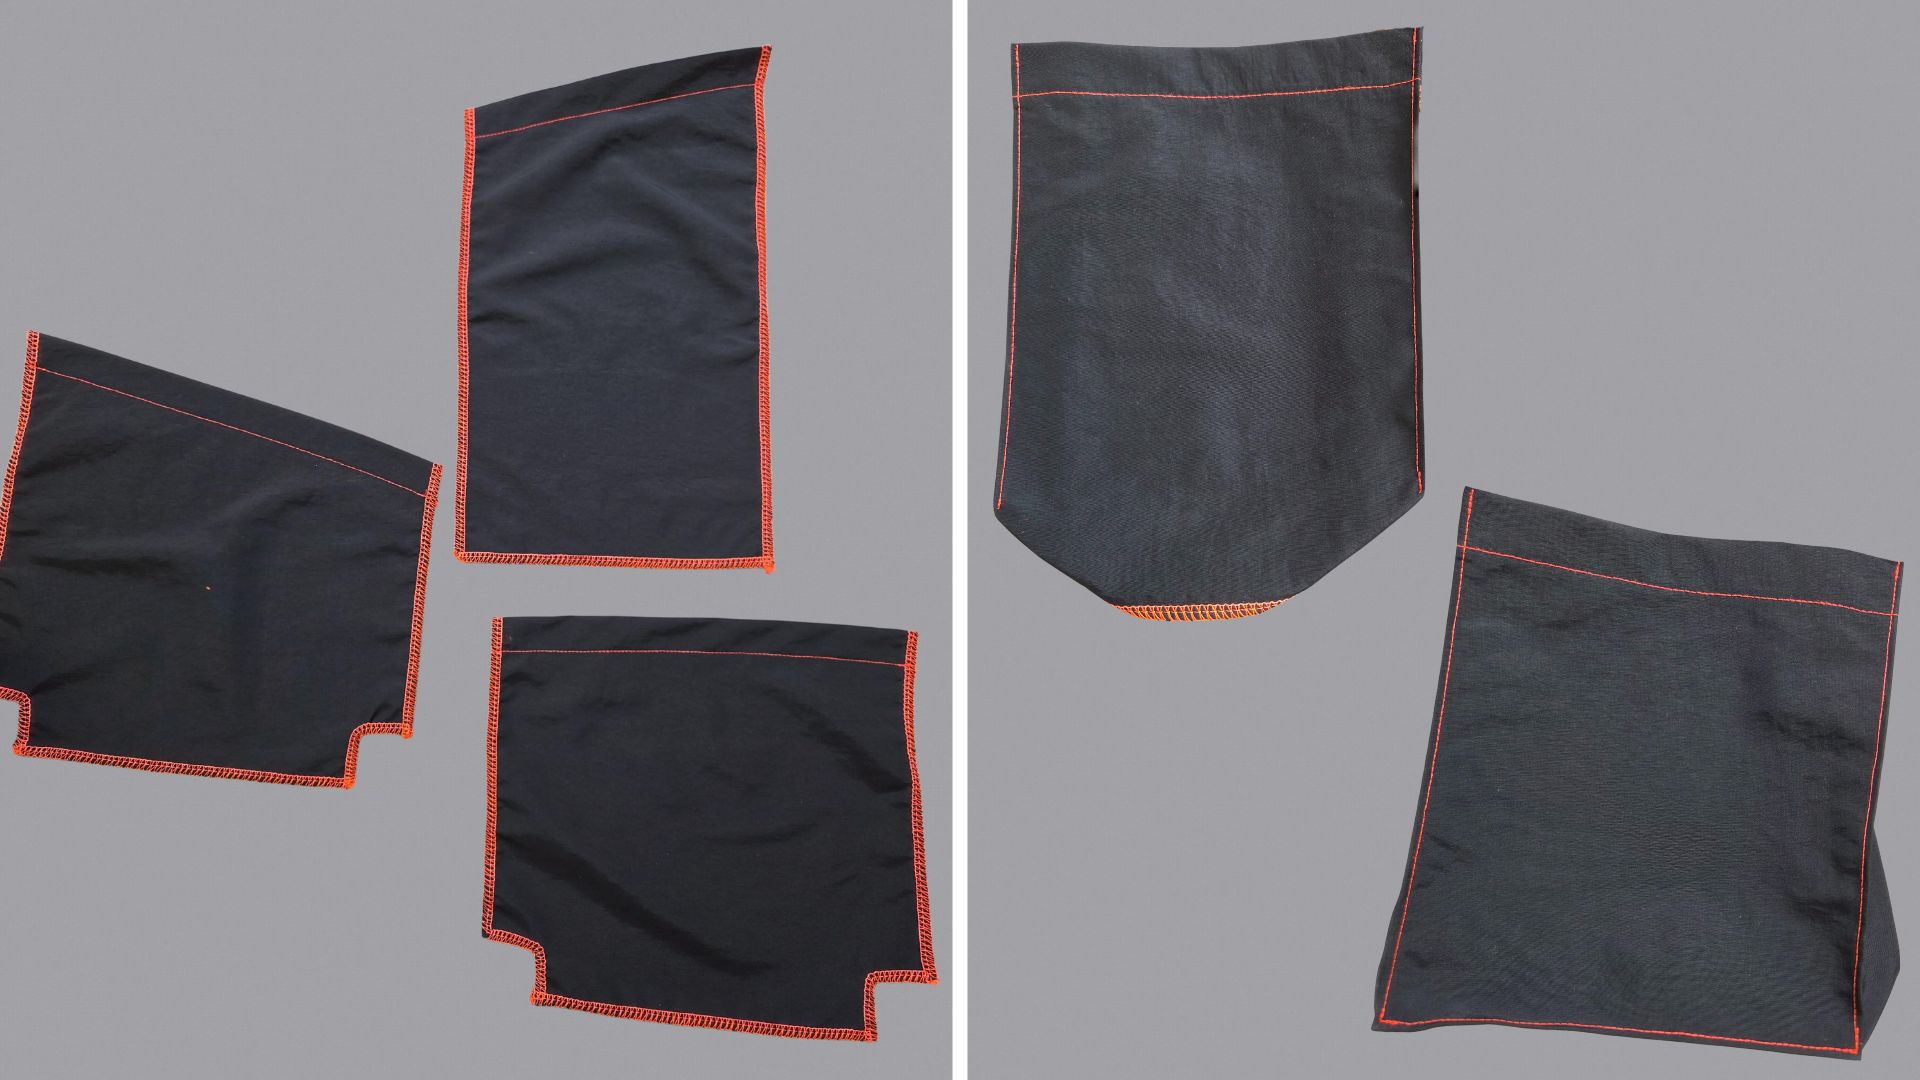
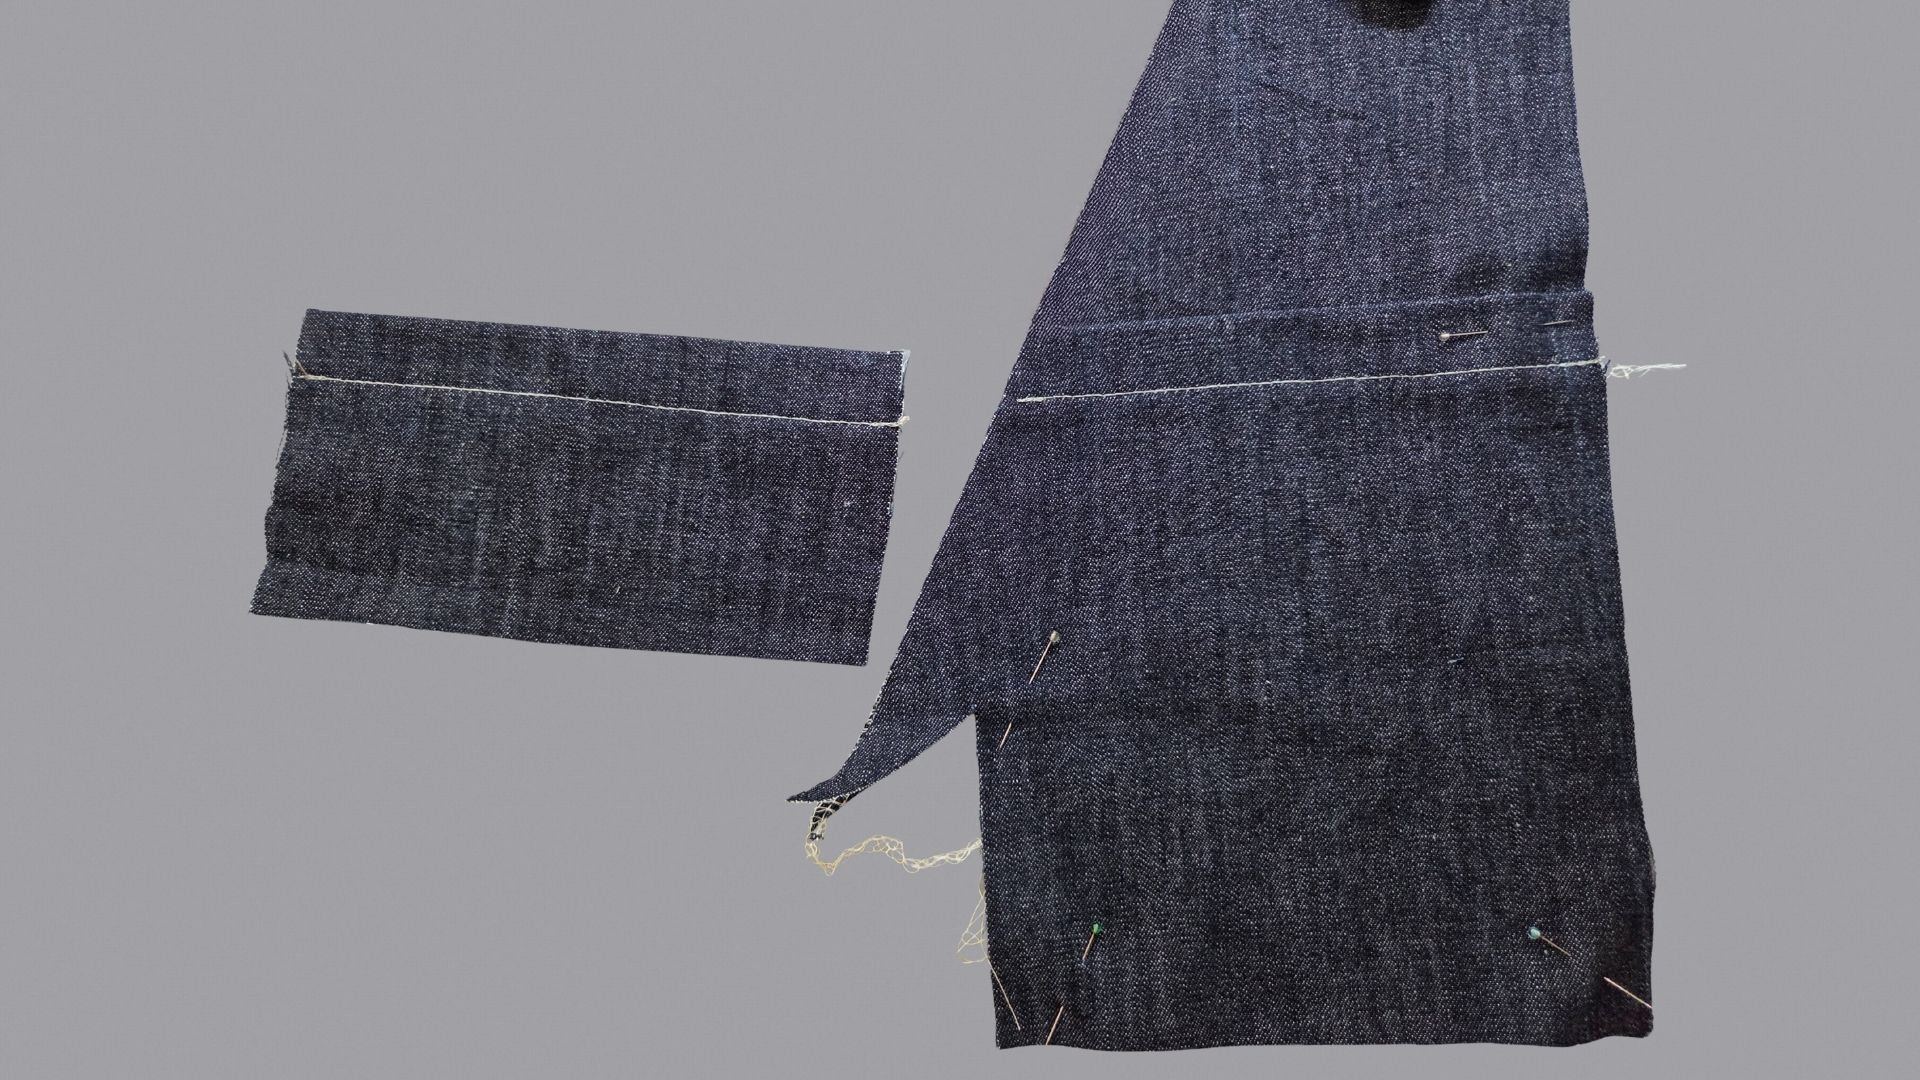
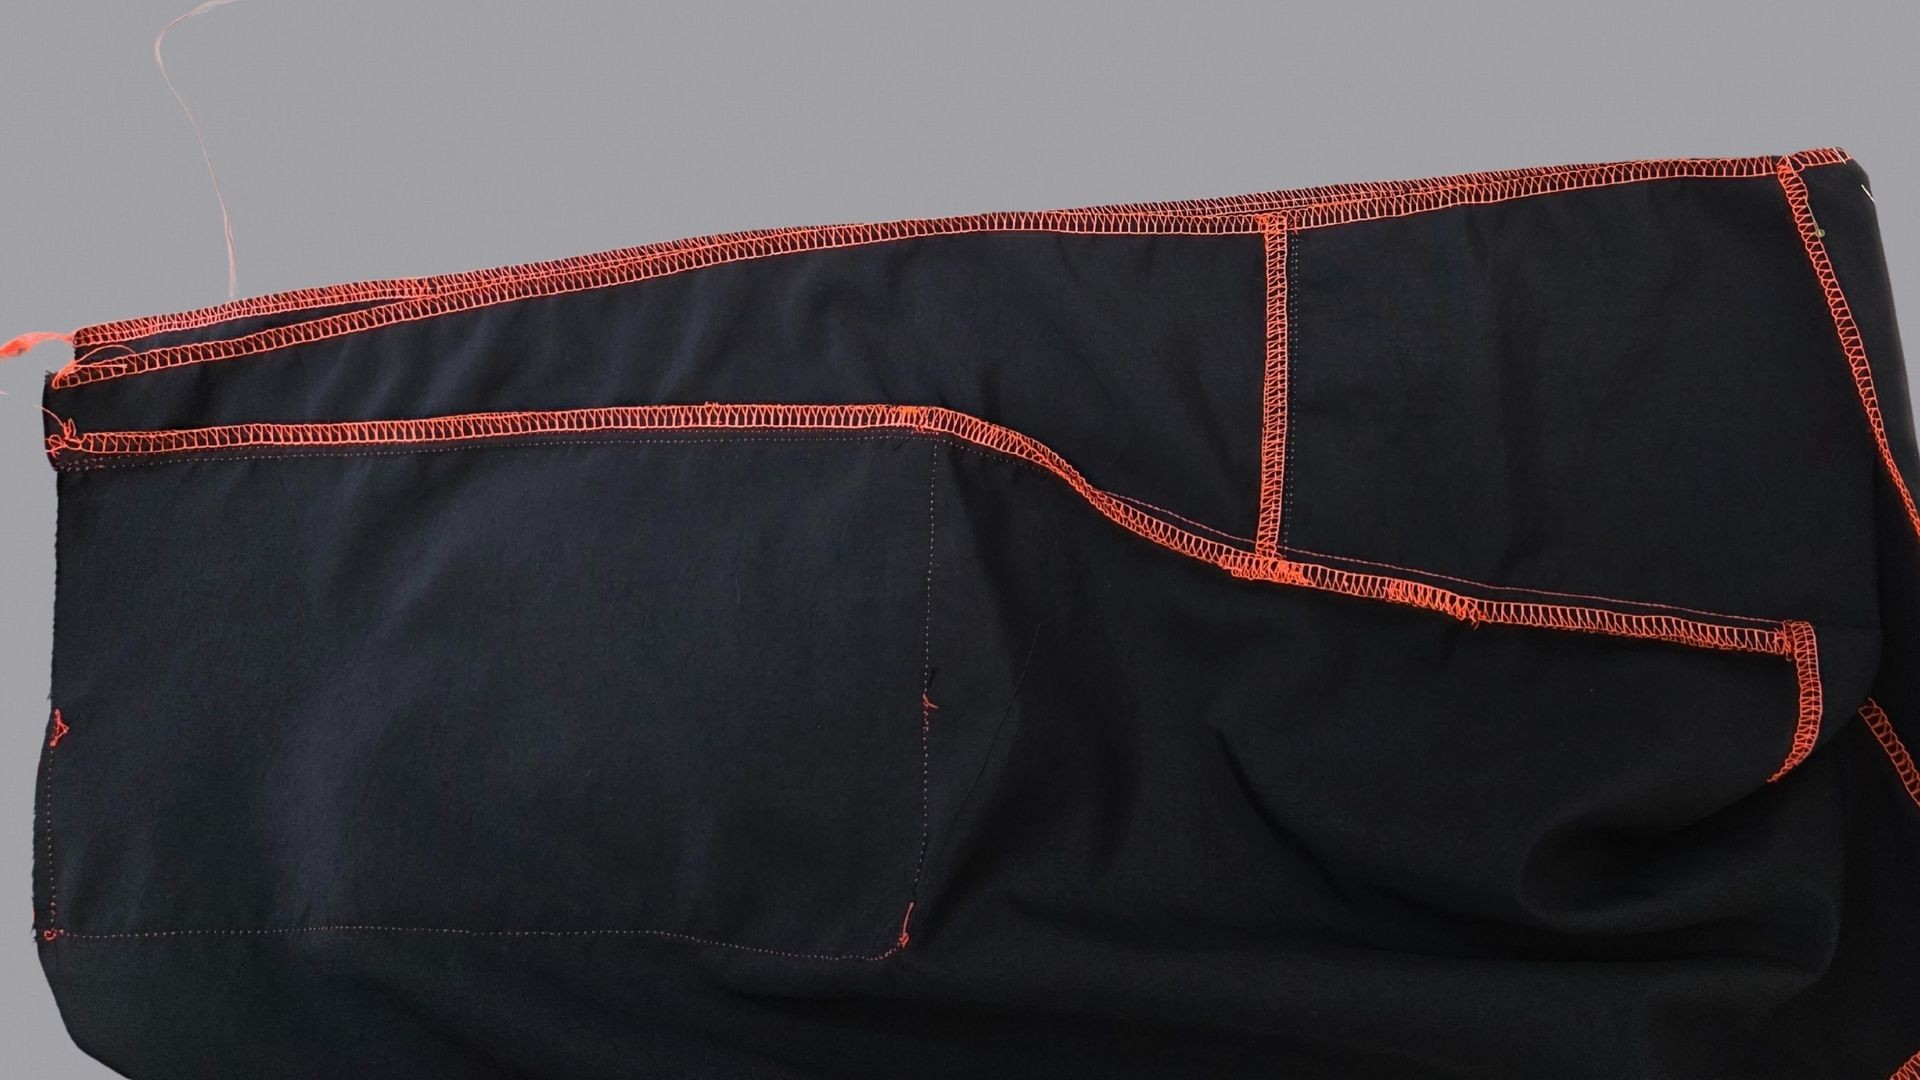
At the top left of the picture you can see the back pocket with flap, which cannot be worked as a cargo pocket. I work the other two pocket bags as cargo pockets in exactly the same way as the front cargo pockets. First, I press the seam allowance and the other 3 cm and then sew the two bottom corners. I then topstitch the wide turn-in close to the edge and press the pleat.
Then I pin the pocket bags onto the trousers, topstitch them close to the edge and secure the upper edges with an additional seam approx. 2 cm long.
Here you can see the lower pocket bag on the right back trouser. The short seam at the pocket opening prevents the pocket bag from slipping or opening up.
I finish the two long sides of the back pants and, as I have sewn the pockets in the side part, the hem as well.
Sew inner leg seam
Now I join the front and back trousers on the inside of the leg. Taking the notches into account, I pin the two pieces and sew them together.
If you want to topstitch the seam allowances from the right side, iron them to one side. Otherwise you can also iron them apart.
Sew and topstitch the crotch seam
Now I can sew the crotch seam. I pin both trouser parts together, right sides facing. The notches and inner leg seams meet exactly.
If you don’t want to topstitch the seam as described in the next step, I recommend sewing it twice or with a triple stitch to prevent it from coming undone when there is a lot of movement.
After sewing together, I neaten the seam allowances and press them to one side.
I decided to topstitch the crotch seam from the right side as well and ironed the seam allowances to the side on which I wanted to topstitch.
Close the side seam and sew the hem of the cargo barrel leg
To close the side seam, I pin the back trousers to the side panel. Here, too, I pay attention to the notch. I then press the seam allowances open.
Then I turn the hem inwards twice by 2 cm and iron it in place.
I inserted my elastic cord into the hem afterwards. Depending on the size of the buttonholes, it may be easier to do this before you sew the hem in place. Then remember to pull the cord stopper onto the cord and knot the cord ends well.
I then topstitch the hem.
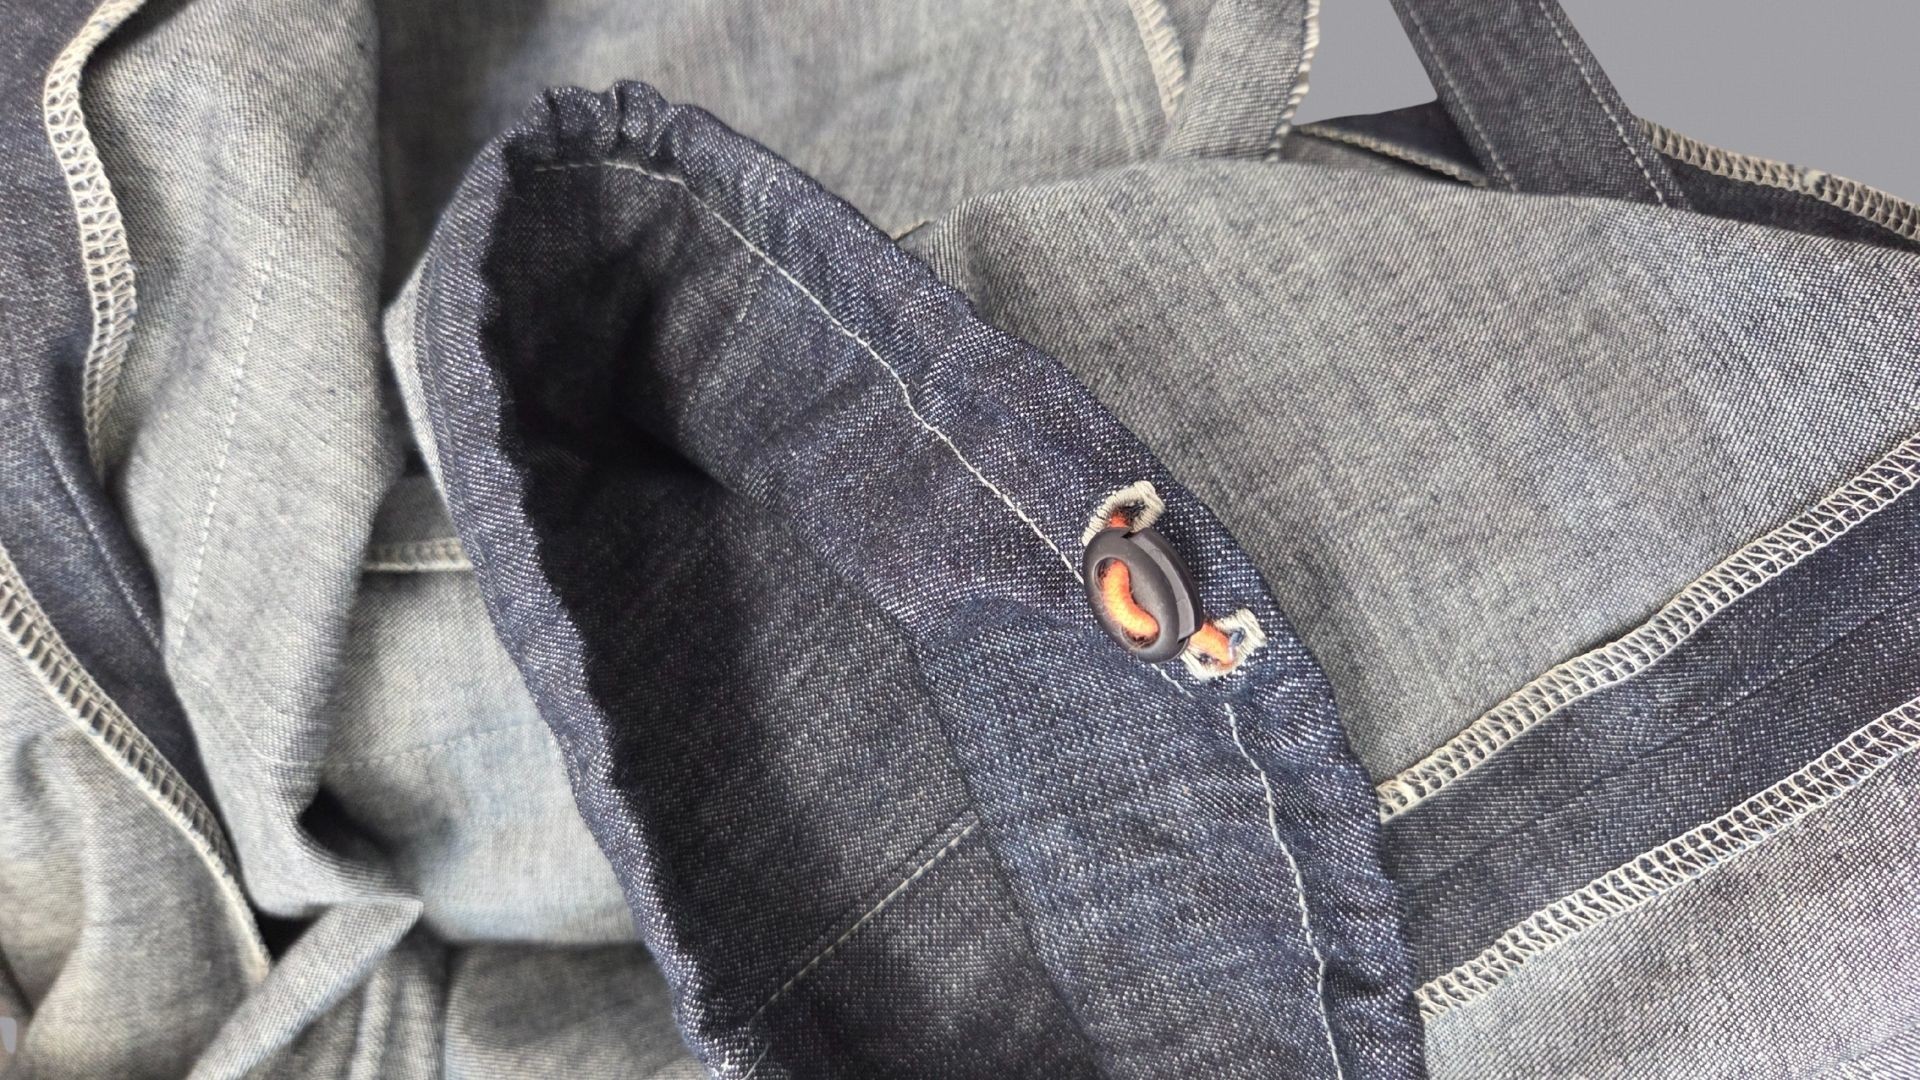
Here you can see the finished hem with the elastic cord and cord stopper inserted.
Sew side seam and hem on shorts
For the shorts with side pocket, I join the back trousers to the side part in the same way as I described above for the front trousers.
The hem edges of shorts without side pockets are neatened.
Then I press the hem 3 cm inwards and topstitch it. I start and finish on the front and back, but do not topstitch over the side section, if there is a pocket.
Sew waistband
Now it’s almost done – you just have to sew the waistband strip to your cargo barrels…
On the left in the picture you can see the waistband strip with buttonholes in the center front, through which I will later thread a cord. You can also sew the buttonholes parallel to the edge of the waistband – depending on how you prefer it.
You can sew the cord yourself using the pattern piece provided or use a ready-made cord. If you are sewing the cord yourself, first fold the long sides of your fabric strip left sides facing and iron the folded edge. Then unfold the fabric strip again and iron the long edges up to the folded edge you just ironed. Then fold it in half again and topstitch the open long edge close to the edge. If you wish, you can also topstitch the folded edge.
I first neaten the two short edges of the waistband strip. I then lay them right sides together and sew them together. I press the seam allowances open.
Then I lay the two long edges of the waistband ring wrong sides together and iron the folded edge.
I lay the cut elastic band (cut approx. 3 – 5 cm shorter than the circumference at the position, where the waistband will be) into a ring so that the ends overlap by approx. 2 cm and sew them together, as shown in the picture on the right. To make sure that it is neither too tight nor too wide, I pull it once around the place where the waistband will sit later and adjust it if necessary. I also check that I haven’t twisted the ribbon by mistake.
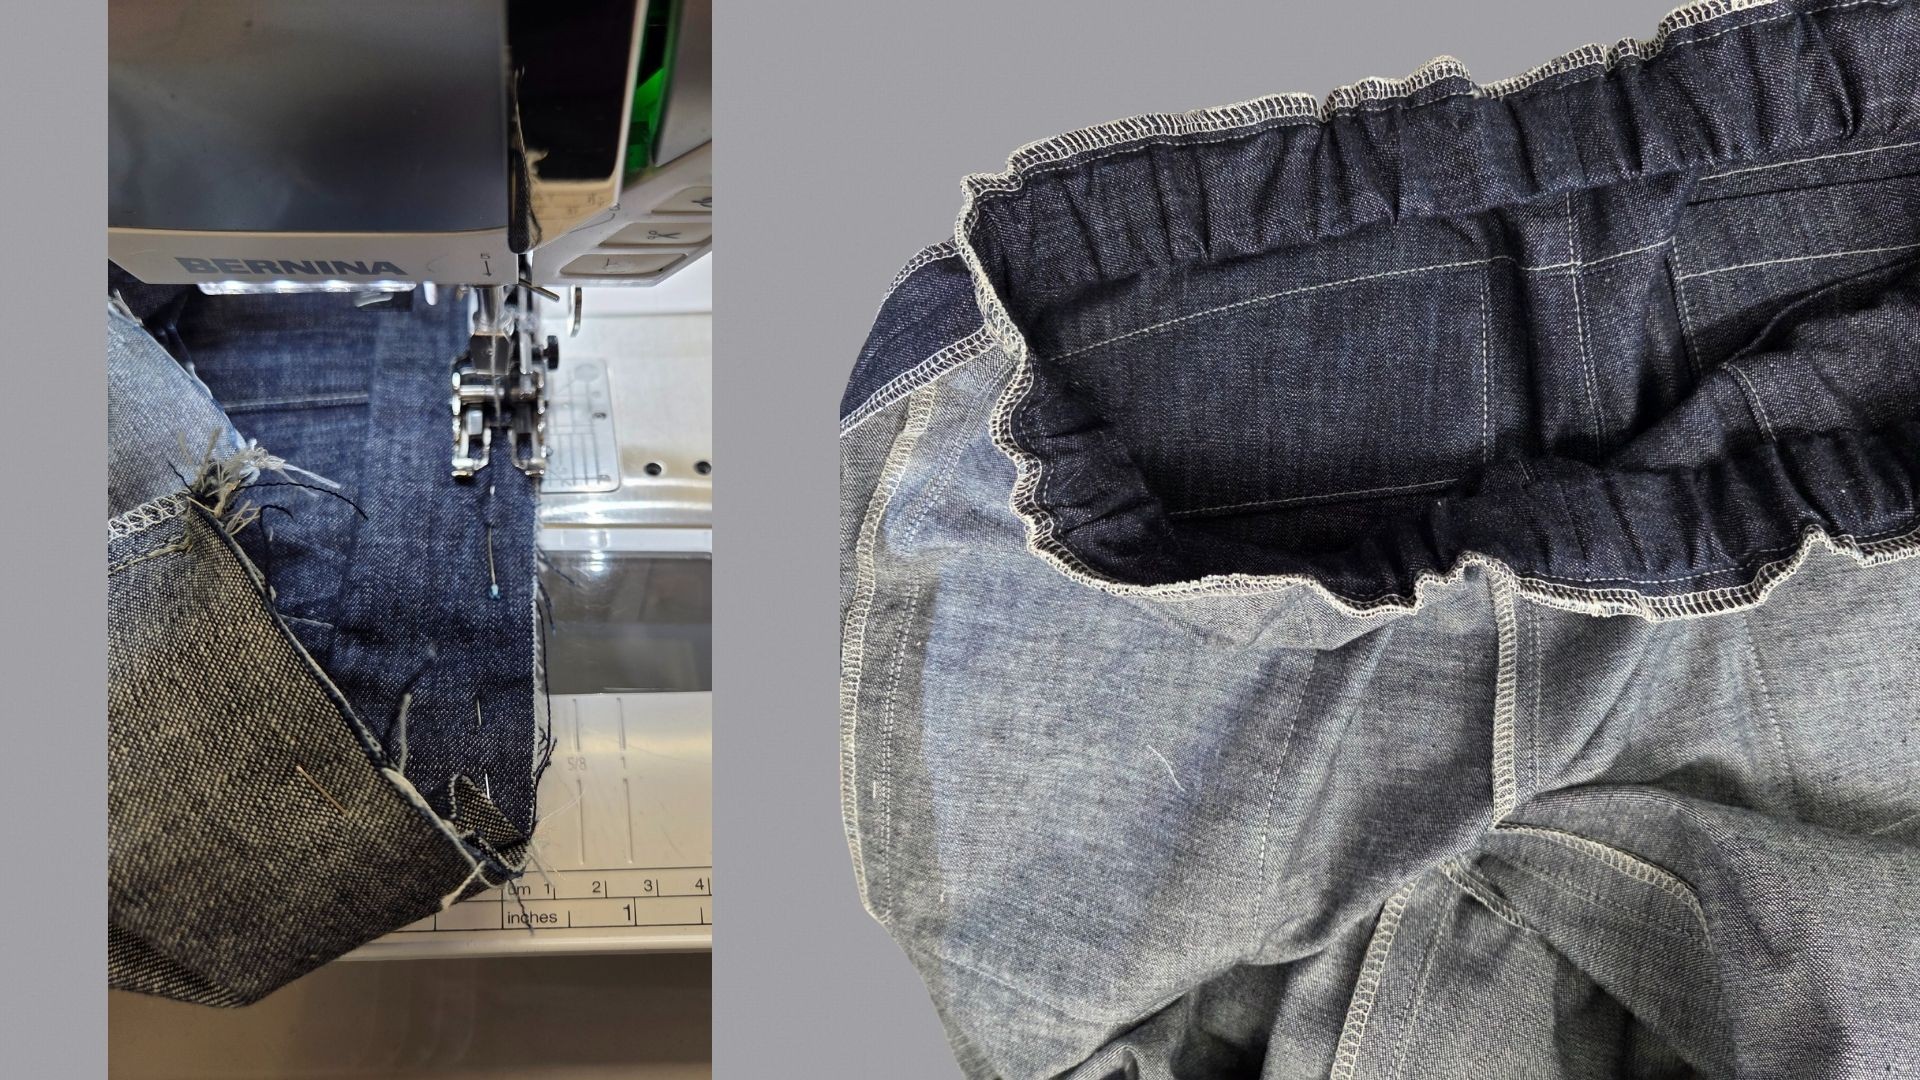
If everything fits, I place the elastic band in the waistband ring and baste the long edges together within the seam allowance. Then I pin the waistband ring to the right side of the fabric on the top edge of the pants. The buttonholes are at the bottom, i.e. on the right side of the fabric of the trousers. The markings at the center front and side seams and the seams at the center back match up exactly. Then I sew the waistband to the trousers, stretching the elastic and then neatening the seam allowances.
Finally, I pull the cord into the waistband and tie knots in the cord ends.
When you’re ready, give your Cargo Barrelleg KEJA another good ironing, put it on and feel good!
The finished Cargo Barrelleg
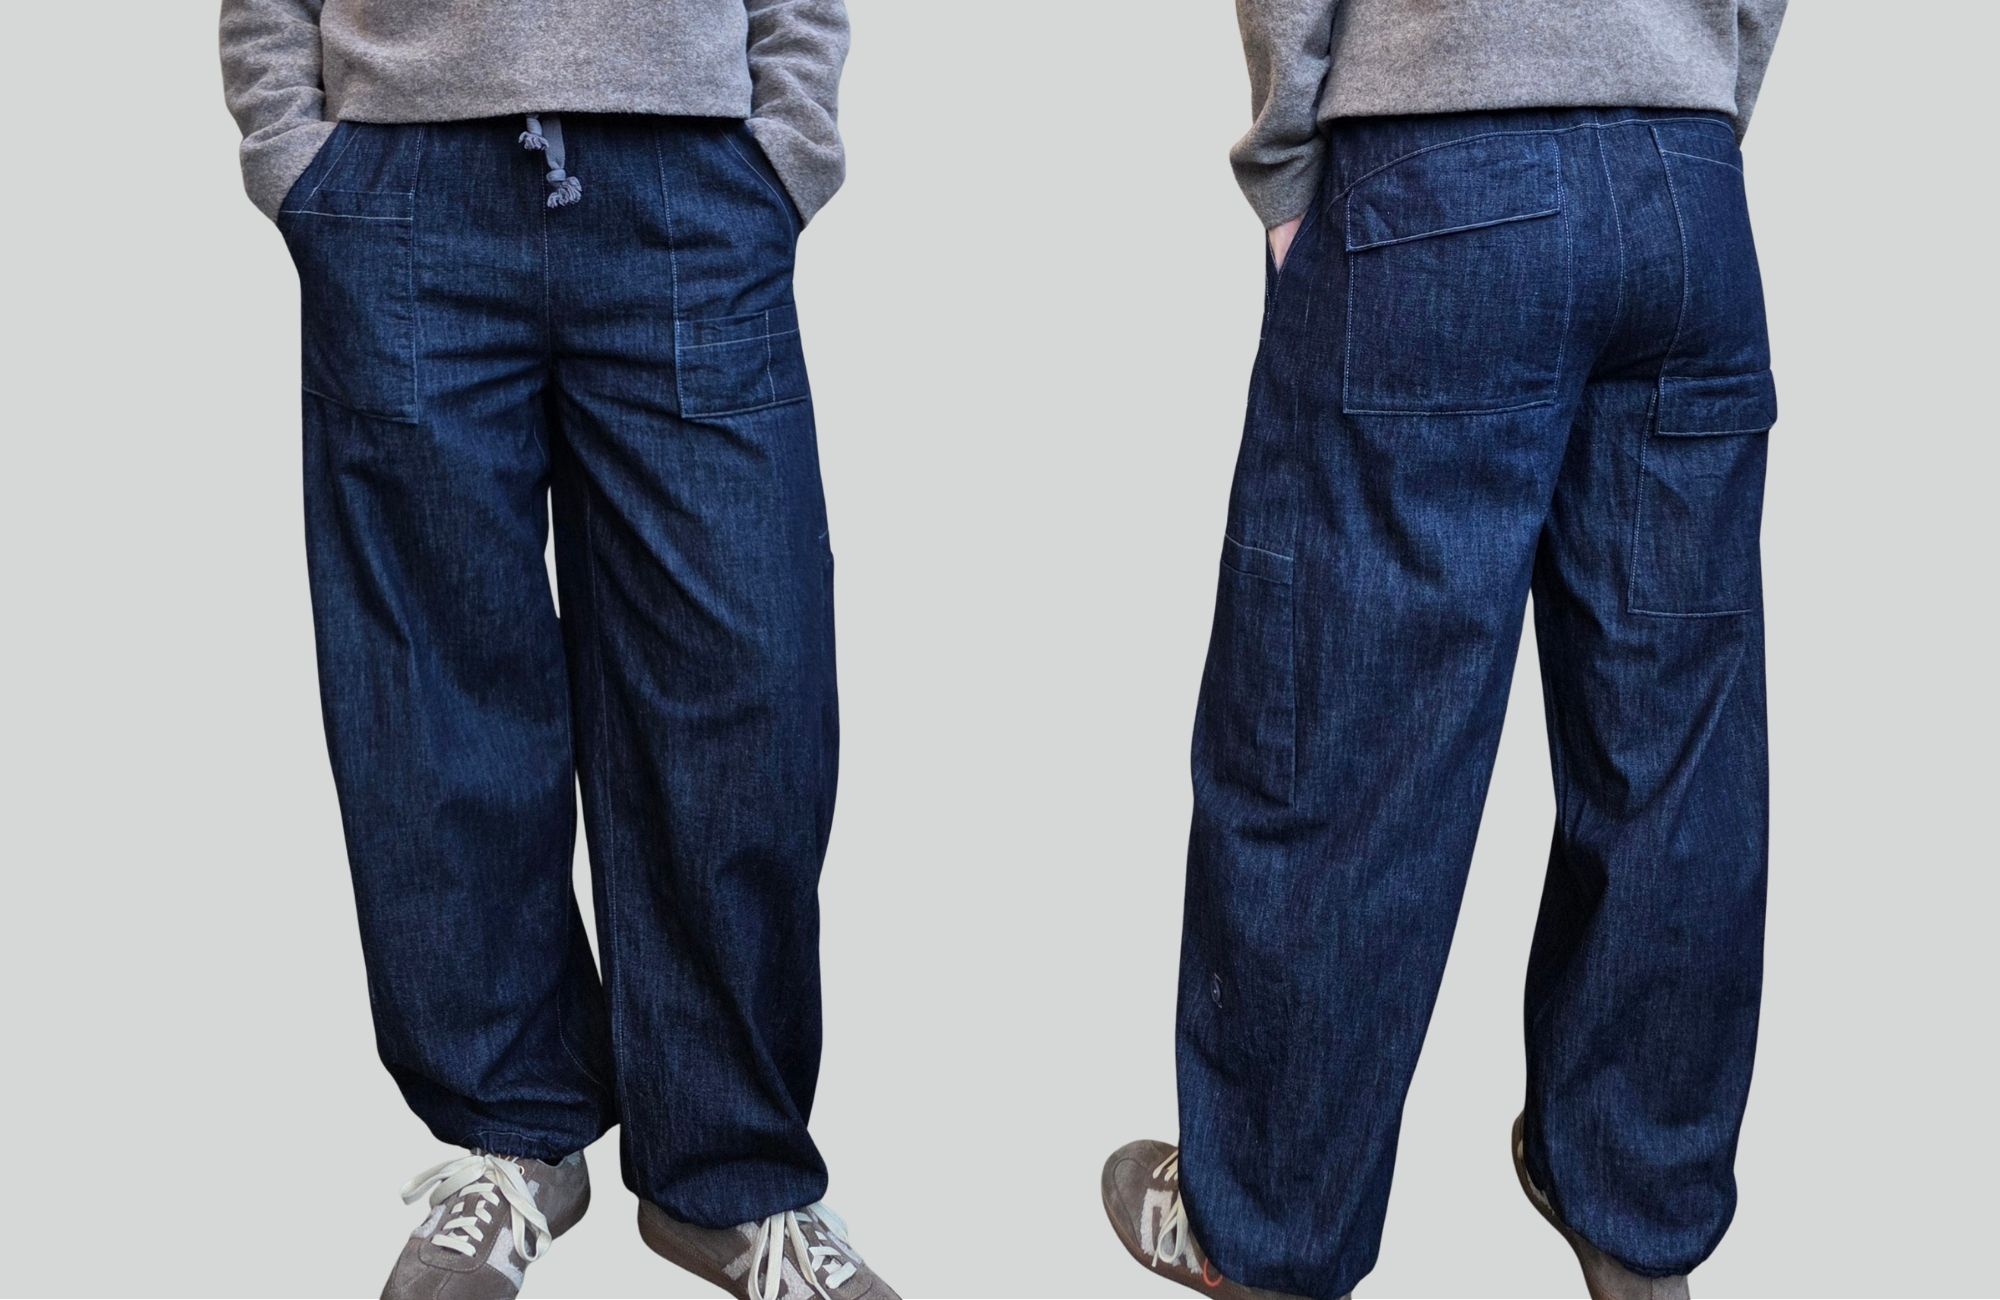
Here you can see the finished KEJA again in the long…
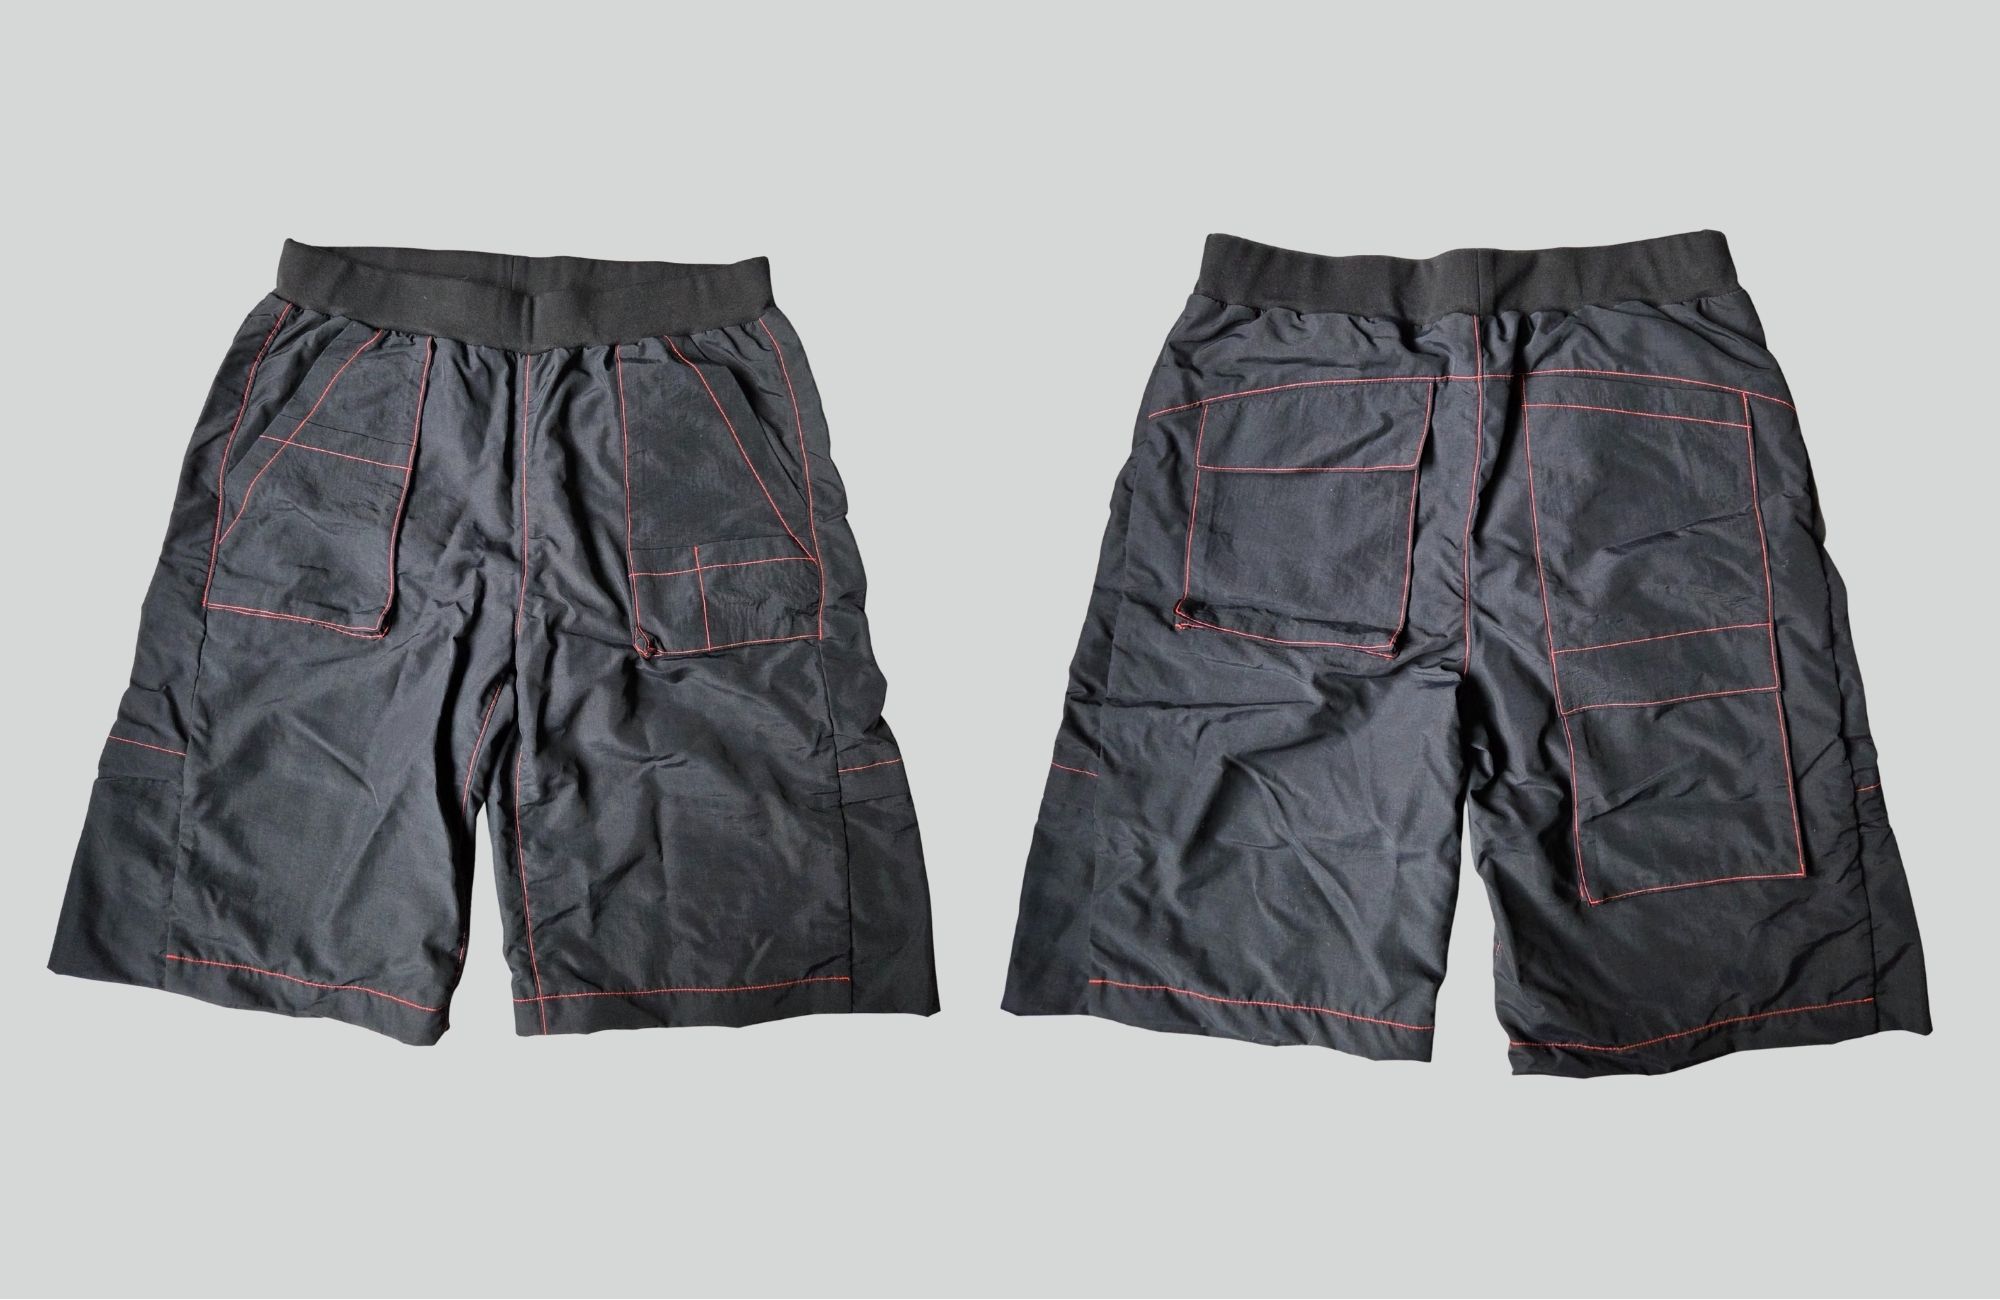
and in the short version. Here I used a ready-made waistband and added the elastic band. As different waistbands stretch differently, you should try it on once before sewing it on, just as described for the elastic band, and adjust it if necessary.
We’d love you to share your #taukokeja on Instagram and link us in the post!
Browse through our store and discover your next project!
-
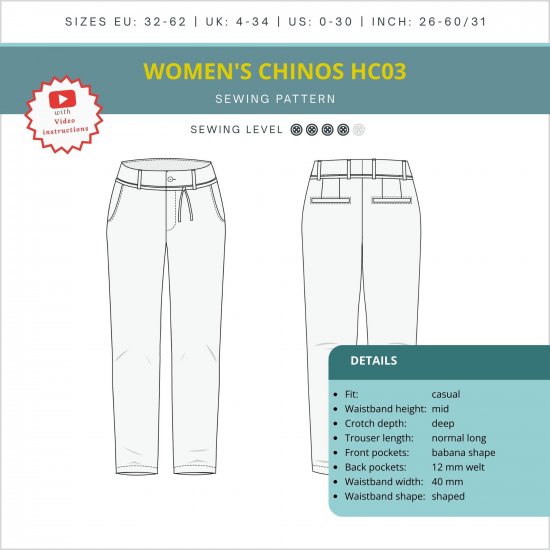
![Title image for sewing pattern “Casual Chino HC03”]()
![Chino HC03 - Sketch]() 14,90 €Incl. tax
14,90 €Incl. tax -
![]()
![]() 14,90 €Incl. tax
14,90 €Incl. tax -
![]()
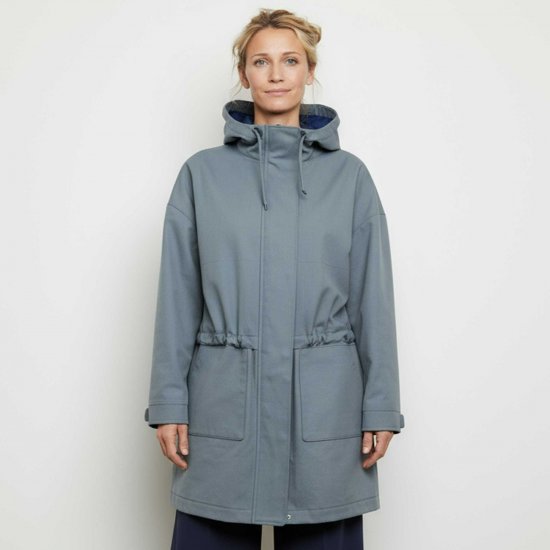
![Parka with hood JM02 Sketch details]() 14,90 €Incl. tax
14,90 €Incl. tax -
![]()
![]() 18,90 €Incl. tax
18,90 €Incl. tax


Legal matters
MISUSE and COMMERCIAL USE
These sewing instructions and the pattern (including all texts, illustrations, photos and graphics) are protected by copyright. Any distribution or reproduction is not permitted. If you would like to sell a product commercially, which is sewn according to this pattern, please contact us by e-mail: lizenzen@smartpattern.de